Feedback
Last date modified: 2026-Jul-27
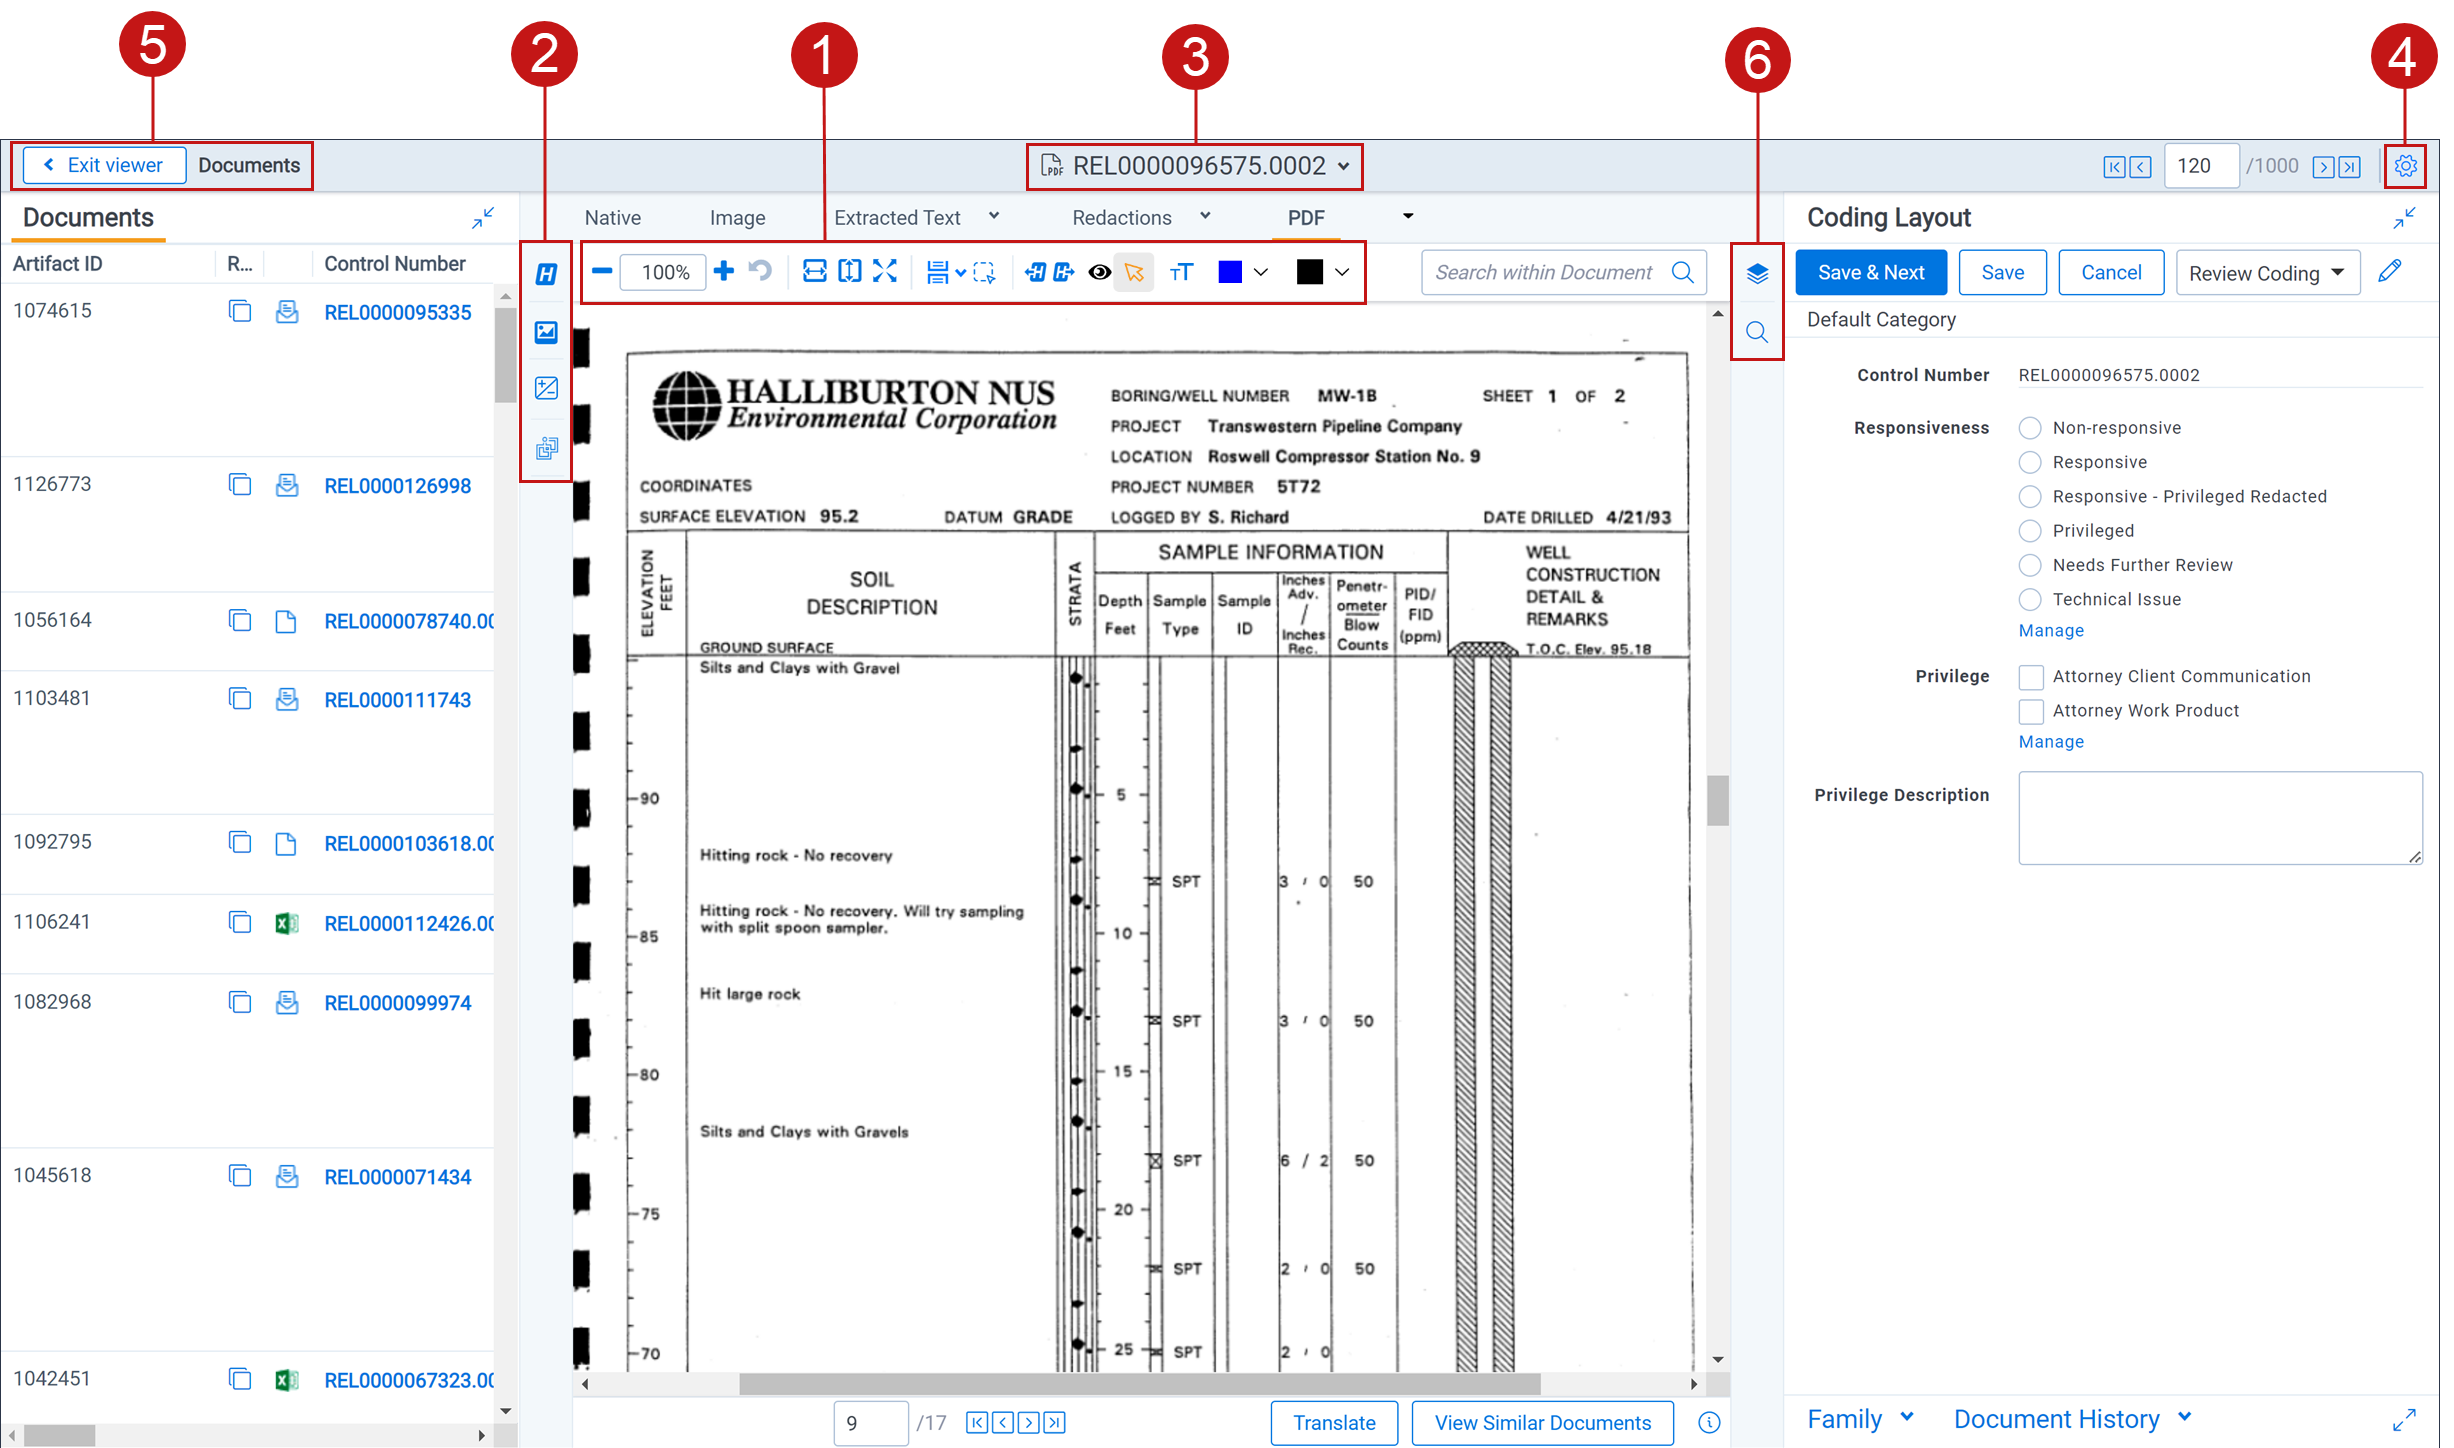
Viewer
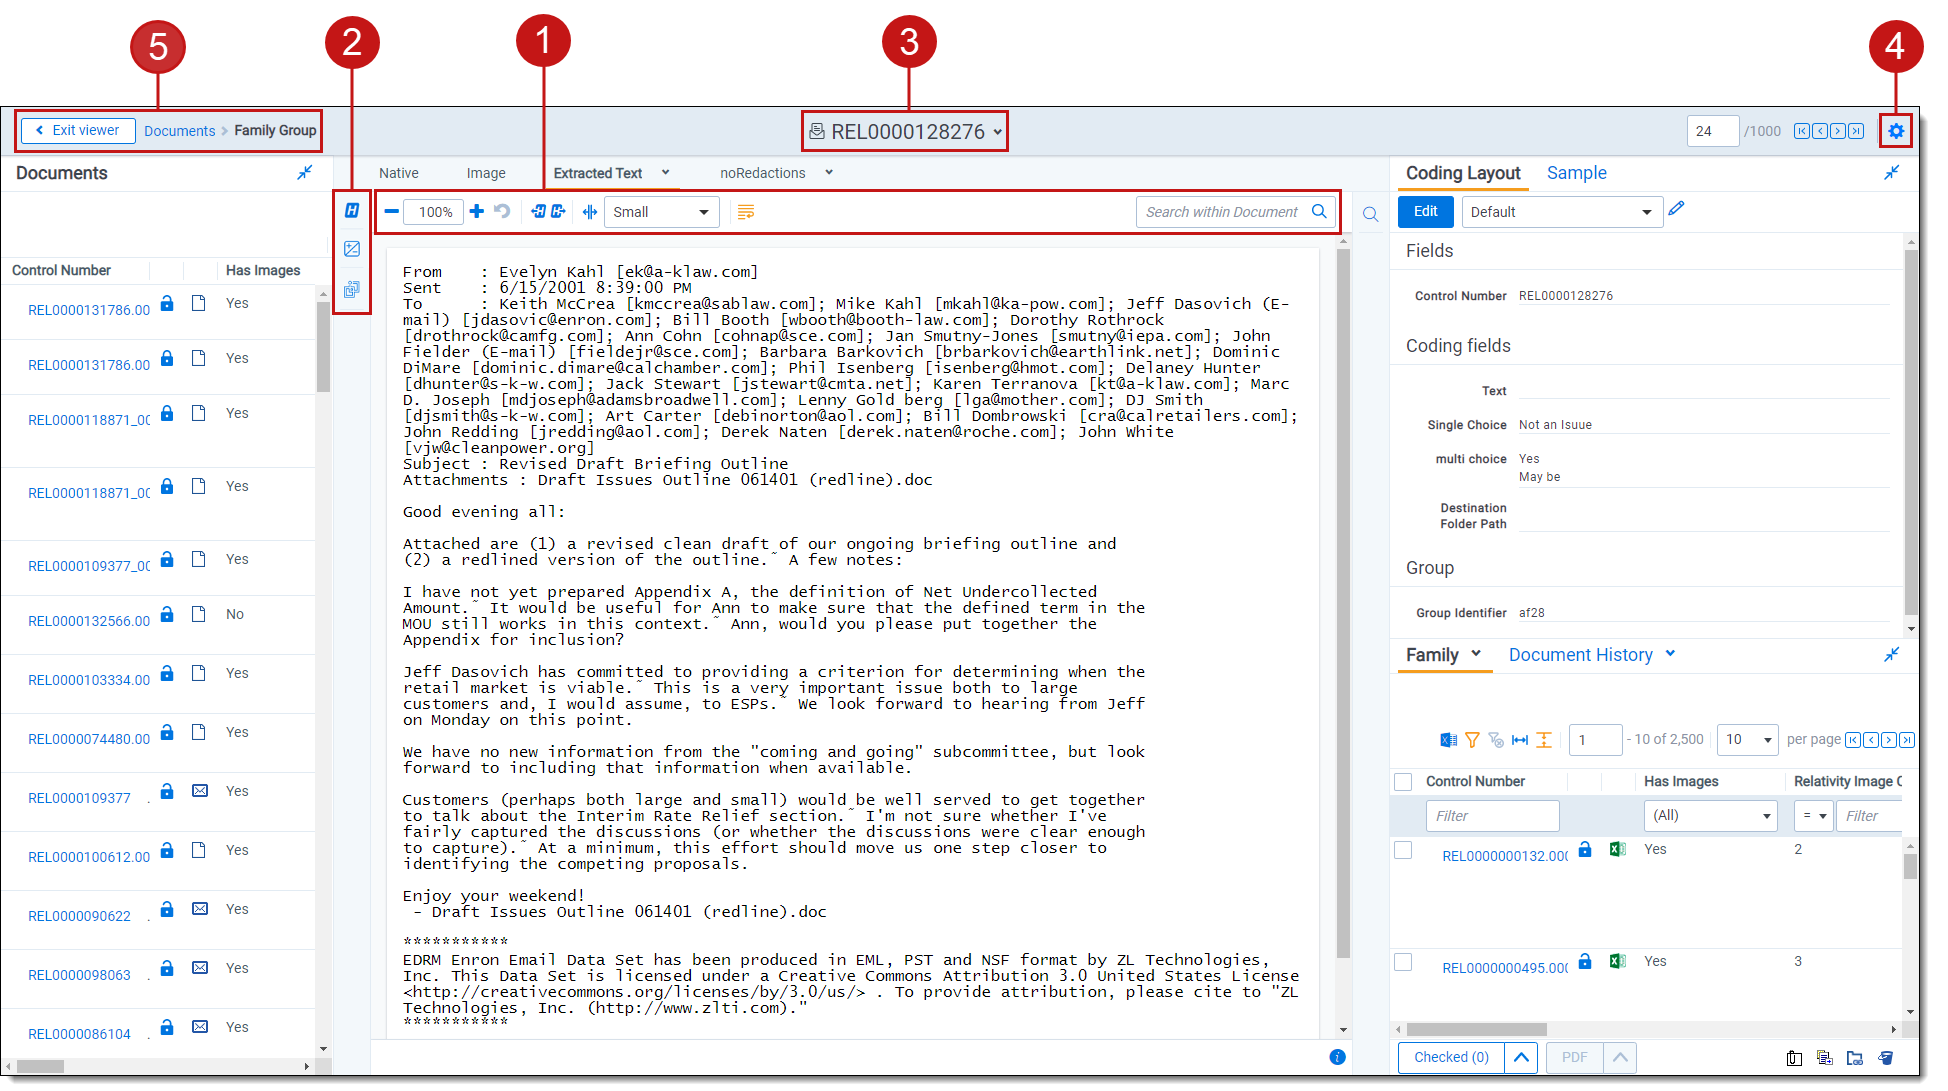
The Review Interface displays workspace documents. You can use the Viewer type tabs to toggle the loaded formats of documents, such as Native Viewer, Image Viewer, Extracted Text Viewer, or Productions Viewer. Using the Viewer, you can control the form of document that displays in the interface. If a document has not been imaged, you can image documents on-the-fly in the Viewer.
Using your internet browser to zoom to any size other than 100% while using the Viewer is not supported and can cause unexpected behavior.
If you do not see the document in the Viewer, it either has not been loaded to the workspace, its conversion failed, or you do not have permission to see it.
See these related pages:
Native Viewer
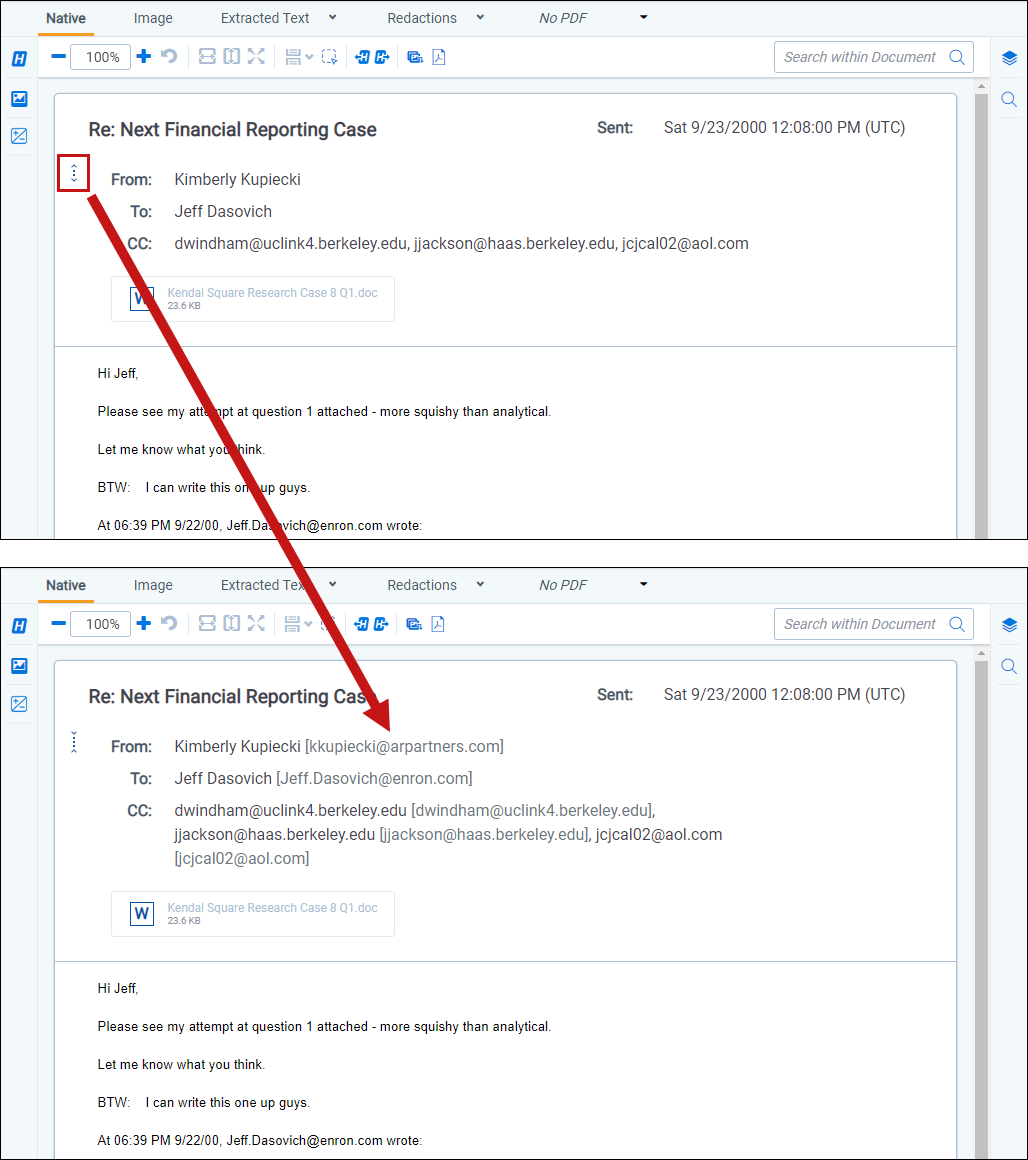
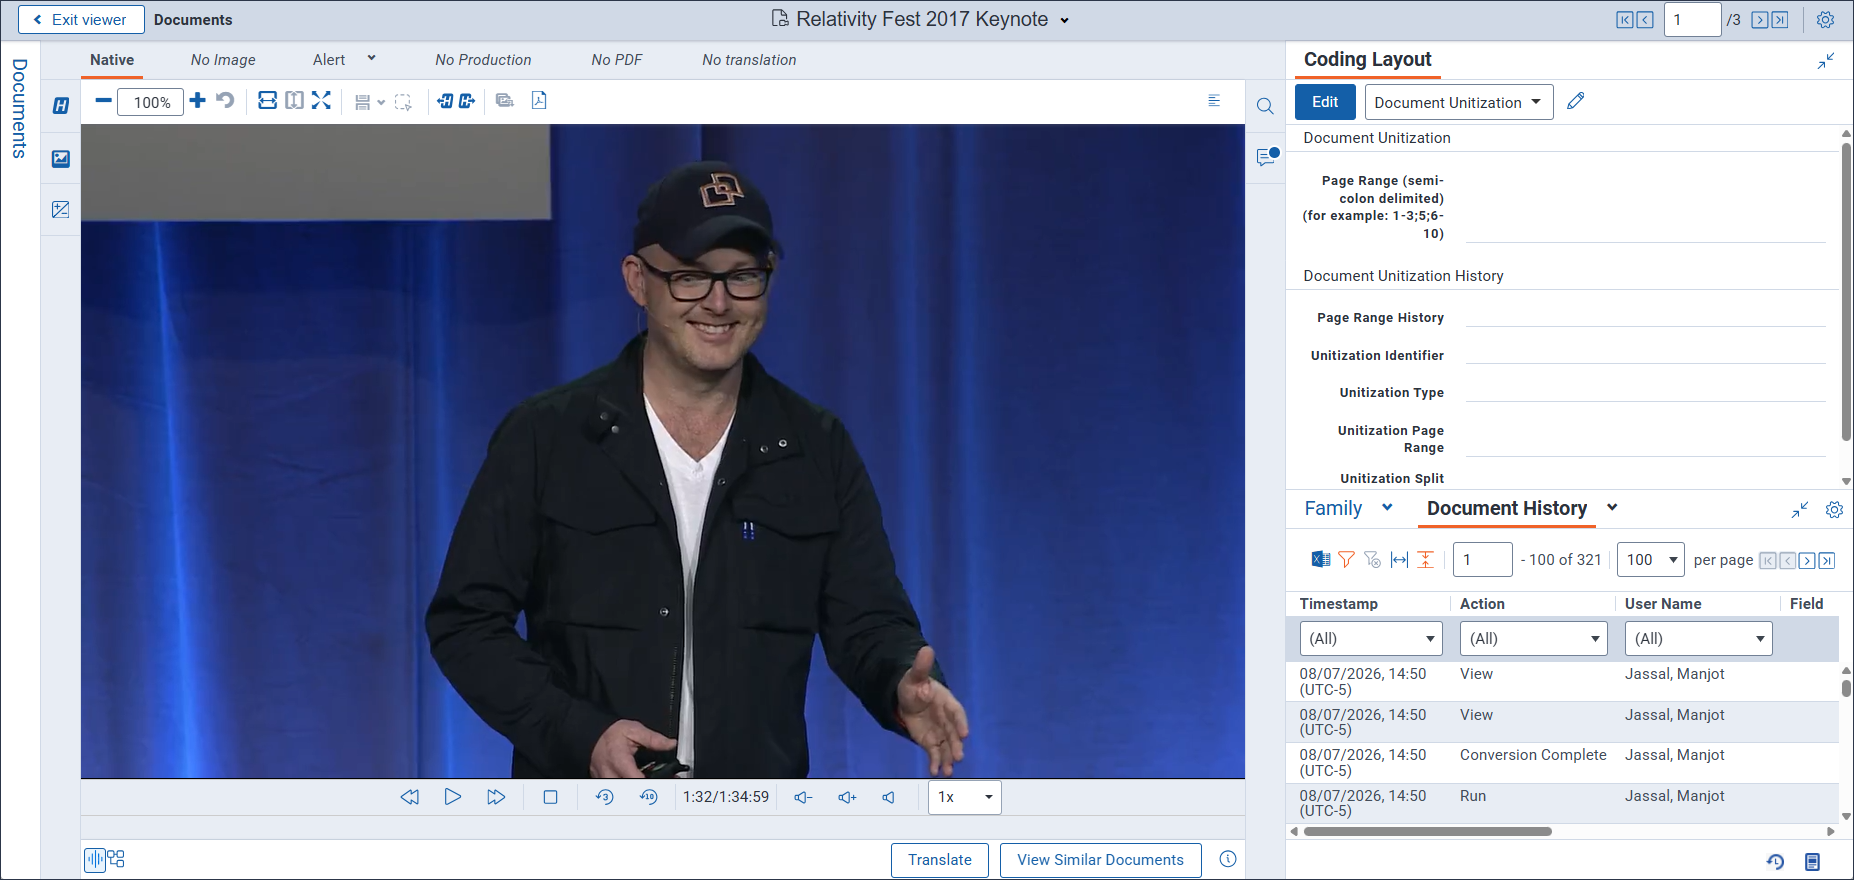
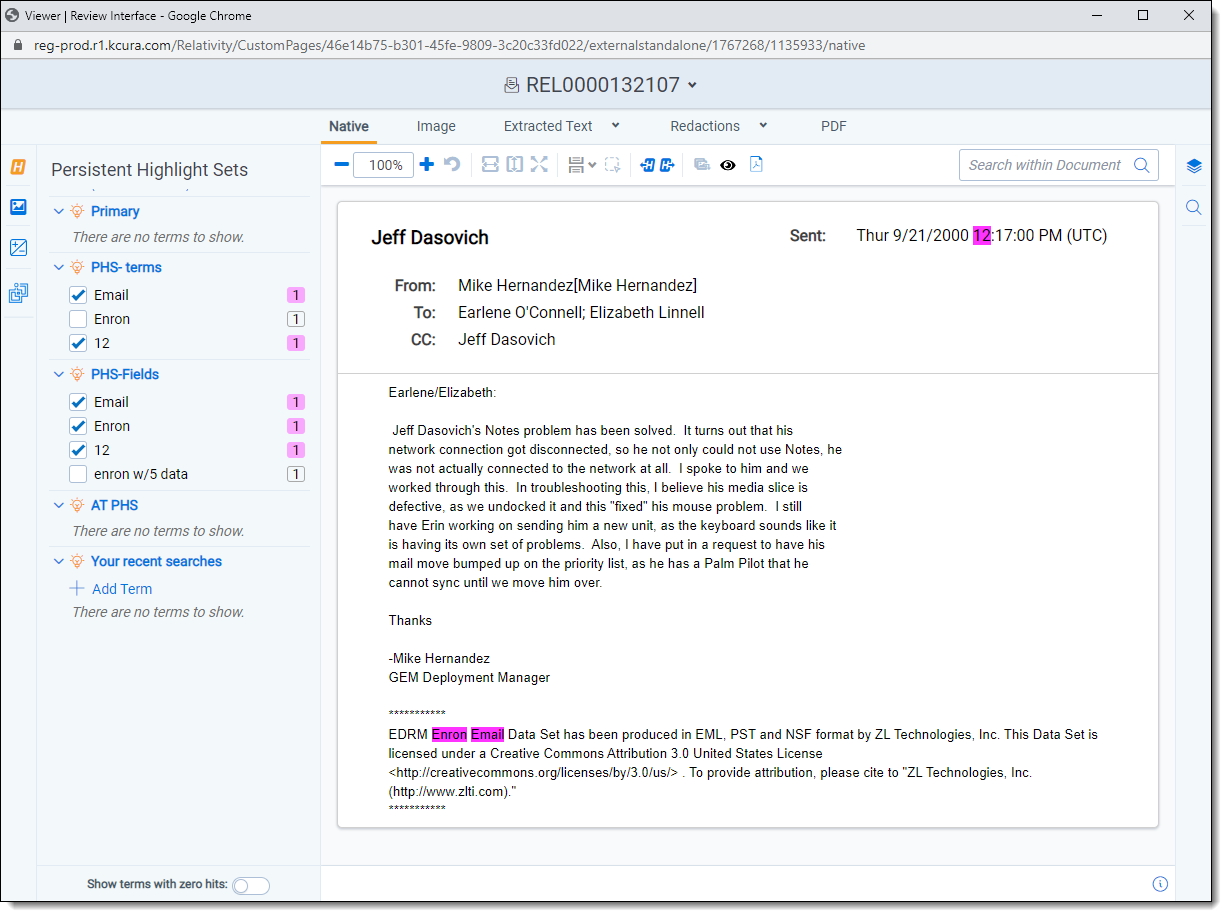
In the Native Viewer, you can expand the email header to display full email addresses. If you collapse or expand an email header, the Viewer maintains the expanded or collapsed state as you navigate through documents in the set.
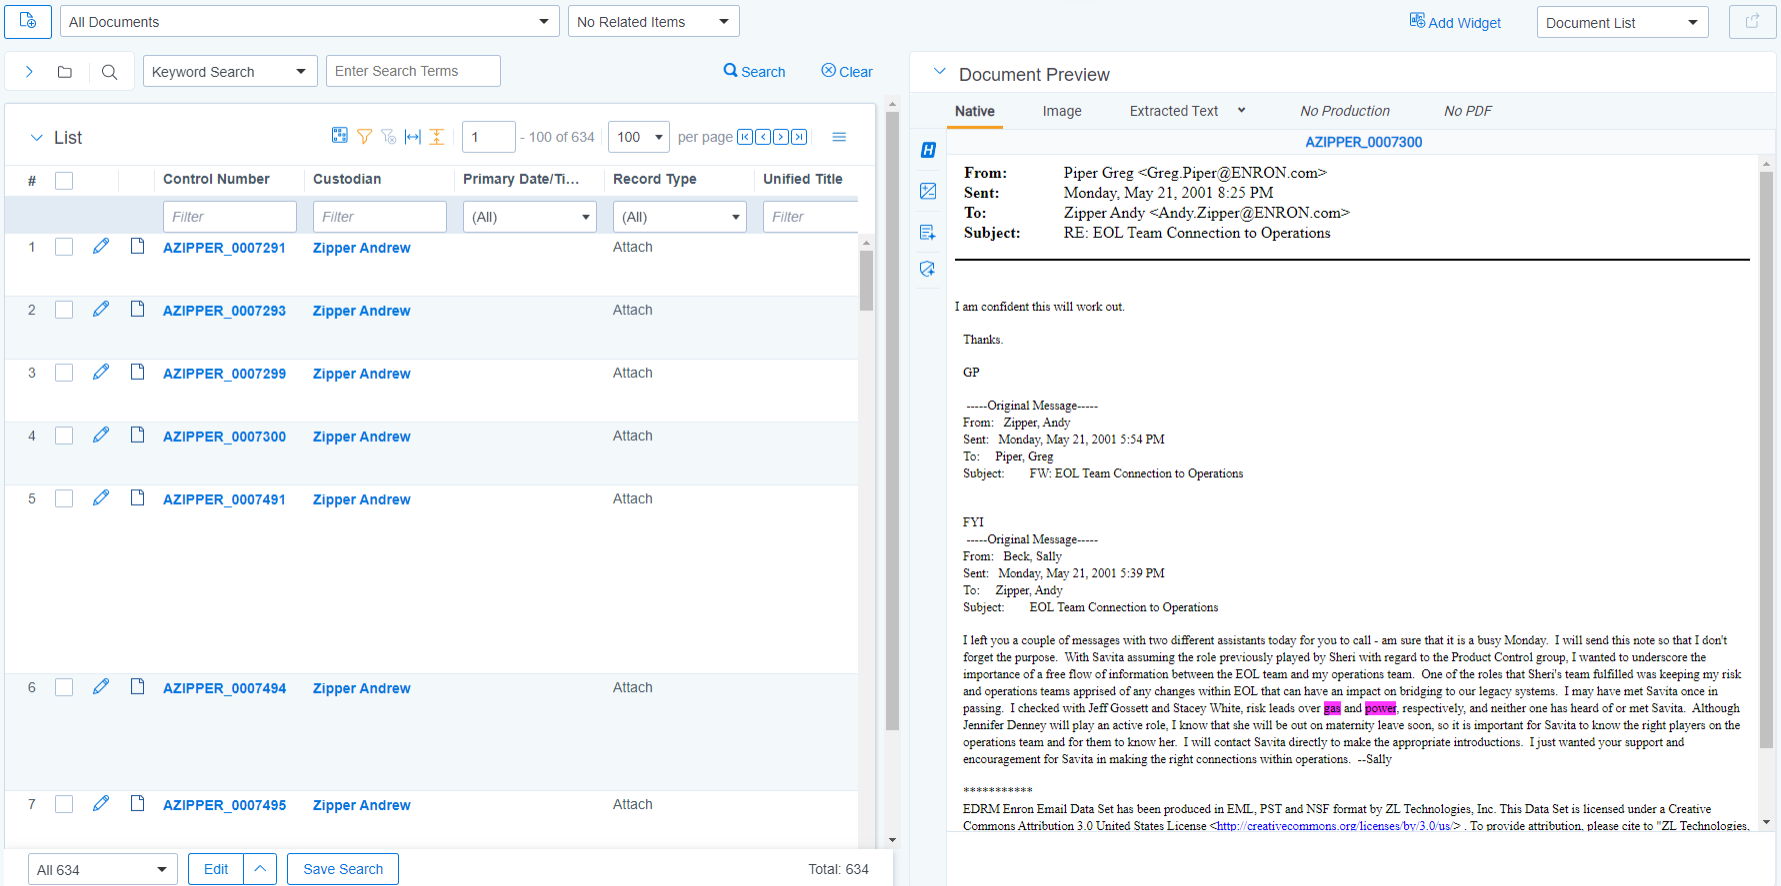
The Native Viewer displays an HTML rendering of the document that is as close to the original version of the document as possible. With the Native Viewer, you can:
- Navigate through a single document and between documents in a document set.
- Conduct text searching.
- Highlight text to copy and paste.
- Zoom, arrange, and save pages that you review in the Native Viewer.
- Print single documents by saving the document as a PDF. To learn more, see Create PDF.
The Viewer displays PDF text by mapping the character codes to Unicode in most cases. To check whether PDF text has been properly encoded and will display correctly in the Viewer, copy the text in the original PDF file and paste it into another application like Microsoft Word or Notepad. If the pasted text does not display correctly, the PDF is not properly encoded. If the pasted text displays correctly in another application but not in the Viewer, contact Support for assistance.
Navigating the Native Viewer
The Native Viewer offers several ways of viewing and working with documents. There are options available in the following sections of the Viewer:
- Native Viewer toolbar options
- Left drawer Viewer options
- Document actions menu
- Viewer settings menu
- Viewer breadcrumbs
- Right drawer Viewer options
Each of these options and menus is described in more detail in the sections below.
Native Viewer toolbar options
The following toolbar options are available in the Native Viewer:

- Zoom Out/In—zooms out and in on the current document in increments of 10% within a range of 10% to 4,000%. If you attempt to zoom out to a percentage lower than 10%, the Viewer automatically sets the display to 10%. If you attempt to zoom in to a percentage higher than 4,000%, the Viewer automatically sets the display to 4,000%. Your zoom setting persists as you navigate through a document set. This means that if you have set one document to 150% and you go to the next document, the next document defaults to 150% zoom.
To specify a zoom percentage without using the zoom out/in toolbar buttons, type the number in the percentage field and press the Enter key. - Reset Zoom—resets the zoom to 100%.
- Fit Width—increases the size of the document to fit the maximum width of the Viewer. This setting persists when you re-size the window.
- Fit Page—fits the entire document into the total size of the page. Clicking this zooms out the document and reduces the font size.
- Fit Actual—fits the document display to the actual size it was in its native application. By default, this resets the zoom percentage to 100%.
- Layout Mode—select one of the following options to determine how documents that are more than one page long display in the Viewer.
- Single—one page of a document will display at a time. Use the page navigation options at the bottom of the Viewer to adjust which page you view.
- Single Continuous—displays the pages in the document stacked vertically so you can scroll up and down to view them.
- Facing Continuous—displays the pages in the document in a row horizontally so you can scroll left and right to view them.
- Draft Mode—click to begin Draft Mode which automatically contrasts text from the background, help you identify poorly drawn redactions, and identify corrupt OCR text. This option is only available on the Native Viewer and PDF Viewer with rendered documents.
- Go To Next/Previous Highlight—moves through previous and next highlighted terms in the document.
- Rotate All Pages—rotates all pages in a document clockwise 90 degrees. This option is only available for documents that have been paginated.
- Designation Display—this option determines how designations are displayed in the Viewer. This option is only available if you have the Relativity.Transcripts application installed and you are viewing an MDB file in the Native Viewer.
- Color Bars—each designation displays as colored bars to the left of the text in the Transcribed Text panel.
- Highlights—each designation displays as highlights over the text in the Transcribed Text panel.
- Color Bars—each designation displays as colored bars to the left of the text in the Transcribed Text panel.
- Redact Markup Visibility—this option determines how markups display in the Viewer.
It only displays if you have the Redact application installed and open a PDF or spreadsheet document in the Native Viewer.
Click the Redact Markup Visibility icon to toggle between the following modes:- Solid—Markups in the document are fully visible and cover text underneath.
- Transparent—Markups in the document are partially visible so that you can still see the text underneath.
- Hidden—Markups in the document are not visible.
- Selector—this option only displays if you open a PDF document in the Native Viewer. Click to enable the selection of markups in the Viewer using left or right click on your mouse.
- Text Selection Mode—this option only displays if you open a PDF document in the Native Viewer. Click to enable text highlight by clicking and dragging your cursor across it. You can then right-click on the highlighted text and copy it.
- Clear Markups—click to remove all markups from the currently selected markup set for this document. This icon only displays in PDF and Excel documents that have been prepared for Redact.
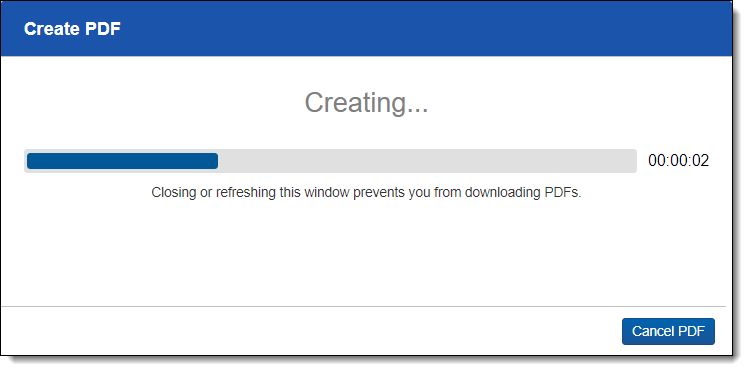
- Create PDF—click to save the current native document as a PDF file. When you click this option, the Create PDF pop-up displays. The document then opens in a new window in your browser as a PDF where you can then choose to save or print the document image.
- Transcript Text—This option only displays if you have an AV document open in the Native Viewer. Click to expand the card and view the transcribed text for an AV document.
Searchable PDF Improvements per Configuration
When you Create PDF from the Native Viewer or using the Mass PDF Operations bar, most types of searchable PDFs will now have significantly smaller file sizes. More specifically, images without highlights, but configured to be searchable and stamped, will benefit from the most dramatic decrease in file size. But overall, the Create PDF feature now generates reduced file saves for a wide range of configurations when creating searchable PDFs. In order to accomplish this for previously unknown file-types and mixed TIFF and JPEG Create PDF jobs, Relativity now treats each page individually, instead of treating the entire document as a whole, allowing for the best file-size-reduction technique possible for each page.
| Image Format | Redactions | Highlights | File Size Reduction |
|---|---|---|---|
| TIFF | Yes | No | Up to 76% |
| TIFF | Yes | Yes | Up to 43% |
| JPEG | Yes | No | Up to 43% |
| JPEG | Yes | Yes | Up to 43% |
After you click Create PDF, a copy of the document converts to a PDF file you can save from your web browser downloads. Relativity assigns a GUID for Create PDF file names.
- Search Bar —searches for terms in the current document and navigates through the hits.
- Entering a term and either clicking the left or right arrow button or pressing Enter in this text box scrolls to and highlights the text of the next instance of the term, from the placement of the cursor.
- Searching in this text box is not case sensitive.
- Searching supports dtSearch and so proximity, fuzziness, and stemming can be used. Unlike dtSearch, the Viewer doesn't have an alphabet file or run on an index. So, while characters like - act as word breaks for searching, they do not for proximity.
- You can remove a term you previously searched for or all of the terms you have recently searched for from the Persistent Highlight Pane. Removing a term or terms will also remove any highlights they generated in the document. To remove a term or terms, hover your cursor over the row of the term or recent searches you wish to remove and then click on the clear term 'x' icon in the right side of the row.
- Show/Hide Hidden Cells—displays or hides all hidden cells in a Microsoft Excel spreadsheet. This functionality is only available for Excel files and does not work on imaged documents because Relativity only images unhidden cells.
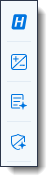
Left drawer Viewer options
The following options are available in the left drawer of the review interface:

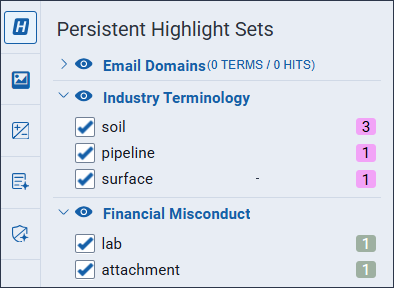
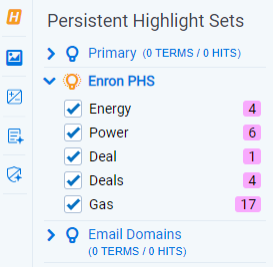
- Persistent
Highlighting—displays or hides a card containing all recent searches from the criteria entered in the search bar and any persistent highlight sets in the workspace. You can also create a dtSearch or keyword search in the Your recent searches section.
Additionally, you can control which highlights display in the current document by clicking on either the persistent set to only display highlights from that set or you can click on a specific term to only see that term highlighted in the document. You can also navigate to and from highlights using this pane.
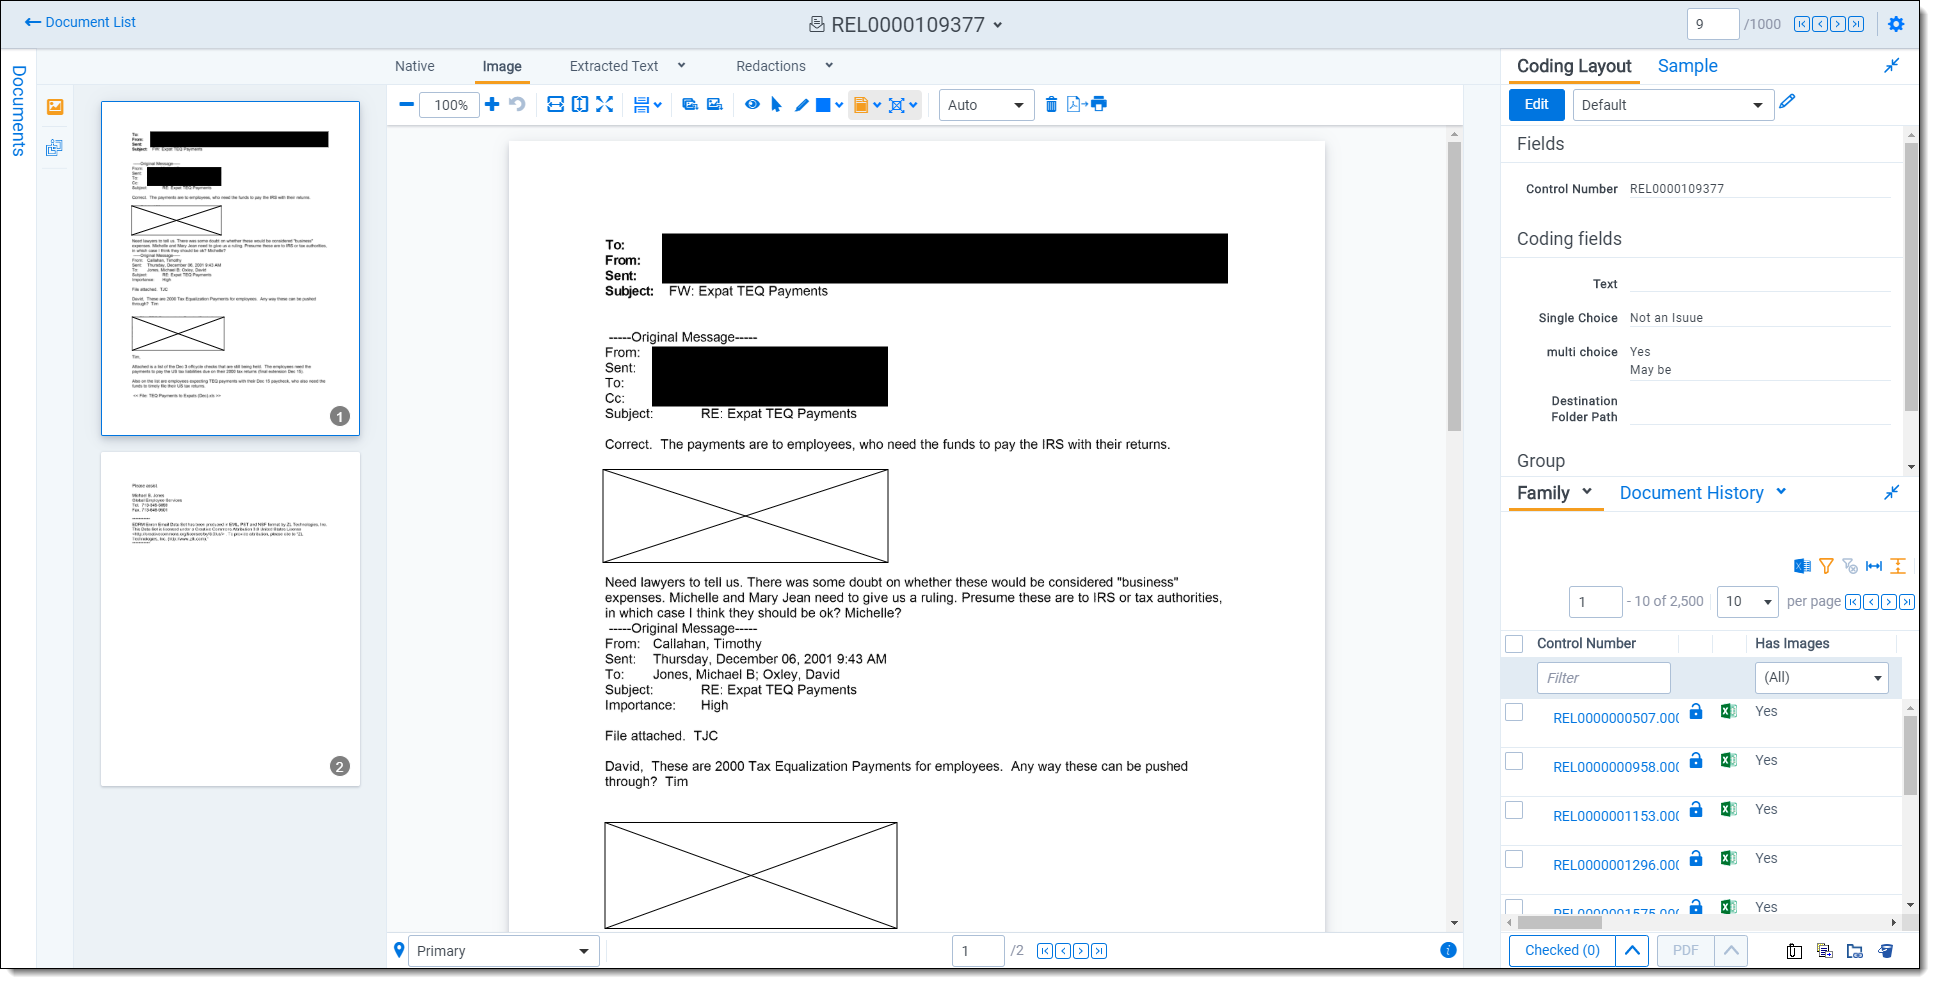
- Thumbnail—click to expand the left drawer and display the Thumbnail Viewer. Each page of the document you are reviewing has its own numbered thumbnail in the Thumbnail Viewer.
- Sentiment—click to expand or collapse the left drawer and display sentiment analysis highlights in the Viewer.
- aiR for Review Analysis—click to expand or collapse the left drawer and display aiR for Review results. You can also enable or disable aiR for Review highlights.
- aiR for Privilege Analysis—click to expand or collapse the left drawer and display aiR for Privilege results.
Right drawer Viewer options
The following options are available in the right drawer:
- Hidden Content—displays or hides information about hidden content. Hidden content can appear in Excel, Word, PDF, or Powerpoint documents. This functionality does not work on imaged documents because Relativity only images unhidden cells.
- Contextual Search—click to expand the right drawer and display the Contextual Search card. This feature allows you to quickly navigate to matching search terms in a document which is useful in longer documents or ones that have many matching search terms. The Contextual Search card has the same functionality as the Search Bar. To learn more about the Search Bar's functionality, see Search Bar. Additionally, each search term match is displayed in a box that includes both words before and after the search term match to make it easy for you to view the context of each one.
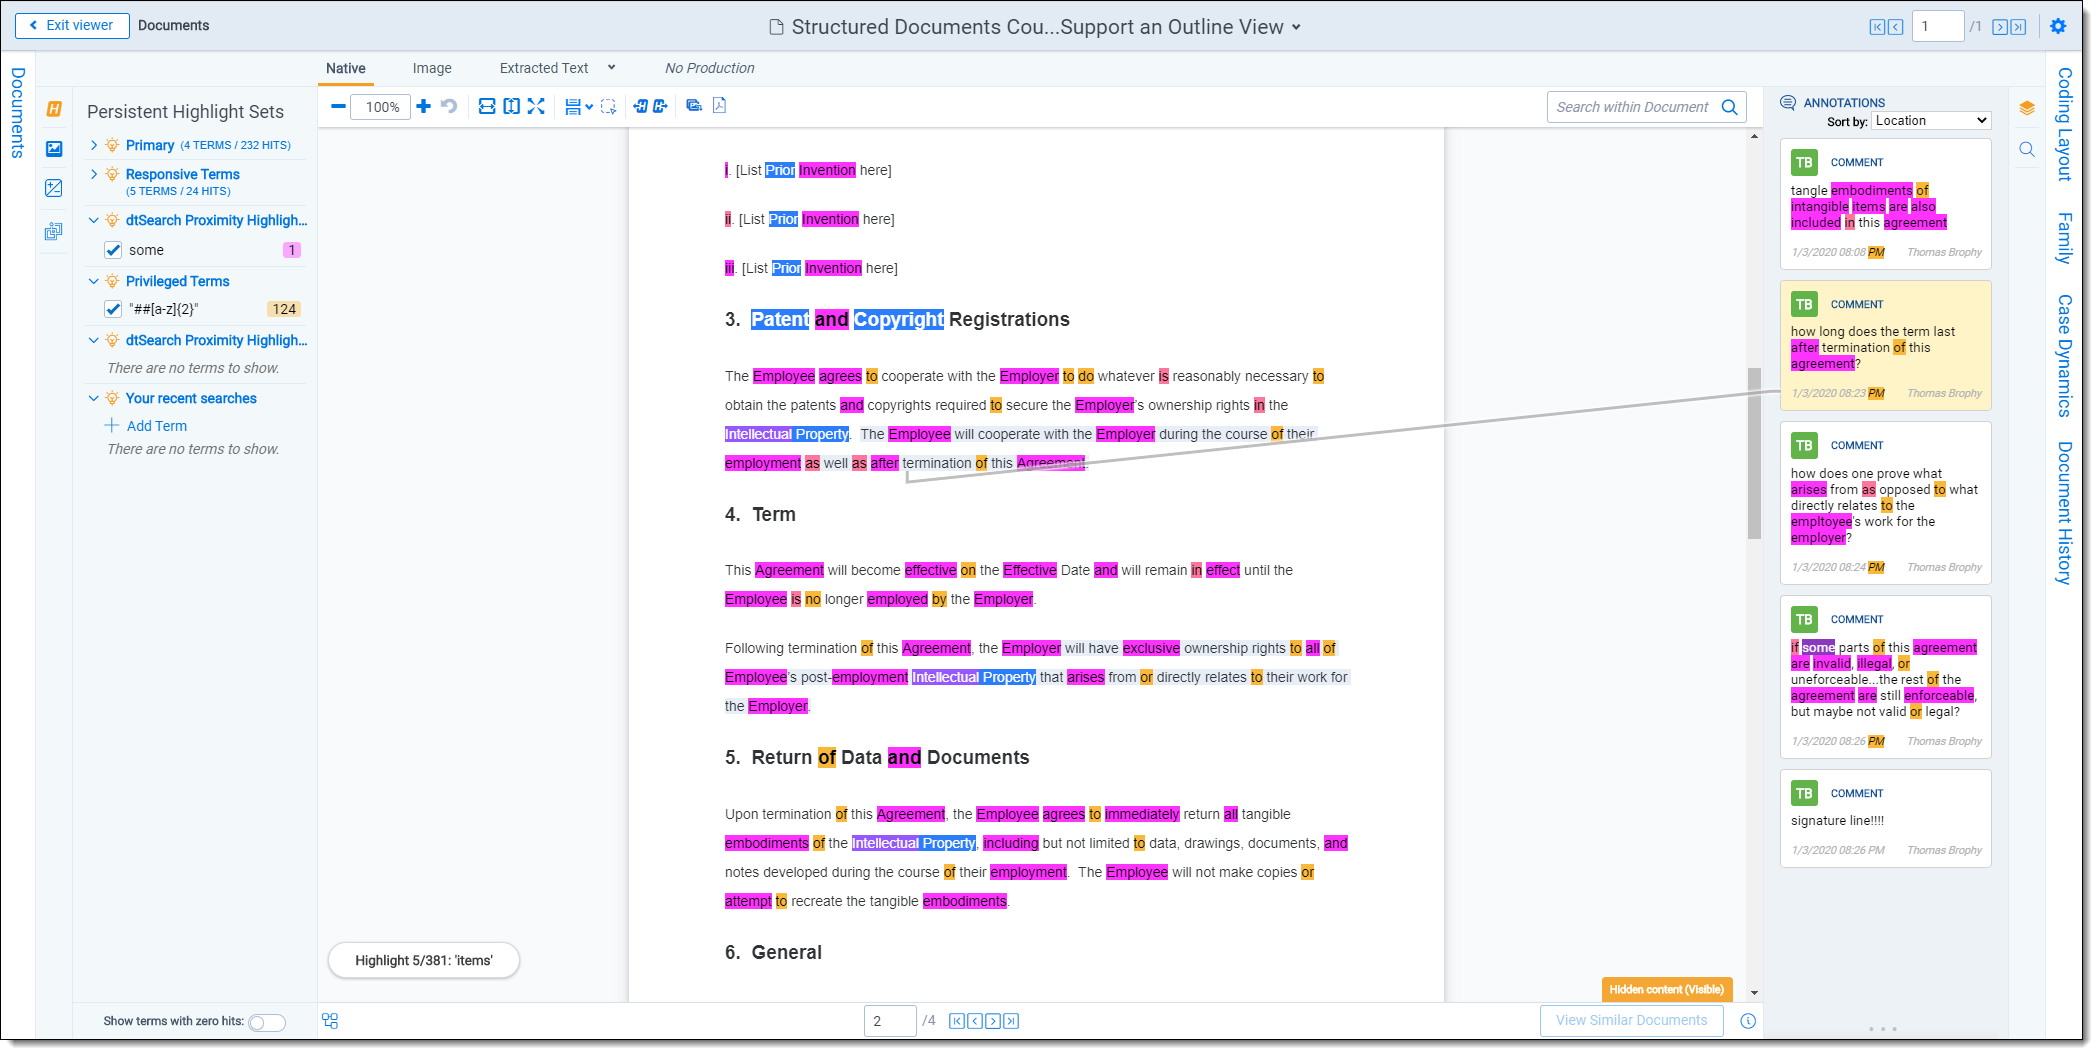
Enter a term or terms in the search box and press Enter on your keyboard to highlight in yellow any matches in the current document. You can click on a desired search term box in the pane to jump to that place in the document. The active search term box will display with a blue border and the matching search term in the document will be highlighted in blue to make it easy to find. - Comments—click to expand the right drawer and display the Comments card. From this card, reviewers can add, edit, or delete comments on any text-based or AV documents in the Native Viewer.
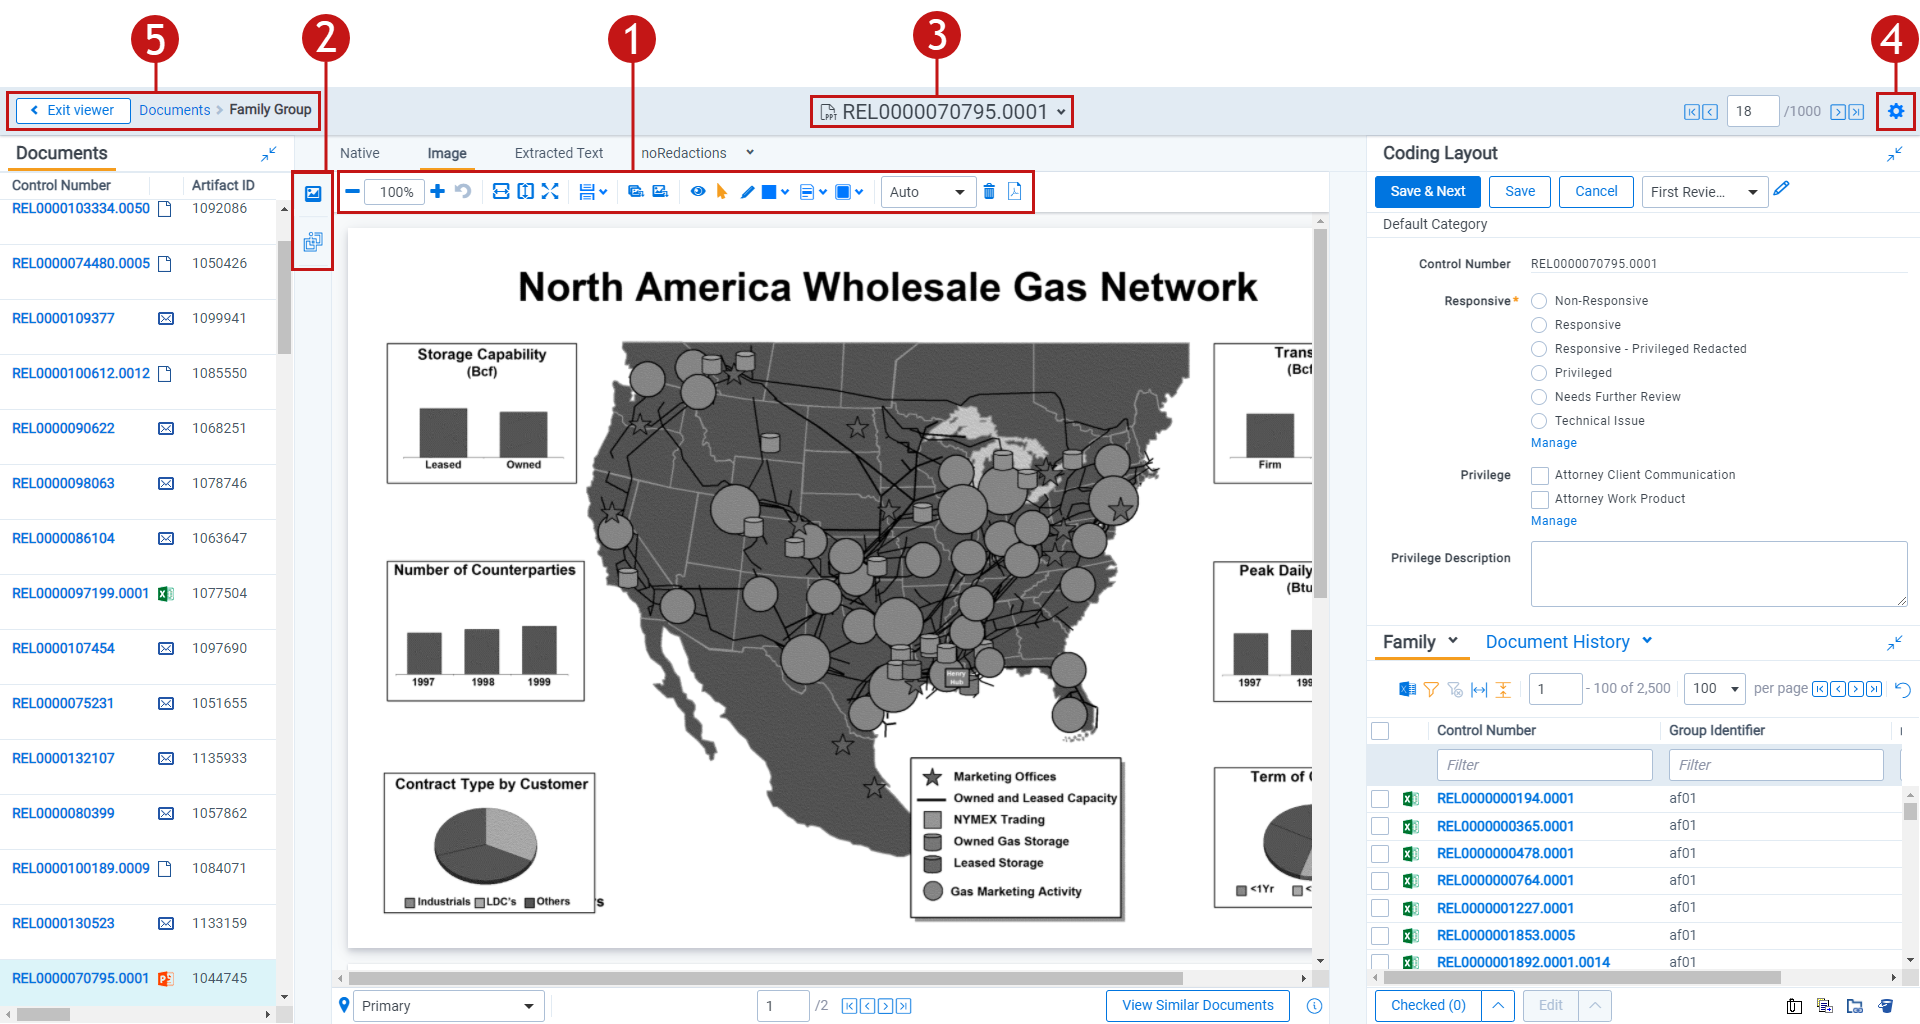
Document actions menu
To learn more about these options, see Document actions menu.
Viewer settings menu
To learn more about these options, see Viewer settings menu.
Viewer breadcrumbs
The Viewer breadcrumbs help you track your current location while browsing documents in the Related items card. The information on your current location updates as you navigate. If Documents is an active link, you can click it to return to the document you were viewing before browsing documents in the Related items card.
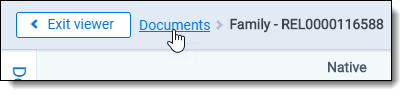
Additionally, to exit the Viewer and return to the page you were previously on, you can click the Exit viewer button at any time.
Copying text in the Viewer
While viewing a document in the Native Viewer, you have several right-click options, including the Copy option. Use this option to copy text from the document you are currently viewing and then paste it into another application.
To do this:
- Highlight the text you want copied.
- Right-click, and then select Copy from the menu.
You cannot copy text if you:
- Have not highlighted any text.
- Do not have permission to the Local Access option on the Document object. This is the same permission that permits you to open the file in its native application.
If you don't have permission to the Local Access option on the Document object, you can't use the Ctrl+C or Ctrl+Ins options in either the Native Viewer or the Extracted Text Viewer.
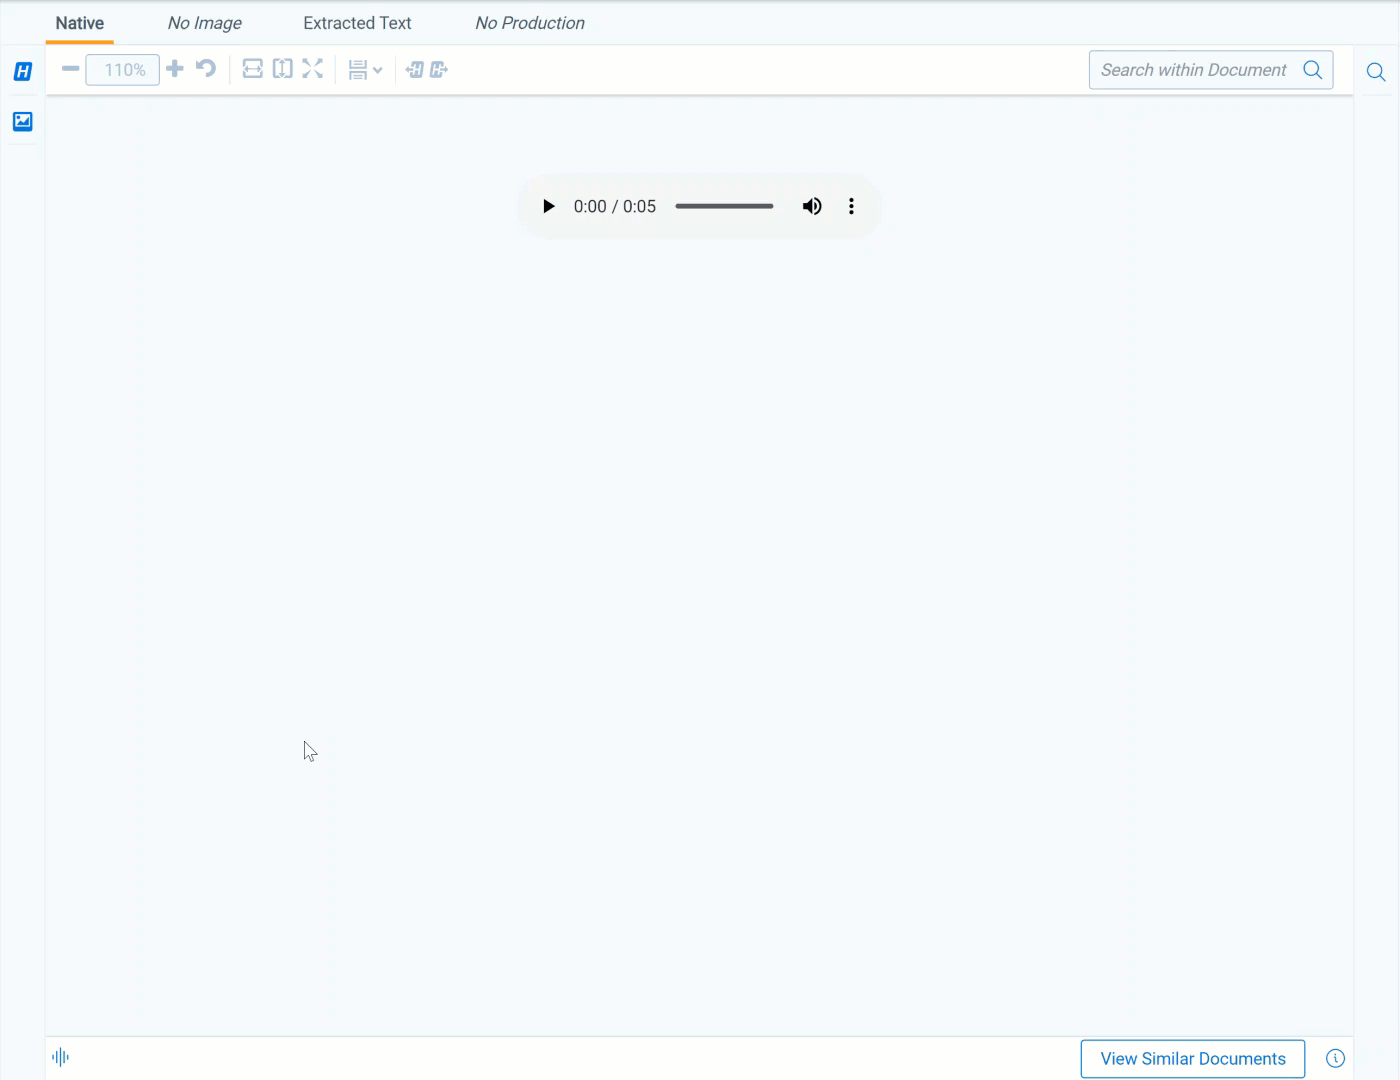
Streaming audio and video files
Audio and video files can be streamed in the Native Viewer. Audio and video file type compatibility varies depending on your internet browser.
If an audio or video file has not been opened in the Native Viewer, it may display with a value of No for the Supported by Viewer field. Once a file has been successfully opened by the Viewer, the Supported By Viewer field displays Yes.
Waveform audio
Media files that are longer than 30 minutes do not display Waveform but can still be played in the Native Viewer. Transcribed text, which is part of AV transcription, is also not affected by this limitation.
Waveform is a visualization of sound that you can view while listening to an audio file in the Native Viewer. Click the Show/Hide Waveform icon to display the Waveform visualization. The visualization tracks the volume and intensity of sound to help you avoid audio inactivity. You can use the audio controls to skip these sections. The visualization also scrolls with a time scale along the bottom to help you identify when a particular audio event occurs.
Document Intelligence
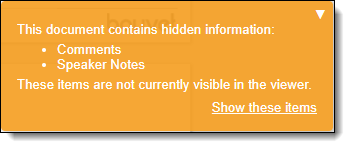
Document Intelligence notifies you that there is hidden or annotated content, including a pivot table or a filtered pivot table, present in the current document in the Native Viewer. This hidden content are the annotations and modifications tracked in certain document formats. For more information on the file types, see Tracking annotations. When hidden content is found in a document, a pop-up modal appears in the lower-right corner. Highlighting and bordering is also visible in the Viewer where the changes were made and a annotation bar is available to sort and view each annotation. Once the notifications appear, you can then choose whether or not to view tracked changes, hidden text and comments in the Viewer.
To view highlights associated with hidden content, such as comments or annotations listed below, the corresponding content must be visible in the Viewer. This is because hidden content is embedded directly within the document and is not stored as metadata or extracted text.
Tracking annotations
The various file types each have distinct annotations that are tracked. Below is each file type that is supported and the related tracked changes:
| File type | File extensions | Annotation type | Tracked changes |
|---|---|---|---|
| Excel | .xls, .xlsx, .xlsb | Tracked Changes, formulas, hidden pages/columns/rows, Comments, concealed cell contents |
Inserted cell, moved cell, modified cell, cleared cell Inserted column, deleted column Inserted row, deleted row Inserted sheet, renamed sheet |
| Word | .doc, .docx | Tracked Changes, comments, hidden text Text within Tracked Changes cannot be searched or highlighted in the Viewer. |
Insertions, deletions, moves |
| PowerPoint | .ppt, .pptx | Speaker notes, comments, hidden slides | |
| Comments, text content outside the printable page |
Using notifications and the annotation bar
When using Document Intelligence, an orange pop-up modal appears in the bottom right corner of the Viewer when hidden content exists. Click on the pop-up modal to see the hidden content on that document. If there is no hidden content found, the modal will say so. If there is hidden content found, it lists each piece of content. Click Show these items to open the annotation bar.
A hidden content icon is available when a supported file type is in the Native Viewer. Click the Hidden Content icon to open or close the annotations bar. If you are viewing an unsupported file type, the icon is not available. For supported file types, see the Tracking annotations.
Annotation bar
The annotation bar is for sorting and viewing the hidden content found with Document Intelligence. Each annotation has a card that lists the tracked change, a description of the change, time and date, and author of the change.
If there are multiple annotation cards in the annotation bar, then you can sort them in multiple ways. Click the Sort By drop down menu for these options:
- Location
- Author A-Z
- Author Z-A
- Oldest first
- Newest first
- Annotation type
Annotation types and highlights
Each type of annotation comes with its distinct highlight in the Native Viewer. Below is a table that lists each annotation type with its highlight in the Viewer:
| File type | Modification | Annotation |
|---|---|---|
| Excel | Inserted cell | Green dotted border around cell. |
| Excel | Deleted cell | Red dotted border around cell. |
| Excel | Concealed cell text | If a cell contains enough text that the column needs to be re-sized to display it all and that cell is next to another cell with text, the full text of the cell does not display. Click Hidden Content to display the cell's full text. |
| Excel | Modified cell | Purple dotted border around cell. |
| Excel |
Moved cell |
Red dotted border around original location; green dotted border around new location. |
| Excel | Inserted row | Green shading in the row header. |
| Excel | Deleted row | Red shading with "DEL" in the row header. If the row is added then deleted, the shading is purple. |
| Excel | Inserted column | Green shading in column header. |
| Excel | Deleted column | Red shading with "DEL" in the column header. If the row is added then deleted, the shading is purple. |
| Excel | Inserted sheet | Green shading in the sheet tab. |
| Excel | Hidden sheet | Grey text in the sheet tab. |
| Excel | Modified sheet | Purple shading on the sheet tab. |
| Word | Comments | Blue background on text and note bubble in document. |
| Word | Insertions | Green shading behind text. |
| Word | Deletions | Red shading behind text. |
| Word | Moves | Purple shading behind text. |
| Word | Hidden text | Red shading behind text. |
| PowerPoint | Speaker notes |
Page under sheet. Each of these pages count toward the document's total number of pages. If you try to navigate to a speaker note, the Viewer will take you to the page above the speaker note, so you can see what the note applies to. |
| PowerPoint | Comments | Note bubble in presentation. |
| PowerPoint | Hidden slide | Hidden icon in bottom left corner of slide. |
| Comments | Note bubble in document. |
Leader lines
Clicking on an annotation or a comment in the Viewer connects it with the related annotation or comment in the Hidden Content or Document Comments pane. If you click on another annotation or comment, the leader line updates to the most recent annotation or comment you have selected.
One connector line is available at a time, unless you moved a cell. In this case, there is a leader line where the cell was originally located and a leader line in the cell's new location. Click the same annotation to remove the leader line.
The Has Hidden Data field is populated during Processing. The hidden content that the Viewer finds may not be perfectly in-sync with the hidden data that the Processing engine finds.
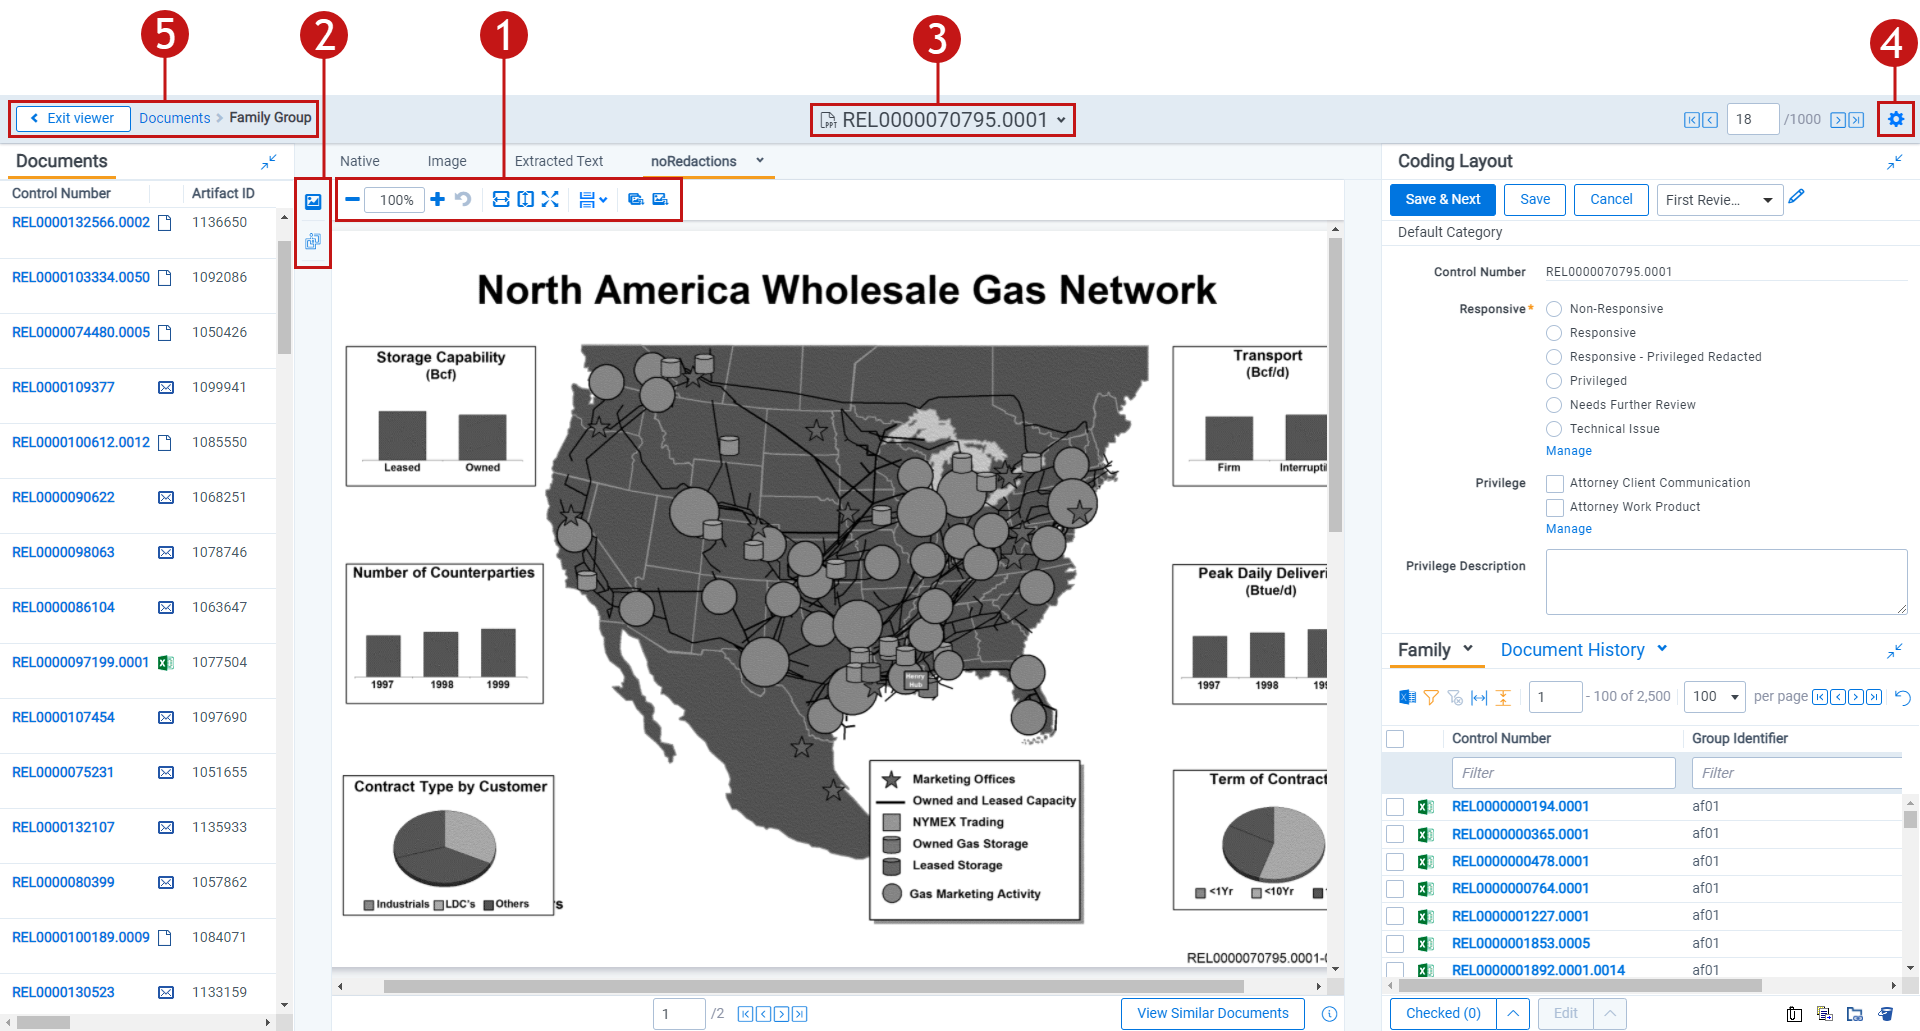
Image Viewer
When you switch to the Image Viewer, a .tiff or .jpeg version of the document displays. You can highlight and redact images in this mode. The Image Viewer is only available if you have loaded an imaged version of the document in the Viewer or if you have manually imaged the file using the Image on the fly option in the Document actions menu. For more information, see Imaging on the fly.
The redactions that are burned into a produced image are the redactions that were on the image at the time that you produced it. If you add or remove redactions from an image after you have produced it, then the image and the produced version of that image will be out of sync.
Navigating the Image Viewer
The Image Viewer offers several ways of viewing and working with documents.
If you used the Basic Imaging profile to produce images of a PDF file, please note that the Viewer displays PDF text by mapping the character codes to Unicode in most cases. To check whether PDF text has been properly encoded and will display correctly in the Viewer, copy the text in the original PDF file and paste it into another application like Microsoft Word or Notepad. If the pasted text does not display correctly, the PDF is not properly encoded. If the pasted text displays correctly in another application but not in the Viewer, contact Support for assistance.
There are options available in the following sections of the Viewer:
- Image Viewer toolbar options
- Left drawer Viewer options
- Document actions menu
- Viewer settings menu
- Viewer breadcrumbs
Each of these options and menus is described in more detail in the sections below.
Image Viewer toolbar options
The Image Viewer displays the following icons in the toolbar:

- Zoom Out/In —zooms out and in on the current document in increments of 10% within a range of 10% to 4,000%. If you attempt to zoom out to a percentage lower than 10%, the Viewer automatically sets the display to 10%. If you attempt to zoom in to a percentage higher than 4,000%, the Viewer automatically sets the display to 4,000%. Your zoom setting persists as you navigate through a document set. This means that if you have set one document to 150% and you go to the next document, the next document defaults to 150% zoom.
To specify a zoom percentage without using the zoom out/in toolbar buttons, type the number in the percentage field and press the Enter key. - Reset Zoom —resets the zoom to 100%.
- Fit Width —increases the size of the document to fit the maximum width of the Viewer. This setting persists when you re-size the window.
- Fit Page —fits the entire document into the total size of the page. Clicking this zooms out the document and reduces the font size.
- Fit Actual —fits the document display to the actual size it was in its native application. By default, this resets the zoom percentage to 100%.
- Layout Mode —select one of the following options to determine how documents that are more than one page long display in the Viewer.
- Single —one page of a document will display at a time. Use the page navigation options at the bottom of the Viewer to adjust which page you view.
- Single Continuous —displays the pages in the document stacked vertically so you can scroll up and down to view them.
- Facing Continuous —displays the pages in the document in a row horizontally so you can scroll left and right to view them.
- Rotate all pages —rotates all pages in a document clockwise 90 degrees.
- Rotate current page —rotates only the current page clockwise 90 degrees.Image rotation is persistent. Any pages that you rotate will be rotated the next time you return to them in the Viewer and for other users who view them after you rotate them. Rotation is also applied when you run the production containing the images.
- Selector —select within a document.
- Markup Visibility —changes the visibility mode of the markups between full visibility, transparent and hidden. By default, this is set to Solid, which means all highlights and redactions appear as solid as you applied them.
- Highlight - <Color> —highlights the selected text with the color you specify from the drop-down menu. The default color is blue. Select from the following:
- Blue
- Green
- Orange
- Pink
- Purple
- Yellow
- Redaction Mode - Basic Redact —enables the basic redaction tool.
- Redaction Mode - Full page —enables the full-page redaction tool. The drop-down menu for this redaction type offers the same options as the basic Redact icon, except that the redaction you choose is applied to the entire page. For example, if you select White, the entire page becomes white.
- Redaction Mode - Inverse —enables the inverse redaction tool.
- Redaction Mode - Mass Redact —apply a full-page redaction across all images or a range of images in the document.
- Redaction Type - <Style> —enables single redaction tool.
- Black —applies a solid black box to the selected text.
- Cross —applies a white box with an X in the middle of it over the selected text.
- Text —applies a box over the selected text, in which you can add text such as "Privileged" or "Redacted."
- White —applies a solid white box over the selected text.
- Font Size —change the font size of the text within a text box redaction.
- Delete Highlights —mass delete markups from any or all images in the document.
- Create PDF —gives you the option of saving the image as a PDF. For more information, see Saving an image as a PDF.
Left drawer Image Viewer options
The following options are available in the left drawer:
- Thumbnail—click to expand the left drawer and display the Thumbnail Viewer. Each page of the document you are reviewing has its own numbered thumbnail in the Thumbnail Viewer. To learn more, visit Thumbnail Viewer.
- aiR for Review Analysis—click to expand or collapse the left drawer and display aiR for Review results. You can also enable or disable aiR for Review highlights.
- aiR for Privilege Analysis—click to expand or collapse the left drawer and display aiR for Privilege results.
Document actions menu
To learn more about these options, see Document actions menu.
Viewer settings menu
To learn more about these options, see Viewer settings menu.
Viewer breadcrumbs
The Viewer breadcrumbs help you track your current location while browsing documents in the Related items card. The information on your current location updates as you navigate. If Documents is an active link, you can click it to return to the document you were viewing before browsing documents in the Related items card.
Additionally, to exit the Viewer and return to the page you were previously on, you can click the Exit viewer button at any time.
Saving an image as a PDF
Clicking the Create PDF icon brings up the following window, in which you can specify your PDF settings:
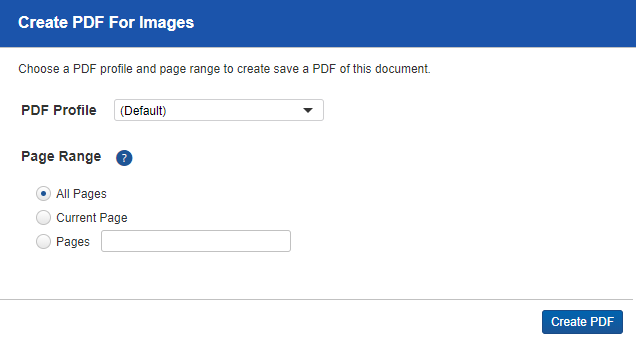
- PDF Profile—select the desired PDF profile to determine how the PDF will be customized.
- Page Range—select from the following standard print range options:
- All pages—saves all pages in the document.
- Current Page—saves only the page you are currently on.
- Pages—saves a range of pages that you specify in the text box to the right.
Extracted Text Viewer
When you switch to Extracted Text Viewer in the Viewer type tabs, you can access a drop-down menu on the right side of the Extracted Text tab where all extracted text and all long text fields on the field edit/creation page are available.
Relativity displays all long text fields made available in the Viewer in the drop-down menu, regardless of whether that field contains text for the current document. If you select a long text field from the drop-down list, and the current document does not have text for that field, the Viewer displays a message stating, "This page is empty".
The Viewer displays PDF text by mapping the character codes to Unicode in most cases. To check whether PDF text has been properly encoded and will display correctly in the Viewer, copy the text in the original PDF file and paste it into another application like Microsoft Word or Notepad. If the pasted text does not display correctly, the PDF is not properly encoded. If the pasted text displays correctly in another application but not in the Viewer, contact Support for assistance.
The Viewer displays PDF text by mapping the character codes to Unicode in most cases. To check whether PDF text has been properly encoded and will display correctly in the Viewer, copy the text in the original PDF file and paste it into another application like Microsoft Word or Notepad. If the pasted text does not display correctly, the PDF is not properly encoded. If the pasted text displays correctly in another application but not in the Viewer, contact Support for assistance.
Navigating the Extracted Text Viewer
The Extracted Viewer offers several ways of viewing and working with documents. There are options available in the following sections of the Viewer:
- Extracted Text Viewer toolbar options
- Left drawer Viewer options
- Document actions menu
- Viewer settings menu
- Viewer breadcrumbs
Each of these options and menus is described in more detail in the sections below.
Extracted Text Viewer toolbar options
The Extracted Text Viewer provides the following options:

- Zoom Out/In —zooms out and in on the current document in increments of 10% within a range of 10% to 4,000%. If you attempt to zoom out to a percentage lower than 10%, the Viewer automatically sets the display to 10%. If you attempt to zoom in to a percentage higher than 4,000%, the Viewer automatically sets the display to 4,000%. Your zoom setting persists as you navigate through a document set. This means that if you have set one document to 150% and you go to the next document, the next document defaults to 150% zoom.
To specify a zoom percentage without using the zoom out/in toolbar buttons, type the number in the percentage field and press the Enter key. - Reset Zoom —resets the zoom to 100%.
- Go To Next/Previous Highlight —moves through previous and next highlighted terms in the document.
- Tab character size —select an option from the drop-down menu to determine the amount of space that is taken when the Tab key was used in the current document. This option can help you ensure that the spacing in a spreadsheet document is aligned and works best when the Tab key is used after each column in the spreadsheet.
- Toggle WordWrap —determines whether the text in the current document will wrap so that it fits on the current page or not.
- Enabled —text in the current document will be forced onto the next line if it cannot display in the current window size. You cannot scroll horizontally with Toggle WordWrap enabled.
- Disabled—text in the current document will not be forced onto the next line will display in more horizontal fashion. You can scroll horizontally to control to view the desired text
- Search Bar—searches for terms in the current document and navigates through the hits.
- Entering a term and either clicking the left or right arrow button or pressing Enter in this text box scrolls to and highlights the text of the next instance of the term, from the placement of the cursor.
- Searching in this text box is not case sensitive.
- Searching supports dtSearch and so proximity, fuzziness, and stemming can be used. Unlike dtSearch, the Viewer doesn't have an alphabet file or run on an index. So, while characters like - act as word breaks for searching, they do not for proximity.
If you don't have permission to the Local Access option on the Document object, you can't use the Ctrl+C or Ctrl+Ins options in either the Native Viewer or the Extracted Text Viewer.
Left drawer Viewer options
The following options are available in the left drawer:
- Persistent
Highlighting—displays or hides a card containing all recent searches from the criteria entered in the search bar and any persistent highlight sets in the workspace. You can also create a dtSearch or keyword search in the Your recent searches section. Because the extracted text varies from the text in the Native Viewer, persistent highlight functionality may differ and some terms might be highlighted in one Viewer and not the other.
Additionally, you can control which highlights display in the current document by clicking on either the persistent set to only display highlights from that set or you can click on a specific term to only see that term highlighted in the document. You can also navigate to and from highlights using this pane.
- Sentiment—click to expand or collapse the left drawer and display sentiment analysis highlights in the Viewer.
- aiR for Review Analysis—click to expand or collapse the left drawer and display aiR for Review results. You can also enable or disable aiR for Review highlights.
- aiR for Privilege Analysis—click to expand or collapse the left drawer and display aiR for Privilege results.
Right drawer Viewer options
The following option is available in the right drawer:
- Contextual Search—click to expand the right drawer and display the Contextual Search card. This feature allows you to quickly navigate to matching search terms in a document which is useful in longer documents or ones that have many matching search terms. The Contextual Search card has the same functionality as the Search Bar. To learn more about the Search Bar's functionality, see Search Bar. Additionally, each search term match is displayed in a box that includes both words before and after the search term match to make it easy for you to view the context of each one.
Enter a term or terms in the search box and press Enter on your keyboard to highlight in yellow any matches in the current document. You can click on a desired search term box in the pane to jump to that place in the document. The active search term box will display with a blue border and the matching search term in the document will be highlighted in blue to make it easy to find.
Document actions menu
To learn more about these options, see Document actions menu.
Viewer settings menu
To learn more about these options, see Viewer settings menu.
Viewer breadcrumbs
The Viewer breadcrumbs help you track your current location while browsing documents in the Related items card. The information on your current location updates as you navigate. If Documents is an active link, you can click it to return to the document you were viewing before browsing documents in the Related items card.
Additionally, to exit the Viewer and return to the page you were previously on, you can click the Exit viewer button at any time.
Productions Viewer
When you switch to the Productions Viewer in the Viewer type tabs, you can access a drop-down menu on the right side of the Productions Viewer tab that displays available production sets that contain the current document.
The redactions that are burned into a produced image are the redactions that were on the image at the time that you produced it. If you add or remove redactions from an image after you have produced it, then the image and the produced version of that image will be out of sync.
Select a production set from the drop-down menu to see how a document was produced in the selected production. If a document is not included in a production, the productions mode option is unavailable.
Navigating the Productions Viewer
The Productions Viewer offers several ways of viewing and working with documents. There are options available in the following sections of the Viewer:
- Productions Viewer toolbar options
- Left drawer Viewer options
- Document actions menu
- Viewer settings menu
- Viewer breadcrumbs
Each of these options and menus is described in more detail in the sections below.
Productions Viewer toolbar options
Productions Viewer provides the following options:

- Create PDF —gives you the option of saving the image as a PDF. For more information, see Saving an image as a PDF.
- Zoom Out/In —zooms out and in on the current document in increments of 10% within a range of 10% to 4,000%. If you attempt to zoom out to a percentage lower than 10%, the Viewer automatically sets the display to 10%. If you attempt to zoom in to a percentage higher than 4,000%, the Viewer automatically sets the display to 4,000%. Your zoom setting persists as you navigate through a document set. This means that if you have set one document to 150% and you go to the next document, the next document defaults to 150% zoom.
To specify a zoom percentage without using the zoom out/in toolbar buttons, type the number in the percentage field and press the Enter key. - Reset Zoom —resets the zoom to 100%.
- Fit Width —increases the size of the document to fit the maximum width of the Viewer. This setting persists when you re-size the window.
- Fit Page —fits the entire document into the total size of the page. Clicking this zooms out the document and reduces the font size.
- Fit Actual —fits the document display to the actual size it was in its native application. By default, this resets the zoom percentage to 100%.
- Layout Mode —select one of the following options to determine how documents that are more than one page long display in the Viewer.
- Single —one page of a document will display at a time. Use the page navigation options at the bottom of the Viewer to adjust which page you view.
- Single Continuous —displays the pages in the document stacked vertically so you can scroll up and down to view them.
- Facing Continuous —displays the pages in the document in a row horizontally so you can scroll left and right to view them.
- Rotate all pages —rotates all pages in a document clockwise 90 degrees.
- Rotate current page —rotates only the current page clockwise 90 degrees.Image rotation is persistent. Any pages that you rotate will be rotated the next time you return to them in the Viewer and for other users who view them after you rotate them. Rotation is also applied when you run the production containing the images.
Left drawer Productions Viewer options
The following options are available in the left drawer:
- Thumbnail—click to expand the left drawer and display the Thumbnail Viewer. Each page of the document you are reviewing has its own numbered thumbnail in the Thumbnail Viewer. To learn more, visit Thumbnail Viewer.
- aiR for Review Analysis—click to expand or collapse the left drawer and display aiR for Review results. You can also enable or disable aiR for Review highlights.
- aiR for Privilege Analysis—click to expand or collapse the left drawer and display aiR for Privilege results.
Document actions menu
To learn more about these options, see Document actions menu.
Viewer settings menu
To learn more about these options, see Viewer settings menu.
Viewer breadcrumbs
The Viewer breadcrumbs help you track your current location while browsing documents in the Related items card. The information on your current location updates as you navigate. If Documents is an active link, you can click it to return to the document you were viewing before browsing documents in the Related items card.
Additionally, to exit the Viewer and return to the page you were previously on, you can click the Exit viewer button at any time.
Imaging on the fly
You can image a single document in the Viewer by selecting the Image on the fly option from the Document actions menu at the top-center of the page.
Using this feature, you can select any imaging profile you have permissions to view and use it to image the document.
If the source file of the document you are imaging is changed during the conversion process, for example through overlay, that document becomes undeliverable and you receive an error. To resolve this error, refresh the page or re-image the document.
After imaging a document on the fly, you can access thumbnail renderings of the imaged pages of the document.
Imaging some file formats can cause problems. Consider the following:
- Many PDFs render and image very well. However, you may have problems rendering and imaging some PDFs due to the variety of their content.
- While most Microsoft Office documents render and image well, you may experience issues when imaging documents with embedded files.
- You may have problems rendering and imaging vector-based documents like Visio and CAD.
PDF Viewer
To ensure maximum PDF Viewer performance, we recommend using Google Chrome version 126 or above.
The PDF Viewer allows you to view PDF files in the Review Interface.
You may experience slowness if you try to open PDF documents that are larger than 300 megabytes.
The Viewer displays PDF text by mapping the character codes to Unicode in most cases. To check whether PDF text has been properly encoded and will display correctly in the Viewer, copy the text in the original PDF file and paste it into another application like Microsoft Word or Notepad. If the pasted text does not display correctly, the PDF is not properly encoded. If the pasted text displays correctly in another application but not in the Viewer, contact Support for assistance.
The Viewer displays PDF text by mapping the character codes to Unicode in most cases. To check whether PDF text has been properly encoded and will display correctly in the Viewer, copy the text in the original PDF file and paste it into another application like Microsoft Word or Notepad. If the pasted text does not display correctly, the PDF is not properly encoded. If the pasted text displays correctly in another application but not in the Viewer, contact Support for assistance.
There are options available in the following sections of the Viewer:
- PDF Viewer toolbar options
- Left drawer Viewer options
- Document actions menu
- Viewer settings menu
- Viewer breadcrumbs
- Right drawer Viewer options
Each of these options and menus is described in more detail in the sections below.
PDF Viewer toolbar options
The PDF Viewer provides the following options:

- Zoom Out/In —zooms out and in on the current document in increments of 10% within a range of 10% to 4,000%. If you attempt to zoom out to a percentage lower than 10%, the Viewer automatically sets the display to 10%. If you attempt to zoom in to a percentage higher than 4,000%, the Viewer automatically sets the display to 4,000%. Your zoom setting persists as you navigate through a document set. This means that if you have set one document to 150% and you go to the next document, the next document defaults to 150% zoom.
To specify a zoom percentage without using the zoom out/in toolbar buttons, type the number in the percentage field and press the Enter key. - Reset Zoom —resets the zoom to 100%.
- Fit Width —increases the size of the document to fit the maximum width of the Viewer. This setting persists when you re-size the window.
- Fit Page —fits the entire document into the total size of the page. Clicking this zooms out the document and reduces the font size.
- Fit Actual —fits the document display to the actual size it was in its native application. By default, this resets the zoom percentage to 100%.
- Layout Mode —select one of the following options to determine how documents that are more than one page long display in the Viewer.
- Single —one page of a document will display at a time. Use the page navigation options at the bottom of the Viewer to adjust which page you view.
- Single Continuous —displays the pages in the document stacked vertically so you can scroll up and down to view them.
- Facing Continuous —displays the pages in the document in a row horizontally so you can scroll left and right to view them.
- Draft Mode —click to begin Draft Mode which automatically contrasts text from the background, help you identify poorly drawn redactions, and identify corrupt OCR text. This option is only available on the Native Viewer and PDF Viewer with rendered documents.
- Go To Next/Previous Highlight —moves through previous and next highlighted terms in the document.
- Redact Markup Visibility — this option determines how markups display in the PDF Viewer. Click the Redact Markup Visibility icon to toggle between the following modes:
- Solid —Markups in the document are fully visible and cover text underneath.
- Transparent —Markups in the document are partially visible so that you can still see the text underneath.
- Hidden —Markups in the document are not visible.
Left drawer Viewer options
The following options are available in the left drawer:

- Persistent
Highlighting—displays or hides a card containing all recent searches from the criteria entered in the search bar and any persistent highlight sets in the workspace. You can also create a dtSearch or keyword search in the Your recent searches section.
Additionally, you can control which highlights display in the current document by clicking on either the persistent set to only display highlights from that set or you can click on a specific term to only see that term highlighted in the document. You can also navigate to and from highlights using this pane.
- Thumbnail—click to expand the left drawer and display the Thumbnail Viewer. Each page of the document you are reviewing has its own numbered thumbnail in the Thumbnail Viewer.
- Sentiment—click to expand or collapse the left drawer and display Sentiment Analysis Highlights in the Viewer.
- aiR for Review Analysis—click to expand or collapse the left drawer and display aiR for Review results. You can also enable or disable aiR for Review highlights.
- aiR for Privilege Analysis—click to expand or collapse the left drawer and display aiR for Privilege results.
Right drawer Viewer options
The following options are available in the right drawer:
- Hidden Content—displays or hides information about hidden content. Hidden content can appear in Excel, Word, PDF, or Powerpoint documents. This functionality does not work on imaged documents because Relativity only images unhidden cells.
- Contextual Search—click to expand the right drawer and display the Contextual Search card. This feature allows you to quickly navigate to matching search terms in a document which is useful in longer documents or ones that have many matching search terms. The Contextual Search card has the same functionality as the Search Bar. To learn more about the Search Bar's functionality, see Search Bar. Additionally, each search term match is displayed in a box that includes both words before and after the search term match to make it easy for you to view the context of each one.
Enter a term or terms in the search box and press Enter on your keyboard to highlight in yellow any matches in the current document. You can click on a desired search term box in the pane to jump to that place in the document. The active search term box will display with a blue border and the matching search term in the document will be highlighted in blue to make it easy to find.
Document actions menu
To learn more about these options, see Document actions menu.
Viewer settings menu
To learn more about these options, see Viewer settings menu.
Viewer Breadcrumbs
The Viewer Breadcrumbs help you track your current location while browsing documents in the Related items card. The information on your current location updates as you navigate. If Documents is an active link, you can click it to return to the document you were viewing before browsing documents in the Related items card.
Additionally, to exit the Viewer and return to the page you were previously on, you can click the Exit viewer button at any time.
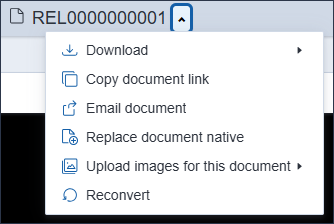
Document actions menu
The following options are available in the Document actions menu:
- Download—hover your cursor over this option and select one of the following:Files over 2 GB cannot be downloaded using this option. If you have a document that is over 2 GB, you can create a saved search that includes any documents you wish to export and then export them using Import/Export.
- Active Production—select to download a copy of the produced document. A user must be granted the Documents - Local Access (Download, Copy Text) permission to use this option.
- Document native—select to download a copy of the current document. A user must be granted the Documents - Local Access (Download, Copy Text) permission to use this option. The Documents - Local Access (Download, Copy Text) permission does not prevent users from being able to download native file on an RDO.
If you cannot download a copy of the document, this option is grayed out. Hover your cursor over this option to view a tooltip that contains an explanation why this option is disabled.
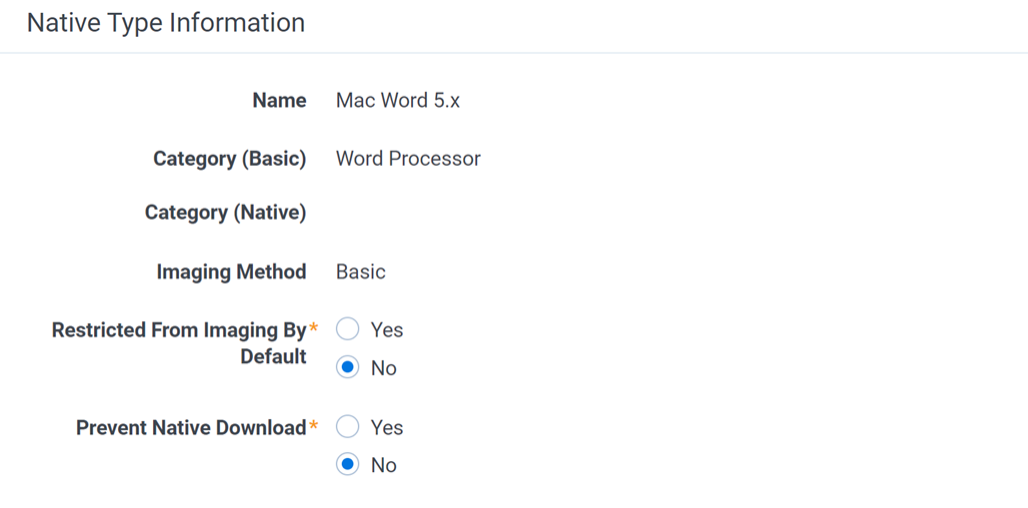
A system or case administrator can determine which native file types users can and cannot download by doing the following:- Navigate to the Native Types tab.
- Click the Edit icon in the row of the desired file type.
- On the Prevent Native Download field, select Yes to prevent users from downloading it or No to allow users to download it.
- PDF—select to download a copy of the stored PDF of the current document. To create a stored PDF, use Mass PDF.
If you cannot download a copy of the document, this option is grayed out. Hover your cursor over this option to view a tooltip that contains an explanation why this option is disabled.
- Copy document link—select to copy the URL to the current document to your clipboard.
- Email document—select to open an email in your default email application with the URL to the current document included in the body of the email. The subject of the email will include the name of the workspace and the current document.
- Replace document native—select to replace the native file of the current document with a new file.
- Image on the fly/Delete all images for this document—Image on the fly will display if the current document has not been imaged. If the current document has been imaged, delete all images for this document will display instead.
- Delete all images for this document—select to delete all original images associated with the current document. If the document has produced images, these are not affected by this option. To remove the produced images from a document, delete the production set instead.
- Image on the fly—to image the current document from the Viewer, hover your cursor over this option and the Image Profile options will display. Select the desired profile option to begin the imaging process.
A system or case administrator can determine which native file types can or cannot be imaged using Image on the fly by doing the following:- Navigate to the Native Types tab.
- Click the Edit icon in the row of the desired file type.
- On the Restricted From Imaging By Default field, select Yes to prevent users from using this option to image the native type or No to allow users to image the native file type.
- Delete all images for this document—select to delete all original images associated with the current document.
- Replace images for this document—to replace the images for the current document using an imaging profile, hover your cursor over this option and select the desired Imaging Profile option to begin the imaging process.
- Reconvert—select to clear your internet browser's cache and reload the current document for review.
- Download translated document—hover your cursor over this option and select the desired language to download a copy of the document in the selected language. This option only displays if a document has been translated.
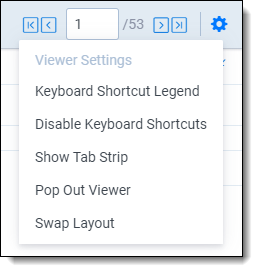
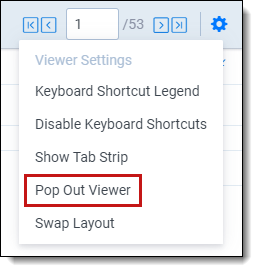
Viewer settings menu
The following options are available in the Viewer settings menu:
- Keyboard Shortcut Legend—select to open the Keyboard Shortcut Legend pop-up modal to view the current keyboard shortcuts available in the Viewer.
- Enable/Disable Keyboard Shortcuts—select to enable or disable the keyboard shortcuts feature while in the Viewer.
- Show/Hide Tab Strip—select to show or hide the sidebar and tab strip in the Native Viewer.
- Pop Out Viewer—select to open the Viewer in a new window in your browser. To learn more, visit Pop Out Viewer.
- Swap Layout—select to move the coding layout and the document card to the opposite side of the Viewer from where they are currently located.
- Review Interface Settings—Allows a third-party developer to temporarily enable or disable other extensions and settings in the Review Interface while they are developing their extension. This option only displays in the Viewer Settings menu if a user has the Document - Review Interface Settings permission. This permission is disabled by default for all users other than System Administrators.
You can toggle instance settings, persistent highlighting, and extensions on or off for the current user to help troubleshoot problems. Settings that are edited only apply to the current user and do not impact settings across the instance. If you edit any of the options on this page, a message displays at the top of the Viewer indicating that the settings have been changed. You may need to refresh your browser for the changes to be reflected in the Viewer. Any changes made do not persist across user sessions and once you log out, the Viewer will return to the state prior to editing the Review Interface Settings.
If you would like to return to the prior Viewer state, click Reset Default Settings at the bottom of the page to restore the settings back to their original values.
Pop Out Viewer
You can open the Viewer in a new window in your browser using the Pop Out Viewer. The Document card and the Coding card remain in the previously opened browser window. They can be expanded to a greater width to take advantage of the space freed up by the Pop Out Viewer. The Pop Out Viewer retains the same functionality as the Viewer. For example, you can switch Viewer types and view highlights or the Thumbnail Viewer as desired.
To open the Pop-Out Viewer in a new browser window, select the Pop Out Viewer option from the Viewer settings menu in the upper-right corner.
To return the Viewer to the previous browser window where the Document card and Coding card are located, you can click either the Pop In Viewer button on the previous browser window or you can select the Pop In Viewer option from the Viewer settings menu in the upper-right.

Alternatively, if you close the browser window that the popped out Viewer is in, the Viewer pops in to the Review Interface or in other words, returns to the original browser window.
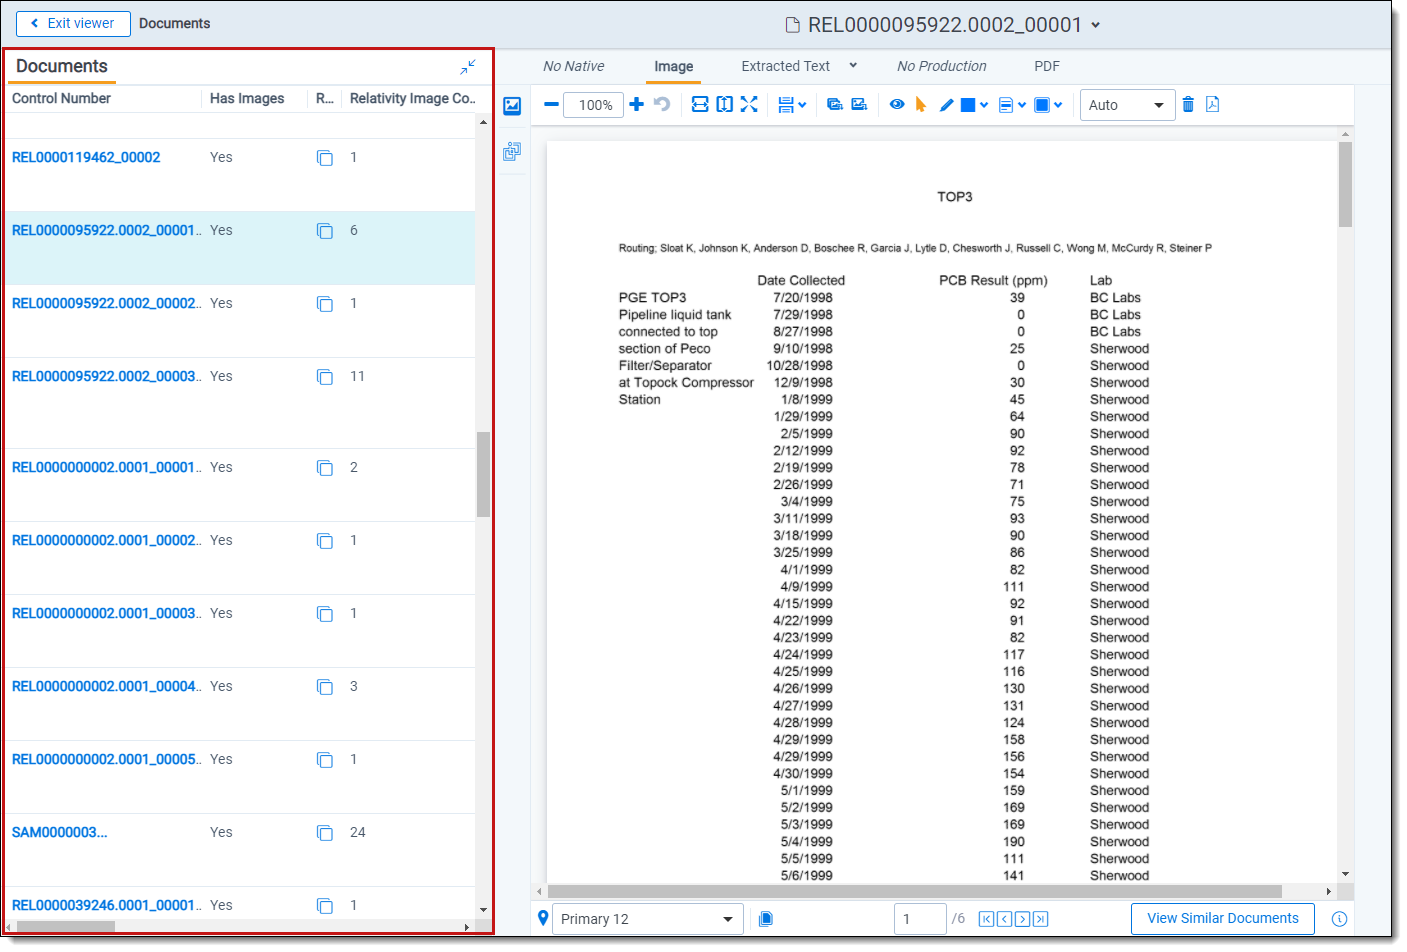
Standalone Viewer
To view a document in a separate browser window, click the file icon in the Document list or in the Viewer on the Documents card or Family card. Launching the Standalone Viewer from either the Documents and Family card launch the Review interface.
Document preview panel
The Document preview panel allows you to view documents in the document list before launching the Viewer. It also allows you to filter the list and quickly view documents in the results which makes the process of finding documents more efficient. To learn more, visit
Related items card
The related items card is located at the bottom-right corner of the Viewer. Related items are customizable groups of documents within a workspace. Common examples are family groups, duplicates, or similar documents.
The Edit field will be available in the Related items card if you add it to the Relational card view.
The related items toolbar includes the following:

- Related items —displays a group of documents related to the active document. Options vary within the workspace. Hover over each icon to display the name of the item. Examples include: family group, duplicates, and thread group.
- Document history —displays a history of actions taken on the current document. You may not have access to document history. If you store your audits in Data Grid, this displays the field name, old value, and new value. In the Document History card, you can click the Details link to display a pop-up with the audit history for the document. Click Run Details to display information about document imaging jobs, including the name of the imaging profile and the formatting options used during mass imaging or imaging on the fly.
- Production —displays all productions in which the document was included. You may not have permissions to view production information.
- Linked —displays all linked records on the active document.
- Search results —displays the results of an Analytics search.
- Batch sets —shows all the batch sets for the active record. See
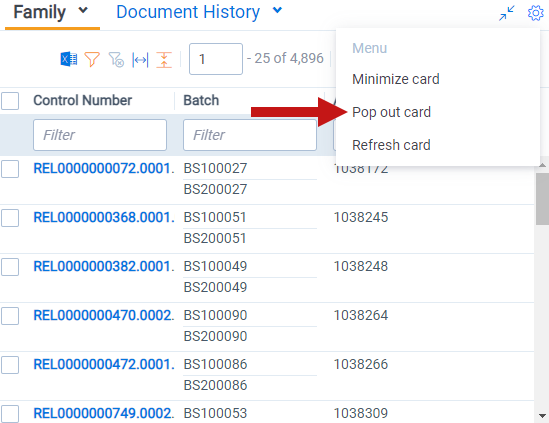
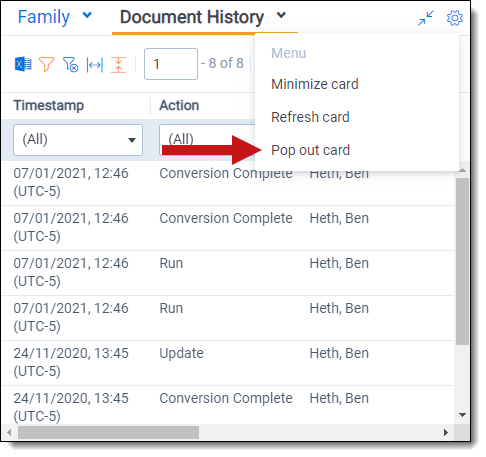
When a coding decision is made, the information in the Related Items card automatically refreshes. If there are two or more reviewers on the same document, a user can refresh this card by clicking on the Menu icon and selecting Refresh card.
The Related items card can be opened in a separate browser window. Click the Menu icon and select Pop out card to open the card in its own window. Click the Menu icon and select Pop in card to close the browser window and return the card to the Viewer.
Document actions in the related items card
You can use the related items card to quickly identify documents related to the active document. You can also use this card to act on those groups of related items.
For instance, in the example of the Related items card below, you can select some or all of the documents in the Related items card and click Edit. This opens a window for you to access all of your active layouts – the same layouts available in the layouts pane. Using these layouts, you can make coding decisions and apply them to the selected documents using mass editing. Alternatively, you can mass PDF, Save as List, Image, or Tally/Sum/Average. To learn more, see Mass operations.
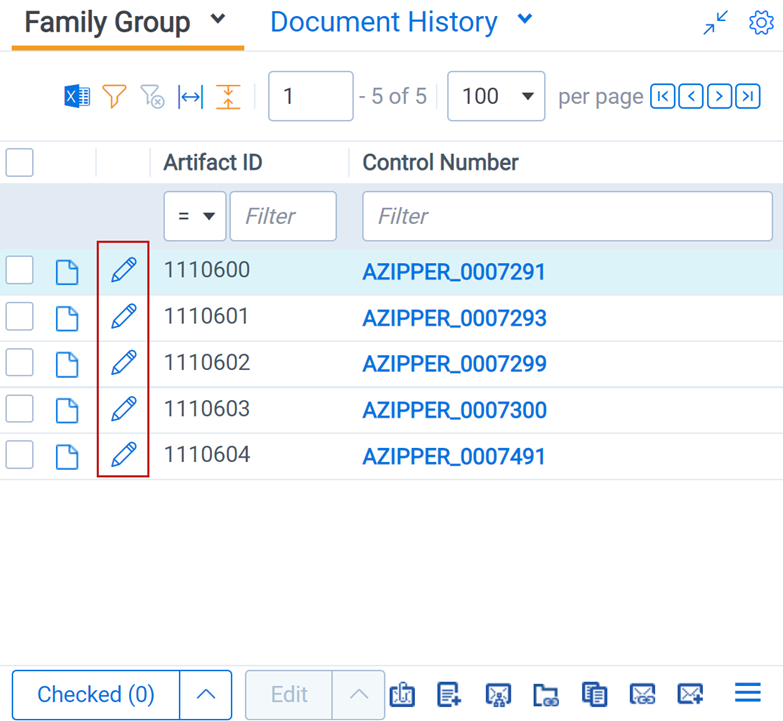
If you add the Edit field to your relational card view, you can click the Edit icon in the row of a document and immediately open that document in the Viewer with the layout ready to be edited.
Document and Production History card
The Document History and Production History card is located in the bottom-right of the Viewer. This card displays either the document history or the production history, depending on which you have selected. The Document History card displays information about the most recent actions taken by users with the current document. The Production History card displays information on any productions that the current document was included in.
You can filter the columns to help find information or export the information in the Document History card to a .csv file.
You can refresh this card by clicking on the Menu icon and selecting Refresh card.
The Document History card can be opened in a separate browser window. Click the Menu icon and select Pop out card to open the card in its own window. Click the Menu icon and select Pop in card to close the browser window and return the card to the Viewer.
Document and Production History card permissions
The following permissions are required to access Document and Production History:
| Object Security | Tab Visibility | Admin Operations |
|---|---|---|
|
|
|
Documents card
The Documents card contains the document list so you can conveniently navigate from document-to-document without having to leave the Viewer. The fields that display in the card are based on which view is selected in the document list. Each time that you save a coding decision in the Viewer, the Documents card refreshes to show the latest results. The highlighted document in the document list now updates when you navigate from document-to-document to make tracking even easier.
If you're using Review Center, the Documents card shows the documents in your current queue. For more information, see Reviewing documents using Review Center.
Email thread visualization tool
When you have installed and run an email threading structured analytics set for documents, you can use the email thread visualization tool. Launch the Email Thread Visualization pane, click the email thread visualization icon in the lower right corner of the displayed document in the Viewer. The email thread visualization pane expands and shows the thread group for the selected email in the Viewer.
Using this tool, you can visually examine email threads and how they are coded. You can also easily perform mass editing from this tool. See Email thread visualization for more information.
.eml and .msg header dates and times in the Viewer
.eml, .msg and RSMF documents have header dates and times in Coordinated Universal Time (UTC) format. The Relativity Native Time Zone Offset field determines how these date/time values are displayed in the Native Viewer, based on the desired time zone and its offset from UTC.
Relativity does not automatically account for Daylight Savings Time. For documents processed in Relativity, DST rules are automatically taken into account when calculating the Relativity Native Time Zone Offset value. For all other documents, if you need the Viewer to account for Daylight Savings Time, deploy the Set Native Timezone Offset With DST script. To learn more, see Set native time zone offset with DST. You must be a Relativity admin to deploy this script.
Thumbnail Viewer
When in the Native Viewer, Image Viewer, or Productions Viewer, you can access and browse thumbnail renderings of a document's pages. Quickly scan, locate, and navigate to pages in an open document.
To open the Thumbnail Viewer, click Thumbnail icon in the left drawer. The left drawer expands and displays the Thumbnail Viewer. Scroll up and down to navigate all pages in the open document and click a page to view it. As you scroll through the document, the thumbnail viewer scrolls simultaneously to keep the viewed pages in focus.
The Thumbnail Viewer is compatible with word processor, presentation, vector image, and raster image file types.
The Thumbnail Viewer may not be available in the Native Viewer for document types that do not paginate such as spreadsheets or plain text.