


Feedback
Last date modified: 2026-Jun-24
Translate
With Translate, you can select a set of documents that are in different languages and translate them to another language to support searching and review workflows. You can also translate a single document from the Viewer. For dozens of file types, including Microsoft Office files and PDFs, you can receive a translation in the native format of the document where supported, along with the translated extracted text. After successfully starting a Translate job, you will receive an email notifying you when it has completed along with a link to the translated documents.
Each document that is successfully processed for translation is charged to you individually. Each errored document will not incur any charge to you. Translated documents can then be viewed in either the native format or the translated language in the Translation Viewer.
This documentation contains references to third-party software, or technologies. While efforts are made to keep third-party references updated, the images, documentation, or guidance in this topic may not accurately represent the current behavior or user interfaces of the third-party software. For more considerations regarding third-party software, such as copyright and ownership, see Terms of Use.
Translate requirements
- Translate is a separate application that must be installed into your instance, and desired workspaces. For more information, see Installing the Translate application.
- You must have an enabled RelativityOne license to use Translate.
- Translate is not available for certain file types.
- Relativity can revoke or limit access to Translate if it is used in an unauthorized manner. Translate cannot be used by customers or third parties to, directly or indirectly, create, train, or improve a similar or competing product or service.
Installing the Translate application
We do not recommend uninstalling Translate from a workspace because it is possible to lose translations in the process. Instead, you can use permissions to restrict user access to Translate features.
Translate is compatible with client domains. You can limit access by installing the Translate application in workspaces with client domains. You can also configure permission levels per workspace based on end-user needs.
The Translate application is not included in the ARM Archive. The application needs to be installed manually in the restored workspace to view any previously translated documents.
You must have an active Translate contract to use this application. If you would like to learn more about using Translate, contact your Account Executive.
Translate can be installed in repository workspaces. Once the Translate application has been installed in your instance, you can install it to any workspace you would like.
The Relativity Translated Extracted Text field is created as part of the installation process. If you already have a field with this name created, you will receive an error when trying to install the Translate application. We recommend either editing or deleting the Relativity Translated Extracted Text field and then installing the application.
To install Translate to a workspace:
- Navigate to the Application Library tab.
- Filter the list for the Translate application and select RelativityOne Translate.
- In the Workspaces Installed section, click Select.
- Select a workspace and click on the Move selected left to right icon.
- Click Apply.
The Translate application is installed and ready for use in the workspace.
Translate permissions
Feature Permissions provide an alternative to Relativity's security management by shifting the focus from Object Types and Tab Visibility to feature-based permissions. This method is an alternative option. Any feature-specific permissions information already in this and other topics is still applicable. The Feature Permissions interface enables administrators to manage permissions at the feature level, offering a more intuitive experience. By viewing granular permissions associated with each feature, administrators can ensure comprehensive control, ultimately reducing complexity and minimizing errors. For details see Instance-level permissions and Workspace-level permissions .
The following permissions are needed to access Translate functionality:
| Object Security | Tab Visibility | Other Settings |
|---|---|---|
|
|
Each permission enables a user to complete different tasks with Translate. By default, Translate permissions are enabled for system admins only.
A brief description of each permission is provided below.
- Document: Translate Document—if enabled, users can translate a single document in the Viewer. To learn more, see Translating a single document.
- Translated Documents: View—if enabled, users can see translated documents in the Translation Viewer.
- Mass Operations: Translate—if enabled, users can run Translate jobs that contain multiple documents at once using the Translate mass operation. To learn more, see Translating multiple documents.There is a maximum limit of 10,000 documents that can be translated in a single job by default. You can adjust the limit by editing the TranslateMassOperationMaximum instance setting value.
If you try to include more than 10,000 documents in a job, it will not run. Jobs must contain a total number of documents equal to or lesser than the TranslateMassOperationMaximum instance setting value to run successfully.
Translating multiple documents
You can translate multiple documents into a new language at a time. We recommend selecting documents that have a single language and no watermarks.
Documents that have multiple languages may have incorrect or incomplete translation results. For example, a sentence that contains multiple languages may not translate correctly.
If a document contains watermarks, there may be partial or incomplete translations because a watermark obscures some words.
There are scenarios where Translate may not correctly translate documents. To learn more, visit Microsoft Azure documentation.
To translate documents to a new language:
- Navigate to the Documents tab.
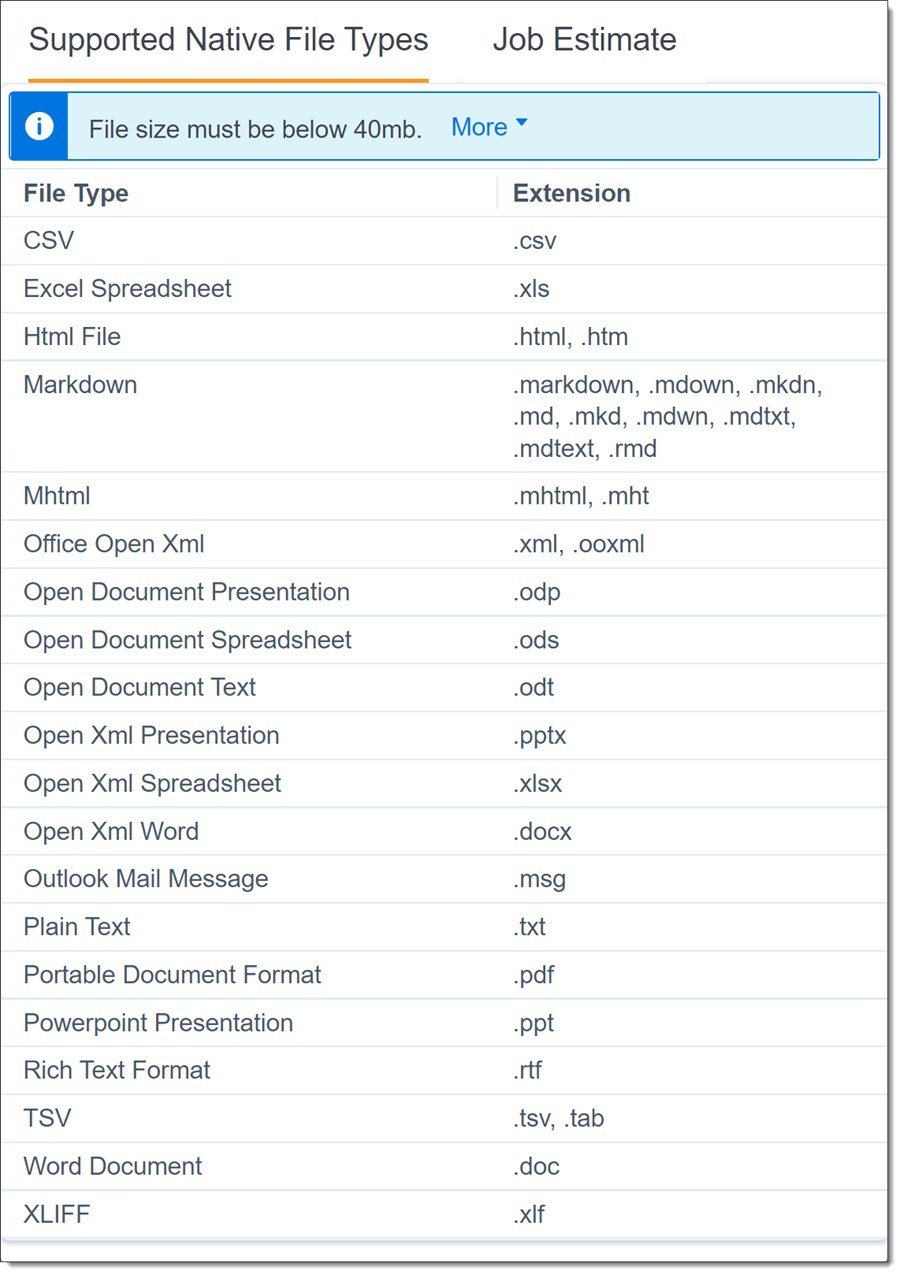
- Select the documents from the list that you wish to translate to another language. The selected documents can contain multiple languages. A document file size cannot be larger than 40 MB. To view a list of document file types that are supported, see Additional file limits may apply.
Selecting a nested search can cause performance issues with Translate.If a document needs to be re-translated in the same language it was previously translated in, you can delete the Translation Relativity Dynamic Object (RDO) to translate that document again to the same target language. To learn more, see Re-translating documents.
- Click on the mass operations toolbar and select Translate.
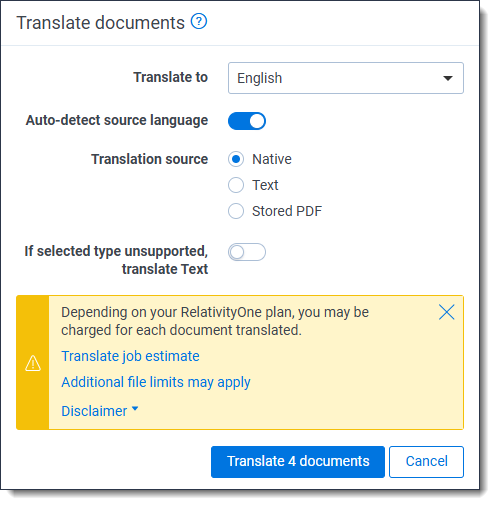
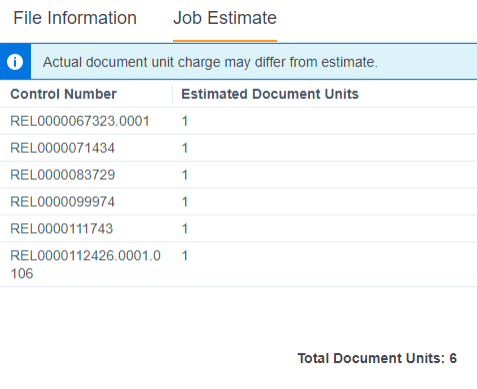
- Complete the fields in the Translate documents modal. To learn more, see Fields.You can see an estimate of the total number of documents before starting the Translate job by clicking on the Translate job estimate link. To learn more, see Fields.
- Click Translate X documents.
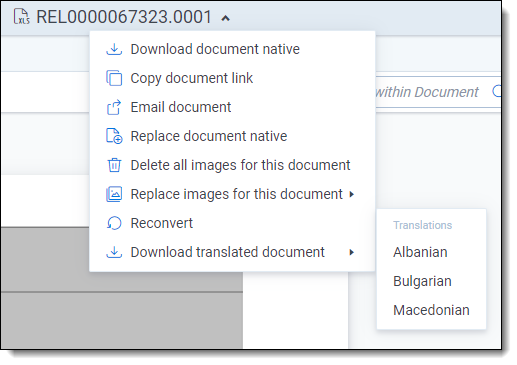
The modal displays a message on whether the Translate job started successfully or not. Once started, jobs may be broken up into smaller jobs for performance reasons. Once the job finishes, you will receive an email with a summary of the results and a link to the translated documents. If the job did not start successfully and you would like more information, see Troubleshooting Translate jobs. - Optionally, you can download a copy of the translated native file by clicking on the Document actions menu and hovering your cursor over the Download translated document option and selecting the desired language you wish to download.
- To view a translated document, select the document from the Documents list.When a document is translated, a Translation RDO is created to store the translated document which is then linked back to the original document to ensure it is preserved.
- Select the Viewer option named after the translated language. For example, if you translated a document to English, click on the English Viewer.
The translated document displays in the Viewer.
Translating a single document
You can translate a single document into a new language. We recommend selecting documents that have a single language and no watermarks.
Documents that have multiple languages may have incorrect or incomplete translation results. For example, a sentence that contains multiple languages may not translate correctly.
If a document contains watermarks, there may be partial or incomplete translations because a watermark obscures some words.
There are other rare scenarios where Translate may not correctly translate a document. To learn more, visit Microsoft Azure documentation.
To translate a single document on-the-fly to a new language:
- Navigate to the Documents tab.
- Select the document you wish to translate from the list. These documents can contain multiple languages. A document file size cannot be larger than 40 MB. To view a list of document file types that are supported, see Additional file limits may apply.
If a document needs to be re-translated in the same language it was previously translated in, you can delete the Translation Relativity Dynamic Object (RDO) to translate that document again to the same target language. To learn more, see Re-translating documents.
- Click the Translate button.

- Complete the fields in the Translate documents modal. To learn more, see Fields.You can see an estimate of the total number of documents before starting the Translate job by clicking on the Translate job estimate link. To learn more, see Fields.
- Click Translate 1 document.
The modal displays a message on whether the Translate job started successfully or not. Once started, jobs may be broken up into smaller jobs for performance reasons. Once the job finishes, you will receive an email with a summary of the results and a link to the translated documents. If the job did not start successfully and you would like more information, see Troubleshooting Translate jobs. - Optionally, you can download a copy of the translated native file by clicking on the Document actions menu and hovering your cursor over the Download translated document option and selecting the desired language you wish to download.
- To view the translated document, click Exit viewerand then select the document from the Documents list.When a document is translated, a Translation RDO is created to store the translated document which is then linked back to the original document to ensure it is preserved. The Translation RDO does not count against storage costs.
- Select the Viewer option named after the translated language. For example, if you translated a document to English, click on the English Viewer.
The translated document displays in the Viewer.
Fields
The following fields can display in the Translate documents modal:
- Translate To—select the language you wish to translate the current document to.Translate automatically detects the language of the current document. Hidden content, such as notes, comments, or hidden cells, are translated as well. Attachments and embedded documents are not translated by this application.
- Auto-detect source language—This option is enabled by default and most documents are translated correctly using this option. If you translate a document that is multilingual and one of the languages is not translated correctly, you can do the following to troubleshoot:
- Delete the Translation Relativity Dynamic Object (RDO) for each document that you want to re-translate.
- Navigate to the Documents tab.
- Select the document or documents from the list.
- Click on the mass operations toolbar and select Translate.
- Disable the Auto-detect source language field.
- Choose the language in the document or documents that was not translated in the previous attempt from the Source Language field.If you select the wrong language for the Source Language field and translate the document, you will be charged for the translation. We recommend verifying which secondary language documents need to be re-translated before proceeding with the translation.
- Complete the remaining fields as desired.
- Click Translate X documents.
- Translation Source—select the document source for this translation:
- Native—if selected, the original document file will be used for the translation. When this option is selected, the If Native unsupported, translate Text field displays in the modal.Certain file types can be translated in their original format. A full list of file types, encodings, and other limitations can be found in the modal by clicking on Additional file limits may apply.
- Text—if selected, the extracted text will be used for the translation. The Source text field option displays in the modal.
- Stored PDF—if selected, the stored PDF will be used for the translation. To create a stored PDF, use Mass PDF.
- If Native unsupported, translate Text—enable this option to automatically translate the extracted text from the selected Source text field if the native document’s format cannot be translated. We recommend enabling this option. If enabled, the Source text field displays in the modal.
- Source text field—select the long text field you would like to translate. Any long text field that has the Available in the Viewer option enabled will appear in this drop-down menu. This option only displays if either Text is selected or If Native unsupported, translate Text is enabled.
- Translate job estimate—click on this link in the modal to view an estimate of the total number of documents that will be translated with this job. Each document unit that is successfully translated will incur a charge. The estimate is based on the selected Source text field.This is an estimate and does not account for numbers, which are non-translatable characters. It also does not account for additional content that Translate finds during the translation process that wasn’t recognized by Relativity’s OCR or text extraction tools.
- Native—if selected, the original document file will be used for the translation. When this option is selected, the If Native unsupported, translate Text field displays in the modal.
- Additional file limits may apply—click on this link in the modal to view Translate's file limitations, including document type and file size limits.
Populated fields
The following fields are populated for documents once a Translate job has finished:
- Relativity Translated Extracted Text—this field is populated with all of the translated extracted text, even if a document is translated multiple times to multiple languages.
- Translation Document Source—this field is populated on the original document, and is named with the control number and target language. This is a multi-object field that can be used to identify which documents have been successfully translated and to what languages.
Working with translated documents
Documents that have been translated function differently than other documents in Relativity. When a document is translated, a Translation RDO is created to store the translated document which is then linked back to the original document to ensure it is preserved. The Translation RDO does not receive a control number and is not stored as a separate document.
Redact is not compatible with translated native documents.
Once a document is translated, the Relativity Translated Extracted Text field is created. This long text field is populated with the translated extracted text and can be used in various types of searches. You can also use the Relativity Translated Extracted Text field to build out analytics indexes.
Re-translating documents
If you need to re-translate one or more documents into the same language, do the following:
- Navigate to the Translated Documents tab.
- Filter the list as needed to locate the documents you wish to re-translate.
- Select the desired documents from the list.
- Select Delete from the mass operations drop-down menu.
The Delete X Translated Documents modal displays. - Click Delete.
The previous translation is removed and the document is ready to be re-translated.
Mass exporting translated documents
We recommend mass exporting translated documents using Import/Export with the RDO export option. The following options are unique to exporting translated documents:
- Ensure that Translated Documents is selected for the Relativity Object Type field.
- Optionally, consider creating or editing a view so that it contains only the translated documents you wish to export. This view can then be selected for the View field in the Import/Export modal to determine which documents are exported.
To learn more about this export workflow, see RDO file export.
Viewing a job's status and usage
You can see the details of a Translate job, including whether it was successful and when it finished from the Translate Jobs tab. Each document that is included in a job is listed separately on this tab. Additionally, you can see information on the usage of Translate in columns like Doc Units to better understand how you will be charged.
The Translate tab is automatically filtered to display jobs that are pending and were created in the last week. You can edit or remove these filters as desired.
The Translate Jobs tab is available at both the instance-level and workspace-level. The information that displays is determined by workspace permissions and lockbox settings.
Optionally, click the Export to CSV icon to download a .csv file that contains the information on the Translate Jobs tab.
The columns on the Translate Jobs tab are described below:
| Column | Description |
|---|---|
| Job ID | Displays the unique ID that is generated for each Translate job. |
| Job Status |
Displays whether a Translate job has finished successfully, errored, is still pending or is currently being translated. Each status is described below:
|
| Doc Ctrl # | Displays the control number for the document included in the job. You can click on the document's control number to open it in the Viewer. |
| Client Name | Displays the name of the client for the workspace where the Translate job occurred. This column only displays on the instance-level Translate Jobs tab. |
| Client Number | Displays the client number for the workspace where the Translate job occurred. This column only displays on the instance-level Translate Jobs tab. |
| Matter Name | Displays the matter name for the workspace where the Translate job occurred. This column only displays on the instance-level Translate Jobs tab. |
| Matter Number | Displays the matter number for the workspace where the Translate job occurred. This column only displays on the instance-level Translate Jobs tab. |
| File Type Submitted | Displays whether the document included in a translation is native or extracted text. |
| Target Language | Displays the language that the document is translated to. |
| Doc Units |
Displays the number of documents that have or will be translated by this job. This is the number of documents you will be charged for using this service as well. Any character on the document you are translating, excluding numbers, is counted as a character. A document unit contains 15,000 or 25,000 characters or less, depending on your contract. For example, when the document unit value in your contract is 15,000, if you translate a document that has 10,000 characters and a document that is 17,000 characters, the first document would count as 1 document unit and the second document would count as 2 document units because it has over 15,000 characters.
|
| User Name | Displays the user that started the Translate job. |
| Job Group | Displays the unique ID that is generated for the document. |
| Request Time | Displays the date and time when each Translate job was submitted. To filter the results based on date, click on the drop-down menu in this column, select the desired filtering options, and click Apply. |
| Completion Time | Displays the date and time when each Translate job completed. To filter the results based on date, click on the drop-down menu in this column, select the desired filtering options, and click Apply. |
| Doc ID | Displays the Artifact ID for each document. |
| Job Failure Reason | Displays the reason why a Translate job was not successful which can be shared with Relativity Support to help you troubleshoot. If a native document was not successful, try translating the extracted text instead. |
Supported languages
The languages supported by Translate vary for documents and scanned PDF documents. You can click the links below to view additional information.
- Afrikaans
- Albanian
- Amharic
- Arabic
- Armenian
- Assamese
- Azerbaijani (Latin)
- Bangla
- Bashkir
- Basque
- Bosnian (Latin)
- Bulgarian
- Cantonese (Traditional)
- Catalan
- Chinese (Literary)
- Chinese Simplified
- Chinese Traditional
- Croatian
- Czech
- Danish
- Dari
- Divehi
- Dutch
- English
- Estonian
- Faroese
- Fijian
- Filipino
- Finnish
- French
- French (Canada)
- Galician
- Georgian
- German
- Greek
- Gujarti
- Haitian Creole
- Hebrew
- Hindi
- Hmong Daw (Latin)
- Hungarian
- Icelandic
- Indonesian
- Inuinnaqtun
- Inuktitut
- Inuktitut (Latin)
- Irish
- Italian
- Japanese
- Kannada
- Kazakh
- Khmer
- Klingon
- Klingon (plqaD)
- Korean
- Kurdish (Central)
- Kurdish (Northern)
- Kyrgyz (Cyrillic)
- Lao
- Latvian
- Lithuanian
- Macedonian
- Malagasy
- Malay (Latin)
- Malayalam
- Maltese
- Maori
- Marathi
- Mongolian (Cyrillic)
- Mongolian (Traditional)
- Myanmar
- Nepali
- Norwegian
- Odia
- Pashto
- Persian
- Polish
- Portuguese (Brazil)
- Portuguese (Portugal)
- Punjabi
- Queretaro Otomi
- Romanian
- Russian
- Samoan (Latin)
- Serbian (Cyrillic)
- Serbian (Latin)
- Slovak
- Slovenian
- Somali (Arabic)
- Spanish
- Swahili (Latin)
- Swedish
- Tahitian
- Tamil
- Tatar (Latin)
- Telugu
- Thai
- Tibetan
- Tigrinya
- Tongan
- Turkish
- Turkmen (Latin)
- Ukrainian
- Upper Sorbian
- Urdu
- Uyghur (Arabic)
- Uzbek (Latin)
- Vietnamese
- Welsh
- Yucatec Maya
- Zulu
- Afrikaans
- Albanian
- Amharic
- Arabic
- Armenian
- Assamese
- Azerbaijani (Latin)
- Bangla
- Bashkir
- Basque
- Bosnian (Latin)
- Bulgarian
- Cantonese (Traditional)
- Catalan
- Chinese (Literary)
- Chinese Simplified
- Chinese Traditional
- Croatian
- Czech
- Danish
- Dari
- Divehi
- Dutch
- English
- Estonian
- Faroese
- Fijian
- Filipino
- Finnish
- French
- French (Canada)
- Galician
- Georgian
- German
- Greek
- Gujarati
- Haitian Creole
- Hebrew
- Hindi
- Hmong Daw (Latin)
- Hungarian
- Icelandic
- Indonesian
- Interlingua
- Inuinnaqtun
- Inuktitut
- Inuktitut (Latin)
- Irish
- Italian
- Japanese
- Kannada
- Kazakh (Cyrillic)
- Kazakh (Latin)
- Khmer
- Klingon
- Klingon (plqaD)
- Korean
- Kurdish (Arabic) (Central)
- Kurdish (Latin) (Northern)
- Kyrgyz (Cyrillic)
- Lao
- Latvian
- Lithuanian
- Macedonian
- Malagasy
- Malay (Latin)
- Malayalam
- Maltese
- Maori
- Marathi
- Mongolian (Cyrillic)
- Mongolian (Traditional)
- Myanmar (Burmese)
- Nepali
- Norwegian
- Odia
- Pashto
- Persian
- Polish
- Portuguese (Brazil)
- Portuguese (Portugal)
- Punjabi
- Queretaro Otomi
- Romanian
- Russian
- Samoan (Latin)
- Serbian (Cyrillic)
- Serbian (Latin)
- Slovak
- Slovenian
- Somali
- Spanish
- Swahili (Latin)
- Swedish
- Tahitian
- Tamil
- Tatar (Latin)
- Telugu
- Tibetan
- Tigrinya
- Tongan
- Turkish
- Turkmen (Latin)
- Ukranian
- Upper Sorbian
- Urdu
- Uyghur (Arabic)
- Uzbek (Latin)
- Vietnamese
- Welsh
- Yucatec Maya
- Zulu
Troubleshooting Translate jobs
If you start a Translate job and do not see a notification that it started successfully, you will see one of the following messages instead. Information on how to troubleshoot these scenarios is also provided below.
| Notification | Troubleshooting Tips |
|---|---|
| Translation Job failed. | For assistance with resolving this notification, contact Relativity Support.. |
| Translation job started, but with the below file warnings. |
This message displays if the job starts but Translate identifies potential native documents that will not be translated because the file type is not supported or the document file size is over 40 MB. If the document file size is too big, try translating the extracted text instead. Translate uses the Relativity Native Type field (and its associated File ID) to determine the file type. If that field is Unknown format type, the original document cannot be translated. You can click on the Save X untranslated documents as a Saved Search link to access the files which will not be translated. If documents are in a secured folder and fail to be translated, ensure that the user trying to translate them has the Translate Documents permission on that folder. Otherwise, the user will see an "Insufficient Permission" message.
|
Once a Translate job finishes, you may see the any of the following messages in the email that is automatically sent to you.
- ServiceUnavailable: The document or part of its content is unsupported.
- Document cannot be opened due to possibly being corrupt.
- Document failed during checking validity. This may be caused by corruption or unsupported type/extension.
- Job has timed out.
If you receive any of these notifications, we recommend deleting the Translation Relativity Dynamic Object (RDO) and trying to translate the native document again. If this does not resolve the issue, try translating the extracted text of the affected documents instead. If you are still receiving this email notification after trying both of these potential solutions, contact Relativity Support.