


 #3f79f9
 #f8d353
 #c14c89
 #54cd93
 #ff6363
 #43bdd6
 #faa85d
 #6b51b4
 #9dbd5b
 #ffa7b2
Feedback
Last date modified: 2026-Jun-24
Email thread visualization
The email thread visualization tool is available for any email threading jobs run as full builds. When the job completes, the visualization is available from the document Viewer when you open a document.
Email thread visualization can improve efficiency as follows:
- Quickly see the story of an email conversation—instantly see where the conversation branched and where drafts or attachments appear as the conversation progressed.
- Optimize your QC process—use the visualization as part of your QC process. Coding highlights can be used to highlight any Yes/No and single choice field in the email thread visualization pane. In this way, you can see how a whole thread is coded with privilege or responsiveness. If discrepancies exist, you can use the visualization to correct them through mass editing.
See these related pages:
- Email threading
- Supported email header formats
- Inclusive emails
- Email threading results
- Structured analytics
- Running structured analytics
- On demand tutorial - Using Email Thread Visualization
- Using Email Thread Visualization in your QC workflows
Requirements for email thread visualization
To use email thread visualization:
- The Analytics application must be installed in the workspace.
- The documents must have the Email Author Date ID field. To generate this, run email threading on the documents. For instructions, see Running structured analytics.
Security permissions
Email thread visualization requires the following permissions:
| Object Security | Admin Operations |
|---|---|
|
|
You must also have View permissions to the following fields:
- Email Action
- Email Thread Group
- Email Author Date ID
- Inclusive Email
- Email Thread Hash
- Email Duplicate Spare
- Email Threading Display
Feature Permissions provide an alternative to Relativity's security management by shifting the focus from Object Types and Tab Visibility to feature-based permissions. This method is an alternative option. Any feature-specific permissions information already in this and other topics is still applicable. The Feature Permissions interface enables administrators to manage permissions at the feature level, offering a more intuitive experience. By viewing granular permissions associated with each feature, administrators can ensure comprehensive control, ultimately reducing complexity and minimizing errors. For details see Instance-level permissions and Workspace-level permissions .
Launching the email thread visualization tool
Email thread visualization is available from the document Viewer for all document types.
To launch the email thread visualization pane, click the Email Thread Visualization icon in the lower left corner of the displayed document in the Viewer. The pane expands and shows the thread group for the selected email in the Viewer.
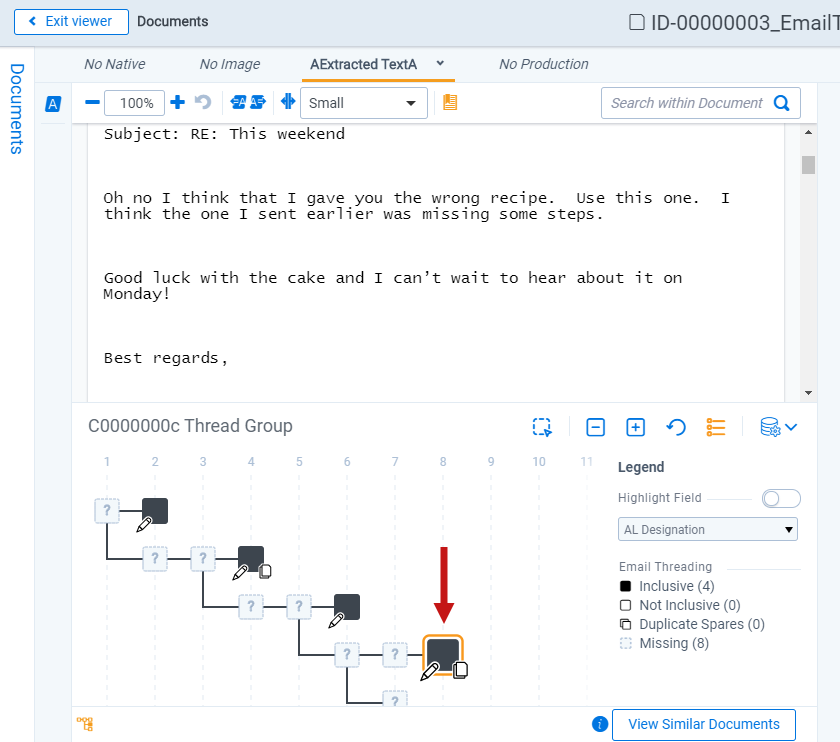
When you click the Email Thread Visualization icon, the email thread visualization pane expands to show the email thread group of the currently opened document. From the visualization, the currently opened document is outlined in orange and appears larger than the unselected documents in the thread. If the current document is an attachment or duplicate spare, the parent that holds that attachment or duplicate spare will be outlined in gray.
- If you are working with multiple email threading sets, check that you have the correct one selected by clicking the Select Structured Analytics Set icon in the top right of the pane. For more information, see Selecting a different structured analytics set.
- If you re-run a set that includes email threading, the Viewer will temporarily hide email threading visualization results for that set. This prevents incomplete results from appearing. If you re-run all email threading sets in a workspace at the same time, the Viewer may temporarily show a message that no structured analytics sets are available.
When you navigate to other documents in the Viewer, the email thread visualization pane persists in its current state. Once opened, the pane remains open for documents which have also run through email threading. If you navigate to new email thread groups, the pane updates to reflect the current group. Navigating to any documents that have not been run through email threading closes the visualization pane.
Common icons and navigation
The visualization pane shows email threads from left to right, with the earliest emails in the thread group appearing on the left. Emails with Forward and Reply actions branch downward before a Reply All action. Email actions are illustrated with arrow icons in the lower left corner of the email icon. For more information on how email actions are shown, see Email Threading Display.
Loading documents from the visualization pane
Clicking on an email icon opens the parent email in the Viewer. If you hover over an email icon, a tooltip window displays with information about who the email is from, the sent date, and any attachments or duplicate spares. You can click on the attachment name or the name of the duplicate spare to open it in the Viewer. For more information, see Using the email icon hover tooltip.
If you navigate to a document within the current document list review queue (meaning, the set of documents that you have opened in the Viewer), then the document opens without refreshing the Viewer screen. If you navigate to an email that is outside of the current document list review queue (such as if you filtered the document list or opened the Viewer from search results), then a new review queue containing only the documents within the selected document's email thread group displays. From the new email thread group review queue, you can only navigate to emails within the same thread group. Click Return to review queue at the top left of the Viewer to return to your original document list review queue.
Navigation icons
The following basic navigation icons are displayed in the email thread visualization pane:
| Icon | Feature | Description |
|---|---|---|

|
Enable Mass Edit Selection | Click this button to enable selecting documents in the visual email thread, along with their duplicate spares or attachments. You can then mass edit the selected documents. See Mass editing using email thread visualization. |

|
Zoom Out and Zoom In controls | Click the plus or minus sign to zoom in or zoom out in your email thread visualization. See Using zoom controls. |

|
Reset Zoom | Click this icon to reset the zoom to its default state. See Using zoom controls. |

|
Collapse Legend / display option controls |
Click this icon to collapse the legend and display options for the email thread visualization pane. See Using the legend. |

|
Expand Legend / display option controls |
Click this icon to expand the legend and display options for the email thread visualization pane. See Using the legend. |

|
Select Structured Analytics Set | Click this icon to select a different email threading structured analytics set. |
Email type icons
Different email types are represented with the following icons:
| Icon | Email Type | Description |
|---|---|---|

|
Inclusive | Emails that are inclusive, non-duplicate spares are represented by black email icons. |

|
Not Inclusive | Emails that are not inclusive are represented by white email icons. |
 / /  |
Duplicate Spare and Other |
An email that has duplicate spares or non-duplicate spare emails that exist at the same location in a thread contain a double stacked email icon. These non-duplicate spare emails are grouped within an "Other Emails" section in the tooltip. The following scenarios are the most common causes of these emails not being marked as duplicate spares:
|

|
Missing |
Missing emails, some secured emails, and a few other cases are represented by a question mark icon.
Inserted confidentiality footers are a common cause of emails being marked as missing, because they change a previous thread segment. You can mitigate this by running email threading with a regular expression filter.
|
Message and file type icons
The Email Threading Display field includes the following file type icons:
| Icon | File Type | Description |
|---|---|---|

|
Send (or Other) | The start of an email thread. This is represented by a simple indentation square. |

|
Reply | The original file name begins with RE:. This is represented by an indentation square with a single left arrow. |

|
Reply All | A reply to all recipients. This is represented by an indentation square with a double left arrow. |

|
Forward |
The original file name begins with FW:. This is represented by an indentation square with a single right arrow. |

|
Draft | The email is a draft and not sent. This is represented by a pencil on the left of the square indentation square. |

|
Email contains one attachment | The file is an email containing a single attachment. This is represented by an indentation square with a single paper icon on the right. |

|
Email contains multiple attachments | The file is an email containing multiple attachments. This is represented by an indentation square with a double paper icon on the right. |
Attachments are documents included in your emails in the document set saved search.
When emails contain attachments:
- The document type determines the attachment's file type icon.
- The attachment’s file name that appears is based on the value in the attachment name field.
Using zoom controls
The visualization first renders in a best zoom state, respecting the particular email thread group size being rendered. You can zoom the visualization further in or out by using the Zoom In and Zoom Out controls in the header as well as by using your mouse's scroll button. Click the Reset Zoom circular arrow to restore the default zoom state.
Using the legend
When you view the email thread visualization for the first time during a session, a legend appears showing the meaning behind the different icons. You can collapse the legend if you want to see more of the visualization. If you collapse the legend, it will stay collapsed until you log out of Relativity.
The legend also contains a key to any coding highlights, as well as other display options that can be turned on or off. See Using coding highlighting.
Using the email icon hover tooltip
If you hover over an email icon, a tooltip displays information about who the email is from, the sent date, and any attachments or duplicate spares. You can click on an attachment name or the name of a duplicate spare to open it in the Viewer.
Sent Date and Email From fields are typically mapped for email threads when you run Structured Analytics email threading on documents. If you do not map these fields in your Structured Analytics profile, or if you do not use them in your workspace, the tooltip will use the derived values from the Analytics engine instead.
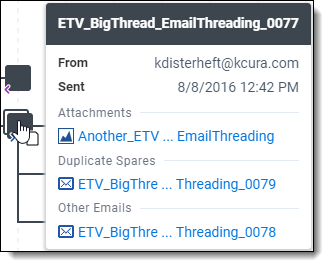
If there are multiple attachments or duplicate spares, you can click on the link displaying the number of documents to display a slideout window of the actual list.
The tooltip window will not display for you after clicking the Enable Mass Edit Selection icon and switching to selection mode.
Selecting a different structured analytics set
When you view a thread in the email thread visualization pane, you can choose to see results from any other email threading structured analytics sets. You can use this to view differences between sets that used different settings or saved searches.
To switch to viewing the thread in a different structured analytics set:
- Click the Select Structured Analytics Set icon.

- Select a structured analytics set from the drop-down menu.
The visualization pane updates to show the other set's results.
- To see a set in the drop-down menu, you must have security permissions for all necessary results fields for the set.
- If a displayed email thread is not in the selected structured analytics set, then the visualization pane displays a notification that the current document is not in the selected set.
Mass editing using email thread visualization
The email thread visualization tool can be used to code entire branches of emails quickly and visually. You can mass edit from the thread group related items pane or the visualization, and changes are reflected in real time.
To mass edit emails in a displayed thread:
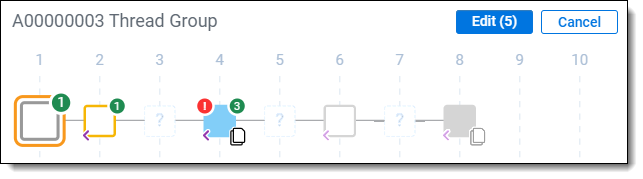
- Click the Enable Mass Edit Selection icon to go from navigation to selection mode.
The Edit and Cancel buttons appear. If you do not want to perform a mass edit, click Cancel to return to navigation mode. - While in selection mode, click on the emails you want to edit. This selects them for mass editing, including any parent or child attachments or duplicate spares that the icon represents. A green circle showing the number of items selected appears in the top right corner of the icon.
- The Edit button displays the total number of emails, attachments, and duplicate spares currently selected across the whole thread group.
- To select an entire branch of a thread, hold down the SHIFT key and click the first email in the branch, then the last email in the branch.
- Click the Edit button to launch the mass edit modal.
The mass edit modal displays options for coding the documents. - Make your coding changes for the selected emails, and then click Done.
The email thread visualization refreshes with the coding changes and restores the pane to navigation mode upon completion.
Using coding highlighting
Use coding highlighting to see how emails in the current thread are coded for a particular yes/no or single-choice field. The visual highlighting makes it easier to spot discrepancies, investigate coding mistakes, and make corrections. Coding for the selected field is reflected in real time.
To use coding highlighting:
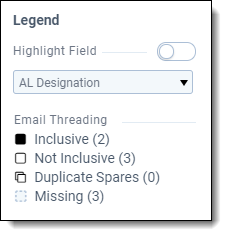
- Click to open the Display Options section of the legend, and then click on the Highlight Field switch to enable coding highlighting.
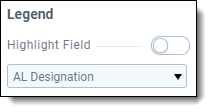
This enables the drop-down Coding Highlight field. To disable coding highlighting, click the switch again. - Select the field you want to highlight in the email thread visualization pane from the drop-down Coding Highlight field, such as Confidential Designation.
The emails in the thread are now highlighted with different colors corresponding to the available choices for the field.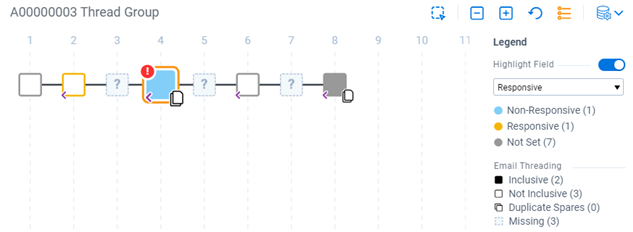
The Legend displays the choices associated with the selected field for the displayed email thread and assigns each choice a color. Coding highlighting for this field will remain as you navigate the email thread. Navigating to other email thread groups with the Coding Highlight enabled will update the legend with the choices coded for the new thread.
Coding highlighting considerations
When you use coding highlighting:
- You can hover over any email to view highlighted coding for duplicate spares or any attachments. For more information, see Using the email icon hover tooltip. Any email where the coding highlighting for its duplicate spares or attachments does not match displays a red exclamation point icon in the top left corner.

- Email thread visualization always shows the coding highlight for the primary document.
- Colors chosen for the highlighted field choices are assigned automatically. When a field choice is highlighted for the first time, a color is associated with that choice and will remain associated with that choice as you view coding highlight for other email thread groups. If you want to change the color that is associated with a choice, see Changing the color associated with a coding choice.
Changing the color associated with a coding choice
Colors are assigned as a field and its choices are being visualized in the Email Thread Visualization. The choices visualized are assigned colors in the order shown in the table below. As new choices on that same field are visualized, they are assigned the next color in the order shown.
|
Order |
Background Color |
Foreground Color |
|---|---|---|
|
1 |
|
#434548 (default) |
|
2 |
|
#434548 (default) |
|
3 |
|
#434548 (default) |
|
4 |
|
#434548 (default) |
|
5 |
|
#434548 (default) |
|
6 |
|
#434548 (default) |
|
7 |
|
#434548 (default) |
|
8 |
|
#434548 (default) |
|
9 |
|
#434548 (default) |
|
10 |
|
#434548 (default) |
As a Relativity system admin, you can update the colors that are assigned to specific coding field values.
To update the color mapped to a choice:
- Unlock the Relativity Color Map application. See
- Unhide the Color Map tab from the application console by clicking Edit next to the tab, then selecting the Visible flag.
- Navigate to the Color Map tab. A list of Yes/No and single choice fields and their field values appears.
- Select the choice that you want to update – Field Value is set to the ArtifactID of the choice.
- Edit the Background Color for the selected choice using the Edit mass operations.
- Use the table above to enter values for the Background Color, such as #43bdd6.
- See
- Re-hide the Color Map tab (optional), then re-lock the Color Map application.