


Feedback
Last date modified: 2026-Jul-14
Automated Workflows
Automated Workflows is a Relativity application that lets users automate tasks in workspaces that previously required manual actions to complete. With automated workflows, users specify a trigger that determines the conditions under which the automation begins as well as whether to run the automation automatically or manually.
Rather than the Automated Workflows application performing the specific task(s), it will send a message to the action you specified and the appropriate application will do the task on behalf of the user. With automated workflows, you can setup automation to reduce and even eliminate the need for users to complete actions in Relativity that previously required manual work. This saves you time and enables users to focus on other important tasks within your business. Additionally, once a workflow has been created, you can copy it to workspaces as needed without having to recreate it from scratch.
Automated workflow permissions
By default, a user must be assigned to a group that is selected as a Workspace Admin or assigned to the System Administrators group to run automated workflows.
A non-admin user cannot view, edit, delete, or add automated workflows without being granted those permissions by an admin user. Additionally, a non-admin user cannot edit or add dtSearch or search term reports actions if they do not have permissions for those objects.
If a user is granted the view automated workflows permissions, they can run actions such as Run Imaging Set even without the Imaging Set permissions.
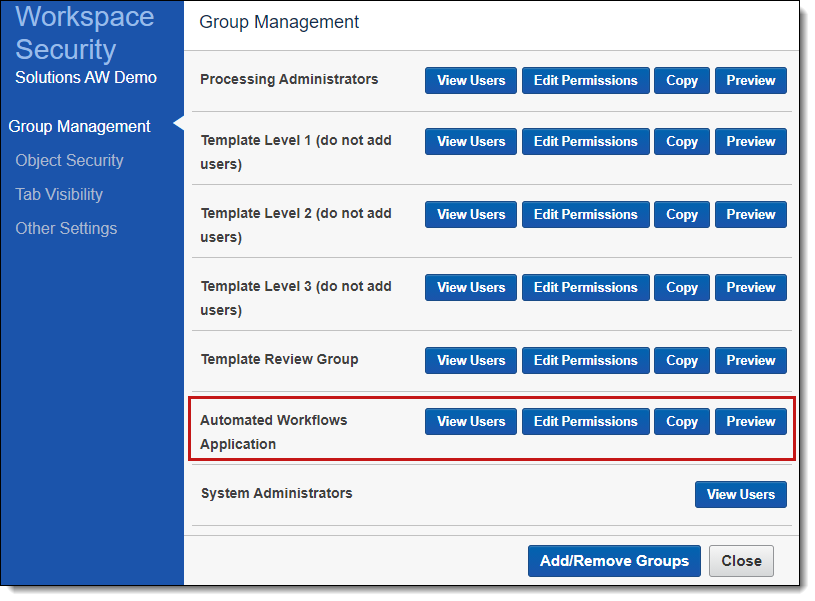
Automated workflows has a unique group and user that's required in your workspace for the application to function. The group and user will be added to the workspace during the application installation to the workspace from the Application Library. You do not need to modify, create, or delete this user and group for your users to access automated workflows. This is specifically created for the automated workflows applications' functionality.
Feature Permissions provide an alternative to Relativity's security management by shifting the focus from Object Types and Tab Visibility to feature-based permissions. This method is an alternative option. Any feature-specific permissions information already in this and other topics is still applicable. The Feature Permissions interface enables administrators to manage permissions at the feature level, offering a more intuitive experience. By viewing granular permissions associated with each feature, administrators can ensure comprehensive control, ultimately reducing complexity and minimizing errors. For details see Instance-level permissions and Workspace-level permissions .
The following permissions are required to use Automated Workflows:
| Object Security | Tab Visibility | Other Settings |
|---|---|---|
|
|
|
Automated workflow overview
An automated workflow typically consists of several components. Each workflow has a trigger which determines when an automated workflow begins. An automated workflow also contains one or more actions which determine what is automated in Relativity. This can include actions like automatically adding new documents that are imported to a dtSearch index or sending an email notification to you once a task in an automated workflow is complete.
The automated workflow components are described in more detail in the Triggers and Actions sections below.
Installation and workspace templates
Application Library installation
When Automated Workflows is available in your instance of RelativityOne, you can install the application to existing workspaces or workspace templates from the Application Library.
Workspace templates
When Automated Workflows is installed to a workspace template, any new workspaces that you create using that template will contain your current automated workflows. The following parts of a workflow are copied over, including:
- Name
- Description
- Active - Active/Inactive
- Trigger
- Actions
Cold Storage and Recycle Bin
If you have active workflows in a workspace and send it to Cold Storage, the workflows are automatically switched to inactive. If you take a workspace out of Cold Storage, we recommend manually updating each workflow first to ensure that they run successfully.
If a workspace is sent to the Recycle Bin, all workflows with the Scheduled Run trigger are set to inactive, however, workflows using any other trigger could still be set to active.
Automated Workflow thresholds
There is a maximum number of 10 active workflows in a workspace. You can create new, inactive workflows at any time, even if you have reached the maximum number of active workflows in a workspace. If you try to create a new workflow after reaching the maximum number of active workflows, you will receive a notification that the new workflow cannot be activated and it will be saved as inactive.
You can use the Total Automated Workflows in Instance script to view a report that displays the number of automated workflows in your instance and additional data such as each workflow's previous run date. To learn more, visit Total Automated Workflows in Instance.
Creating a new workflow
To create a new automated workflow, do the following:
- Navigate to the Automated Workflows tab.
- Click the New Automated Workflow button.
- Enter the required Name of your workflow in the Workflow Info section.
- Optionally, enter a Description of your workflow in the Workflow Info section.
- Enable the Active field if you would like to make the workflow you are creating active upon completion or disable it if you would like the workflow you are creating to be inactive upon completion.
An automated workflow cannot be manually started if Active is disabled.
- Select a trigger from the Select Trigger card. To learn more about the trigger options, see Triggers.
- Click the Add Action button to display the drop-down menu and select the desired action. To learn more about the action options, see Actions.
We recommend adding no more than 100 actions to an automated workflow to ensure high performance.
- Depending on which action you select, you may need to complete the remaining fields on the action card. To learn more about the additional fields, see Actions.
Each time you add a new action, clicking outside of the Action card saves any selections that you have made. To edit a previously created action, select the desired Action card and make any edits.
- If you would like to receive an email notification when this workflow's run concludes, consider using the Workflow Notification Settings options. The notification settings offer greater control over when you receive an email. To learn more, see Workflow Notification Settings.
- Depending on which action you select, you may need to complete the remaining fields on the action card. To learn more about the additional fields, see Actions.
- Repeat the previous step as many times as needed to create your automated workflow.
- Optionally, you can also add an action in between previously created actions by hovering your cursor in the space between the two actions and clicking the Add icon. Select the desired action from the drop-list to add it to the workflow and then complete the remaining fields as described in step 7.
- Once you have selected all of the actions for your workflow, click Save in the upper-center of the page and then click Activate in the pop-up.
- If you have the Active toggle enabled, your workflow will save with the automated workflow waiting for the trigger to begin automation.
- If you have the Active toggle disabled, your workflow will save but the automation will not be set up to run the actions you have selected until the workflow is made active.
Once a workflow is saved, the Last Run section appears below the Workflow Info section to help you track the progress of a workflow. After you successfully create a workflow, the Workflow Status appears as Pending. To learn more about the statuses that display in this section, see Automated Workflow Status.
Editing an existing workflow
An automated workflow must be inactive in order for a user to edit it. When attempting to edit an active workflow, you are prompted to make the workflow inactive before beginning the editing process.
To edit an existing automated workflow, do the following:
- Navigate to the Automated Workflows tab and click Edit in the row for the workflow you want to edit.
- If the workflow you are trying to edit is currently active, the Edit Active Workflow pop-up appears. Click Continue to make the workflow inactive and proceed with editing.
- Edit the fields in the Workflow Info section.
- Optionally, edit the trigger by clicking Change Trigger on the right-side of the card and then making your edit. To learn more about the trigger options, see Triggers.Clicking outside of the Trigger card will cause any edits you have made to save. Click Change Trigger at any time to resume editing the trigger.
- Optionally, edit an action by clicking on the Action card, opening a drop-down menu where you can make your edits. To learn more about the action options, see Actions.
Alternatively, click the X in the upper-right corner of the Action card to remove the action from the current automated workflow. - Optionally, you can also add an action in between previously created actions by hovering your cursor in the space between the two actions and clicking the Add icon. Select the desired action from the drop-list to add it to the workflow and then complete the remaining fields. For more information about the fields, see step 7 in Creating a new workflow.
- Once all edits have been made, click Save in the upper-center of the screen.
The edits made to the automated workflow are saved. Depending on the options selected, the automated workflow will either become active and wait for the trigger to begin automation or will be inactive until you choose to activate it.
Workflow Sync
After the creation of a workflow, you can copy it to other workspaces as desired. If you edit a workflow that was previously copied, you can also sync the workflow to bring those edits to any of the workspaces where the workflow was copied.
Copying a workflow to workspaces
Once a workflow has been created, you can copy it to one or more workspaces at a time.
The following is required to copy a workflow to another workspace:
- You must install the Automated Workflows application to each workspace you wish to copy a workflow to.
- The workspaces must also have the features that are used in the actions or the Other trigger of the copied workflow installed. For example, if the workflow you are copying has the Build dtSearch Index action then each workspace should have dtSearch installed.
- A user must have the following permissions: Copy to Workspaces, Automated Workflows - Add, and permission to access the workspace in each of the workspaces that they wish to use the copy workflow feature.
- The workflow cannot have already been copied to a workspace.
- A workspace should have the objects used in either the actions or the Other trigger of the workflow you are copying. For example, you created a workflow that has the Run Imaging Set action and the Native Documents imaging set selected. This workflow cannot be copied to other workspaces unless they also contain the Native Documents imaging set.
To copy a workflow to one or more workspaces:
- Navigate to the Automated Workflows tab.
- Select the workflow from the list that you wish to copy.
- Click Workflow Sync.
The Copy to Workspaces modal displays. - Filter as desired and select the workspaces you wish to copy the workflow to.
- Click the Move selected from left to right icon.If a workflow cannot be copied to a workspace, because of a dependency issue such as the workspace is missing an object, a message displays near the top of the modal. Click the Download details link to download a .csv file for more information on the dependency issues.
- Click Copy.
A Copy to workspaces in progress bar displays on the workflow to help you track its completion. To cancel the copy to workspaces job, click the Cancel Copy to workspaces link.
Once the job is done, the workflow is copied to the selected workspaces. An email is sent to the user that provides additional information on the results of the workflow copy action.If the workflow cannot be copied to a workspace, that workspace is skipped, and the workflow is copied to the remaining workspaces. Additionally, a message displays providing more detail on why the copy action could not be completed for one or more workspaces.
Sync a workflow to workspaces
Once a workflow has been copied to workspaces, you can edit the workflow and then bring those changes to the workspaces where the workflow was previously copied. This makes it easy to maintain a uniform workflow across many different workspaces.
The following is required to sync a workflow with other workspaces:
- A workspace should have the objects used in either the actions or the Other trigger of the workflow you are syncing. For example, you created a workflow that has the Run Imaging Set action and the Native Documents imaging set selected. This workflow cannot be synced to other workspaces unless they also contain the Native Documents imaging set.
- A user must have the following permissions: Sync to Workspaces, Automated Workflows - Add, and permission to access the workspace in each of the workspaces that they wish to use the copy workflow feature.
To sync edits in a workflow to one or more workspaces:
- Navigate to the Automated Workflows tab.
- Select the workflow from the list that you wish to copy.
- Click Workflow Sync.
The Copy to Workspaces modal displays. - Click on the Sync to workspaces tab.
- Select the workspaces you wish to sync the workflow with. Only workspaces that contain the copied workflow will display in the list.
- Click the Move selected from left to right icon.If a workflow cannot be synced to a workspace, because of a dependency issue such as the workspace is missing an object, a message displays near the top of the modal. Click the Download details link to download a .csv file for more information on the dependency issues.
- Click Sync.
A Sync to workspaces in progress bar displays on the workflow to help you track its completion. To cancel the sync to workspaces job, click the Cancel Sync to workspaces link.
Once the job is done, the workflow is synced with the selected workspaces. An email is sent to the user that provides additional information on the results of the workflow sync action.If the workflow cannot be synced with a workspace, that workspace is skipped, and the workflow is synced with the remaining workspaces. Additionally, a message displays providing more detail on why the sync action could not be completed for one or more workspaces.
Template Workflow
You can designate a workflow as a Template Workflow to signify that the workflow is linked to other identical workflows in your instance. You can then leverage Workflow Sync to push updates from the Template Workflow to the identical, linked workflows.
If there is not a designated Template Workflow, the Template Workflow field will be set to Yes in the following scenarios automatically:
- During new workspace creation from a template workspace, if there are automated workflows in the template workspace.
- During a Copy to Workspace operation using Workflow Sync.
To change the Template Workflow:
- Navigate to the Automated Workflows tab.
- Select the workflow you would like to set as the Template Workflow.
- Click Edit.
- Optionally, if the Edit Active Workflow modal displays, click Continue.
- Enable the Template Workflow field.
- Click Save.
- Click Continue in the Save Automated Workflow modal.
A job runs to update the links of all the existing child workflows in the instance to the selected Template Workflow. Once that job completes, the selected workflow is now the Template Workflow.When promoting an existing workflow as the new Template Workflow, it will automatically update all linked workflows to recognize the new parent template. However, this does not automatically sync any changes on the template. Run the Workflow Sync job to promote any changes to the linked workflows.
Triggers
The following triggers are available in an automated workflow.
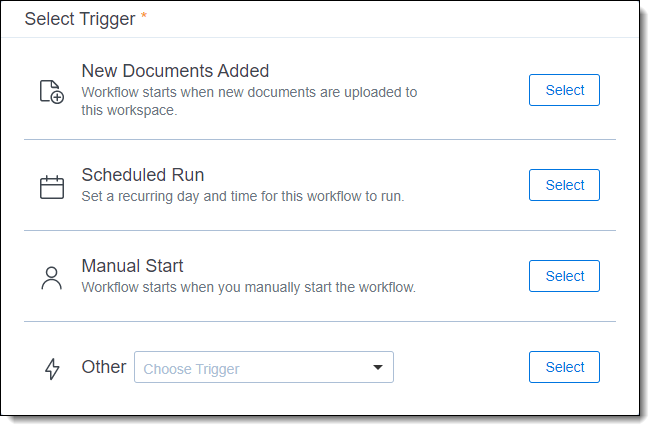
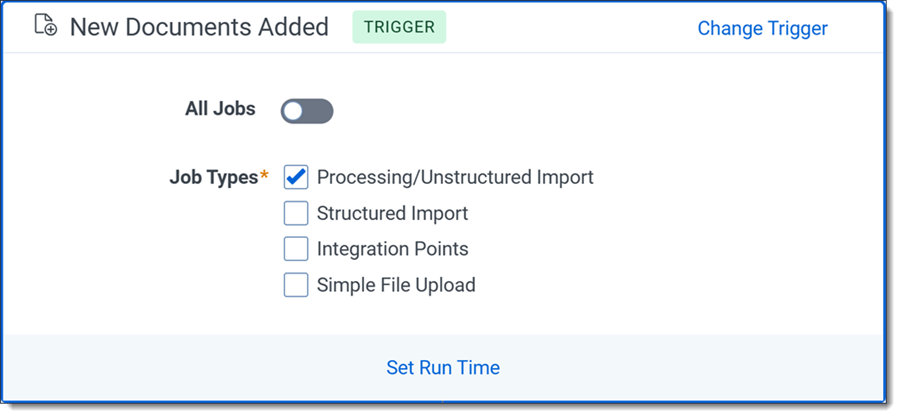
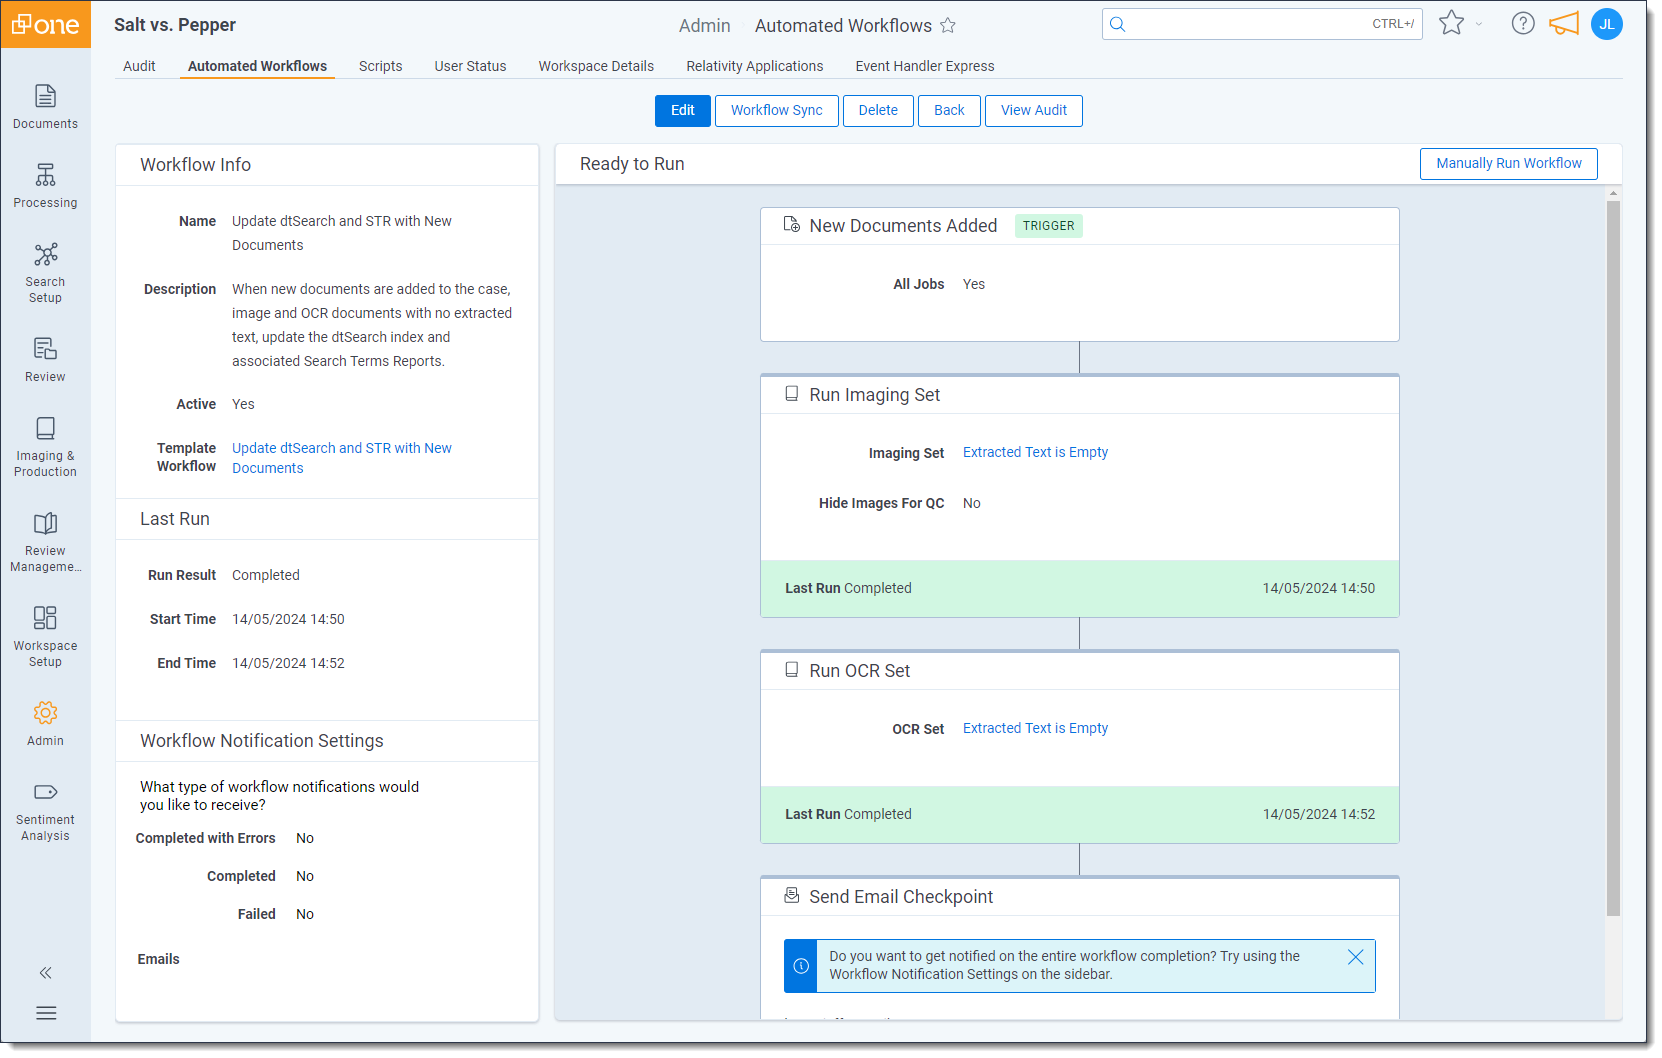
- New Documents Added - if this trigger is selected, when a new document is added to the workspace, the automated workflow will start once receiving the documents is completed from the supported import methods.
Optionally, to select a later time for this workflow to run, click Set Run Time and select a Time Range and Time Zone. For example, you can use this option to set a Time Range of 9:00 PM to 5:00 AM so that the automated workflow runs during your business's off-hours.If you overlay documents into your workspace, the automated workflow runs an incremental build on the search index(es) you have selected. You must navigate to the search index you have selected for automation and perform a full build to apply the changes made to the documents.The following are supported import methods: - Scheduled Run - select this trigger to create a pattern or schedule that determines when this automated workflow begins a run. You can create a scheduled run based on a weekly, daily, or hourly cadence and the fields needed to setup the schedule vary depending on which Run option you choose. The fields that display when each Run option is selected are described below:
- Daily - Select to run this automated workflow as often as once a day or as infrequently as once a year.
- Every - Enter a number to determine how frequently this automated workflow will run on a daily basis. You can enter a value between 1 and 365 for this field. For example, entering a value of 1 will cause this automated workflow to run once every day, whereas, entering a value of 7 will cause this automated workflow to run once every seven days.If you select the 30 minutes option, the workflow will run for the first time during the next hour at the 30 minute mark and not when 30 minutes have passed. For example, if it is 9:59 AM, the first run will occur at 10:30 AM but if it is 10:01 AM then the first run will occur at 11:30 AM.
- Skip weekends - If enabled, an automated workflow will not run on Saturday or Sunday even if a workflow is scheduled during that time. For example, if you have an automated workflow that is scheduled to run every two days starting on Tuesday with the Skip weekends option enabled, the workflow will run on Tuesday and Thursday, but skip Sunday.
- Start Time - Enter a value in the hours:minutes format or the hh:mm tt (AM/PM) format to determine what time the automated workflow will begin. You cannot enter more than 24:00 for this value.
- Time Zone - Select the desired time zone from the drop-down menu to determine when the automated workflow will begin.
- Every - Enter a number to determine how frequently this automated workflow will run on a daily basis. You can enter a value between 1 and 365 for this field. For example, entering a value of 1 will cause this automated workflow to run once every day, whereas, entering a value of 7 will cause this automated workflow to run once every seven days.
- Hourly - Select to run the automated workflow as frequently as every 30 minutes or as infrequently as every 12 hours.
- Every - Select an interval option from the drop-down menu to determine how much time passes between each automated workflow run.
- Skip weekends - If enabled, an automated workflow will not run on Saturday or Sunday even if a workflow is scheduled during that time.
- Time Zone - Select the desired time zone from the drop-down menu to determine when the automated workflow will begin.
- Every - Select an interval option from the drop-down menu to determine how much time passes between each automated workflow run.
- Weekly - Select to run the automated workflow as frequently as once a week on a specific day or set of days or to run as infrequently as once a year.
- Every - Enter a number to determine how often this automated workflow will run on a weekly basis. You can enter a value between 1 and 52. For example, if you enter 3 in this field, the automated workflow will run every three weeks.
- On - Click on the desired icon(s) to determine which day of the week this automated workflow will run. You can select multiples days in a week if you would like the automated workflow to run on several days in a given week.
- Start Time - Enter a value in the hours:minutes format or the hh:mm tt (AM/PM) format to determine what time the automated workflow will begin for the specified day or days. You cannot enter more than 24 for this value.
- Time Zone - Select the desired time zone from the drop-down menu to determine when the automated workflow will begin.
- Daily - Select to run this automated workflow as often as once a day or as infrequently as once a year.
- Manual Start - Select this trigger to make it so the workflow can only be started by clicking the Manual Run button. This option is recommended for users that require more control over a workflow.This is useful for a workflow that requires data clean up or sign-off from a stakeholder before running the other actions. For example, if missing extracted text in documents need to be identified and inserted prior to running your dtSearch index build.
- Other - Select this trigger and the desired supported action in the drop-down menu to base the start of the workflow's run on the completion of the selected action. The supported actions are described in the table below. The workflow will run whether the supported action is completed by a user manually or completed automatically by another automated workflow.
Optionally, to select a later time for this workflow to run, click Set Run Time and select a Time Range and Time Zone. For example, you can use this option to set a Time Range of 9:00 PM to 5:00 AM so that the automated workflow runs during your business's off-hours.You cannot select an object for an action that is the same as the one selected for the trigger in this workflow to prevent it from running infinitely.Name Description On OCR Set Completed Select this option to start the workflow's run after an OCR Set action finishes. On Imaging Set Completed Select this option to start the workflow's run once imaging is complete. On dtSearch Index Build Completed Select this option to start follow-up actions after a dtSearch index build completes. On Structured Analytics Set Completed Select this option to start follow-up actions when a Structured Analytics set finishes. On Translate Job Completed Select this option to start the workflow's run when a Translate job finishes for either single or multiple documents. On Search Terms Report Run Completed Select this option to start subsequent actions after a Search Terms Report has finished running.
Actions
The following actions are available in an automated workflow.
- Run Analytics Index - select this action and do the following to automate an Analytics index build:
- Select an index from the Analytics Index drop-down menu. To learn more, see Analytics indexes.
- Update only new documents is enabled by default. When enabled, only new documents are included in the Analytics index build. This is the equivalent of running the index with an incremental population. Optionally, you can disable this to include all documents in the Analytics index build, which is the equivalent of a full population.
If you want to run more than one Analytics index in your automated workflow, select an additional action, select the Run Analytics Index action, and then select the additional index to run. Repeat this process until all Analytics indexes have been added to the workflow.- When automating the build of an index, we recommend adding a Run Structured Analytics Set action to your workflow before the Run Analytics Index action. Make sure the structured analytics set selected is configured to identify repeated content. Once the structured analytics set has finished creating repeated content filters, the Analytics index will automatically link to them. For more information, see Automatically linking repeated content filters.
- Run Structured Analytics Set - select this action and do the following to automate a structured analytics set build:
- Select a set from the Structured Analytics Set drop-down menu. To learn more, see Running Structured Analytics.
- Update only new documents is enabled by default. When enabled, only new documents are included in the results of the structured analytics set build. Optionally, you can disable this option to include all documents in the structured analytics set build.
If you want to run more than one structured analytics set in your automated workflow, select an additional action, select the Run Structured Analytics Set action, and then select the additional set to run. Repeat this process until all structured analytics sets have been added to the workflow.
- Run Contracts Analysis - The Contracts application is required to view and select this option.
- Run Contracts OCR - The Contracts application is required to view and select this option. Each document in the Contracts OCR Set should be imaged before a Contract OCR build begins. The Contracts Extracted Text field must also be empty. Contracts does not run OCR on all documents that have this field already populated.
- Run Set Long Text Field Size - select this action and complete the following fields to calculate the long text size and save that value in a decimal field for each document in the selected saved search.
- Saved Search - Select an option to calculate the long text size for each document in the public saved search.If you select a saved search that is not public, the workflow fails to run. If this occurs, you can edit the saved search, select Public for the Owner field, and then run the workflow again to resolve the error.
- Long Text Field - Select the field this workflow uses to calculate long text size.
- Decimal Field (KB) - Select the field this workflow uses to store the calculated long text size.
- Saved Search - Select an option to calculate the long text size for each document in the public saved search.
- Run Import/Export from Staging – The Import/Export application must be installed to view or select this option. Select this action and then select an Import/Export job from the Job Name drop-down menu to automate scheduled runs using Staging as the source or target. Only jobs configured with Staging and created after August 15, 2025 can be selected. Scheduled runs inherit parent job settings and write or read exclusively to or from Staging.
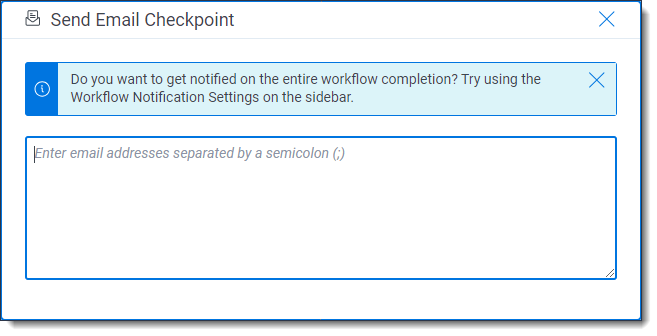
- Send Email Checkpoint - select this action and enter the email address of yourself or a user that you wish to be notified when the automated workflow runs, completes an action, or when the workflow completes depending on the order of this email action. Enter the following format: yourname@emaildomain.com. Separate multiple email addresses with a semi-colon delimiter.If you wish to receive an email in the middle of an automated workflow after the completion of a specific action, select Send Email directly after that action.
- Run Imaging Set - select this action to convert a group of documents to images using an imaging set and profile. To learn more, visit Imaging. After selecting Run Imaging Set, complete the following fields:
- Imaging Set - select the desired imaging set to determine which documents are imaged using the associated imaging profile. To learn more, visit Imaging sets.If an imaging set action initiated by Automated Workflows contains documents with unsupported file types, these will automatically be skipped. Users must run the imaging set manually if they would like to retry documents with an unsupported file type. Documents with other error types, such as timeout errors or password protected files are not excluded and will be retried when initiated by Automated Workflows. This prevents repeated processing of documents that cannot be imaged successfully without manual intervention.
- Hide Images For QC - If enabled, this option prevents users without sufficient permissions from viewing the document images in the selected Imaging Set.
- Imaging Set - select the desired imaging set to determine which documents are imaged using the associated imaging profile. To learn more, visit Imaging sets.
- Run OCR Set - select this action to translate images of text, such as scanned and redacted documents, into actual text characters for each document in a saved search. To learn more, visit OCR. After selecting Run OCR Set, complete the following field:
- OCR Set - select the desired OCR Set from the drop-down menu. The OCR Set you select will determine which saved search is used for this action.OCR Sets that utilize a production are not available for Automated Workflows.
- OCR Set - select the desired OCR Set from the drop-down menu. The OCR Set you select will determine which saved search is used for this action.
- Run PDF Set - select this action and then select an option from the PDF Set drop-down menu to create stored PDFs for each document in a saved search. Running this action will not override any existing PDFs for documents even if the PDF profile chosen has that setting enabled. To learn more about PDF Sets, see PDF Sets.If the selected PDF Set includes more than 100,000 documents, consider splitting it into smaller sets or adjusting the instance limit to avoid errors.
- Build Elasticsearch index - select this action and then an option from the Index drop-down menu to automate an incremental Elasticsearch index build. An Elasticsearch index can be used to search short message data. To learn more, see Building a short message search index.The Search AI application must be installed to use this action. For more information, including installation instructions, see Building a short message search index.
- Build dtSearch index - select this action and do the following to automate a dtSearch index build:
- Select an index from the Index drop-down menu. To learn more, see dtSearch.
- Update only new documents is enabled by default. If enabled, a full build will be completed the first time this index is built and any builds after the first will be incremental. Only new documents will be included in incremental builds. If this option is disabled, there will be a full build of this index each time the workflow is run.
If you want to run more than one dtSearch index in your automated workflow, select an additional action, select the Build dtSearch index action, and then select the additional index to run. Repeat this process until all Analytics indexes have been added to the workflow.
- Run Search Terms Report - select this action and then search terms report from the Report drop-down menu to automate running a search terms report. To learn more, see Search terms reports.
If you want to run more than one search terms report in your workflow, select an additional action, select the Run Search Terms Report action, and then select the additional search terms report to run. Repeat this process until all search terms reports have been added to the workflow.
Canceling a workflow
When an automated workflow is running, you can click the Cancel Workflow button in the Workflow Status section of an automated workflow to begin the cancellation process. Once the button is clicked, the workflow is canceled once the currently running task is completed or in other words, the cancellation of an automated workflow does not cancel an action that is currently in progress.
In order to cancel an action that's already in progress, you must navigate to that particular actions object and cancel the job from there. For example, if the automated workflow is building a dtSearch index build but the search terms report action has a Pending status, clicking the Cancel Workflow button will ensure the search terms report will not run. If you wish to cancel the dtSearch index build, navigate to the Search Indexes tab, identify the dtSearch index build that is running, and cancel from the dtSearch index build page.
Automated workflow status
The Last Run section provides information regarding your workflow. It can help you see whether or not a workflow is running, the previous status of the workflow, the last time the workflow ran, and if the workflow is in progress, you can view the start time and how long the workflow has been executing for.
A description of each field and the various statuses you might see in this section are detailed below.
- Run Result - Displays the status of previous run for each action at the bottom of the card. The following statuses display:
- Completed - the status of the action once it has successfully completed.
- Completed with Errors - the status when an action has completed but with at least one error. Any action resulting in a Completed with Errors status will cause the workflow to move on to the next action and the workflow will continue running until complete.
- Failed - the status when an action that resulted in an error has been completed and the workflow could not continue to the next step. Any action in the automated workflow that results in a Failed status will stop the workflow from continuing.
- Canceled - the status when a user has canceled the workflow from progressing further.
- Start Time - the date and time of when the automated workflow began.
- End Time - the date and time of the last time the automated workflow completed.
Once you start an automated workflow, additional information about the run displays above the trigger and action cards.
- Workflow Status - the overall status of the automated workflow displays in the upper-right. The following statuses can display for this field:
- Creating Workflow - the status after saving either a new workflow or editing an existing workflow.
- Creation Failed - the status after unsuccessfully trying to create a new workflow. This status also displays if you edited a workflow and it cannot be saved.
- Queued - the status for a workflow that has been started but is waiting for resources because there are too many workflows already running in the instance. The workflow will begin once the resources are available.
- Ready to Run - the status of a workflow after it is successfully created and ready to start. This status also displays after a workflow has been completed to indicate that it is ready to be run again.
- In Progress - the status of a workflow once it has started.
- Start Time - the time and date that the automated workflow started.
- Time Elapsed - the total time running the current automated workflow is taking or displays the amount of time that the most recently completed automated workflow took.
Workflow Notification Settings
The Workflow Notification Settings offer greater control over when you receive email notifications about a workflow's run. For example, you can choose to only receive notifications when a workflow run ends in failure so that you can promptly troubleshoot it.
You can edit workflows that were created before this feature's release to add the desired notification settings. If you have a template workflow, you can use the Copy to Workspaces feature to propagate the notification settings to multiple workflows at once. To learn more about Copy to Workspaces, see Copying a workflow to workspaces.
The following notifications sections are available in this section:
- Completed with Errors - enable this option and enter one or more email addresses separated by a semicolon in the textbox to receive an email notification whenever this workflow completes a run with errors.
- Completed - enable this option and enter one or more email addresses separated by a semicolon in the textbox to receive an email notification whenever this workflow completes a run successfully.
- Failed - enable this option and enter one or more email addresses separated by a semicolon in the textbox to receive an email notification whenever this workflow fails to complete a run.
Viewing audit information
You can view information that details previous runs of a specific automated workflow or identify changes that were made to a workflow by clicking the View Audit button. This will bring up a pop-up window with the Relativity audits on your automated workflow. From this window, you can view when the automated workflow ran, additional details on the status of a particular action in your workflow, and see which users have made edits to the workflow's settings.
Error handling and troubleshooting
Failure saving an automated workflow
In the event there is a failure when saving the workflow, the workflow will be set to an Inactive status. The objects and settings will be saved, but the automation will not be in place. To attempt to resolve the failure, edit and then save the workflow to initiate the automated workflow creation step again. For more information, see Creating a new workflow.
Action resulting in Completed with Errors
When an action results in the Completed with Errors status, the workflow can be re-run via the Manually Run Workflow button. You can also resolve the issue on the object itself.
If you have multiple actions that take place after the action that Completed with Errors. You can create a separate automated workflow to re-run those steps or press the Manually Run Workflow button to restart the workflow. Keep in mind, that this will also start the action you just resolved over again.
Action resulting in Failed
When an action results in the Failed status, the workflow can be re-run via the Manually Run Workflow button. You can also resolve the issue on the object itself.
If you have multiple actions that take place after the action that Failed. You can create a separate Automated Workflow to re-run those steps or press the Manually Run Workflow button to restart the workflow. Keep in mind, that this will also start the action you just resolved over again.