


Feedback
Last date modified: 2026-Mar-02
Prompt Criteria validation in Review Center
When you validate aiR for Review Prompt Criteria, the validation process compares aiR for Review's AI-based relevance predictions to human coding decisions. Review Center calculates the validation statistics and helps you organize, track, and manage the human side of the coding process.
See these related pages:
- aiR for Review prompt criteria validation
- Setting up aiR for Review prompt criteria validation
- Reviewing documents using Review Center
How Review Center fits into the validation process
When you create a validation set, there are several steps that cross between aiR for Review and Review Center:
- Set up the validation sample—choose the sample size, settings, and desired margin of error for the validation statistics.
- Run aiR for Review on the sample—this creates the relevance predictions that will be used for comparison.
- Code the sample using skilled human reviewers—this records human coding decisions for comparison to the AI predictions. For the sake of validation, these are considered the "correct" decisions.
- Review the validation statistics—these statistics measure any differences between the AI predictions and the human decisions. It also measures what percentage of the overall document set is likely relevant.
- Accept or reject the results—this either confirms the Prompt Criteria as effective for use with a larger document set, or it returns you to the aiR for Review dashboard for editing and improvement.
- Apply or improve the Prompt Criteria—return to aiR for Review to either run the Prompt Criteria on larger sets of documents, or to improve the Prompt Criteria and try again.
During validation, steps 3 through 5 take place in Review Center. For information on the other steps, see Setting up aiR for Review prompt criteria validation.
For a general overview, see aiR for Review prompt criteria validation.
Managing the coding process
After you create the Prompt Criteria validation queue, the coding process is similar to any other validation queue in Review Center. Reviewers code documents using the Review Queues tab, and administrators track and manage the queue through the main Review Center tab.
Administering the queue
As coding progresses, the Review Center dashboard displays metrics and controls related to queue progress. The main validation statistics will not appear until all documents have been coded and the validation process is complete. From the dashboard, the queue administrator can pause or cancel the queue, view coding progress, and edit some settings.
- For information on the Review Center dashboard, see Monitoring a Review Center queue.
- For information on validation queue settings, see Monitoring a validation queue.
The statistics produced during Prompt Criteria validation are similar to the ones produced for a regular Review Center queue, but not identical. For more information, see Prompt Criteria validation statistics.
Coding in the queue
Reviewers access the validation queue from the Review Queues tab like all other queues.
During review:
- Have reviewers code documents from the sample until all documents have been served up.
- Sample documents that are coded outside the Review Queues tab will still count towards the validation statistics, but they might not be reflected in dashboard charts and tables.
- We strongly recommend coding every document in the validation queue. Skipping documents lowers the accuracy of the validation statistics.
For full reviewer instructions, see Reviewing documents using Review Center.
Validation does not check for human error. We recommend that you conduct your own quality checks to make sure reviewers are coding consistently.
Reviewing validation statistics
When reviewers have finished coding all the documents in the queue, review the validation statistics. You can use these to determine whether to accept the validation results, or reject them and try again with a different set of Prompt Criteria. You can also see how these statistics change based on the cutoff score you select.
The statistics for Prompt Criteria validation include:
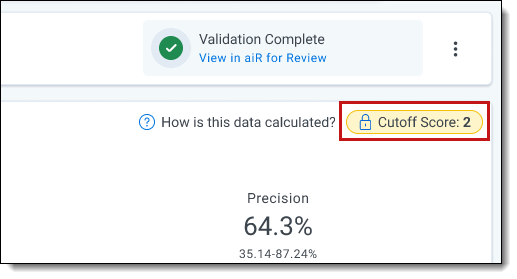
- Elusion rate—the percentage of documents that aiR predicted as non-relevant, but that were actually relevant.
- Precision—the percentage of documents that aiR predicted as relevant that were truly relevant.
- Recall—the percentage of truly relevant documents that were found using the current Prompt Criteria.
- Richness—the percentage of relevant documents across the entire document set.
- Error rate—the percentage of documents that received errors in aiR for Review.
You can click on each statistic in the dashboard to see how it was calculated. The ranges listed below each statistic apply the margin of error.
The exact criteria for whether to accept or reject may vary depending on your situation, but the goal is to have the AI predictions match the decisions of the human reviewers as closely as possible. In general, look for a low elusion rate and high recall.
For more information on how the statistics are calculated, see Prompt Criteria validation statistics.
Choosing a cutoff score
At the top of the Validation Stats panel, a slider appears for adjusting the cutoff score. This is the aiR score that Review Center uses as the dividing line between positive and negative document predictions.

By default, the cutoff score is set at 2 (Borderline Relevant). This means that aiR document scores of 2 or higher are counted as positive predictions, and lower scores are counted as negative. If you change the slider to 3 (Relevant), the statistics will update to count only scores of 3 or higher as positive. You can set the slider to any value between 1 and 4. You can also change the cutoff score as many times as you want before accepting or rejecting results. Each time you move the slider, the validation statistics update to reflect the new cutoff.
The most commonly used cutoffs are 2 (Borderline Relevant) and 3 (Relevant).
When you accept the validation results, the chosen cutoff score becomes permanent. The final cutoff score appears in the upper right corner of the Validation Stats panel.
For more information on how the cutoff score affects the statistics, see How documents are categorized for calculations.
Accepting or rejecting results
When the human coding decisions are complete, you can review how effectively the AI matched human decisions, then decide whether to accept the results and use the Prompt Criteria as-is, or whether to reject the results and improve the Prompt Criteria.
After all documents in the validation queue have been reviewed, a ribbon appears underneath the Queue Summary section. This ribbon has two buttons: one to accept the validation results, and one to reject them.
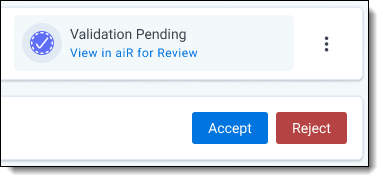
If you click Accept:
- The cutoff score you selected becomes permanent for the queue. For more information, see Choosing a cutoff score.
- In aiR for Review, you can no longer create new Develop sets.
- The queue status changes to Validation Complete.
If you click Reject:
- In aiR for Review, you can create a new Develop set.
- The queue status changes to Rejected.
After you make the choice, the Validation Progress strip on the dashboard displays the final validation statistics and a link back to the aiR for Review project. From there, you can either use the finalized Prompt Criteria on a larger document set, or create a new Develop set, edit the Prompt Criteria, and continue improving it.
For information on continuing work in the aiR for Review tab, see Setting up aiR for Review prompt criteria validation.
If you reject this validation, you can run validation again later. Even if you reject the results, Review Center keeps a record of them. For more information, see Viewing results for previous validation queues.
Manually rejecting validation results
If you change your mind after accepting the validation results, you can still reject them manually.
To reject the results after accepting them:
- On the right side of the Queue Summary section, click on the three-dot menu and select Reject Validation.
- Click Reject.
After you have rejected the validation results, you can resume normal reviews in the main queue.
Viewing results for previous validation queues
After you have run validation, you can switch back and forth between viewing the statistics for the current validation attempt and any previous validation queues that were completed or rejected. These queues are considered linked. Viewing the statistics for linked queues does not affect which queue is active or interrupt reviewers.
To view linked queues:
- Click the triangle symbol near the right side of the Queue Summary section.

A drop-down menu listing all linked queues appears. - Select the queue whose stats you want to view.
When you're done viewing the linked queue's stats, you can use the same drop-down menu to select the main queue or other linked queues.
How changes affect the validation results
The validation process assumes that the Prompt Criteria, document set, and coding decisions will all remain the same. If any of these things change, the validation results will also change. Sometimes this can be solved by recalculating the validation statistics, but often it means creating a new validation queue.
Scenarios that require recalculation
The following scenarios can be fixed by recalculating statistics:
- Changing coding decisions on documents within the validation sample
- Re-running aiR for Review to fix errored documents
In these cases, the sample itself is still valid, but the numbers have changed. For these situations, recalculate the validation results to see accurate statistics. For instructions on how to recalculate results, see Recalculating validation results.
Scenarios that require a new validation queue
The following scenarios require a new validation queue:
- Changing the Prompt Criteria
- Adding or removing documents from the document set after validation starts
In these cases, the sample or the criteria themselves have changed, so recalculating does not help. For these situations, create a new validation queue.
Recalculating validation results
If you have re-coded any documents from the validation sample, you can recalculate the results without having to re-run validation. For example, if reviewers had initially skipped documents in the sample or coded them as non-relevant, you can re-code those documents outside the queue, then recalculate the validation results to include the new coding decisions.
When Review Center detects that documents have been coded outside the queue and it's ready for completion, a banner appears with a button to calculate statistics. You can also manually recalculate them at any time.
To recalculate validation results:
- On the right side of the Queue Summary section, click on the three-dot menu and select Recalculate Validation.
- Click Recalculate.