


Feedback
Last date modified: 2026-Mar-03
Users
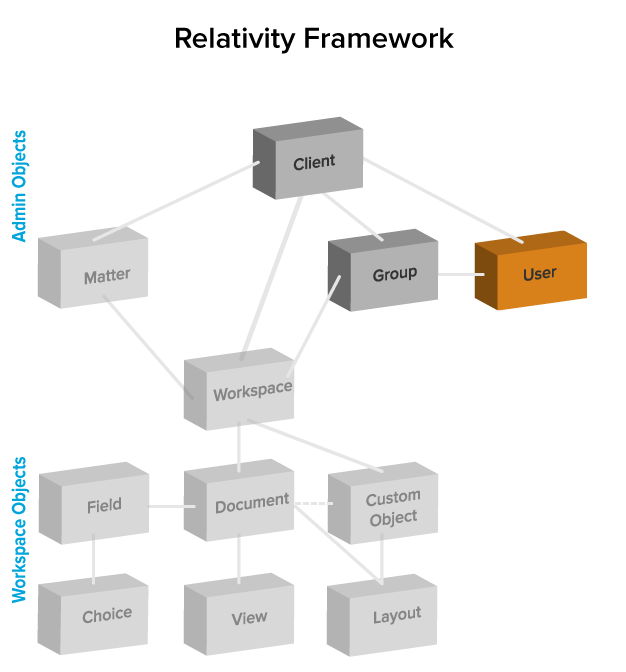
Users are individuals who have access to the Relativity environment. You create users and add them to groups, which are then associated with workspaces. Users are also directly associated to clients. This diagram illustrates how clients, groups, and workspaces relate to users.
Visit Relativity Learning to explore additional learning opportunities for this topic.
User status
You can view information about users currently logged in to Relativity from the User Status tab, which is available from within any workspace or from Home. Whether or not you're in a workspace determines the functionality and information available on the User Status tab as follows:
- Home - the tab lists users currently logged in to Relativity. You can send web page messages and email messages to users listed on the tab. You can also force the log out of these users from the system.
- Within a workspace - the tab lists the subset of users accessing the current workspace. You can send web page messages and email messages to users listed on the tab.
Creating and editing a user
To create a new user, follow this procedure:
- Navigate to the Users tab.
- Click the New User button in the upper-left. To edit an existing user, click the
 icon next to their name.
 - Complete the fields on the form. See Fields.
- Click Save.
Once you have created users, you can assign them to groups. When you add or remove users from a group, Relativity will execute a job and send you an email notification once it's completed. In case of an error, the email will contain a link that you can use to retry the job. Please note that to use the retry link, you need to be logged into Relativity. Additionally, you can find the retry link in the Errors tab.
The (Admin) Errors tab has been permanently removed from RelativityOne, and the ability to read errors through the API has been disabled. Job-specific errors are now addressable directly within your workspaces. For more information, see Errors tab deprecation.
You can preview the security settings of any workspace available for a user by clicking Preview Security.
Adding a user log-in type
Relativity supports several authentication and log-in methods. You must assign the user at least one of these types in order for them to log-in.
See the following pages:
- Managing users authentication methods - for procedures to add individual authentication methods to a users.
- Authentication - for a general overview of the authentication system.
Fields
The User Information section fields are:
- First Name - the user’s first name. This field must be between 1 and 50 characters.
- Last Name - the user’s last name. This field must be between 1 and 50 characters. The system displays a user as <last name>, <first name>.
- Email - the user’s email address. While the system won't validate this information, you must enter it in the following format: name@domain.extension. Relativity users can have the same first and last name, but the email address must be unique.
- Organization Type - specifies the type of organization the user belongs to. Assign the organization type that best describes the user’s organization, such as corporation, law firm, or government.
- Title - the user’s title. You may assign a title that accurately reflects the user’s role within their organization. Doing so provides clarity on the types of users engaged in your projects and supports the customization of educational materials and training programs. If Organization Type is selected, you must select a choice for Title.
Pre-defined values for User Title:Assigning a title is for informational purposes only. It does not affect user permissions, security settings, or any other authorization within Relativity. Organization Type - Corporate
Title - Contract Lawyer
- General Counsel
- IT/Security
- Legal Counsel/AGC/In-House Counsel (eDiscovery)
- Legal Counsel/AGC/In-House Counsel (Employment)
- Legal Counsel/AGC/In-House Counsel (Litigation)
- Legal Counsel/AGC/In-House Counsel (Regulatory)
- Legal Counsel/AGC/In-House Counsel (Transactional/Corporate/Commercial)
- Legal Operations
- Lit Support/eDiscovery Director
- Paralegal/Legal Assistant
Organization Type - Law FirmTitle - Barrister
- eDiscovery Lawyer
- IT/Security
- Lit Support/eDiscovery Director
- Litigator-Associate
- Litigator-Counsel
- Litigator-Partner/Practice Partner
- Litigator-Solicitor
- Paralegal/Legal Assistant
- Project Manager
- Reviewer/Contract Attorney/Contract Lawyer
- Transactional/Corporate Lawyer
Organization Type - OtherTitle - Academic Professor
- Consultant/Expert
- Cyber security/Forensics
- Other
- Student
Organization Type - Public SectorTitle - Attorney/Staff Attorney/Lawyer
- Director
- IT/Security
- Lit Support/eDiscovery Director
- Paralegal/Legal Assistant
- Project Manager
- Reviewer/Contract Lawyer/Contract Attorney
- Special Litigation Counsel
Organization Type - Service ProviderTitle - Administrator
- Cyber Security/Forensics
- IT/Security
- Project Manager
- Reviewer/Contract Lawyer/Contract Attorney
- Type - the user type. The default values are internal or external, but you can add any type value. Type is for reference purposes only and has no impact on access or billing.
- Client - the client associated with the user. Click Select to choose from available clients. Items on the selected client list are set by a system view. It's possible you'll see only a sub-set of items.
The Other User Details section fields are:
- Keywords - an optional field where extra user information may be recorded.
- Notes - an optional field where extra user information may be recorded.
The Access section fields are:
- RelativityOne Access - a toggle where you can control the user’s access to Relativity.
- Enabled - the default value. Enabled users can log in to RelativityOne and, if applicable may be considered for billing under your Relativity license.
- Disabled - users cannot access RelativityOne and would not be counted or billed as named users on your Relativity license, if applicable.
- When Relativity is first deployed, the system sets the Relativity Access field for existing users using the following criteria. A system admin can change a user's access at any time.
- If a user is in a group with rights to a workspace, their Relativity Access is set to Enabled.
- If a user is not in a group with rights to a workspace, their Relativity Access is set to Disabled.
- Disable on Date (UTC) - the date when the user's Relativity access is disabled. Use the field to auto-disable users on a specific date in the future, for example, when managing contact reviewers. When you specify the date, it can't be in the past. For more information, see Auto-disable usersThe Disable on Date value is in UTC and does not represent local time.
- Trusted IPs - specifies a list of trusted IP addresses for a user. Authentication fails if a user attempts to log in to Relativity from an unauthorized IP address.Relativity only supports the IPV4 format for Trusted IP addresses. It doesn't support the IPV6 format.
The Permissions sections fields are:
- Change Settings - users without admin rights can change their settings depending on whether the toggle is enabled or disabled.
- First name
- Last name
- Email address
- Item list page length
- Default selected file type
- Advanced search default
- Enable or disable Native Viewer Cache Ahead
While "My Settings" appears grayed out in the user preview, users will still be able to access and change their own settings based on their assigned permissions.Feature Permissions provide an alternative to Relativity's security management by shifting the focus from Object Types and Tab Visibility to feature-based permissions. This method is an alternative option. Any feature-specific permissions information already in this and other topics is still applicable. The Feature Permissions interface enables administrators to manage permissions at the feature level, offering a more intuitive experience. By viewing granular permissions associated with each feature, administrators can ensure comprehensive control, ultimately reducing complexity and minimizing errors. For details see - Change Document Viewer - users can change document viewers depending on whether the toggle is enabled or disabled.
- Enabled - users can select which viewer they want to use. You can still set a default viewer in the Document Viewer field, but users can switch between viewers.
- Disabled - users can't select which viewer they want to use. Whatever viewer appears in the Document Viewer field in User Settings is the only viewer the user has access to.
- Document Skip - This feature is not currently compatible with RelativityOne and as a result, this option does not impact a user's ability to access this feature.
- Keyboard Shortcuts - Choose a default setting for the keyboard shortcuts icon in the Review Interface. This property is set to Enabled by default.
The Defaults section fields are:
- Item List Page Length - a numeric field indicating the default list length for all views in Relativity except for views that are embedded into layouts as an Associative Object List. You can set it from 1 to 200. Associative object lists in a layout do not inherit this value (the default number of items per page for these lists is 10 and cannot be customized).
- Document Viewer - uses the Aero viewer to review documents. This field is non-editable.
- Document Viewer Preference - determines the default viewer:
- Viewer
- Image
- Long Text
- Production
- Show Filters - determines whether or not filters on all columns are visible by default for that user.
By default, this is set to Visible, but you can modify it as necessary. This version sets the Default Filter Visibility field to Visible for existing users whose filters are hidden.
- Enabled - shows filters by default.
- Disabled - hides filters by default.
If a user is currently logged in to Relativity when a system admin modifies a setting, the user must log out and log back in for the changes to take effect. This also applies to the system admin if they are altering the setting on their own account. - Saved Search Owner - determines whether saved searches are public or private by default. If Public is selected, the search is public and all users with rights to it can see it. If User is selected, the search is private and only the logged in user is able to see it. The property’s default value is configurable on a system level.
- Document Skip Preference - controls whether or not the user has the ability to skip documents during review that no longer meet the original conditions of a view due to propagation. This field is non-editable and set by default to be disabled.
- User-Group Email Notifications (if applicable) - controls the type of email notifications Relativity will send to an admin that is adding or deleting users or groups. The available options are:
- Receive All- receive all email notifications regarding the addition or removal of a user or group.
- Receive Errors Only - receive email notifications on failed operations only regarding the addition or removal of a user or group.
- Do Not Receive - receive no email notifications regarding the addition or removal of a user or group.
Viewing user audit records
Use the View Audit function to view a user's audited actions. To access the audit records, select the Users tab and click the name of a user. Then click View Audit.
Audit records are not modified when a user is deleted or disabled. You will still be able to search for a user's audits based on their user name.

The user's history displays in a new window.
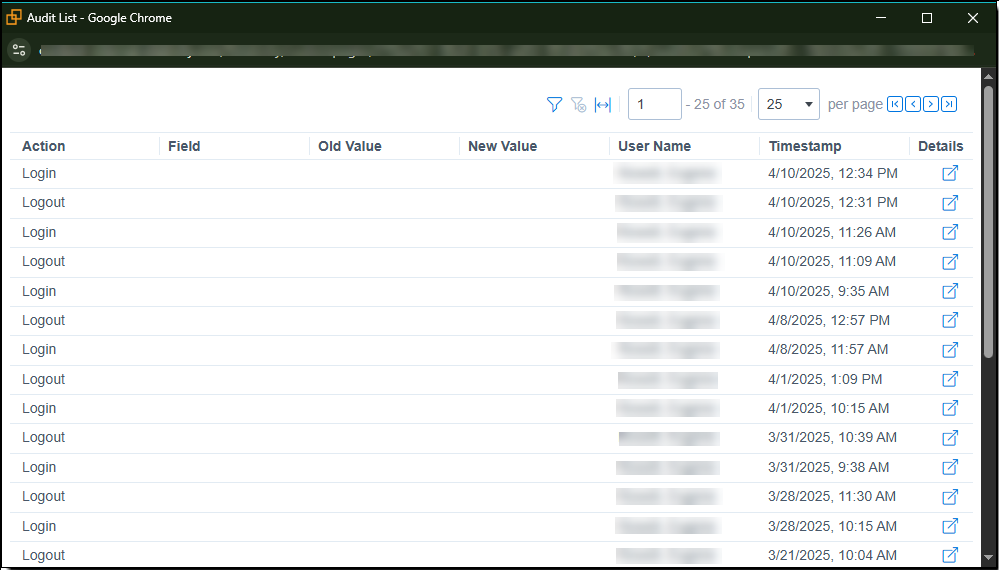
The following columns display:
- User Name - The name of the Relativity user who performed the action.
- Action - The action that was performed.
- Timestamp - The date and time that the action was performed.
Sending messages to users
From Home or within a workspace, you can send web page messages to one or more users with the mass send message feature. Use the following steps to send a message:
- Open the User Status tab in from within a workspace or from Home.
- Select the checkbox next to the names of the users you want to send a message to.
- Select Send Message from the drop-down menu at the bottom of the page.
- Click Go. The Webpage Dialog appears.
- Enter your message in the Message field, and then click Send Messsage. The selected users receive a web page message immediately.
To send an email message to an individual recipient, you can click on their email address link. This will launch your native email application, allowing you to compose the message. Your login information will identify you as the sender of the email message.
Bounce list removal
If a user reports not receiving their invitation or 2FA challenge email, the system administrator should check the User page to see if the "Remove from Bounce List" button is enabled.
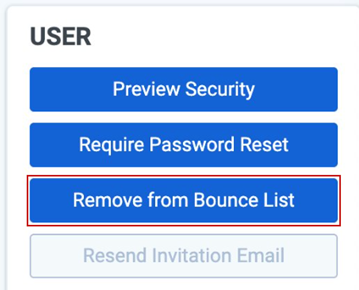
If the button is enabled, click it to remove the user's email from the bounce list, then resend the invitation or ask the user to log in again to generate the 2FA challenge email. Follow this process to troubleshoot situations where users do not receive Relativity-sent emails. This applies to all workflows, not just user authentication.
If the button is not enabled, the user is not on the bounce list, and there may be another issue with the user's email address or server. The user should check their junk email and spam folders, and may need to consult with internal IT. For more information on user invitations, see Centralized Authentication .
Forcing users to log out
From Home, you can force users to log out of Relativity from the User Status tab.
When you use the Force Log Out option to terminate a user's session, any changes the user made and did not save will be lost.
Use the following steps to log users out:
- Click your name in the upper right corner of Relativity, and click Home.
- Open the User Status tab.
- Select the checkbox next to the names of users you want to log out.
- Select Force Log Out from the drop-down menu at the bottom of the page, and then click Go.
- Click OK on the confirmation message. Relativity immediately logs out the users you selected.
Adding or removing users from a client domain
You can add or remove objects from client domains if you have the client domains feature activated.
Client domain admins cannot add themselves to any group (even groups tied to their own client domain). Only a System Administrator can change a user’s group memberships.
Use the following steps to add a user to a client domain:
- Navigate to the Users tab.
- Click the icon to edit the user.
- Click Select next to the Client field in User Information section of the Users tab.
- Select the client with client domains enabled from the list.
- Click Save.
Use the following steps to remove a user from a client domain:
- Navigate to the Users tab.
- Click the icon to edit the user.
- Click Select next to the Client field in User Information section.
- Select a client not associated with a client domain from the list.
- Click Save.
Auto-disable users
You can auto-disable users on a specific date in the future. You can set the Disable On Date (UTC) field when creating or editing an individual user:

You can also use a mass-operation to set the Disable On Date (UTC) field for multiple users:
- Navigate to the Users tab.
- Select the checkbox next to the names of users.
- Select Enable from the mass operations drop-down menu at the bottom of the page and the Enable Users dialog will open.
- Select the checkbox next to the Disable On Date (UTC) field.
- Enter or select the value for the Disable On Date (UTC) field. The date-time value must be in the future.If you select the checkbox and leave the date value blank, will clear the Disable On Date (UTC) for the users.
- Click Ok. The Disable On Date (UTC) field is set for the selected users, and they will be automatically logged out on the specified date and time.