Feedback
Last date modified: 2026-May-22
Importing a document load file
You can use Import/Export to import document load files, .dat, .csv, and .txt, into RelativityOne that contain document metadata, native files, or extracted text. You're also able to use saved job profiles to expedite the configuration process.
If you want to use Import/Export with Express Transfer active, which is the recommended workflow for data transfer, refer to Express Transfer overview for more information.
Refer to Import/Export load file specifications and Data upload size limitation for more information regarding load files. Also see General recommendations for structured data import and export jobs.
To import a document load file:
- Use tabs, search, or the quick nav bar to navigate to the Import/Export Job page.
- On the Import/Export Job page, click the New Import/Export Job button to start a new job.
- On the Choose Workflow dialog, the Import button is selected by default. Next, click the Structured (Processed) Data workflow box to import a document load file to your workspace.
 If Express Transfer has been activated, the Express Transfer section will display a status of Active. See Activating and deactivating Express Transfer for more information.
 - On the Choose the Load File Type dialog, click the Document box to import a document load file to your workspace.

- If Express Transfer is not Active, skip this step. If it is Active:
- Click Select Folder on the Select data to Import dialog to browse to your local drive and select the folder with the files that you want to upload. In the case of universal naming convention (UNC) paths, you can copy and paste the path into the Select Folder address bar in the dialog box to access the desired folder. For example, \\ServerName\SharedResourceName\FilePath.
- Click Staging Load File to select a load file from the StructuredData folder in Staging.
- Accessing Choose from Staging requires Allow Staging Import permissions. Refer to the Permissions page for more information.
- If you choose to import load file data from Staging, the load file and all linked files will be copied to the destination located outside of your Staging Area. After the import is completed, you can clean up the source data in Staging.

- You can choose only one folder with a load file to transfer.
- File names must be 200 characters or less, including the extension.
- We recommend using a local drive instead of a mapped or external drive to avoid potential slowness and connection issues with the file import process. Also see Data transfer performance considerations.
- When Express Transfer is active, you should not zip data for importing.
- When Express Transfer is active, it uploads only files linked in the selected load file, regardless of their location.
- When Express Transfer is active, it ignores mismatches in upper and lower case between file paths in the load file and the actual file names.
- When Express Transfer is active, it supports load files with relative paths, absolute paths, and UNC paths. It is possible to mix different path types in a single load file.
- On the Choose Load File and Location dialog, complete the following fields, then click Continue. Refer to Import/Export load file specifications for more information regarding load files.
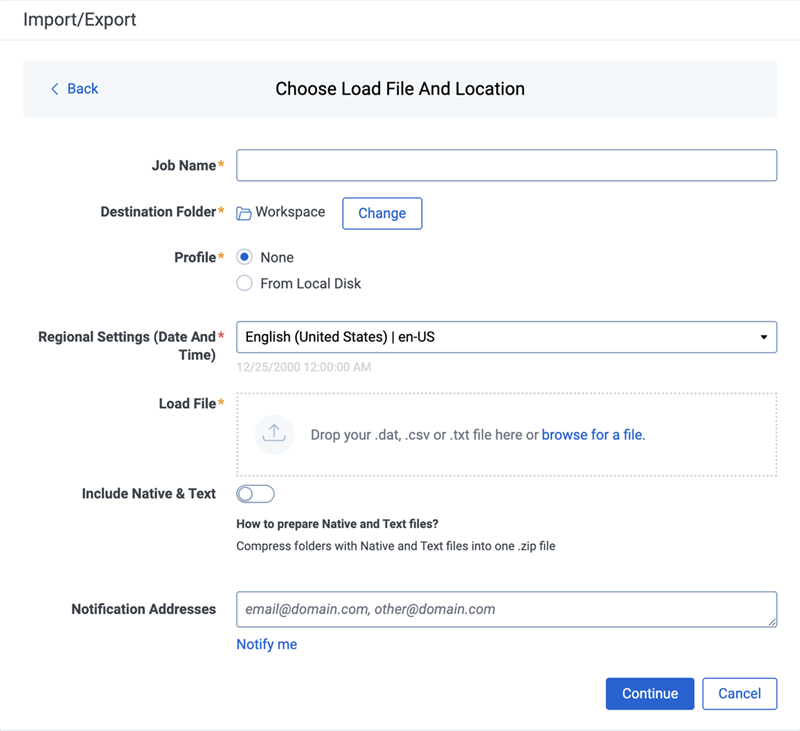
- Job Name—provide a descriptive job name so that you can quickly identify and track that job on the Import/Export Job Page. The Job name field accepts up to 50 characters.
- Destination folder—by default, Relativity populates the destination with the root workspace folder to simplify job creation. You can do one of the following:
- Keep the default destination folder.
- Choose a different folder by clicking Change, followed by Select, and then selecting the desired folder from the list.
- Create a new workspace folder by right-clicking on an existing folder, click Create, enter a new folder name, click out of the new folder to save it, then click Select.
- Profile—the job configuration settings that were previously saved to a profile file (.ie or .kw*). They can be reused when creating future jobs with the same or similar settings in RelativityOne. This saves time and effort as well as helps prevent data entry errors when you're mapping fields, for example. Profiles with the ".ie" extension can only be used in Import/Export.
- None—select this option if you do not desire to use a profile for this import or if you intend to create a new profile based on the settings entered in the upcoming steps. You will be able to save the profile settings later to an .ie file via the Download Profile (.ie) button.
- From Local Disk Profiles—use this option to select a previously saved Import/Export profile (.ie file) or an existing .kw* profile, created via the former Relativity Desktop Client application, to reuse the job settings for this workflow. Use the drag and drop feature or browse for a file to choose it. All job settings provided within the selected profile file will be automatically entered where applicable in the succeeding workflow dialogs.
- Regional Settings (Date and Time)—select the desired format for imported date and time data. A preview of the chosen format will appear below the selection. The setting selected will remain for all future jobs until you choose another one from the list or until you clear your browser cache. When browser cache is cleared, the setting will revert to the US date and time by default.
- Load File—use the drag and drop feature or click browse for a file to select the document load file from your local drive.
- Choose From Staging—select a load file from the StructuredData in Staging. Your load file data must not be zipped. Otherwise, you will not be able to choose it from Staging.
- Include Native & Text—select this option to include native and text files. The Include Native & Text option is not available for image or production import workflows as there are no native files included in OPT files.
- Native & Text—if Include Native & Text was selected, use the drag and drop feature or click browse for a file to select the zipped native and text file from your local drive. See ZIP archive with extracted text and natives.
- (Optional) Notification Addresses—enable email notifications by providing the email addresses of those who should get notified once the job completed, failed, or canceled.
- On the Load File Settings dialog, select the delimiters and encoding values of the document load file for the import, then click Continue. The File Column Headers Preview pane will help you to choose the proper settings.

- File Encoding—select an encoding format for the document load file. Consult your processing vendor or department to determine the correct encoding option, if necessary. The File Column Headers Preview pane automatically updates when you select the File Encoding type. Since the load file is parsed based on the delimiter set, you may need to check delimiters used in the load file if the column headers are not lined up correctly. Determine the delimiters used in the file, and then select them in the delimiters section of this dialog.
- First Line Contains Column Names toggle—select this option if the first line contains column names. Select the delimiters and encoding values used by your load file as needed:
- Column—select the character used to separate columns.
- Quote—select the character used as the text qualifier.
- Newline (Long Text Fields)—select the character used to indicate the end of a line in any extracted text or long text field.
- Multi-Value—select the character used to separate choices within a field.
- Nested Value—select the character used to separate the different levels of a multi-choice hierarchy.
- File Encoding—select an encoding format for the document load file. Consult your processing vendor or department to determine the correct encoding option, if necessary. The File Column Headers Preview pane automatically updates when you select the File Encoding type. Since the load file is parsed based on the delimiter set, you may need to check delimiters used in the load file if the column headers are not lined up correctly. Determine the delimiters used in the file, and then select them in the delimiters section of this dialog.
- On the Load File Fields Mappings dialog, select the load file fields to import and map them to the workspace fields, then click Continue. For more information, see Load File Field Mappings options.

- On the Import Settings dialog, configure your import job by selecting from which line number you want the load file to begin importing and how you want the records to be imported.
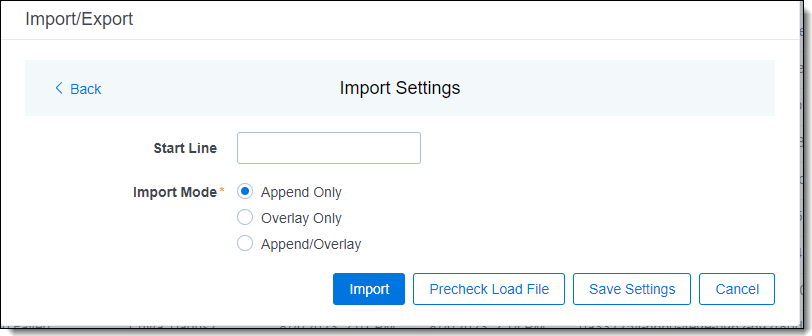
- Start Line—select the line number in the load file where you want the import process to begin. The default value is set to 0, which results in loading the entire load file.
- Import mode—choose an import mode:
- Append Only—loads only new records.
- Overlay Only—updates existing records only. If selected, you must include an Overlay Identifier in an overlay load. This field acts as a link indicating RelativityOne where to import the data. A field can be used as an Overlay Identifier only if it meets all of the following requirements:
- It belongs to the same artifact type as the object being mapped.
- It is not a base (system) field.
- Its field type is Fixed‑Length Text.
- Its field category is Generic or Identifier.
- Append/Overlay—adds new records and overlays data on existing records.
For Append/Overlay and Overlay Only, if a blank metadata field exists in the load file, .dat or.csv, the blank value will overlay (remove) any existing value that may reside in the corresponding mapped field. - Multi-Select Field Overlay Behavior—this field appears if you selected Overlay Only or Append/Overlay as the Import Mode and have mapped at least one Multiple Choice or Multiple Object field. Choose one of the following options:
- Use Field Settings—merges or replaces all values for multi-choice and multi-object fields in the load file with corresponding multi-choice and multi-option fields in the workspace. The fields are merged according to the overlay behavior settings in the environment.
- Merge Values—merges all values for multi-choice and multi-object fields in the load file with corresponding multi-choice and multi-option fields in the workspace. The fields are merged regardless of the overlay behavior settings in the environment.
- Replace Values—replaces all values for multi-choice and multi-object fields in the load file with corresponding multi-choice and multi-option fields in the workspace.
- (Optional) Click Download Profile (.ie) on the Import Settings dialog to download the job configuration settings entered thus far to an .ie file on your computer. This way they can be reused for other jobs.
- (Optional) Click Precheck Load File to check for errors prior to importing the load file. For details, see Pre-check Load File optional step.
- Click the Import button to start the importing process.
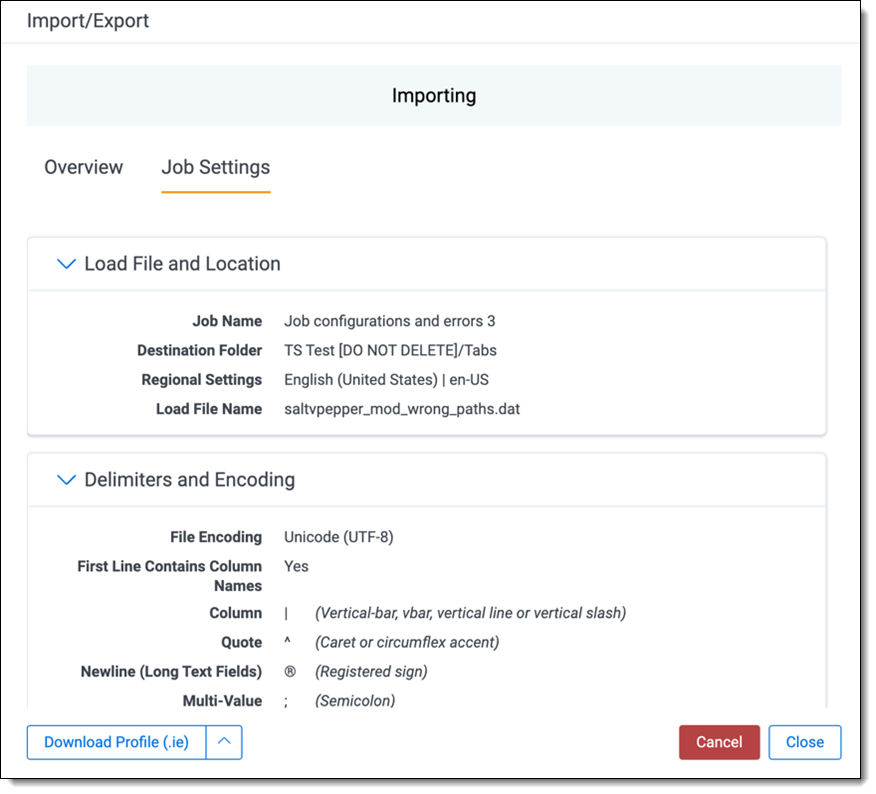
- Review the importing progress on the Overview tab on the Importing dialog. Real-time details regarding the number of transferred files and data size being processed are displayed during the Uploading and Extracting steps. If needed, click Cancel to stop the import job before it completes. Otherwise, click Close when the importing process is complete.If you used Import/Export in web only mode, meaning Express Transfer was not active, do not close the Importing dialog until after the Uploading step has successfully completed. Closing the dialog prior to the Uploading step completing will terminate the data transfer (upload) process.

- Go to the Job Settings tab on the Importing dialog to review the job configuration settings. If desired, click Download Profile (.ie) to download the job configuration settings entered thus far to an .ie file on your computer. This way they can be reused for other jobs.
- If no errors were found in the load file, go to the next step. If errors were found, click the Errors tab on the Importing dialog to view them, then do either of the following:Only records that imported without errors will appear in the workspace.
- To proceed without correcting the errors, click Close.
- To manually correct them now, click the Download Error Load File button. Review the errors and correct them as needed. When you have finished, upload the file with the corrected data by clicking the Select button on the Importing screen next to New Load File. Then, navigate to the load file on your local drive to select it. Once selected, click Import to import the job with corrected data.
You can only correct documents included in the original load file. If you need to add missing documents, create a new import job.
- Click Finish to close the dialog.
You can review the Import/Export Job page to see more information about the job. Refer to
For more information on where Import/Export saves files, see the Community article Import/Export: Where Files Are Saved By The Import/Export Application.
If you ran the job with Express Transfer active, you are able to close the Import/Export application while the job is running, if desired, and the transfer job will continue and not be affected. You can monitor the progress and history of jobs within Express Transfer. For more information, see Express Transfer Job tracking and history. You do not have to be logged into RelativityOne to view information within the Express Transfer application.
Load File Field Mappings options
You can map fields on the Load File Fields Mappings dialog using:
- Auto Map Fields button to automatically map fields.
- The fields from the load file will be mapped to any existing fields of the exact same name in the workspace. Any fields without a match will display "Choose..." in the Workspace Fields column. You will need to select one from the drop-down list. To search for a field in the list, begin typing the desired field name and matching search results are displayed for selection.
- Consider the following when auto-mapping fields:
- Case is not taken into account for the mapping. For example, a field named "email" in the load file would map to a field named "Email" in the workspace.
- Spacing is taken into account. For example, in a two-word field name, if there is one space between words in the workspace field, and two spaces between words in the load file field, the fields will not be mapped.
- Characters are mapped only to themselves. For example, an underscore is only mapped to another underscore, not to a space.
- Only fields matched or those with additional settings selected are loaded into the workspace. Other fields in the Load File Fields and Workspace Fields are ignored. You must always match the identifier field for the load file.
- Map with AI button to map similarly named fields when field names in the load file don't match precisely field names in the workspace.
- Consider the following when mapping fields with AI:
- Your data is neither used for training nor sent outside of the RelativityOne infrastructure. It remains fully protected within our secure environment.
- Fields are mapped based on the similarities in the meaning of fields’ names.
- Fields are mapped automatically when the name meaning similarities are strong.
- The Review label appears for the mappings that may require your attention.
- Fields remain unmapped if the AI model cannot understand the meaning of the field name, or the name similarities are below the threshold. If you want to map these fields, choose a corresponding field from the Workspace Fields list or create a new workspace field.
- Consider the following when mapping fields with AI:
- Workspace Fields column to manually map the load file fields to the existing workspace fields. Use the Filter box to search for field names.
Depending on your workflow, complete the following additional options available on this dialog:
- Export to CSV button—click to save the field mapping configuration to a .csv file on your local drive. This option cannot be accessed after the job has run and can only be selected prior to executing the job.
- Create Field button—click if you want to create a new workspace field. Import/Export currently supports creating document object field types listed below. If you need to define advanced field settings, create a field directly from the Fields tab. For more information, go to Fields.
- Currency
- Date
- Decimal
- Fixed-Length Text
- Long Text
- Multiple Choice
- Single Choice
- User
- Whole Number
- Yes/No
- Sort by button—click to choose your preferred sorting option:
- Default (A-Z)—sorts all rows in alphabetical order, based on the load file field names.
- Mapped on top—brings the mapped fields to the top and sorts them in alphabetical order.
- Unmapped on top—brings the unmapped fields to the top and sorts them in alphabetical order.
- Review on top—brings the mapped fields which require review to the top and sorts them in alphabetical order.
- Load File Sample column—presents read-only example data from the load file fields.
- Load File Fields column —displays the field names from the load file. Use the Filter box to search for field names.
- Additional Field Settings column—to enable additional field settings, click the Choose down arrow in this column to select the additional field as follows:
- Text File—select this option if the mapped Long Text field contains a relative path, absolute path, or UNC path to a text file, and then select the File Encoding type for the file. If using absolute or UNC paths, Express Transfer must be activated prior to starting the import job. This field was renamed from Extracted Text since it now applies to any Long Text field.
- Folder Information column—select this option if you want to use a metadata field to build the folder structure for the workspace.
- Native File—select this option if the field from your load file contains a relative path, absolute path, or UNC path to the native files. If using absolute or UNC paths, Express Transfer must be activated prior to starting the import job.
Pre-check Load File optional step
You can click Precheck Load File option on the Import Settings dialog to run a validation process on the load file to check for errors prior to importing it. For more details, refer to Pre-check Load File.
If the workflow is configured to use Staging, the Pre-check Load File step will be unavailable. Ensure your load file is validated manually before proceeding.
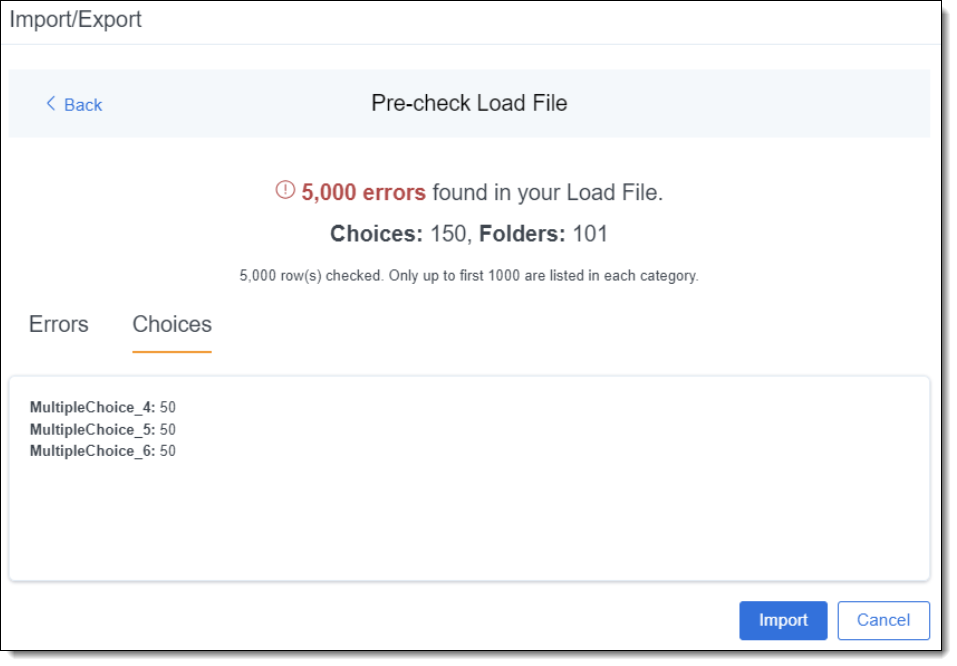
All detected errors are displayed in the Pre-check window. Click the down arrow next to any error message to view its details. If you want to correct the errors in the source file(s) and repeat the importing steps, click Cancel to discontinue importing the file at this time. Otherwise, go to the next step to import the load file with errors and correct them later. The following validations are performed during precheck:
- Date format
- Field type
- Field length
- Number of load file cells
- Number of folders and choice fields
- File paths for natives and extracted text. The precheck checks 1,000 random lines across the whole load file.
The Pre-check Load File summary dialog displays a maximum of 1,000 errors for each error category. For example, if an error category has 2,000 errors, only the first 1,000 will be displayed in the drop-down list.