


Feedback
Last date modified: 2026-Feb-26
Exporting a production set load file
You can use Import/Export to export a production set load file out of RelativityOne.
If you want to use Import/Export with Express Transfer, which is the recommended method for data transfer, refer to Express Transfer overview for more information. With Express Transfer activated, you can run up to five concurrent export jobs on a single client machine. For more information, see Concurrent and consecutive jobs.
Refer to Import/Export load file specifications for more information regarding load files. Also see General recommendations for structured data import and export jobs.
To export a production load file:
- Use tabs, search, or the quick nav bar to navigate to the Import/Export Job page.
- On the Import/Export Job page, click the New Import/Export Job button to start a new job.
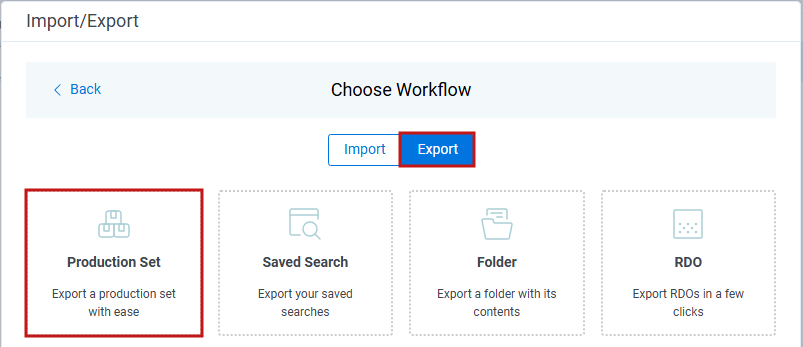
- On the Choose Workflow dialog, click the Export button, then click Production Set.
 If Express Transfer has been activated, the Express Transfer section will display a status of Active. See Activating and deactivating Express Transfer for more information.
 - Complete fields on the Export Settings dialog, then click Continue. For details, see Export Settings.
- On the Load File Settings dialog, select the data file format and data file encoding, then click Continue.
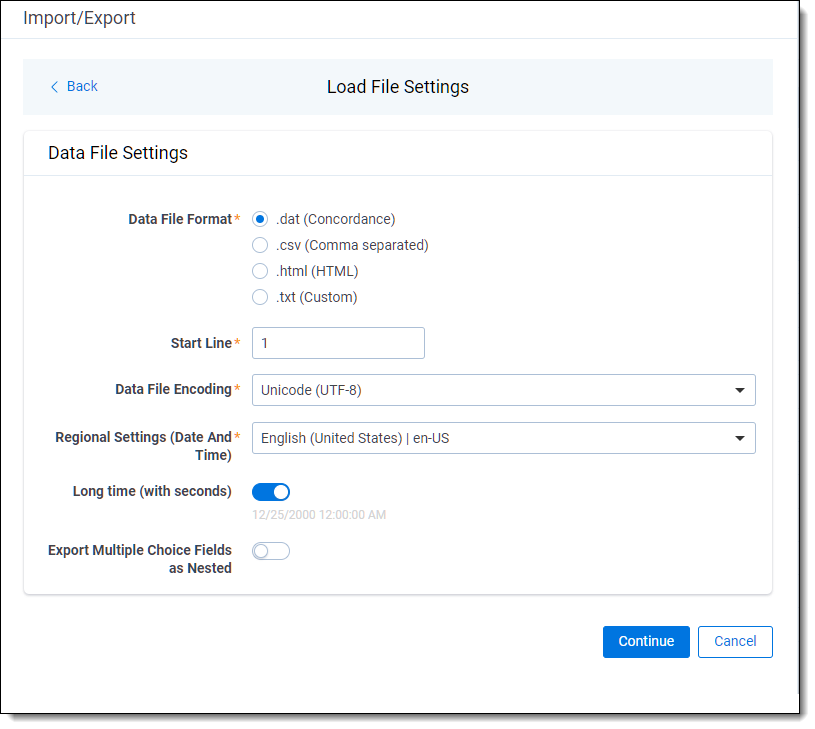
- Data File Format—select one of the formats below for the load file you are exporting:
- .dat (Concordance)—load file exports with the standard Concordance delimiters.
- .csv (Comma separated)—load file exports with comma separated delimiters
- .html (HTML)—load file is in HTML format and contains hyperlinks to launch any exported files.
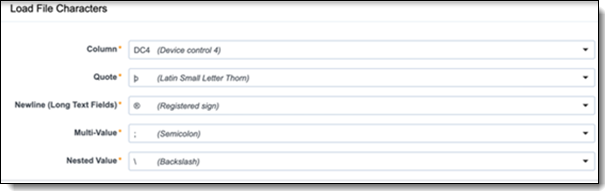
- .txt (Custom)—load file exports with the custom delimiters that you select in the Load File Characters section that is displayed.
- Start Line—select a line (record number) that identifies the initial document for export. The application begins by exporting the document with this number and continues by exporting documents with subsequent record numbers.
- Data File Encoding—select the encoding type for the document-level load file from the drop-down.
- Regional Settings (Date and Time)—select the desired format for the exported date and time data. A preview of the chosen format will appear below the next field. Your selection for this field will remain for future export jobs until you change it or clear the browser cache. Clearing the browser cache will default the format to "English (United States)."
- Long Time (with seconds)—by default, this option is toggled off. Toggle it on if you want to include seconds with the exported date and time information. For example, the time will export as 12:10 AM (HH:MM AM/PM) when the toggle is off. It will export as 12:10:25 AM (HH:MM:SS AM/PM) when the toggle is on.
- Export Multiple Choice Fields as Nested—select this option to maintain the hierarchy of RelativityOne multiple-choice lists, when applicable. The nested value delimiter, a backslash, separates child choices.
- Data File Format—select one of the formats below for the load file you are exporting:
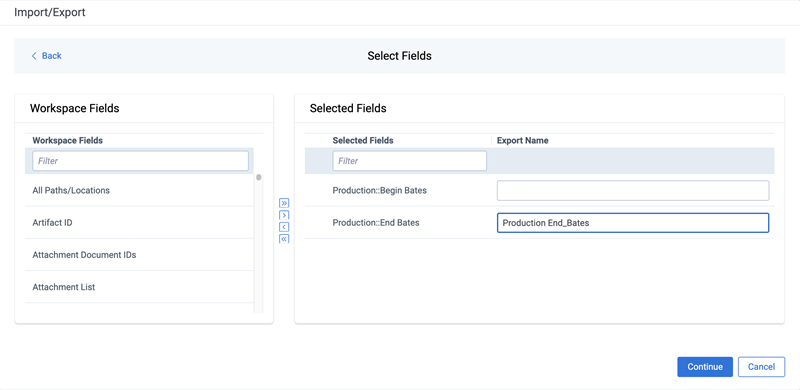
- On the Select Fields dialog, choose the Workspace Fields that you want to export by moving them to the Selected Fields box, then click Continue. Optionally, you can enter field name aliases to replace the original workspace field names in the exported load file. The Workspace Fields box displays all available fields, but only the fields in the Selected Fields box will be exported. The Production::Begin Bates and Production::End Bates fields automatically populate in the Selected Fields column.You can do the following to move fields:
- Highlight a field and click one of the directional arrow buttons in the center to move it between boxes.
- Double-click on a field to move it between boxes.
- Use CTRL+ left mouse click to select multiple fields, then choose the desired directional arrow to move between boxes.
- In Selected Fields column, set the load file column order by dragging the fields to their proper ordering position.
 Field aliases should not include delimiters that define the load file structure. The job will not start if a field alias includes such delimiter.
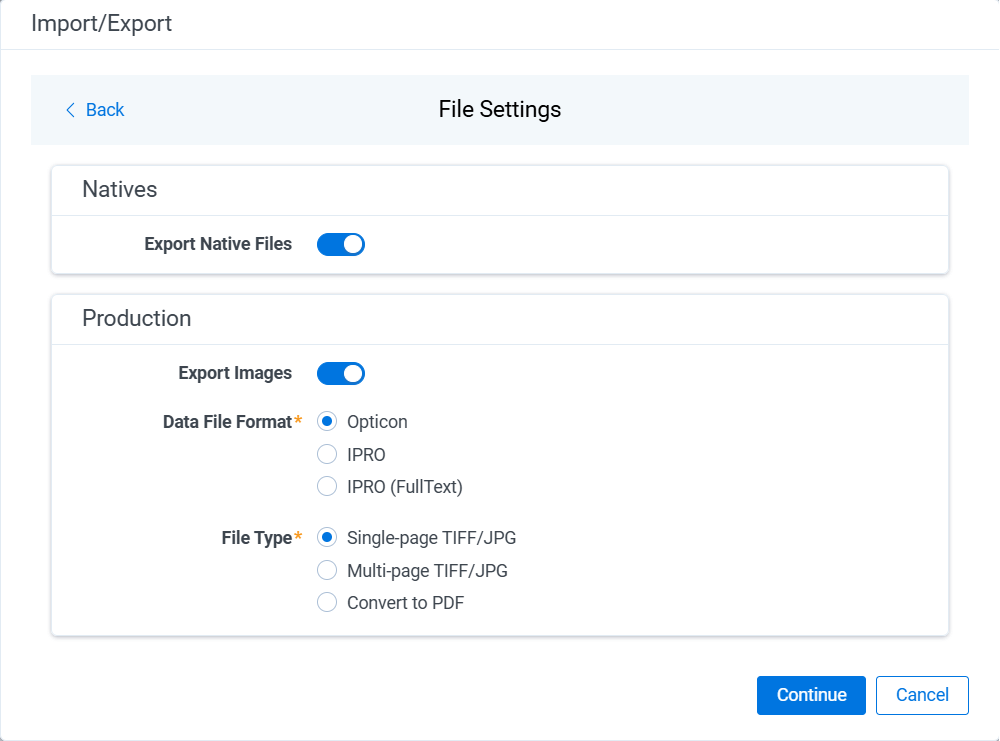
- In order to include native files and/or images in the exported data, select the corresponding options on the File Settings dialog, then click Continue.
-
Natives:
- Export Native Files toggle—select this option to export native files.
- Export Native Files toggle—select this option to export native files.
-
Production:
- Export Images toggle—select this option to include images in the export. If this option is toggled on, then you must set the Data File Format and the File Type for export images.
- Data File Format—select one of the formats for image-level load file: Opticon, IPRO, or IPRO (FullText).
- File Type—select one of the file types: Single-page TIFF/JPG, Multi-page TIFF/JPG, or Rendered PDF.The Convert to PDF option is only available for production sets that contain exclusively images or a combination of images and native files. Production sets that include only native files or mixed content, such as PDFs combined with images, are not supported for PDF conversion.
-
Natives:
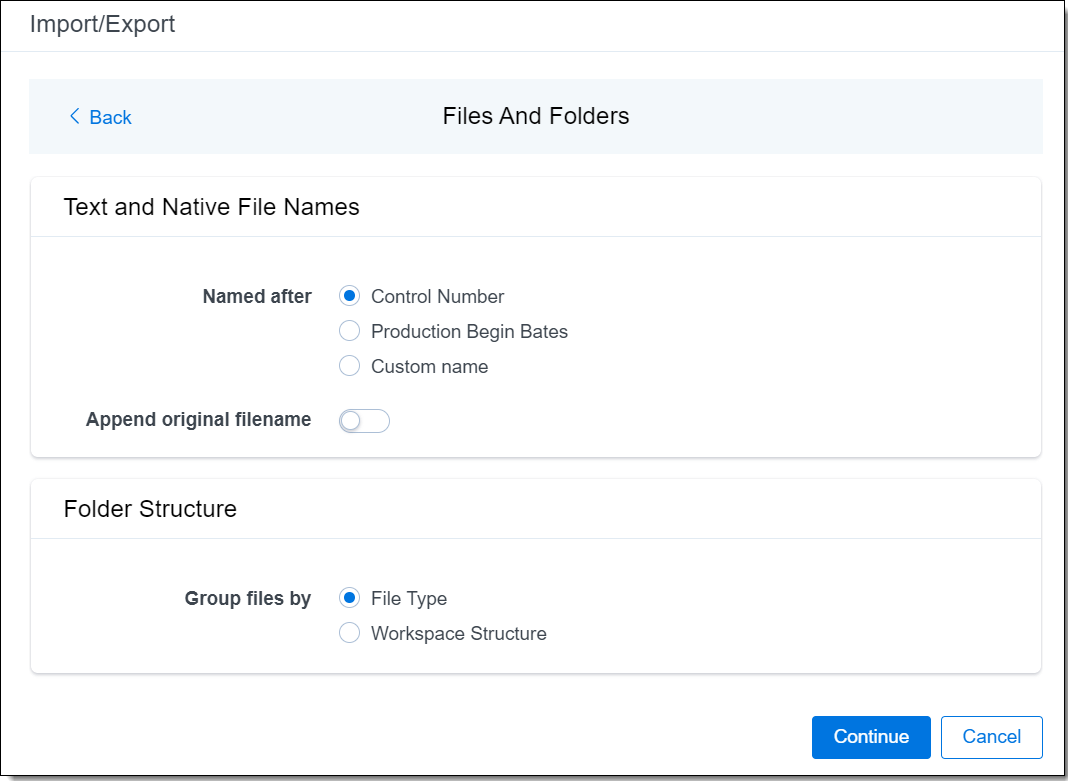
- On the File And Folders dialog, choose the desired naming convention and folder structure for the exported files, then click Continue.
-
Text and Native File Names:
- Named after—select one of the following naming conventions for exported files:
- Control Number—select this option to name the files after the control number.
- Production Begin Bates—select this option to name the files after the production number.
- Custom name—select this option to customize native and text file names. If this option is selected, enter data in the following fields that are displayed:
- Prefix—choose whether to have the prefix be the Control Number or Production Begin Bates.
- Select spacing—select the desired spacing option from the drop-down list.
- Select field—choose a field from your workspace or choose Custom Text and provide your text.
- Preview—you will be able to view a Preview of the custom file name to see if it's what you want and make changes in the fields as needed.
- Append original filename toggle—select this option to append the original file name, which is defined as the file name as it was on disk, to the end of the exported file name.
-
Folder Structure:
- Group files by—select one of the options below for how to group the exported file:Depending on the structure of your exported data, export job performance degradation may result and be several times longer when using Workspace Structure compared with using File Type. Unless it is necessary to use Workspace Structure, we recommend using the File Type option for the export job.
- File Type—select this option to group files by their type and place them in separate folders based on type, such as in Natives, Images, Text, and PDFs folders.
- Workspace Structure—select this option to preserve the workspace folder structure. This option may reduce the time of preparing production data since the files will not need to be manually realigned later to replicate the folder structure in the workspace.
- Group files by—select one of the options below for how to group the exported file:
- Named after—select one of the following naming conventions for exported files:
-
Text and Native File Names:
- On the Text File Settings dialog, you can select to export text field as files and then choose the text file encoding as follows.
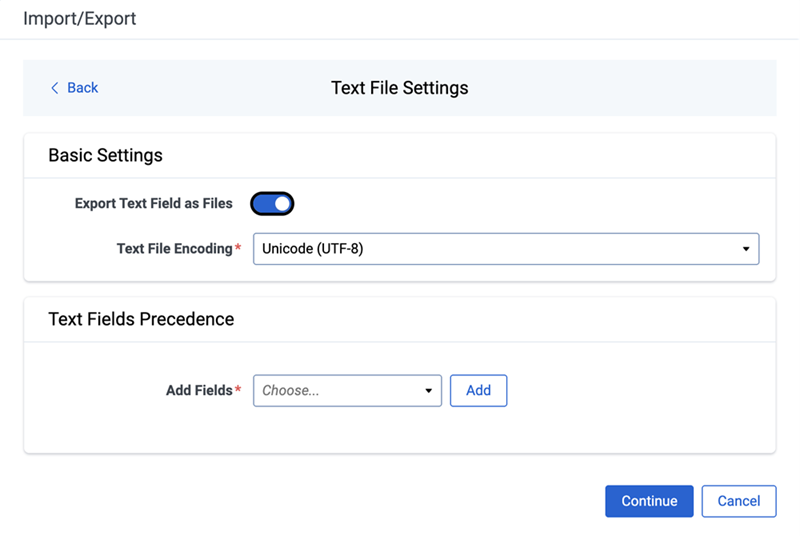
- Export Text Field as Files toggle—determines the export method of the extracted text or OCR. Select this option if you want to export files as individual document-level text files, with one file per document. Deselect it to include text as part of your load file.
- Text File Encoding—if Export Text Field as Files is toggled on, then select the encoding format for the document-level text files.
- Text Fields Precedence—select and assign an order to long text fields that Relativity checks for text when performing an export. Relativity adds the Text Fields Precedence column as the last column in the load file. You must select at least one long text field to use this functionality. Choose the fields from the Add Fields drop-down, then click Add. To delete a selected field, click its trashcan icon.
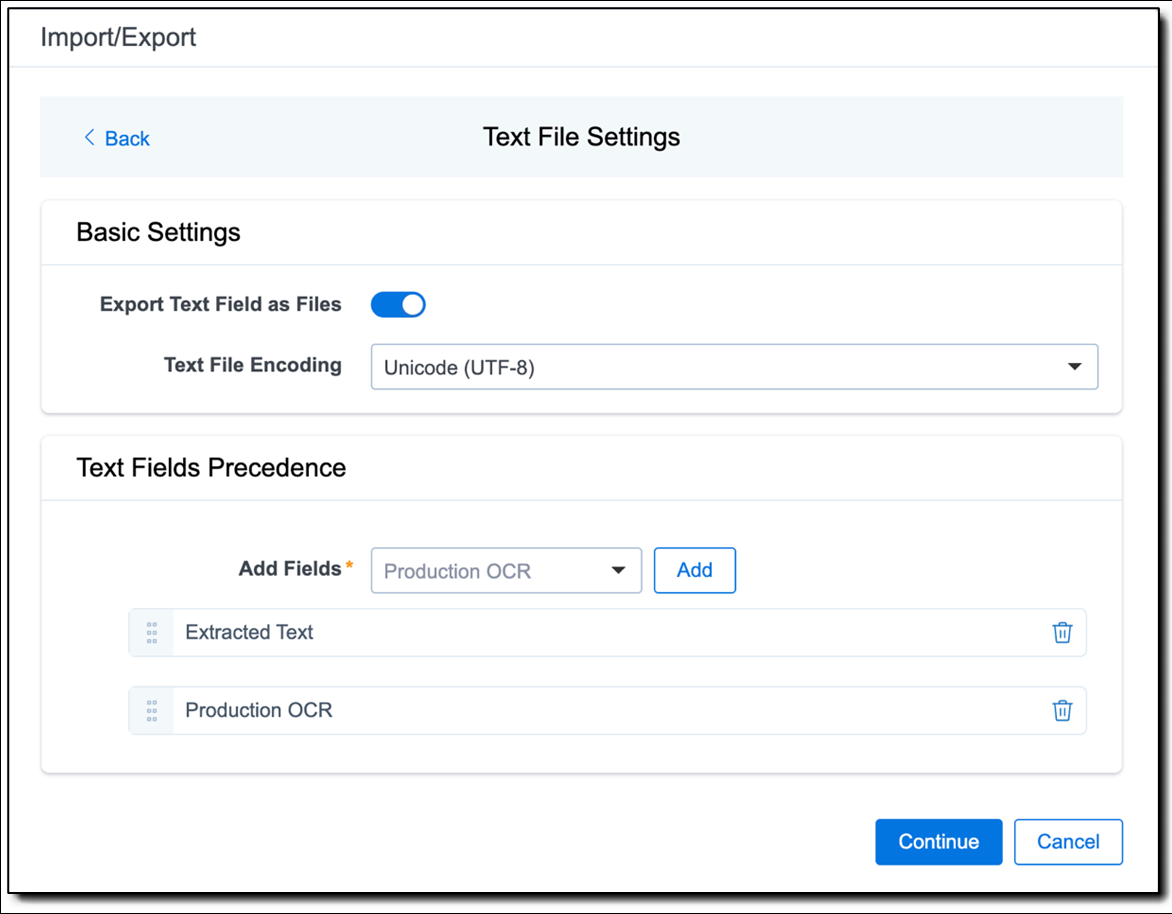
To order the precedence of the fields, click the six-dot handle next to the field name and drag it to the proper ordering position.
During an export, the system checks the first field in the list for text. If the field is null, it checks the next field in order of precedence for text, and so on. When Relativity finds a field that contains text, it adds the contents of that field to the Text Fields Precedence column in the document load file. Then continues checking the fields for the next document and so on. For example, if you listed the Extracted Text field first and the Production OCR field second, the system would first check the Extracted Text field for content, and if it was null, it would move on to the Production OCR field, and so on.If you have workflows that rely on clearing a text field for multiple production versions, you will need to ensure that you clear this field using either Mass Replace or a load file that sets the values to NULL. Operations such as Mass Edit will clear the field but set it to blank instead of null. This may result in exporting blank text files.The Text Fields Precedence column displays the file path to the exported files if you select the Export Text Field as Files checkbox above.
- Click Continue.
- (Optional) In the Advanced Settings dialog, toggle on Set Custom Information if you want to customize the volume and folder information using the fields below. Otherwise, leave the toggle off.
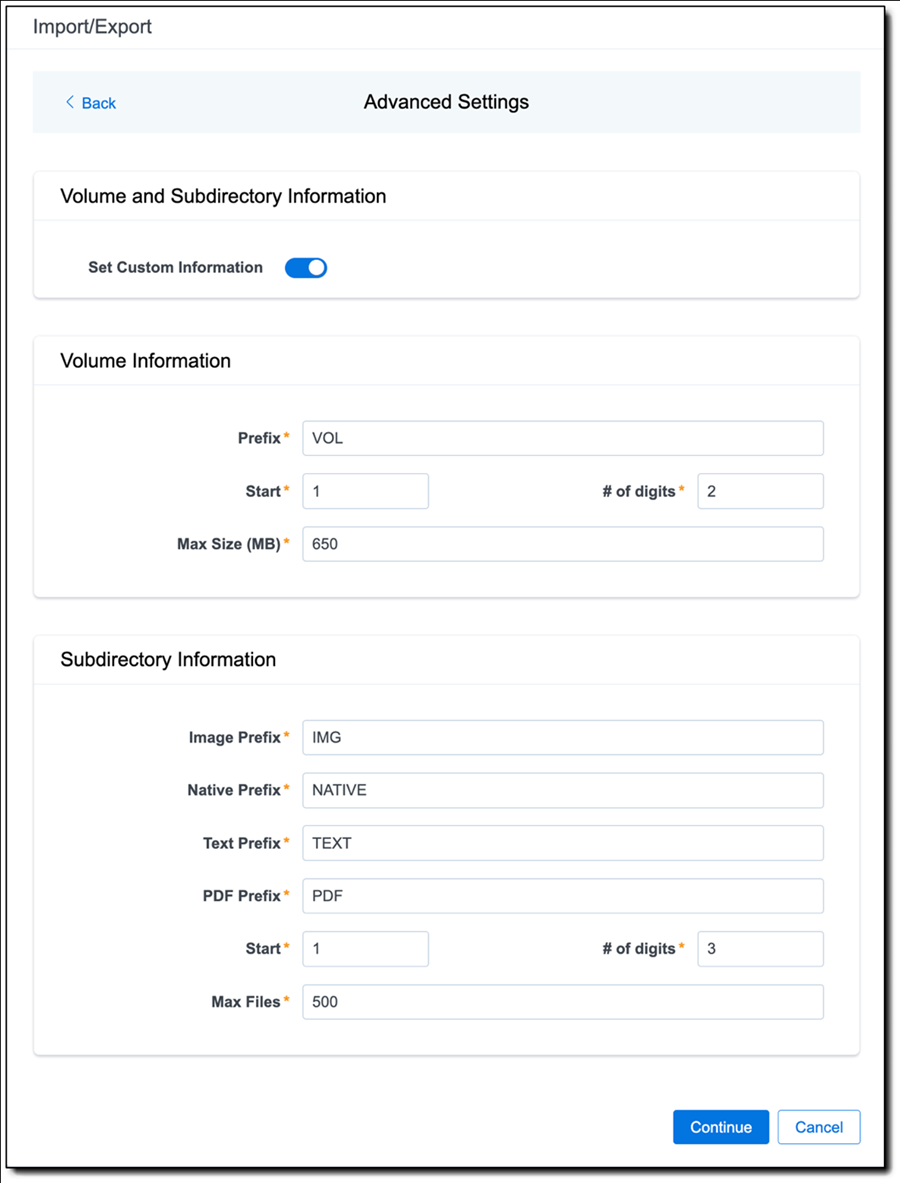
For more information, see Load file export recommendations.- Volume Information —this section controls the naming and size of the volume identifier. Set the following options in this section:
- Prefix—enter the alpha prefix for the volume identifier.
- Start—enter the first number used for the numeric section of the volume identifier. Multiple volumes increment numbers during export creating unique volume identifiers.
- # of digits—enter the number of digits attached to the prefix. For example, if you enter 3, the output is VOL001, VOL002, and so on.
- Max Size (MB)—enter the maximum size allowed for each volume.
- Subdirectory Information —this section controls the naming and size of volume sub-folders. Set the following options in this section:
- Image Prefix—enter the alpha prefix for the sub-directory that stores exported images.
- Native Prefix—enter the alpha prefix for the sub-directory that stores exported native files.
- Text Prefix—enter the alpha prefix for the sub-directory that stores exported extracted text files.
- PDF Prefix—enter the alpha prefix for the sub-directory that stores exported extracted PDF files.
- Start—enter the starting number for the sub-directories.
- # of digits—select the number of digits of the sub-directory prefix. For example, if you enter 3, the output is IMG001, IMG002, and so on.
- Max Files—select the number of files to store in each sub-directory.
- Volume Information —this section controls the naming and size of the volume identifier. Set the following options in this section:
- Click Continue.
- On the Export Job Configuration Summary dialog, review the export job settings and go back to make any corrections as needed.
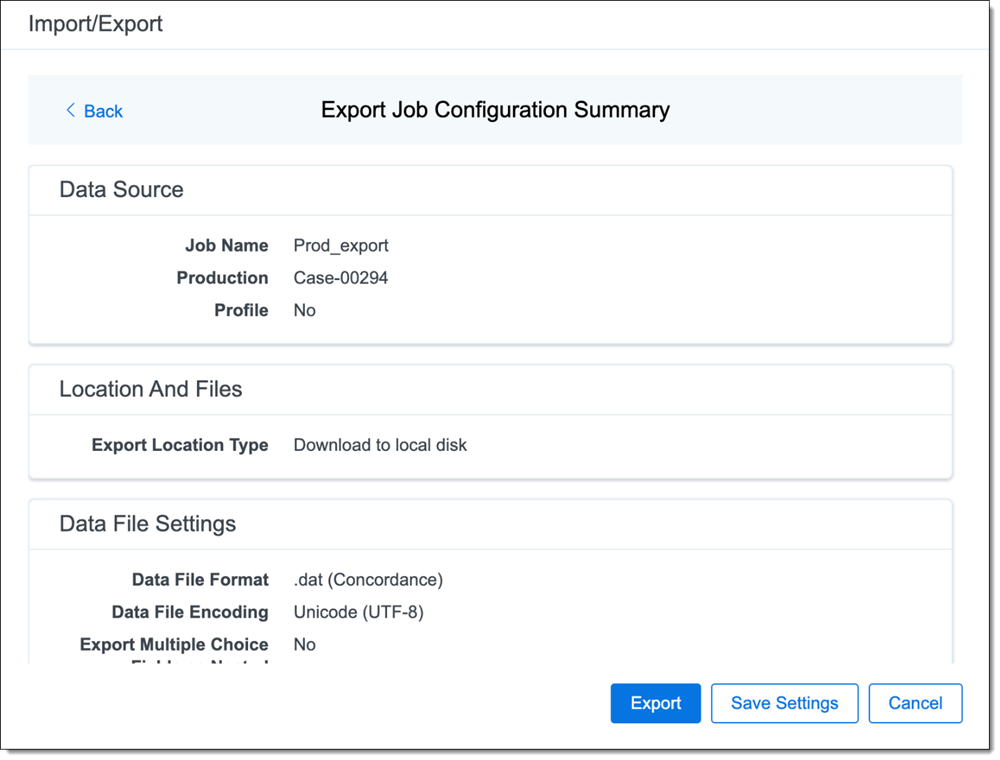
- (Optional) Click Save Settings on the Export Job Configuration Summary dialog to export the job configuration settings entered thus far to its own profile file, .ie file extension. Save it on your computer so you can reuse these settings when creating a new export job with Import/Export. Import/Export saves job configuration settings to its own profile file format, .ie file extension. Comparing to the legacy .kw* standard, it brings more flexibility as you now can apply saved job settings across various workspaces. The .ie profile file format is not supported in other RelativityOne data transfer tools.
- Click the Export button to start the exporting process.
- When it's complete, the job summary lists the records exported successfully, including Load files containing .dat, opt, etc., errors found, and path to your exported files.
- If using Import/Export with Express Transfer active, the exported files automatically start to download. You can track the download's progress in the Exporting dialog or in Express Transfer. For more information, see Express Transfer Job tracking and history.If you ran the job with Express Transfer active, you can close the Import/Export application while the job is running. The transfer job will continue uninterrupted. You can monitor the progress and history of the job within Express Transfer. You do not have to be logged into RelativityOne to view information within the Express Transfer application.
- If using Import/Export in web only mode, the application generates a zip file containing the exported data that can be download. Click the Download button to save the exported data zip file to your computer, or click the Close button to close the dialog without downloading the file.
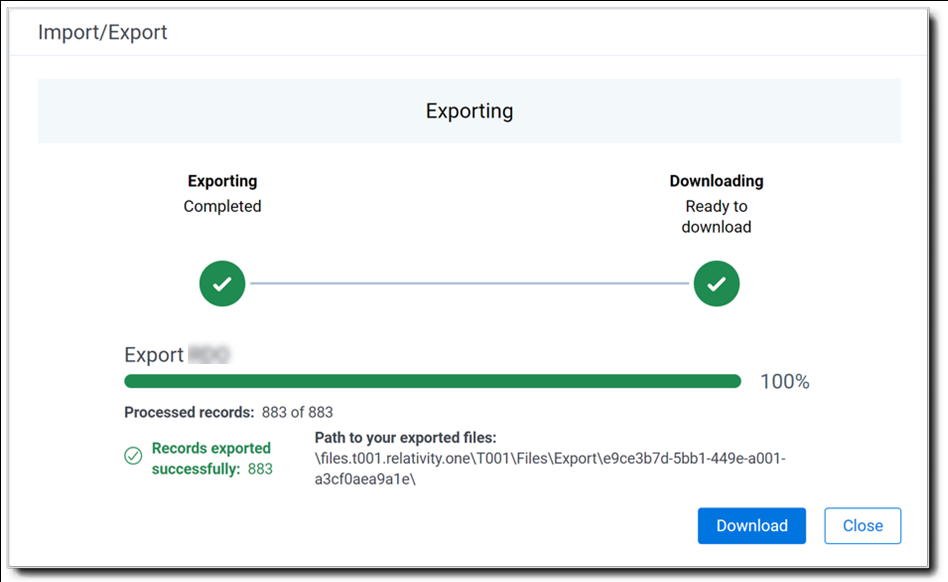 When downloading zip files to your computer, you can configure your browser to allow you save the zip file to a custom file name of your choosing as well as to a specific folder destination instead of using the default file name and destination. In the Settings menu of your browser, select Downloads. Toggle on the option to ask where to save or what to do with each file before downloading. Now, when you click the Download button in the Exporting dialog, your browser will display a dialog that allows you to change the default zip file name and select a destination other than the default one. If needed, you can also create a new folder in the chosen destination for the exported data.
 - If you chose to Export to Staging Area when setting up your export job on the Export Settings dialog, the application automatically exports data to your RelativityOne file share and skips the downloading process. Go the path listed on the dialog to access the exported data files.
- If using Import/Export with Express Transfer active, the exported files automatically start to download. You can track the download's progress in the Exporting dialog or in Express Transfer. For more information, see Express Transfer Job tracking and history.
For more information on where Import/Export saves files, see the Community article Import/Export: Where Files Are Saved By The Import/Export Application.
You can always view the job's Exporting dialog information after it's closed by going to the Import/Export Job page and clicking the job name link. The Job page also contains more details about all jobs.
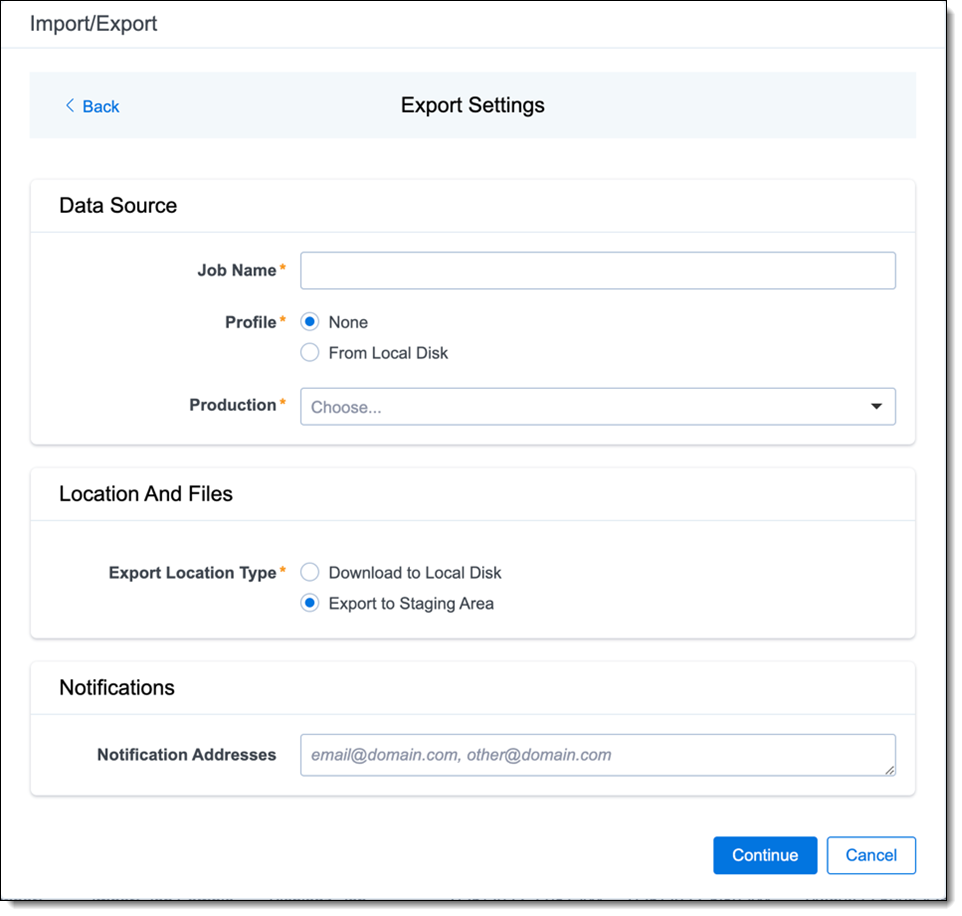
Export Settings
-
Data Source:
- Job Name—provide a descriptive job name so that you can quickly identify and track that job on the Import/Export Job page. The Job name field accepts up to 50 characters.
- Profile—the job configuration settings that were previously saved to a profile file (.ie or .kw*). They can be reused when creating future jobs with the same or similar settings in RelativityOne. This saves time and effort as well as helps prevent data entry errors when you're mapping fields, for example.
- None—select this option if you do not desire to use a profile for this export or if you intend to create a new profile based on the settings entered in the upcoming steps. You will be able to save the profile settings later on the Export Job Configuration Summary dialog. The file extension for the new profile created will be “.ie”.
- From Local Disk Profiles—use this option to select a previously saved Import/Export profile (.ie file) or an existing .kw* profile to reuse the job settings for this workflow. Use the drag and drop feature or browse for a file to choose it. All job settings provided within the selected profile file will be automatically entered where applicable in the succeeding workflow dialogs.
- Production—choose the desired production set to export.
-
Location and Files:
- Export Location Type—select one or both of these options:
- Local Disk—select this option to export the selected production set data to the Staging Area and compress it to a single zip file. Once complete, you can download the zip file with your web browser directly to a local disk by clicking the Download button. This is the recommended option when Express Transfer is activated.This temporary non-Staging Area location is automatically deleted once the download is completed when using Express Transfer or is deleted after 5 days when using web mode for downloads. This data is not included in your Staging Area threshold.
- Local Disk—select this option to export the selected production set data to the Staging Area and compress it to a single zip file. Once complete, you can download the zip file with your web browser directly to a local disk by clicking the Download button. This is the recommended option when Express Transfer is activated.
- Staging Area—select this option to create a copy of the data in the StructuredData folder in the Staging Area. You will need to use Staging Explorer later to download data. The exported data will not be compressed.
- Local Disk and Staging Area—select both options to create a copy of the selected data in the StructuredData folder in the Staging Area, as well as download it to your local disk with Express Transfer or web browser.
- The StructuredData folder is included in your Staging Area threshold. To avoid additional storage costs, you may want to delete the exported data from that folder once it is no longer needed.
- For some combinations of job configuration and data, Windows system on your local machine may not be able to open ZIP archives due to too long file paths. You may receive an error message: “The compressed (zipped) folder is invalid.” For details, go to General recommendations for structured data import and export jobs.
- Export Location Type—select one or both of these options:
-
Notifications:
- (Optional) Notification Addresses—enable email notifications by providing the email addresses of those who should get notified once the job completed, failed, or canceled.