


Feedback
Last date modified: 2026-Jul-14
Manual markups with PDF files
Redact allows you to apply markups to PDF files in the Viewer. An audit of the markups applied to each document can be viewed at any time to make tracking markups easy. You can also quickly locate any markups in a document and approve or reject them as part of your quality control process by using the Redaction Navigation card. Additionally, the Original Text field in the Redaction Navigation card is now supported with PDF documents so that you can see what text each markup covers.
Placing a markup on a document causes the coding layout to refresh. If you are editing a layout and place a markup, any unsaved edits to the layout fields will be lost. We recommend editing the fields on a layout and saving your changes before applying manual markups to a document.
If you would prefer to have markups applied automatically, see Automated PDF markup project.
PDF markup considerations
You can see a preview of what markups will look like on a PDF file by using the Download Marked Up File button in the toolbar at the bottom of the Viewer.
Supported file types
To learn more about which file types are compatible with Redact, see Redact supported file types.
PDF basic redactions
To apply a black, text, or white redaction to a PDF, do the following:
- Select the desired markup set in the bottom-left drop-drown menu. If None is selected, you will not be able to apply markups.
- Click the Redaction Mode icon. The black redaction tool is the default. Click the drop-down menu to select a different tool. You can select from the following:
- Black - creates a solid black box, like using a black marker. While you draw the box, a gray translucent fill appears.
- Text - creates a white redaction box with black text. The text will fill the box by default. You can right-click a text box redaction and select Edit to change the text redaction as desired. Alternatively, you can right-click a text box redaction and select either most recent word or phrase you entered while editing a redaction or if you have never edited or created a text redaction before, you can select Redacted instead. The system admin determines which text options are available.
- White - creates a solid white box with a gray border. The gray border won't be printed or produced.
- Draw the redaction boxes across the sections of the page you want to redact. You can draw in any direction.
The redaction is applied to the PDF file.
PDF highlights
To apply an highlight to a PDF, do the following:
- Select the desired markup set in the bottom-left drop-drown menu. If None is selected, you will not be able to apply markups.
- Click the Highlight Mode icon and select a color from the drop-down menu. Blue is the default color.
- Draw the highlight across the sections of text you want to highlight.
The highlight is applied to the PDF file.
Rejecting highlights or markups
To reject a markup or highlight so that it isn't included in production, do the following:
- You can use either of the following methods to select highlights or markups:
- Hold down on Ctrl on your keyboard, and left-click on each highlight or markup you wish to reject.
- Right-click on a markup after selecting any other highlight or markup you would like to reject.
- Do either of the following to reject the selected markups:
- If you right-clicked on a markup, select Reject from the right-click menu.
The selected markups are rejected. - Otherwise, press the Delete key on your keyboard and click Reject in the modal.
The selected markups are rejected.
- If you right-clicked on a markup, select Reject from the right-click menu.
Reviewing markups
After markups have been placed, it is a best practice to perform quality control on documents before they are produced. To learn more about how to do this using Redact, visit Reviewing markups to ensure accuracy.
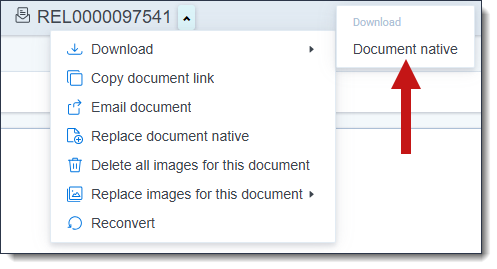
Downloading and exporting marked up documents
You can download or export documents in the following ways:
- To download a copy of the native file without any markups, click on the document actions menu in the Viewer, hover your cursor over the Download option, and then select Document native.
- To download a copy of a native PDF file with the markups applied in the Native Viewer, click on the Download Marked Up File button.
- To export multiple documents that have markups applied, run a production that includes these documents and then export the production set using Import/Export.