


Feedback
Last date modified: 2026-Jul-24
Reviewing markups to ensure accuracy
After markups have been applied, whether it be manually or automatically by a project, it is important to review them for quality control purposes. The Redact Navigation card allows you to track whether a markup has been reviewed and remove any markups that are no longer needed. Alternatively, to ensure that automated projects applied markups correctly, you can use Quality Review to compare the number of matches found in the extracted text of a document versus the number of markups that were applied by the project(s) to help you identify discrepancies before producing documents.
Using the Redact Navigation card to review markups
The Redact Navigation card offers you the ability to indicate that a markup has been approved or you can remove any markups that are no longer needed as you perform quality control. After a markup has been applied to a document, the file will be marked with Yes for the Redact - Has Native Redactions field. You can then create a saved search using that field to organize a set of documents that have had markups applied in Redact. For more information on this, see Searching for documents with Redact fields.
After opening a document in the Viewer, click the Redact Markup Navigator ![]() icon in the bottom-left to expand the Redact Navigation card. Each markup is displayed in its own row that provides additional information described below. Optionally, you can click the Approve icon to approve a markup or click the Reject icon to remove the markup from the document as part of your quality control process.
icon in the bottom-left to expand the Redact Navigation card. Each markup is displayed in its own row that provides additional information described below. Optionally, you can click the Approve icon to approve a markup or click the Reject icon to remove the markup from the document as part of your quality control process.
If you want to approve or reject several markups at once, select the desired markups manually or choose All from the Checked drop-down menu, and then click Accept or if you want to reject all markups, click Reject.
While viewing the Redact Navigation card in the Image Viewer, you can download a CSV report to your workstation that includes Redact related information by clicking the ![]() icon.
icon.

The following columns display in the Redact Navigation card:
| Column Name |
Description |
|---|---|
|
Accept/Reject |
This optional column allows you to review markups that have already been applied. The Accept/Reject column can be in one of the following states depending on which icons have been selected:
|
| Location | Displays the cell name where the markup is located. Optionally, you can click on the cell name to navigate to the location of this markup. |
| Markup Scope | Displays what each markup obscures as selected when creating the project. |
| Markup Subtype | If the markup is a highlight, this column displays the name of the color used in the highlight. If the markup is a redaction, this column display the name of the redaction type. |
| Markup Text | Displays the text in the markup for text redactions. |
| Markup Type | Displays whether the markup is a highlight or redaction. Optionally, you can click on the Markup Type to navigate to the markup within the document. |
| Origin |
Displays one of the following options to indicate where a markup came from:
|
| Original Text | Displays the text that is obscured by each markup. If multiple cells are obscured by a single markup, this column will display the name of each cell that is covered by the markup and the text that is obscured by the markup. |
| Project | Displays the name of the project that applied each markup in the document. |
| Reason | Displays the rationale you entered when creating the project for each markup. |
| Rule | Displays the name of the rule that resulted in the match and caused a markup to be applied by the Redact project. |
| Sheet | Displays the name of the sheet where the markup is located. Optionally, you can click on the sheet name to navigate to the location of this markup. |
| Timestamp | Displays the date and time when a markup was created. |
Using the Redact navigation card in the Image Viewer
In addition to the functionality described above, the Redact navigation card offers additional options in the Image Viewer to help you better understand how markups were applied to an OCR document that has extracted text. Applying markups to OCR documents has some fuzziness and if there are similar characters in the document to your search terms it can lead to false matches. As a result, we recommend QC'ing markups that are applied to an OCR document to ensure accuracy. You can view both the extracted text of the document and the text recognized as part of an OCR job and compare the two to better understand why a markup was or was not applied to certain terms.
Click View text to see the extracted text from the current document in a pop-up window.
Click View hocr to see the text from the OCR document in a pop-up window.
Review image markups using Quality Review
After running an automated image markup project, it is a best practice to review documents and ensure that all sensitive information has been properly redacted or highlighted. To aid you in this process, the Image Viewer has Quality Review. Click on the Redact Image Markup Navigator ![]() icon and ensure that the Quality Review
icon and ensure that the Quality Review ![]() icon is selected.
icon is selected.
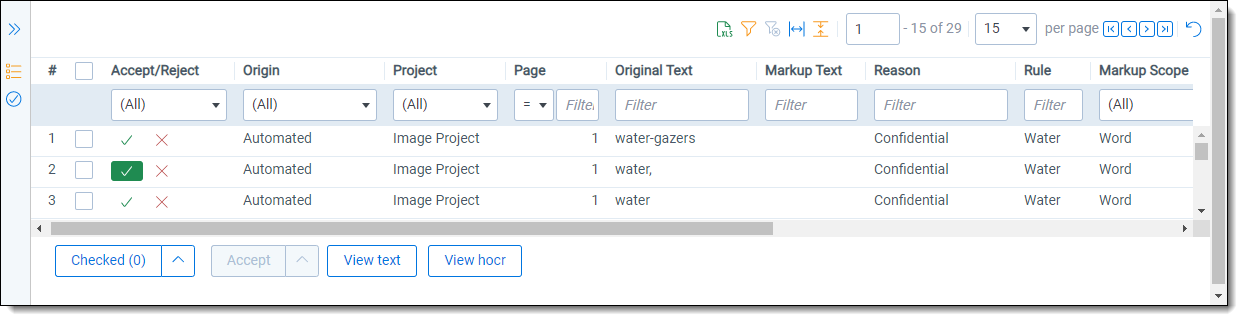
Quality Review contains a view, Image Quality Review, that allows you to compare the number of matches in the extracted text of a document as determined by the rules in the project you ran versus the number of markups applied to the document. You can use this view to find discrepancies and ensure that markups are applied to all of the correct information before production.
The following columns display in Quality Review:
| Column Name | Description |
|---|---|
| Type | Displays whether each rule was a regular expression or word/phrase. |
| Rule | Displays the name of the rule in a previously ran project that has a match either in the normal text or extracted text of the document. |
| Placed | Displays the total number of markups applied to this document. |
| Expected | Displays the total number of matches in the extracted text of the document. If this number is higher than in the Placed column, carefully review the document to ensure that there is not any sensitive information that could be exposed after production. |
Delete Native Markups
Markups that have been applied to a native document can be removed from one or more documents at a time using the Delete Native Markups mass operation. Delete Native Markups allows you to remove either all markups applied to the documents or all of the markups from a single markup set.
To remove markups on native documents, do the following:
- Navigate to the Documents tab.
- Select each document that you wish to remove markups from.
- Select Delete Native Markups from the mass operations toolbar.
The Delete Native Markups pop-up displays. - Select either All Markup Sets to remove all markups from the selected documents or the desired markup set to remove only markups applied using that markup set.
- On the Remove From field, select one of the document types to remove markups from.
- Click Save.
The markups are removed from the selected documents and an email is sent to the user's email address that summarizes the results of the mass operation.