


Feedback
Last date modified: 2026-Jun-24
Import data
To import data from Microsoft to RelativityOne using Purview Sync, you will need to have the application installed and configured properly. For more information, see Install Purview Sync.
Prerequisites
Complete the following before importing data.
Microsoft Purview review sets
You must create review sets in Microsoft before using Purview Sync. For more information, see Microsoft's documentation.
- Microsoft recommends using review sets created after November 1, 2025, following their fix to the Custodian column in the .csv load file. Prior to this, the column was empty.
- This fix applies only to review sets created after implementation. Please check Microsoft documentation for its load file metadata.
- Purview Sync not support jobs based on old review sets. To ensure accurate and defensible custodian data, Purview Sync will allow creating jobs only with new review sets, post-fix.
Processing app
You must install the Processing app in the same workspace that you installed Purview Sync.
- In your processing profile, you must set the Auto-publish set field to Yes.
- Setting the Auto-publish set to Yes automatically starts the publishing process after the completion of discovery.
- Setting the Auto-publish set to No, automatic publishing process will not start automatically.
- For the job to be completed, you must manually publish the files in the processing set within 71.5 hours after the job enters the processing phase.
- If the file is not published within this time frame, the job will not complete successfully.
Workspace fields
You must configure fields in the following way before running a Purview Sync job:
- There must be one field which will be the identifier in your workspace. This means one field with the Identifier property set to Yes. The name of this field can be anything. For example, Control Number.
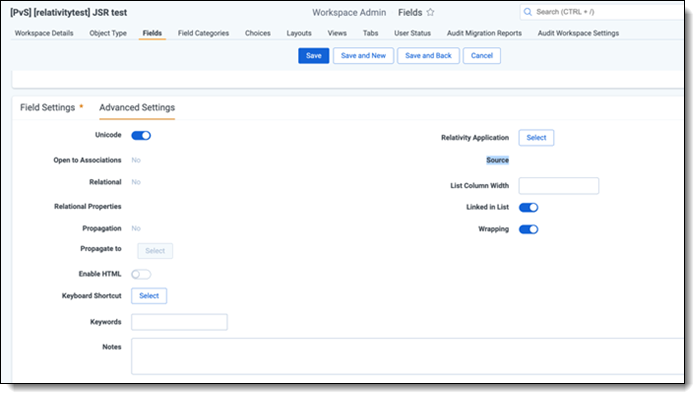
- Purview Sync requires the following fields in the workspace with sources set. Names of these fields can be anything:
- File Name
- Source Path
- You must enable all required processing fields for Purview Sync. For example, the Level and Virtual Path fields.
- For the metadata overlay purposes, you must have fields added to your workspace that would match column headers from the Microsoft load file. For more information, see Automatic overlay and using Microsoft fields.
Considerations
Before importing data, consider the following.
Job size and performance
Keep the following in mind when planning the size of your Purview Sync job.
- We recommend keeping exports sizes below 100 GB. We recommend creating multiple review sets when the data set is larger than 100 GB.
- We recommend including no more than 100 custodians in a single Purview Sync job.
- Each custodian in a Purview Sync job corresponds to a processing data source in RelativityOne, and processing is optimized for up to 100 data sources per set.
- Jobs that exceed this number may fail or experience degraded performance during processing.
- If you need to ingest data for more than 100 custodians, we recommend splitting them across multiple Purview Sync jobs.
For more information, see Processing data source and using quick-create set.
Review sets
Keep the following in mind when creating review sets in Microsoft Purview.
- You can add any Microsoft 365 data to your review set in Purview, and Purview Sync will import the entire review set at once.
- You can import one review set per one Purview Sync job.
- If you apply filters to your review set, they are not respected in the export process of your data to Relativity. For example, data is transferred as if filters were not applied.
Job naming
Keep the following in mind when naming your Purview Sync jobs.
- Purview Sync automatically creates job names based on the name of their Review Set and the date of creation, unless you create your own job name.
- If you create two jobs the same day using the same Review Set, Purview Sync will add all the files to the same folder.
- We recommend distinguishing these jobs with naming them in a different way.
Email attachments
Keep the following in mind when importing email attachments.
- Email attachments from Microsoft are delivered both within the email container and as individual files.
- Each version, the container and the standalone file, has its own identifier in the Microsoft load file.
- As a result, these attachments appear in Relativity both as part of the email family and as separate loose files.
- When a Purview review set contains an email with a single attachment, then Microsoft Purview exports the attachment as a separate file.
- The email that includes this attachment, is extracted by Processing. Check the processing profile used in this job to change deduplication behavior.
- For more information, see Processing profiles. see the Processing guide.
Microsoft Teams data
Keep the following in mind when importing Microsoft Teams data.
- Microsoft changed the structure of Microsoft Teams export data by removing metadata that previously enabled reliable attachment‑to‑message linking.
- Attachments may be displayed under a system‑generated placeholder Teams message, named Attachments with a time stamp when conversation‑level linkage is not available.
- All attachments continue to be fully captured and preserved.
Microsoft Copilot data
Keep the following in mind when importing Microsoft Copilot data.
- Microsoft is updating its support for Copilot.
- This means that some attachments may not be discoverable in Microsoft Purview. These undiscovered attachments cannot be imported into Purview Sync.
Sensitive Labels
Keep the following in mind when importing Sensitive Labels.
- Microsoft stores Sensitive Labels as GUIDs, rather than display values.
- Purview Sync imports Sensitive Labels as GUIDs and populates them as such in the workspace, provided that Sensitive Labels are included in the metadata selected to be overlaid in your Purview Sync job.
Importing
After you initiate import of data from Microsoft Purview to Relativity, the process starts with an export of your review set from Microsoft Purview.
Data is exported in the condensed directory structure format. Emails are exported as .msg files.
Data is exported as archives containing native files, or raw files, and a load file. The load file includes additional metadata in MS format from the Microsoft server. This data is then sent to the processing source location you selected during the import process of files from Microsoft Purview to Relativity.

To import the review sets from Microsoft to RelativityOne,
- Navigate to the Import tab.
- Click the New Import button.
- Select a Purview Case and a Purview Review Set.
- Optionally, update the Job Name and add a Job Description. Click Next.
- For more information, see Import fields.

- Choose your Processing Source Location and Processing Profile.
- Optionally, update the Processing Set Name, select Receive Progress Notifications, and enter any relevant email addresses to receive notifications. Click Next.
- For more information, see Processing fields.
- Make sure everything in the Import summary is correct and click Add Import.
The Import Successfully Initiated window pops up. - The job will appear under Imports where you can view Job Name, Job Status, Start Date, Size, Purview Case, Purview Review Set, and Processing Source Location.
Import fields
The list contains the fields you need to enter information in when importing.
- Purview Case—select the case from Microsoft eDiscovery Premium that you want to import.
- Purview Review Set—select the review set from Microsoft eDiscovery Premium that you want to import.
- Job Name—enter the name of your job or leave it autopopulated by Purview Sync.
- Description (Optional)—enter a description of the case and set.
Processing fields
Within Processing, the two jobs are discover and publish.
To set up processing:
- Processing Source Location—select the file repository for collected data to be stored for future processing of documents or for storing collected data.
- Processing Profile—select a processing profile available in the drop-down menu. The available profiles are from the selected workspace.
- You must have the Processing app installed on the workspace you are using.
- You must have the Auto-publish set in your processing profile set to Yes.
- All data in a completed collection or completed with errors collection will be processed after collection is complete.
- Processing Set Name—the name defaults to the Export Name in the Import step. You can also edit it for a custom name.
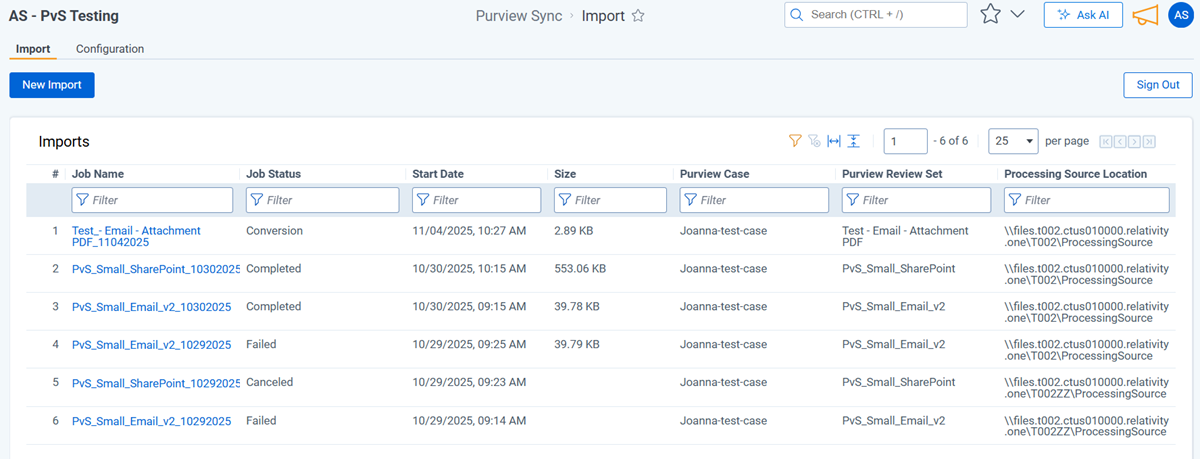
Imports list
The imports list page includes the Purview imports you added to Relativity. The list includes the data you entered such as job name, Purview Case, Review Set, and Processing Source Location. It also includes imported data such as Status, Date, and Size.
You must log in to Microsoft to see the import list.
The Imports list page provides a high-level overview of all created imports. In the import list, you will see the following information:
- Job name—the name given to the export while creating your job in Purview Sync.
- Status—the status of the import job. In the Status column, you can see different statuses:
- Scheduled—your job has been initiated.
- Export—export of your data. Then the data is downloaded as zipped files from Relativity and extracted from zips.
- Conversion—automatic conversion from HTML into RSMF (Relativity Short Message Format) is taking place.
- Processing—data is being processed in Relativity.
- Overlay—automatically updates existing records in the review workspace by merging or replacing data from the source with corresponding fields in the workspace.
- Completed—all data is collected and in Relativity.
- Failed—your job has failed. View the error description and code in the Import Details slide-out page (see below).
- Start Date—value is what the time stamp is when Relativity starts the import. Stored in UTC. Displayed in local time.
- Size—the size of the export before processing in its compressed size.
- Purview Case—the eDiscovery Premium case created in Microsoft Purview. This is similar to a workspace.
- Purview Review Set—the data set created in Microsoft Purview.
- Processing Source Location—the file repository for collected data to be stored for future processing of documents or for storing collected data. Click on the processing set name to go to the workspace with the processing set.
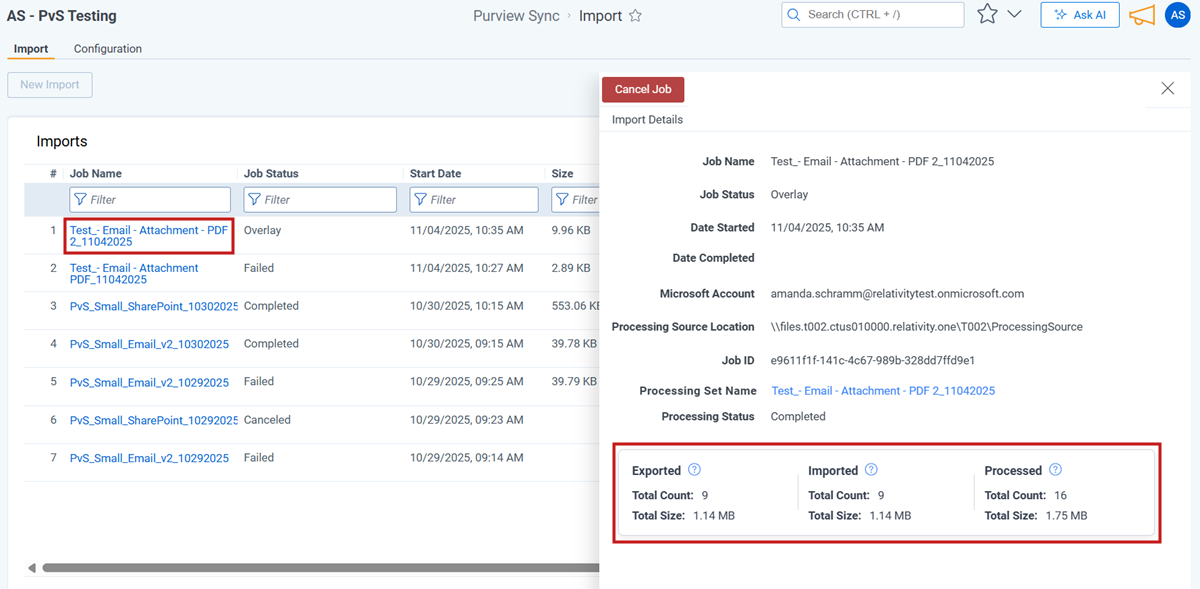
Import details
Click a job name to see the Import Details slide-out page. On the Import Details page, you can see the following information:
- Job Name—the name of the job. By default, this is the Review Set name and date created.
- Error Details—short error description and code of the error.
- Job Status—the status of the import job.
- Date Start—lists the date and time Relativity started importing data.
- Date Completed—lists the date and time Relativity completed the import. When the job is not yet completed, the column shows To be determined.
- Microsoft Account—lists the user's Microsoft email address.
- Processing Source Location—lists the file repository that collected data is stored for future processing of documents or for storing collected data.
- Job ID—unique ID of your job. It might be helpful if you contact Customer Support.
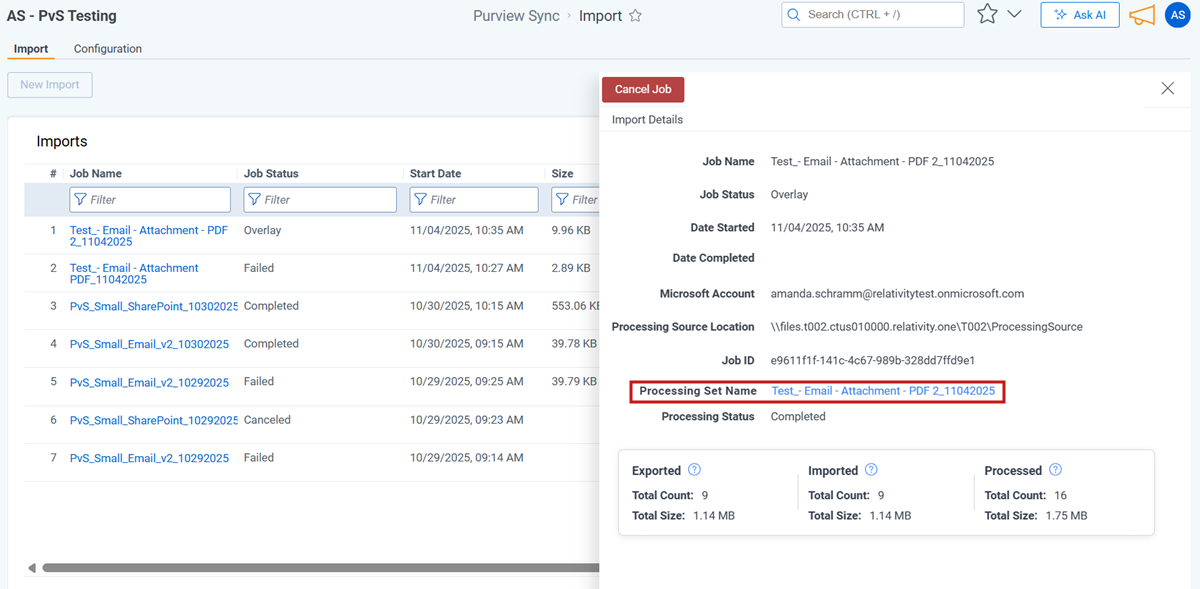
Underneath these job details, you can find details of a Processing Set:
- Processing Set name—after clicking into it, you get directed to the Processing app in Relativity, where you can see all details of the processing of your job.
- Workspace—name of the workspace where your processing set is.
- Processing Status—status of the processing part of your job. It might be different from the Job Status visible on the Imports List.
Select Processing Set Name to view specific processing details and any errors.
Cancel and retry job
You can cancel a Purview Sync job at any time after it has been created. You cannot cancel a finished job, Completed status, or has failed, Failed status.
You can retry a Purview Sync job that failed. When retried, Purview Sync resumes processing from the point where the job stopped, except for the Conversion stage of the job.