


Feedback
Last date modified: 2026-Jul-08
Processing profiles
A processing profile is an object that stores the numbering, deNIST, extraction, and deduplication settings that the processing engine refers to when publishing the documents in each data source that you attach to your processing set. You can create a profile specifically for one set or you can reuse the same profile for multiple sets.
This documentation contains references to third-party software, or technologies. While efforts are made to keep third-party references updated, the images, documentation, or guidance in this topic may not accurately represent the current behavior or user interfaces of the third-party software. For more considerations regarding third-party software, such as copyright and ownership, see Terms of Use.
Relativity provides a Default profile upon installation of processing.
Creating or editing a processing profile
To create or edit a processing profile:
- Use the search bar to navigate to the Processing Profile tab.
- Click New Processing Profile or select any profile in the list.
- Complete or modify the fields on the Processing Profile layout.
- Click Save. Once you save the processing profile, you can associate it with a processing set.
You can't delete the Default processing profile. If you delete a profile that is associated with a processing set you've already started, the in-progress processing phase will continue with the original profile settings you applied when you submitted the job, but you won't be able to proceed to the next phase. For example, if you delete a profile during discovery, you won't be able to publish those discovered files until you add a new profile to the set. If you have an existing processing set that you haven't started that refers to a profile that you deleted after associating it to the set, you must associate a new profile with the set before you can start that processing job.
Fields
Relativity doesn't re-extract text for a re-discovered file unless an extraction error occurred. This means that if you discover the same file twice and you change any settings on the profile, or select a different profile, between the two discovery jobs, Relativity will not re-extract the text from that file unless there was an extraction error. This is because processing always refers to the original/primary document and the original text stored in the database.
Processing profile information
The Processing Profile Information category of the profile layout provides the following fields:
- Name—the name you want to give the profile.
Numbering settings
The Numbering Settings category of the profile layout provides the following fields.
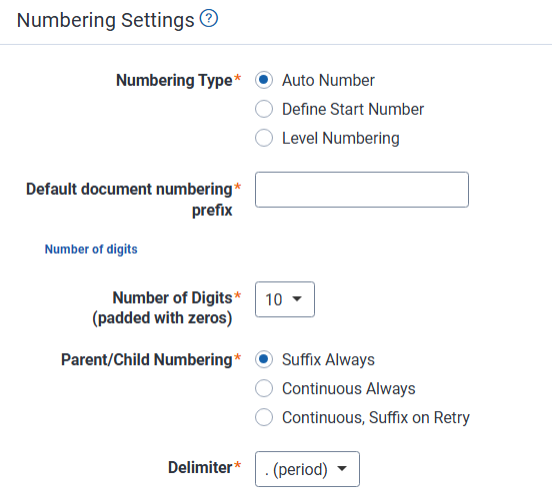
- Numbering Type—determines how the documents in each data source are numbered when published to the workspace. This field gives you the option of defining your document numbering schema. It is useful in keeping your document numbering consistent when importing documents from alternate sources. The choices for this field are:
- Auto Number—determines that the next published document will be identified by the next available number of that prefix.
- Define Start Number—sets the starting number of the documents you intend to publish to the workspace.
- Relativity uses the next available number for that prefix if the number is already published to the workspace.
- To ensure continuity, Relativity will never assign a control number below the defined starting number in future processing sets. For example, if you define a starting number of 100, the numbers 0-99 become unavailable for future use for that prefix.
- This option is useful when you process from a third-party tool that does not provide a suffix for your documents and you want to define a new start number for the next set of documents to keep the numbering continuous.
- Selecting this choice makes the Default Start Number field available below and the Start Number field on the data source layout.
- Default Start Number—the starting number for documents that are published from the processing set(s) that use this profile.
- This field is only visible if you selected the Define Start Number choice for the Numbering Type field above.
- If you use a different start number for the Start Number field on the data source that you attach the processing set, that number takes precedence over the value you enter here.
- The maximum value you can enter here is 2,147,483,647. If you enter a higher value, you'll receive an Invalid Integer warning next to field value and you won't be able to save the profile.
- Default Start Number—the starting number for documents that are published from the processing set(s) that use this profile.
- Level numbering—option to number documents with a control number that follows the format PPP.BBBB.FFFF.NNNN at a document level. For details on level numbering, see Level numbering special considerations.
- Number of Digits—determines how many digits each level of the document's control number contains.
- Level 2 (box number)—corresponds to the BBBB level . Selecting 4 in the drop-down list will allow for the following range in this level: 0001-9999. By default, this field is set to 3.
- Level 3 (folder number)—corresponds to the FFFF level . Selecting 4 in the drop-down list will allow for the following range in this level: 0001 - 9999. By default, this field is set to 3.
- Level 4 (document number)—corresponds to the NNNN level at the document level . Selecting 4 in the drop-down list will allow for the following range in this level: 0001 - 9999. By default, this field is set to 4.
- Number of Digits—determines how many digits each level of the document's control number contains.
- Default document numbering prefix—the prefix applied to each file in a processing set once it is published to a workspace. The default value for this field is REL.
- When applied to documents, this appears as the prefix, followed by the number of digits you specify. For example, <Prefix>xxxxxxxxxx.
- If you use a different prefix for the Custodian field on the processing data source(s) that you add to your processing set, the custodian's prefix takes precedence over the profile's.
- The character limit for this prefix is 75.When Level numbering is selected, the prefix corresponds to the PPP section in the PPP.BBBB.FFFF.NNNN format and it can be used to identify the source or owner of the documents also known as ‘party code’ or ‘source’.
- Number of Digits—determines how many digits the document's control number contains. The range of available values is 1 to 10 when Define Start Number is selected. By default, this field is set to 10 characters.
- Parent/Child Numbering—determines how parent and child documents are numbered relative to each other when published to the workspace. The choices for this field are as follows. For examples of each type, see
Parent/child numbering type examples.
- Suffix Always—child documents are numbered according to their parent, along with a suffix and delimiter of your choice.
- Continuous Always—child documents receive the next sequential control number after their parent.
- Continuous, Suffix on Retry—child documents are assigned control numbers in continuous format by default. However, new child documents discovered through retry go through the Suffix Always numbering process.
It is possible for your workspace to contain a document family that has both suffixed and non-suffixed child documents. See Suffix special considerations for details.
- Delimiter—the delimiter you want to appear between the different fragments of the control number of your published child documents. The choices for this field are:
- - (hyphen)—adds a hyphen as the delimiter to the control number of child documents. For example, REL0000000001-0001-0001.
- . (period)—adds a period as the delimiter to the control number of child documents. For example, REL0000000001.0001.0001.
- _(underscore)—adds an underscore as the delimiter to the control number of child documents. For example, REL0000000001_0001_0001.
- Delimiter—the delimiter you want to appear between the different fragments of the control number of your published child documents. The choices for this field are:
- Level numbering cannot be used with Quick-Create Set(s).
- Level numbering and data source cannot be changed upon publish, retry, or republish. Non-level numbering cannot be changed to level numbering on a published processing set and then republished. Once published, Numbering Type cannot be changed.
When Level numbering is selected as the Numbering Type in the Processing Profile, the prefix corresponds to the PPP section in the PPP.BBB.FFF.NNNN format. It can be used to identify the source or owner of the documents also known as ‘party code’ or ‘source’.
In the Number of digits section, you can determine the number of digits to use in each level. For example, selecting 4 in the drop-down list will allow for the following range in that level: 0001 - 9999.
Level 2 (box number)—corresponds to the BBB level in the PPP.BBB.FFF.NNNN format. Default value is 3 digits.
Level 3 (folder number)—corresponds to the FFF level in the PPP.BBB.FFF.NNNN format. Default value is 3 digits.
Level 4 (document number)—corresponds to the NNNN level in the PPP.BBB.FFF.NNNN format. Default value is 4 digits.
Once published, Numbering Type cannot be changed. Thus, Level numbering and data source cannot be changed upon publish, retry, or republish. Non-level numbering cannot be changed to level numbering on a published processing set and then republished.
Create a new Processing Set and add the data sources that you need. If the profile used by the Processing Set is Level Numbering, you can define the start number for each Data Source when adding or modifying data sources to the Processing Set.
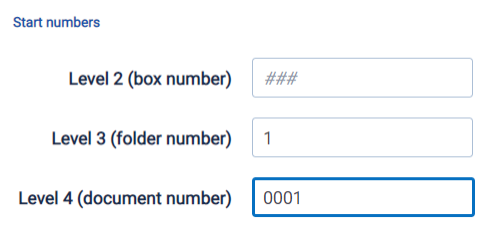
When you create a new data source, the system will use # to indicate how many digits were configured for that level in the Processing Profile used on the current Processing Set. If a level was configured to take up to 3 digits, you can enter a start number with no padding, (e.g., 1), or with padding, (e.g., 0001).
Level numbering and control numbers
By using Level Numbering, you can define a prefix text and three numbering levels as the control number to be used on documents that are published. For example:
- Prefix: REL.
- Level one numbering: 001
- Level two numbering: 001
- Level three numbering: 0001
When creating the control number, each level will be separated by a dot symbol, e.g., REL.001.001.0001.
Each level has a range of numbers that it can support. For example, 01 supports from 01 to 99. On the other hand, 001 supports from 001 to 999.
Fields like Family/Group Identifier, Attachments, and Parent ID are created based on the new control number.
Document level numbering vs page level numbering
The Level Numbering applies only at the document level. For example, if a data source is processing data using 01 for Level 1 numbering, 001 for Level 2 numbering, and 0001 for level 3 numbering, then the corresponding control numbers will be as follows:
| Example List of Documents to Process | Resulting Control Number |
|---|---|
| Doc 1: document with 3 pages | PREFIX.001.001.0001 |
| Doc 2: a one-page document | PREFIX.001.001.0002 |
| Doc 3: a one-page document | PREFIX.001.001.0003 |
| Doc 4: a 5 pages document | PREFIX.001.001.0004 |
| Doc 5: a 2 pages document | PREFIX.001.001.0005 |
| Doc 6: an email with no attachments | PREFIX.001.001.0006 |
Keeping families together
Families roll over to new level
When a family does not fit on the current level, the whole family rolls over to next level to keep the family together. See the example below:
When a family does not fit on the current level, the whole family rolls over to next level to keep the family together. See example below:
| Number | Document |
|---|---|
| REL.001.0001.9999 | Excel document |
| REL.001.0002.0001 | Word document |
| REL.001.0002.0002 | Word document |
9,997 documents later
| Number | Document |
|---|---|
| REL.001.0002.9997 | email with no attachments |
| REL.001.0003.0001 | email with 4 attachments |
| REL.001.0003.0002 | attachment 1 |
| REL.001.0003.0003 | attachment 2 |
| REL.001.0003.0004 | attachment 3 |
| REL.001.0003.0005 | attachment 4 |
The email with 4 attachments couldn’t use 9998 because the current level only had 2 values left (9998 - 9999), but families are required to stay together in the same level, so it roll overs to the next level.
Multi-level families must roll over
A family is every document that can be traced to the same parent. Grandchildren are in same family as children, thus, grandchildren stay in the same level as the rest of the family.
Publish scenario:
| Number - Document |
|---|
| REL.001.0001.9999 – excel document |
| REL.001.0002.0001 – word document |
| REL.001.0002.0002 – word document |
9,995 documents later
| Number - Document |
|---|
| REL.001.0002.9995 – email with no attachments |
| REL.001.0003.0001 – email with 4 attachments |
| REL.001.0003.0002 – attachment 1 from REL.001.0003.0001 |
| REL.001.0003.0003 – attachment 2 from REL.001.0003.0002 |
| REL.001.0003.0004 – attachment 3 from REL.001.0003.0001 |
| REL.001.0003.0005 – attachment 4 from REL.001.0003.0001 |
Family does not fit in one level
If there are more children documents than it can fit in a single level, then Relativity will suffix the children that overflow.
Publish scenario:
| Number - Document |
|---|
| REL.001.0003.0001 – email with 10,000 attachments |
| REL.001.0003.0002 – attachment 1 |
| REL.001.0003.0003 – attachment 2 |
| REL.001.0003.0004 – attachment 3 |
| REL.001.0003.0005 – attachment 4 |
| [...] |
| REL.001.0003.9999 – attachment 9998 |
| REL.001.0003.0001_0001 – attachment 9999 |
| REL.001.0003.0001_0002 – attachment 10,000 |
Republish scenarios
New child found during republish
If during Retry-Discover, Relativity finds new children from a password-protected file, then Relativity will publish these children using the parent control number and a suffix appended to it. See the example below:
Initial Publish:
| Number | Document |
|---|---|
| REL.001.001.0001 | |
| REL.001.001.0002 | |
| REL.001.001.0003 | (Password-protected file) |
| REL.001.001.0004 |
Republish:
| Number | Document |
|---|---|
| REL.001.001.0001 | |
| REL.001.001.0002 | |
| REL.001.001.0003 | (Password-protected file) |
| REL.001.001.0003_0001 | new child found in REL.001.001.0003 |
| REL.001.001.0003_0002 | new child found in REL.001.001.0003 |
New child found during republish in a document with the highest possible control number at a specific level
If during Retry-Discover, Relativity finds new children in a document that holds the highest control number in the last level, then Relativity will publish these children with their parent's control number and a suffix appended to it. The family will not be moved to a new folder. See example below:
Initial Publish:
| Number | Document |
|---|---|
| REL.001.001.9997 | |
| REL.001.001.9998 | |
| REL.001.001.9999 | (Password-protected file) |
| REL.001.002.0001 | |
| REL.001.002.0002 |
Republish:
| Number | Document |
|---|---|
| REL.001.001.9997 | |
| REL.001.001.9998 | |
| REL.001.001.9999 | (Password-protected file) |
| REL.001.001.9999_0001 | new child found in password-protected file |
| REL.001.002.0001 | |
| REL.001.002.0002 |
A child with multiple children is found during republish
If during Retry-Discover, Relativity finds new children in a document that holds the highest control number in a level, and those children also have children, then Relativity will publish these children with the ORIGINAL parent control number + a suffix appended to it. Family will not be moved to a new folder. See example below:
Initial publish:
| Number | Document |
|---|---|
| REL.001.001.9997 | |
| REL.001.001.9998 | |
| REL.001.001.9999 | (Password-protected file) |
| REL.001.002.0001 | |
| REL.001.002.0002 |
Republish:
| Number | Document |
|---|---|
| REL.001.001.9997 | |
| REL.001.001.9998 | |
| REL.001.001.9999 | (Password-protected file) |
| REL.001.001.9999_0001 | new child found in REL.001.001.9999 |
| REL.001.001.9999_0002 | new child found in REL.001.001.9999_0001 |
| REL.001.001.9999_0003 | new child found in REL.001.001.9999_0001 |
| REL.001.001.9999_0004 | new child found in REL.001.001.9999 |
| REL.001.002.0001 | |
| REL.001.002.0002 |
New documents from a container
When Relativity finds new root level documents, Relativity will not suffix them. Instead, Relativity will assign them to the next control number available.
Initial publish received error on ZIP container and can publish only two documents:
| Number | Document |
|---|---|
| REL.001.001.9997 | |
| REL.001.001.9998 | |
| REL.001.001.9999 | SourceFolder/containerFile.Zip |
| REL.001.002.0001 | SourceFolder/containerFile.Zip/1.txt |
| REL.001.002.0002 | SourceFolder/containerFile.Zip/2.txt |
| REL.001.002.0003 | SourceFolder/flatDocument |
When retry-discover yields two more documents from the ZIP container:
| Number | Document |
|---|---|
| REL.001.001.9997 | |
| REL.001.001.9998 | |
| REL.001.001.9999 | SourceFolder/containerFile.Zip |
| REL.001.002.0001 | SourceFolder/containerFile.Zip/1.txt |
| REL.001.002.0002 | SourceFolder/containerFile.Zip/2.txt |
| REL.001.002.0003 | SourceFolder/flatDocument |
| REL.001.002.0004 | SourceFolder/containerFile.Zip/3.txt (new doc) |
| REL.001.002.0005 | SourceFolder/containerFile.Zip/3.txt (new doc) |
Republish new root documents, each family is a single document
If new documents are published with a start number that is within a range that have unused numbers, new documents will be published in those gaps. See example below:
Initial Publish started at REL.001.001.001. First 998 documents are single documents with no families or attachment. Document 999 is family with 30 documents, so it is published on the next level:
| Number | Document |
|---|---|
| REL.001.001.001 | |
| REL.001.001.998 | Next document is a family with 30 documents that rollovers. |
| REL. 001.002.001 | Family with 30 attachments. |
| REL.001.002.030 | Last document published. |
Republish finds 3 new root documents, each family is a single document. Thus, new documents are published using any numbering gaps.
| Number | Document |
|---|---|
| REL.001.001.999 | First document is published using 999. |
| REL.001.002.031 | Second document is published in the next available number. |
| REL.001.002.032 | Third document uses next available number and so on. |
Collisions
Collisions with a new data source
Let's assume that documents were already published using numbers REL.001.001.001 to REL.001.001.010. If a new data source is created with a start number that was already used (e.g., REL.001.001.008), then the new data source start number is the next available number: REL.001.001.011.
Collisions among multiple data sources
If a user adds 3 data sources and each data source has 10 documents and the same start number, when published, each data source start number will be the next available number. For example:
Data source 1: REL.001.001.0001- REL.001.001.0010
Data souce 2: REL.001.001.0011- REL.001.001.0020
Data souce 2: REL.001.001.0021 - REL.001.001.0030
Overflow scenarios
Children overflow during republish
If the number of new children found during republish is higher than the maximum allowed by the suffix padding digits, then Relativity would use the next consecutive number without increasing the padding of the previous published children.
Initial Publish:
| Number | Document |
|---|---|
| REL.001.001.9998 | |
| REL.001.001.9999 | (Password-protected file) |
| REL.001.002.0001 | |
| REL.001.002.0002 |
Republish:
| Number | Document |
|---|---|
| REL.001.001.9998 | |
| REL.001.001.9999 | (Password-protected file) |
| REL.001.001.9999_0001 | new child found in REL.001.001.9999 |
| REL.001.001.9999_0002 | new child found in REL.001.001.9999_0001 |
| REL.001.001.9999_0003 | new child found in REL.001.001.9999_0001 |
| ... | |
| REL.001.001.9999_9999 | new child found in REL.001.001.9999 (uses 4 digits padding) |
| REL.001.001.9999_10000 | new child found in REL.001.001.9999(uses 5 digits padding) |
| REL.001.002.0001 |
Inventory / Discover settings
The Inventory | Discover Settings category of the profile layout provides the following fields.
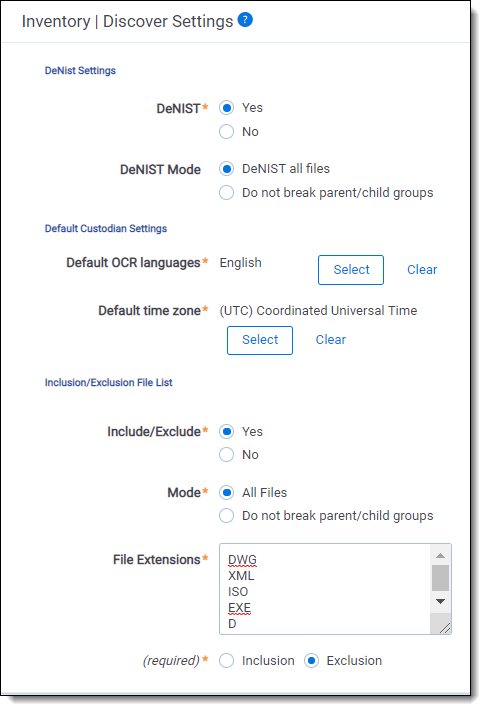
- DeNIST—if set to Yes, processing separates and removes files found on the National Institute of Standards and Technology (NIST) list from the data you plan to process so that they don't make it into Relativity when you publish a processing set. The NIST list contains file signatures—or hash values—for millions of files that hold little evidentiary value for litigation purposes because they are not user-generated. This list may not contain every known junk or system file, so deNISTing may not remove 100% of undesirable material. If you know that the data you intend to process contains no system files, you can select No. If the DeNIST field is set to Yes on the profile but the Invariant database table is empty for the DeNIST field, you can't publish files. If the DeNIST field is set to No on the processing profile, the DeNIST filter doesn't appear by default in Inventory, and you don't have the option to add it. Likewise, if the DeNIST field is set to Yes on the profile, the corresponding filter is enabled in Inventory, and you can't disable it for that processing set. The choices for this field are:
- Yes—removes all files found on the NIST list. You can further define DeNIST options by specifying a value for the DeNIST Mode field.When DeNISTing, the processing engine takes into consideration everything about the file, including extension, header information and the content of the file itself. Even if header information is removed and the extension is changed, the engine is still able to identify and remove a NIST file. This is because it references the hashes of the system files that are found in the NIST database and matches up the hash of, for example, a Windows DLL to the hash of known DLL's in the database table.
- No—doesn't remove any files found on the NIST list. Files found on the NIST list are then published with the processing set.The same NIST list is used for all workspaces in the environment. Relativity makes new versions of the NIST list available shortly after the National Software Reference Library (NSRL) releases them quarterly. The NIST list is deployed to all instances by Relativity.
- Yes—removes all files found on the NIST list. You can further define DeNIST options by specifying a value for the DeNIST Mode field.
- DeNIST Mode—specify DeNIST options in your documents if DeNIST is set to Yes.
- DeNIST all files—breaks any parent/child groups and removes any attached files found on the NIST list from your document set.
- Do not break parent/child groups—doesn't break any parent/child groups, regardless if the files are on the NIST list. Any loose NIST files are removed.
- Default OCR languages—the language used to OCR files where text extraction isn't possible, such as for image files containing text. This selection determines the default language on the processing data sources that you create and then associate with a processing set.
- Default time zone—the time zone used to display date and time on a processed document. This selection determines the default time zone on the processing data sources that you create and then associate with a processing set. The default time zone is applied from the processing profile during the discovery stage.
The processing engine discovers all natives in UTC and then applies the time zone's UTC offset to all date and time metadata fields. When applicable, date and time values are further adjusted by the Daylight Savings Time (DST) offset. These adjusted values are also reflected in the text extracted during processing, for example the Sent Date/Time displayed in the header portion of email text.- Processing also uses the configured time zone to populate two system fields that are automatically mapped and published to the workspace: Relativity Native Time Zone Offset and Time Zone Field. These are used downstream for Native Viewer file conversion and Imaging activities. For more information, see System-mapped fields.
- This time zone setting does not affect the RSMF Filter date range in the Short Message Viewer, which uses the viewer’s local machine time zone instead. See RSMF file creation limitations for details.
RSMF extracted text preserves source-file timestamps (typically UTC) regardless of the processing profile offset. Only the RSMF metadata fields are adjusted.
- Include/Exclude—enables the toggle for the inclusion/exclusion fields. The Inclusion/Exclusion File List allows you to manually enter custom lists of file extensions to either include or exclude. This gives greater flexibility to cull down data sets during Processing, resulting in faster Discovery, increased relevancy for review, and storage reduction. If DeNist and Include/Exclude are both selected, DeNist will run first.
- Yes—reveals the additional associated inclusion/exclusion fields as required.
- No—hides the additional associated inclusion/exclusion fields.
- Mode—specifies Include/Exclude options in your documents if Include/Exclude is set to Yes.
- All files—breaks any parent/child groups and removes any attached files found on the inclusion/exclusion list from your document set.
- Do not break parent/child groups—doesn't break any parent/child groups, regardless if the files are on the inclusion/exclusion list. Any loose inclusion/exclusion files are removed.
- File Extensions—cross references the identified File Extension of the file, not its original extension.
This long text field is used to enter the list of file extensions. The file extensions will be determined based on groupings of case insensitive alphanumeric characters. Hard returns are determined as delimiters and file a new extension. For example, the following list:
.dwg
.xml
.iso
.exe
.d
will create a list of .dwg, .xml, .iso, .exe, .d to exclude from DiscoveryFile extensions must be separated with a hard return in order to be filed as a new extension. Extensions are case insensitive and should be entered as just the name of the extension (such as exe versus .exe). - Inclusion/Exclusion Selection
- Inclusion—causes any File Extension within the list to be Discovered while all other to be filtered out.
- Exclusion—causes any File Extension within the list to be filtered out while all other File Extensions get included.
Extraction settings
The Extraction Settings category of the profile layout provides the following fields.
For all text extraction methods described below, Relativity is recommended over both Native settings and dtSearch for performance and accuracy.
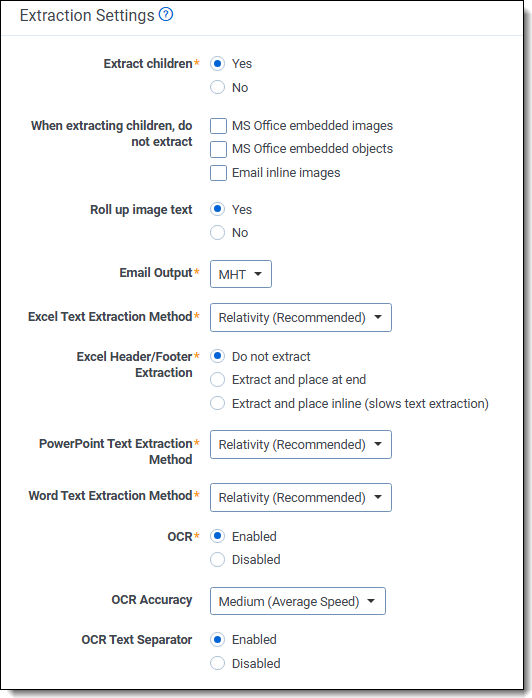
- Extract children—Choose whether or not to extract child items during discovery, including message attachments, embedded objects and images, and other non-parent files. Select either:
- Yes—to extract all child files during discovery so that both child and parent items are included in the processing job.
- No—to exclude child items, so that only parent items are included in the processing job. Selecting No hides the corresponding options for embedded image and object extraction, and image text roll up.
- The Extract children field must be set to Yes if you are working with short message data. If you set this field to No, attachments that are discovered and published are not viewable.
- You do not need to set the Extract children field to Yes to have files within PST, L01, ZIP, and other container files extracted. Relativity automatically expands these containers by default.
- When extracting children, do not extract—choose to include or exclude MS Office embedded images, MS Office embedded objects, and Email inline images. Options are:
- MS Office embedded images—selecting this option excludes images of various file types found inside Microsoft Office files (such as .jpg, .bmp, or .png in a Word file) from discovery. As a result, these embedded images are not subject to text extraction and OCR, nor are they published as discrete items to the workspace.
- MS Office embedded objects—selecting this option excludes objects of various file types found inside Microsoft Office files (such as an Excel spreadsheet inside a Word file, or a PDF file inside in a Word file) from discovery. As a result, these embedded objects are not subject to text extraction and OCR, nor are they published as discrete items to the workspace.
- Email inline images—selecting this option excludes images of various files types found inside emails (such as .jpg, .bmp, or .png in an email) from discovery. As a result, these embedded in-line images are not subject to text extraction and OCR, nor are they published as discrete items to the workspace.
- See Microsoft Office child extraction support for information on what MS Office documents can have embedded images and objects extracted.
- See Email image extraction support for information on what type of emails can have inline images extracted.
- Depending on how an object is embedded within an MS Office file, the content may display natively as either an icon, or as a static - and sometimes limited - view of the content itself. For example, in the case of a Word document with embedded Excel spreadsheet, Word creates and stores an .emf image file of the active sheet and no other sheets. This is in addition to storing the Excel file, unless the Microsoft option Link to File was chosen when embedding the object, in which case the .emf image file is the only representation of the embedded content. These .emf files are treated as embedded images by Relativity, and as such are subject to the Extract children and Do not extract... MS Office embedded images settings. Choosing not to suppress these MS Office embedded images results in the .emf file being OCR'd and published to the workspace. If text is needed for searching, but you want to reduce your workspace size, consider additionally enabling the Roll Up Image Text option described below.
- Roll up image text—selecting this option appends the image's text to the end of the parent document, following a text separator, and excludes the image from being published to the workspace. The benefit of this feature is cost savings due to reduced file count and size in the hosted workspace.
- You must enable OCR to get any text for image text roll up.
- Images that have their text rolled up are marked as deleted. You can view a list of deleted items on the Files tab > Deleted files view.
- An image can be attached to a document as an MS Office embedded image, an Email inline image, or even an MS Office embedded object if the image is stored as an object. The Roll up image text option applies to any and all of these scenarios, as long as you have not chosen to suppress extraction using the When extracting children, do not extract... options.
- The exceptions to this general rule are images that are non-inline hidden attachments of MSG files, and images embedded in Microsoft OneNote files. The Do not extract... and Roll up image text options do not apply to these. Setting Extract Children to Yes results in the unconditional extraction, OCR, and roll up of these images, with only the parent file published to the workspace.
| Extract children | When extracting children, do not extract embedded images, embedded objects, email inline images | Roll-up Image Text | Child Extracted? | Child text and OCR appended to parent? | Child published? |
|---|---|---|---|---|---|
|
No
|
N/A
|
N/A
|
✕
|
N/A |
N/A |
|
Yes
|
Checked
- don't extract |
No
|
✕
|
N/A
|
N/A
|
|
Yes
|
Checked
- don't extract |
Yes
|
✕
|
N/A
|
N/A
|
|
Yes
|
Unchecked
- do extract |
No
|
✓
|
✕
|
✓
|
|
Yes
|
Unchecked
- do extract |
Yes
|
✓
|
✓
|
✕
|
Other extraction settings
- Email Output—determines the file format in which emails will be published to the workspace. The options are:
- MSG—publishes emails which are handled as MSGs during processing as MSG
- MHT—converts and publishes emails which are handled as MSGs during processing as MHT
- This option affects the following file types: Outlook files, Lotus Notes files, Bloomberg files.
- Relativity does not convert EML formats to MHT.
- Hashing for deduplication is performed on emails before conversion to MHT. The Processing Duplicate Hash value contains the Body, Header, Recipient, and Attachment hashes instead of the SHA256 hash used on native MHTs. After conversion, unique information from MSGs may render the same in the resulting MHT due to the files format. An example is two MSG's that contain "[www.test.com [http//:www.test.com]" and "www.test.com<http://www.test.com/>" in their respective text. During hash generation, these MSG's result in unique body hashes. When converted to an MHT, this text renders as "www.test.com<http://www.test.com/>". You can view or map individual Body, Header, Recipient, and Attachment hashes from the Files tab.
- This conversion happens during discovery.
- MSG files take up unnecessary space because attachments to an MSG are stored twice, once with the MSG itself and again when they’re extracted and saved as their own records. As a result, when you convert an MSG to an MHT, you significantly reduce your file storage because MHT files do not require duplicative storage of attachments.
- If you need to produce a native email file while excluding all privileged or irrelevant files, convert the email native from MSG to MHT by using the Email Output field. After an email is converted from MSG to MHT, the MHT email is published to the workspace separately from any attachments, reducing the chance of accidentally producing privileged attachments.
- Once you convert an MSG file to MHT, you cannot revert this conversion after the files have been published. For a list of differences between how Relativity handles MSG and MHT files, see MSG to MHT conversion considerations.
There is also a Yes/No Processing field called Converted Email Format that tracks whether an email was converted to MHT.
- Excel Text Extraction Method—determines whether the processing engine uses Excel, Relativity, or dtSearch to extract text from Excel files during publish. For a list of the differences between text extraction methods, see Text extraction method considerations.
- Relativity (Recommended)—Relativity uses its built-in engine to extract text from Excel files.Using Relativity's built-in engine is the recommended method for performance and accuracy.
- Native (Legacy)—Relativity uses Excel to extract text from Excel files.
- Native - failover to dtSearch (Legacy)—Relativity uses Excel to extract text from Excel files with dtSearch as a backup text extraction method if extraction fails.
- dtSearch- failover to Native (Legacy)—Relativity uses dtSearch to extract text from Excel files with Native as a backup text extraction method if extraction fails. This typically results in faster extraction speeds; however, we recommend considering some differences between dtSearch and Native extraction. For example, dtSearch doesn't support extracting the Track Changes text from Excel files. For more considerations like this, see dtSearch special considerations. If you select dtSearch, you will see a warning that indicates this is a less optimal choice and to consider selecting Relativity (Recommended) instead.
- Relativity (Recommended)—Relativity uses its built-in engine to extract text from Excel files.
- Excel Header/Footer Extraction—extract header and footer information from Excel files when you publish them. This is useful for instances in which the header and footer information in your Excel files is relevant to the case. Any selections for this field are nullified if you select dtSearch for the extraction method. Header and footer options are:
- Do not extract—doesn't extract any of the header or footer information from the Excel files and publishes the files with the header and footer in their normal positions. This option is selected by default; however, if you change the value for the Excel Text Extraction Method field above from dtSearch, back to Native, this option will be de-selected and you'll have to select one of these options in order to save the profile.
- Extract and place at end—extracts the header and footer information and stacks the header on top of the footer at the end of the text of each sheet of the Excel file. Note that the native file will still have its header and footer.
- Extract and place inline (slows text extraction)—extracts the header and footer information and puts it inline into the file. The header appears inline directly above the text in each sheet of the file, while the footer appear directly below the text. Note that this could impact text extraction performance if your data set includes many Excel files with headers and footers. Note that the native file will still have its header and footer.
- PowerPoint Text Extraction Method—determines whether the processing engine uses PowerPoint, Relativity, or dtSearch to extract text from PowerPoint files during publish. For a list of the differences between text extraction methods, see Text extraction method considerations.
- Relativity (Recommended)—Relativity uses its built-in engine to extract text from PowerPoint files.Using Relativity's built-in engine is the recommended method for performance and accuracy.
- Native (Legacy)—Relativity uses PowerPoint to extract text from PowerPoint files.
- Native - failover to dtSearch (Legacy)—Relativity uses PowerPoint to extract text from PowerPoint files with dtSearch as a backup text extraction method if extraction fails.
- dtSearch - failover to Native (Legacy)—Relativity uses dtSearch to extract text from PowerPoint files with Native as a backup text extraction method if extraction fails. This typically results in faster extraction speeds; however, we recommend considering some differences between dtSearch and Native extraction. For example, dtSearch doesn't support extracting watermarks from pre-2007 PowerPoint files, and also certain metadata fields aren't populated when using dtSearch. For more considerations like this, see dtSearch special considerations.
- Relativity (Recommended)—Relativity uses its built-in engine to extract text from PowerPoint files.
- Word Text Extraction Method—determines whether the processing engine uses Word, Relativity, or dtSearch to extract text from Word files during publish. For a list of the differences between text extraction methods, see Text extraction method considerations.
- Relativity (Recommended)—Relativity uses its built-in engine to extract text from Word files.Using Relativity's built-in engine is the recommended method for performance and accuracy.
- Native (Legacy)—Relativity uses Word to extract text from Word files.
- Native - failover to dtSearch (Legacy)—Relativity uses Word to extract text from Word files with dtSearch as a backup text extraction method if extraction fails.
- dtSearch - failover to Native (Legacy)—Relativity uses dtSearch to extract text from Word files with Native as a backup text extraction method if extraction fails. This typically results in faster extraction speeds; however, we recommend considering some differences between dtSearch and Native extraction. For example, dtSearch doesn't support extracting watermarks from pre-2007 Word files, and also certain metadata fields aren't populated when using dtSearch. For more considerations like this, see dtSearch special considerations.
- Relativity (Recommended)—Relativity uses its built-in engine to extract text from Word files.
- OCR—select Enable to run OCR during processing. If you select Disable, Relativity won't provide any OCR text in the Extracted Text view.
- For information regarding how processing OCR works, see Special considerations - OCR and text extraction.
- OCR performed during processing is not intended to be a complete replacement for imaging and OCR features available post-publish in the workspace. For example, no options are provided here for configuring image dpi, dithering algorithm and threshold, image pre-processing such as deskewing and parallax distortion removal, and image auto-rotation.
- If OCR is not essential to your processing job, it is recommended to disable OCR on your processing profile. Forgoing OCR at this stage can significantly reduce processing time and prevent irrelevant documents from having OCR performed on them. You can then perform OCR on only relevant documents post-publish within the workspace.
- OCR Accuracy—determines the desired accuracy of your OCR results and the speed with which you want the job completed. This drop-down menu contains three options:
- High (Slowest Speed)—Runs the OCR job with the highest accuracy and the slowest speed.
- Use the High setting for documents with dark backgrounds, or handwritten text.
- Medium (Average Speed)—Runs the OCR job with medium accuracy and average speed.
- Low (Fastest Speed)—Runs the OCR job with the lowest accuracy and fastest speed.
- Use the Low setting for crisp, or electronically-generated text.
- High (Slowest Speed)—Runs the OCR job with the highest accuracy and the slowest speed.
- OCR Text Separator—select Enable to display a separator between extracted text at the top of a page and text derived from OCR at the bottom of the page in the Extracted Text view. The separator reads as, “--- OCR From Images ---“. With the separator disabled, the OCR text will still be on the page beneath the extracted text, but there will be nothing to indicate where one begins and the other ends. By default, this option is enabled.
When you process files with both the OCR and the OCR Text Separator fields enabled, any section of a document that required OCR will include text that says OCR from Image. This can then pollute a dtSearch index because that index is typically built off of the extracted text field, and OCR from Image is text that was not originally in the document.
Short message conversion settings
Import short message files in their native format directly into Relativity for processing. This feature eliminates having to convert short message files to RSMF (Relativity Short Message Format) before processing. You can define conversion settings in the processing profile's Short Message Conversion Settings section. The short message conversion settings you define only apply to processing jobs where RSMF conversion occurs during processing. The settings do not impact data already in RSMF format before processing takes place.
- To view more detailed information on processing an RSMF file, including the steps needed to prepare for processing, see Processing an RSMF file.
- To view information on supported file types for short messages, see:
- For short message mapping considerations, see Relativity's short message format.
Use the following settings to define short message conversion extraction parameters.
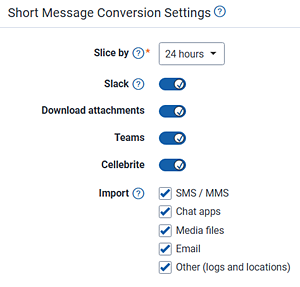
- Slice by—determines how Relativity splits conversations into RSMF files in terms of time.
- 4 hours—conversations are grouped in 4-hour blocks starting from 00:00 on any day where the message in the conversation exists.
- 8 hours—conversations are grouped in 8-hour blocks starting from 00:00 on any day where the message in the conversation exists.
- 12 hours—conversations are grouped in 12-hour blocks starting from 00:00 on any day where the message in the conversation exists.
- 24 hours—conversations are grouped in 24-hour blocks starting from 00:00 on any day where the message in the conversation exists.
- 1 week—conversations are grouped in 7-day blocks starting from Monday where the message in the conversation exists.
- This setting determines how a conversation is split into RSMF documents in terms of time.
- Slicing takes into consideration the processing time zone and shifts slices accordingly.
- Slicing does not affect any files RSMF processed. It affects only the files generated with short message conversion.
- Slack—use this toggle to turn on or off the conversion of Slack export containers to RSMF.
- On—select this option to convert Slack export containers to RSMF during processing. When toggled on, you will see additional fields for downloading attachments and for setting slicing time blocks.
- Off—select this option to turn off conversion of Slack export containers to RSMF. When toggled off, you will not see the additional fields for downloading attachments or setting slicing time blocks.
- Download Attachments—use this toggle to download attachments from Slack servers (files.slack.com/) while converting conversations to RSMF.
- On—select this option to download attachments and include them as standalone files during RSMF conversion.
- Off—select this option to exclude attachments. Relativity retains links to output RSMF files instead of downloading the actual files.
Enabling Download Attachments can significantly increase total data volume. Slack exports commonly expand by 100 times or more when you download attachments. For example, a 1 GB export may result in 100–300 GB of processed data. Verify available storage and processing budget before enabling this option. - Teams—use this toggle to turn on or off the conversion of
Teams data to RSMF during the processing of PST files.
- On—select this option to convert Teams data to RSMF during the processing of PST files.
- Off—select this option to turn off conversion of Teams data to RSMF during the processing of PST files. This will process all Teams data found in PST as MSG files.
- Cellebrite—use this toggle to turn on or off the conversion of Cellebrite UFDR files to RSMF. See the table below the options to view what is included and what is silently skipped.
- SMS/MMS—message data.
- Chat apps—including but not limited to:
- Facebook Messenger
- Telegram
- Media files—including but not limited to:
- Images
- Audio
- Videos
- Documents
- Email—see the Generated RSMF fields table for a full list of extracted email metadata.
- Other (logs and locations)—including but not limited to:
- Call logs
- Browser history logs
- Browser search logs
- Notes
- Passwords
- Contacts
- Web bookmarks
- Import—choose whether to include data from UFDR.
- SMS / MMS—includes text messages and multimedia messages.
- Chat apps—covers messages from applications likes WhatsApp, Facebook Messenger, and similar apps.
- Media files—encompasses photos, videos, and audio files.
- Email—includes email files. See Email data extracted from Cellebrite for a list of fields included or not included during conversion.
- Other (logs and locations)—contains logs, location data, and other files.
Import option What it includes What is silently skipped if disabled SMS/MMS Text messages and multimedia messages All SMS and MMS records Chat apps WhatsApp, Facebook Messenger, and similar apps All chat application conversations Media files Photos, videos, and audio files All media content Other Logs, location data, and miscellaneous files Logs and other non-message content Enable all import options unless you have a specific reason to exclude a data type. Disabling any option silently skips all matching content during processing — no error or warning is generated, and the output will be smaller than expected.
Limitations when creating RSMF files
There are a few limitations when creating RSMF files.
- There is a viewer condition that restricts the number of events to 10,000.
- There is a processing condition that limits each RSMF file to a maximum size of 2 GB. During short message conversion of source data (such as Slack, Teams, or Cellebrite events) into an RSMF file, Relativity splits conversations into multiple files if they exceed either of these conditions.
- Each RSMF file is limited to a maximum size of 2 GB. Files exceeding this limit cannot be parsed, previewed, or downloaded within Relativity. There is no in-product path for processing oversized files. If an RSMF file exceeds 2 GB, split it into smaller files externally before uploading. When splitting, ensure that conversation threads are not divided across file boundaries, as this may result in incomplete conversation records in the output.
If an oversized file has already been processed and is not accessible, contact Relativity Support for assistance.
- The date range filter in the Short Message Viewer displays timestamps in the viewer’s local machine time zone, regardless of the time zone configured in the processing profile. This behavior affects both RelativityOne and Relativity Server 2024. As a workaround, manually adjust your filter dates to account for the offset between your local time zone and the processing profile time zone.
Orphaned messages
If a conversation extends across multiple time frames because of slicing, it will be divided into several files. As a result, messages from a single thread will be stored in different files that correspond to each sliced time frame. Messages that are saved outside of the parent conversation will become orphaned, meaning they will no longer be linked to the parent conversation. Relativity adds a note at the top of the message indicating it is an orphan.

If a conversation extends across multiple time frames because of slicing, it will be divided into several files. As a result, messages from a single thread will be stored in different files that correspond to each sliced time frame. Messages that are saved outside of the parent conversation will become orphaned, meaning they will no longer be linked to the parent conversation. Relativity adds a note at the top of the message indicating it is an orphan.
Deduplication settings
The Deduplication Settings category of the profile layout provides the following fields:
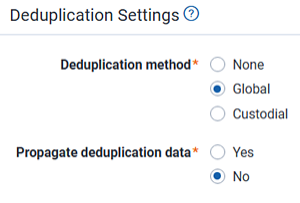
- Deduplication method—the method for separating duplicate files during discovery. During deduplication, the system compares documents based on certain characteristics and keeps just one instance of an item when two or more copies exist. The system performs deduplication against published files only. Deduplication doesn't occur during inventory or discovery. Deduplication only applies to parent files; it doesn't apply to children. If a parent is published, all of its children are also published. Select from the following options. Don't change the deduplication method in the middle of running a processing set, as doing so could result in blank DeDuped Custodians or DeDuped paths fields after publish, when those fields would otherwise display deduplication information.
- None—no deduplication occurs.
- Even when you select None as the deduplication method, Relativity identifies duplicates by storing one copy of the native document on the file repository and using metadata markers for all duplicates of that document.
- Relativity doesn't repopulate duplicate documents if you change the deduplication method from None after processing is complete. Changing the deduplication method only affects subsequent processing sets. This means that if you select global deduplication for your processing settings, you can't then tell Relativity to include all duplicates when you go to run a production.
- Global—arranges for documents from each processing data source to be de-duplicated against all documents in all other data sources in your workspace. Selecting this makes the Propagate deduplication data field below visible and required.If you select Global, there should be no exact e-mail duplicates in the workspace after you publish. The only exception is a scenario in which two different e-mail systems are involved, and the e-mails are different enough that the processing engine can't exactly match them. In the rare case that this happens, you may see email duplicates in the workspace.
- Custodial—arranges for documents from each processing data source to be de-duplicated against only documents in data sources owned by that custodian. Selecting this makes the Propagate deduplication data field below visible and required.Deduplication is run on custodian ID's; there's no consequence to changing a custodian's name after their files have already been published.
- None—no deduplication occurs.
- Propagate deduplication data—applies the deduplication fields you mapped out of deduped custodians, deduped paths, all custodians, and all paths field data to children documents, which allows you to meet production specifications and perform searches on those fields without having to include family or overlay those fields manually. This field is only available if you selected Global or Custodial for the deduplication method above. You have the following options:
- Select Yes to have the metadata fields you mapped populated for parent and children documents out of the following: All Custodians, Deduped Custodians, All Paths/Locations, Deduped Paths, and Dedupe Count.
- Select No to have the following metadata fields populated for parent documents only: All Custodians, Deduped Custodians, All Paths/Locations, and Deduped Paths.
- If you republish a processing set that originally contained a password-protected error without first resolving that error, then the deduplication data won’t be propagated correctly to the children of the document that received the error.
- In certain cases, the Propagate deduplication data setting can override the extract children setting on your profile. For example, you have two processing sets that both contain an email message with an attachment of a Word document, Processing Set 1 and 2. You publish Processing Set 1 with the Extract children field set to Yes, which means that the Word attachment is published. You then publish Processing Set 2 with the Extract children field set to No but with the Deduplication method field set to Global and the Propagate deduplication date field set to Yes. When you do this, given that the emails are duplicates, the deduplication data is propagated to the Word attachment published in Processing Set 1, even though you didn’t extract it in Processing Set 2.
Publish settings
The Publish Settings category of the profile layout provides the following fields.
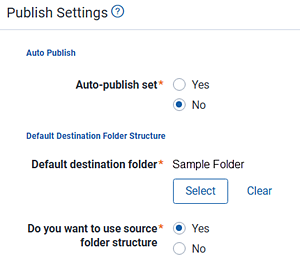
- Auto-publish set—arranges for the processing engine to automatically kick off publish after the completion of discovery, with or without errors. By default, this is set to No. Leaving this at No means that you must manually start publish.
- Default destination folder—the folder in Relativity into which documents are placed once they're published to the workspace. This value determines the default value of the destination folder field on the processing data source. You have the option of overriding this value when you add or edit a data source on the processing set. Publish jobs read the destination folder field on the data source, not on the profile. You can select an existing folder or create a new one by right-clicking the base folder and selecting Create.
- If the source path you selected is an individual file or a container, such as a zip, then the folder tree does not include the folder name that contains the individual file or container.
- If the source path you selected is a folder, then the folder tree includes the name of the folder you selected.
- Do you want to use source folder structure—maintain the folder structure of the source of the files you process when you bring these files into Relativity.
If you select Yes for Use source folder structure, subfolders matching the source folder structure are created under this folder. See the following examples:
Example 1 (recommended)
- Select Source for files to process: \\server.ourcompany.com\Fileshare\Processing Data\Jones, Bob\
- Select Destination folder for published files: Processing Workspace \ Custodians \
Results: A subfolder named Jones, Bob is created under the Processing Workspace \ Custodians \ destination folder, resulting in the following folder structure in Relativity: Processing Workspace \ Custodians \ Jones, Bob \
Example 2 (not recommended)
- Select Source for files to process: \\server.ourcompany.com\Fileshare\Processing Data\Jones, Bob\
- Select Destination folder for published files: Processing Workspace \ Custodians \ Jones, Bob \
Results: A sub-folder named Jones, Bob is created under the Processing Workspace \ Custodians \ Jones, Bob \ destination folder, resulting in the following folder structure in Relativity: Processing Workspace \ Custodians \ Jones, Bob \ Jones, Bob \. Any folder structure in the original source data is retained underneath.
If you select No for Do you want to use source folder structure, no sub-folders are created under the destination folder in Relativity. Any folder structure that may have existed in the original source data is lost.
Other considerations
The follow sections describe other considerations for numbering, prioritizing publishing speed, and dtSearch,
Parent/child numbering type examples
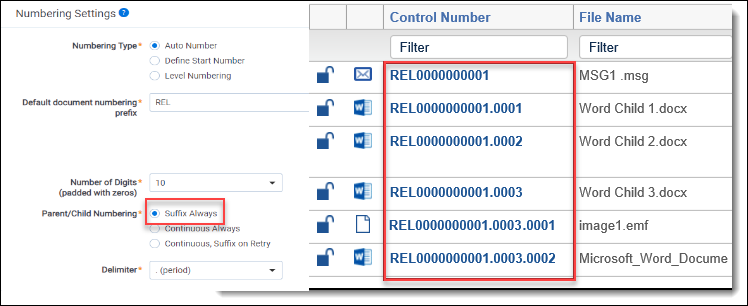
To better understand how each parent/child numbering option appears for published documents, consider the following scenario.
Your data source includes an MSG file containing three Word documents, one of which is password protected:
- MSG
- Word Child 1
- Word Child 2
- Word Child 3 (password protected)
- sub child 1
- sub child 2
When you process the .msg file, three documents are discovered and published, and there’s an error on the one password-protected child document. You then retry discovery, and an additional two sub-child documents are discovered. You then republish the processing set, and the new two documents are published to the workspace.
If you chose Suffix Always for the Parent/Child Numbering field on the profile, the identifiers of the published documents would appear as the following:
If you chose Continuous Always for the Parent/Child Numbering field on the profile, the identifiers of the published documents would appear as the following:
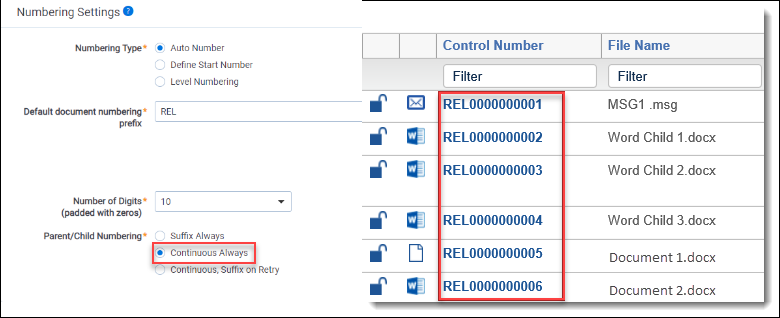
- In this case, the .msg file was the last document processed, and Word Child 3.docx was the first error reprocessed in a larger workspace. Thus, the sub child documents of Word Child 3.docx do not appear in the screen shot because they received sequence numbers after the last document in the set.
If you chose Continuous, Suffix on Retry for the Parent/Child Numbering field on the profile, the identifiers of the published documents would appear as the following:
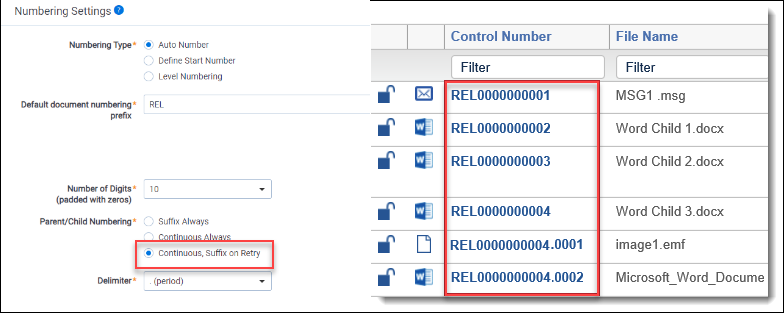
- Suffix on retry only applies to errors that have not been published to the workspace. If a document has an error and has been published, it will have a continuous number. If you resolve the error post-publish, the control number doesn’t change.
Prioritizing publishing speed special considerations
Publishing speed can be prioritized by performing one of the following actions:
- setting the Deduplication method to None
- setting the Create Source Folder Structure to No
Suffix special considerations
Note the following details regarding how Relativity uses suffixes:
- For suffix child document numbering, Relativity indicates secondary levels of documents with a delimiter and another four digits appended for additional sub-levels. For example, a grandchild document with the assigned prefix REL would be numbered REL0000000001.0001.0001.
- It is possible for your workspace to contain a document family that contains both suffixed and non-suffixed child documents. This can happen in the following example scenario:
- You discover a primary (level 1) .msg file that contains child (level 2) documents and grandchild (level 3) documents, none of which contain suffixes.
- One of the child documents yields an error.
- You retry the error child document, and in the process you discover two grandchildren.
- The newly discovered grandchildren are suffixed because they came from an error retry job, while the primary and non-error child documents remain without suffixes, based on the original discovery.
dtSearch special considerations
When you publish Word, Excel, and PowerPoint files with the text extraction method set to dtSearch on the profile, you'll typically see faster extractions speeds, but note that those file properties may or may not be populated in their corresponding metadata fields or included in the Extracted Text value.
The dtSearch text extraction method does not populate the following properties:
- In Excel, Track Changes in the extracted text.
- In Word, Has Hidden Data in the corresponding metadata field.
- In Word, Track Changes in the corresponding metadata field.
- In Powerpoint, Has Hidden Data in the corresponding metadata field.
- In Powerpoint, Speaker Notes in the corresponding metadata field.
The dtSearch text extraction method will display track changes extracted text in-line, but changes may be poorly formatted. The type of change made is not indicated. The Native text extraction method will append track changes extracted text in a Tracked Change section.
The following table breaks down which file properties are populated in corresponding metadata fields and/or Extracted Text for the dtSearch text extraction method:
| File type | Property | Included in dtSearch Corresponding metadata field | Included in dtSearch Extracted text |
|---|---|---|---|
| Excel (.xls, .xlsx) | Has Hidden Data | ✓ | ✓ |
| Excel (xls, .xlsx) | Track Changes (Inserted cell, moved cell, modified cell, clear cell, inserted column, deleted column, inserted row, deleted row, inserted sheet, renamed sheet) | ✓ | |
| Word (.doc, .docx) | Has Hidden Data | ✓ | |
| Word (.doc, .docx) | Track Changes (Insertions, deletions, moves) | ✓ | |
| Powerpoint (.ppt, .pptx) | Has Hidden Data | ✓ | |
| Powerpoint (.ppt, .pptx) | Speaker Notes | ✓ |
Check marks do not apply to .xlsb files.
Relativity does not possess a comprehensive list of all differences between the Native application and dtSearch text extraction methods. For additional information, see support.dtsearch.com.
Text extraction method considerations
As text extraction directly impacts search results, the following table lists which features are supported by the Relativity, Native, and dtSearch methods:
| Features | Relativity | Native | dtSearch | ||||||
|---|---|---|---|---|---|---|---|---|---|
| FEATURE DIFFERENCES | Excel Features Supported |
Word Features Supported |
Power Point Features Supported |
Excel Features Supported |
Word Features Supported |
Power Point Features Supported | Excel Features Supported |
Word Features Supported |
Power Point Features Supported |
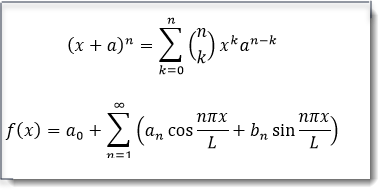
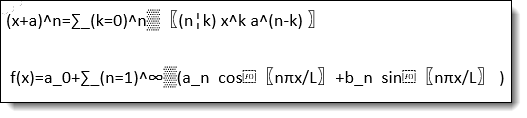
| Math equations. For more information, see Math equations. | Not Supported | Not Supported | Not Supported | ✓ | ✓ | ✓ | ✓ | ✓ | ✓ |
| Math formulas (sum, avg, etc.) |
Not Supported | Not Supported | Not Supported | Not Supported | Not Supported | Not Supported | ✓ | ✓ | ✓ |
| SmartArt | ✓ * | ✓ * | ✓ * | ✓ * | ✓ * | ✓ * | ✓ * | ✓ * | ✓ * |
| Speaker notes | N/A | N/A | ✓ ** | N/A | N/A | ✓ | N/A | N/A | ✓ *** |
| Track changes | ✓ | ✓ | N/A | ✓ | ✓ | N/A | ✓ *** | ✓ *** | N/A |
| Hidden data | ✓ | ✓ | ✓ | ✓ | ✓ | ✓ | ✓ *** | ✓ *** | ✓ *** |
| 2016+ new chart styles | Not Supported |
✓ | ✓ | Not Supported |
✓ | ✓ | Not Supported |
✓ | ✓ |
| * Pre-2007 Office SmartArt are considered attachments and will be extracted and OCRd. ** When a header or footer is in the Speaker Notes section, field codes are not extracted. *** For more information, see dtSearch special Considerations. |
|||||||||
| FULLY COMPATIBLE AND SUPPORTED FEATURES | |||||||||
| Bullet lists | ✓ | ✓ | ✓ | ✓ | ✓ | ✓ | ✓ | ✓ | ✓ |
| Chart box | ✓ | ✓ | ✓ | ✓ | ✓ | ✓ | ✓ | ✓ | ✓ |
| CJK and other foreign language characters | ✓ | ✓ | ✓ | ✓ | ✓ | ✓ | ✓ | ✓ | ✓ |
| Clip art | ✓ | ✓ | ✓ | ✓ | ✓ | ✓ | ✓ | ✓ | ✓ |
| Comments and replies | ✓ | ✓ | ✓ | ✓ | ✓ | ✓ | ✓ | ✓ | ✓ |
| Currency format | ✓ | ✓ | N/A | ✓ | ✓ | N/A | ✓ | ✓ | N/A |
| Date / Time format | ✓ | ✓ | ✓ | ✓ | ✓ | ✓ | ✓ | ✓ | ✓ |
| Field codes | ✓ | ✓ | ✓ | ✓ | ✓ | ✓ | ✓ | ✓ | ✓ |
| Footer | ✓ | ✓ | ✓ | ✓ | ✓ | ✓ | ✓ | ✓ | ✓ |
| Header | ✓ | ✓ | ✓ | ✓ | ✓ | ✓ | ✓ | ✓ | ✓ |
| Hidden slide | N/A | N/A | ✓ | N/A | N/A | ✓ | N/A | N/A | ✓ |
| Macros | N/A | ✓ | N/A | N/A | ✓ | N/A | N/A | ✓ | N/A |
| Margins / Alignment Format | N/A | ✓ | N/A | N/A | ✓ | N/A | N/A | ✓ | N/A |
| Merged cell (horizontal) | ✓ | N/A | N/A | ✓ | N/A | N/A | ✓ | N/A | N/A |
| Merged cell (vertical) | ✓ | N/A | N/A | ✓ | N/A | N/A | ✓ | N/A | N/A |
| Number format (positive / negative) | ✓ | N/A | N/A | ✓ | N/A | N/A | ✓ | N/A | N/A |
| Number format (fraction) | ✓ | N/A | N/A | ✓ | N/A | N/A | ✓ | N/A | N/A |
| Number format (with comma) | ✓ | N/A | N/A | ✓ | N/A | N/A | ✓ | N/A | N/A |
| Number format (with decimal point) | ✓ | N/A | N/A | ✓ | N/A | N/A | ✓ | N/A | N/A |
| Password protected (cell level) | ✓ | N/A | N/A | ✓ | N/A | N/A | ✓ | N/A | N/A |
| Password protected (column level) | ✓ | N/A | N/A | ✓ | N/A | N/A | ✓ | N/A | N/A |
| Password protected (file level) | ✓ | ✓ | ✓ | ✓ | ✓ | ✓ | ✓ | ✓ | ✓ |
| Password protected (row level) | ✓ | N/A | N/A | ✓ | N/A | N/A | ✓ | N/A | N/A |
| Password protected (sheet / page level) | ✓ | N/A | N/A | ✓ | N/A | N/A | ✓ | N/A | N/A |
| Phone number format | ✓ | N/A | N/A | ✓ | N/A | N/A | ✓ | N/A | N/A |
| Pivot table | ✓ | N/A | N/A | ✓ | N/A | N/A | ✓ | N/A | N/A |
| Right to left test format | N/A | ✓ | N/A | N/A | ✓ | N/A | N/A | ✓ | N/A |
| Slide numbers | N/A | N/A | ✓ | N/A | N/A | N/A | N/A | N/A | ✓ |
| Table | ✓ | ✓ | ✓ | ✓ | ✓ | ✓ | ✓ | ✓ | ✓ |
| Text box | ✓ | ✓ | ✓ | ✓ | ✓ | ✓ | ✓ | ✓ | ✓ |
| Transitions | N/A | N/A | ✓ | N/A | N/A | ✓ | N/A | N/A | ✓ |
| WordArt | ✓ | ✓ | ✓ | ✓ | ✓ | ✓ | ✓ | ✓ | ✓ |
| Word wrapping format | N/A | ✓ | N/A | N/A | ✓ | N/A | N/A | ✓ | N/A |
Math equations
The following table includes examples of what the extracted text would look like if Native or dtSearch are used rather than Relativity:
| Original Document |
Text Extraction Method | ||
|---|---|---|---|
| Relativity | Native | dtSearch | |
|
NO TEXT |
|
|