


Feedback
Short Message Advanced Access
This content refers to Preview, Advance Access or limited-availability functionality that may not be available in all Relativity environments.
This program contains a number of short message enhancements including new ways to convert data to RSMF, enhanced short message search capabilities and new short message review features. The new end-to-end workflow, which utilizes both new and previously released features, is described below. There is also information on the best practices for short message data review for production and investigation workflows.
The Short Message Advanced Access program includes the following features:
- There is a new syntax and index using Elasticsearch for searching short message metadata and text. To learn more, visit Short message search index.
- You can now code at the message-level in the Short Message Viewer. To learn more, visit Short Message Viewer coding Advanced Access.
Before you begin
Permissions
The following permission is needed to use the Short Message Advanced Access features:
| Object Security |
|---|
|
Installing the Short Message Search application
Before searching on short message metadata, you will need to take the one time step of installing the Search AI application to your workspace.
Before you install the Search AI app, you must:
- Notify Relativity of the names of the workspaces you want to use.
- Get confirmation that processing has been deployed to those workspaces.
- Re-process any RSMF data in those workspaces.
Once you complete those steps, you can install the application in your workspace.
- Navigate to the workspace where you want to install the application.
- Navigate to the Relativity Applications tab.
- Click New Relativity Application to display an application form.
- Click the Select from Application Library radio button in the Application Type section.
- Click the Ellipsis icon in the Choose from Application Library field.
- Select Search AI on the Select Library Application dialog.
This dialog only displays applications added to the Application Library. If Search AI is not included in the list, - Click Ok to display the application in the Choose from Application Library field. The application form also displays the following fields:
- Schema Version—displays the version of the application that you are installing.
- User-friendly URL—displays a user-friendly version of the application's URL. This field may be blank.
- Application Artifacts—displays object types and other application components.
- Map Fields—there are no fields available in Search AI for mapping.
- Click Import to install the Search AI app into the workspace.
- Review the import status of the application. Verify that the install was successful or resolve errors.
The Search AI application is now in your workspace, and you can now build an Elasticsearch index.
Considerations
During the Advanced Access program, if you encounter any part of the features described on this page not working as expected, please notify your point of contact as well as your Customer Success Manager. Our team will work directly with you to resolve the incident.
- The Search and Review features are initially configured for specific workspaces and are not available in workspaces Relativity does not configure.
- Any existing RSMF files in the workspace will need to be reprocessed and the Elastic index will need to be built after the files are processed to use the Search and Review features included in the Advanced Access program.
- The Search and Review features are opt-in and you can revert to existing workflows as desired.
- The Elastic index will be visible within search indexes and the Documents tab.
- Message-level metadata is initially managed using the MD5 hash value. We will change the reference between the RSMF and metadata to the Document ID later in 2024. After the change is implemented, it will require you to republish your RSMF files. This will ensure that the document ID is used as a reference between the RSMF and message-level metadata and prevent a very low chance of any data reference conflicts.
- ARM is not currently compatible with the Short Message Advanced Access program.
- dtSearch to Elasticsearch syntax is not currently available with the Short Message Advanced Access program.
New Short Message Workflow
Short message data can be imported into RelativityOne, reviewed, produced, and exported using the following workflow.
- The short message data can be accessed directly from the application via an API or it can be received as an exported file such as a .json, xmls, etc. You can use Relativity’s Collect for direct access and to automatically convert chat data to an RSMF file. To learn more, see Short message data collection.
- If you need to convert .json exports from Slack or .pst exports from Microsoft Teams, RelativityOne Slack and Teams conversion can be configured in your processing profile to convert RSMF files for you. Relativity also provides developer tools to complete RSMF file creation. You may find partners on the Relativity App Hub that also offer RSMF creation services. To learn more, see Importing and converting to RSMF.
- Use search terms to identify RSMF documents with hits for conversations that need review using dtSearch. You can also take advantage of the new advanced searching capabilities using Elasticsearch to search across messages and message-level metadata to further cull down data or find additional insights. To learn more, see Searching messages.
- Using either the Short Message Viewer or the document list, review and code the documents using the new message-level coding feature. To learn more, see Reviewing RSMF documents.
- Produce the relevant documents using production. To learn more, see RSMF Imaging and production.
- Export the documents from Relativity using Import/Export. To learn more, see Exporting RSMF documents.
Short message data collection
| File format | Chat application |
|---|---|
| .json | Slack |
| .pst | Microsoft Teams |
| .ufdr | Cellebrite |
| .mbox and .xml | Google Chat |
Collection
Using the proper credentials, configure and collect data from Slack, Microsoft Teams, Google Chat, or Bloomberg using the Collect application. To learn more about Collect, see Collect. To learn more about collecting from Slack, see Short message conversion for Slack.
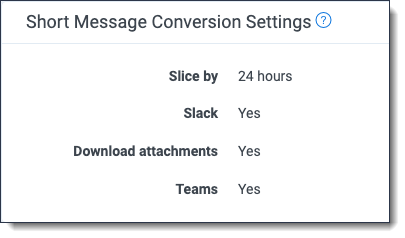
Data will automatically be converted to RSMF and should be converted into 24 hour files by conversation. Consider breaking up extremely dense conversations that contain more than 10,000 messages further into 12 or even 8 hour segments.
Importing and converting to RSMF
If you have received Slack .json and Microsoft Teams .pst exports, you can convert these files to the RSMF format using Processing. Use import to bring in the files and leverage the conversion functionality in Processing. Cellebrite and Google Chat files will be supported later this year.
For other short message data types, use a third-party solution to convert exports to an RSMF. To find a third-party solution, see Relativity App Hub.
Create RSMF files by conversation or channel in 24 hour increments.
Processing an RSMF file
Processing is the recommended method of ingesting RSMF files into Relativity. Using Processing ensures that the appropriate metadata header fields are extracted and families and attachments within the RSMF file are properly linked to give you the best near-native review experience.
As of January 2025, RelativityOne extracts short message data from all RSMF files during processing. The metadata contains all the message, timestamps, participants, and reactions from the RSMF file. You can verify that a file should have metadata collected by navigating to the Files tab in processing. Documents with metadata will have a document_uuid attribute. If a document does not contain a document_uuid, you can create a new processing set to process the document and capture the short message metadata.
When documents are published using processing, the Artifact IDs are attached to short messages. To check that an Artifact ID is attached, you can open the document in the Viewer and verify that you have the option to code short messages. Alternatively, before publishing, you can create a document_uuid field and then map the document_uuid field so that it is visible on the Documents tab after publishing. To learn more, see Mapping the document_uuid field.
Before you begin
We recommend doing the following before you process RSMF files:
- Ensure that the default processing profile has the Extract children option set to Yes. Disabling this field results in missing attachments.
- Ensure that you select a relational field MD5 Hash for the Source field. See the image below for an example. Setting up MD5 Hash in this manner will ensure that RSMF files are associated to the correct metadata. We will change the reference between the RSMF and metadata to the Document ID later in 2024.

- Ensure that you select a relational field such as Group Identifier for the Source field. See the image below for an example. Setting up the Group Identifier in this manner will ensure that attachments appear in the Short Message Viewer and are tied to the correct parent messages.

- Ensure that the processing profile is setup for Microsoft Teams and Slack.
Processing
Once you have made the preparations above, you are ready to process the RSMF files. To learn more, see Processing an RSMF file.
Integration Points
You can now promote RSMF files between workspaces through Integration Points and export the message-level metadata without having to re-process the files.
Before you begin
Initially, native files transfer will be supported with Links Only option for message-level metadata jobs. You will not be able to copy both metadata and native files, when using Physical Files option while setting up native files transfer in the Integration Points job. If you need to transfer physical files, then you can do it with separate Integration Points jobs.
If you’ve previously processed RSMF files before February 21, 2025, you will need to re-publish those files before running the Integration Points job. To republish the files:
- Navigate to the Files tab.
- Select the documents that need to be republished from the list.
- Select the Republish mass operation.
- Click Republish.
Searching messages
Once processing is complete, you can cull the documents further before starting the review process.
Elasticsearch is available for searching but it does not support search term reports. You can continue to leverage dtSearch for search term reports before reviewing documents.
Depending on your review process, use search terms to identify RSMF documents with hits for conversations that need review using dtSearch.
You can filter based on RSMF headers to remove conversations based on non-relevant periods of data using date ranges, specific channels, or non-important custodians that hasn’t been previously culled during collect.
You can use an Elasticsearch index for additional advanced searching based on message metadata. Elasticsearch returns RSMF documents that have hits and you can use the Document preview panel to open each document from the Documents tab to see the full conversation. To learn more, visit Short message search index.
We plan on adding the ability to see message hits highlighted according to search criteria in the Document preview panel later in the Advanced Access program.
Reviewing RSMF documents
Once non-relevant messages have been culled, you can review documents using new features available in the Advanced Access program.
Coding RSMF documents in the Short Message Viewer
You can now code individual messages using the Short Message Viewer. To learn more, visit Short Message Viewer coding Advanced Access.
Coding messages
Once you’ve determined which RSMF documents need to be reviewed, add those documents to a saved search to generate a Review queue. You can use queues to assign and manage reviewers’ work.
As part of Advanced Access, you can now hover your cursor over the icon to see associated RSMF and message-level metadata. This provides additional insight and details relating to each message.

You can review messages and code them individually as Responsive/Not Responsive or Privileged/Not Privileged or with Notes. These fields or choices cannot be edited in Advanced Access.
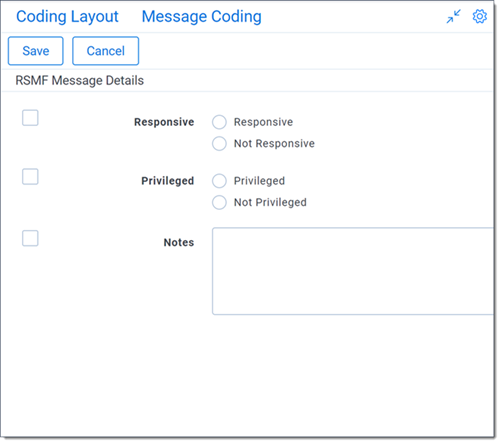
If you only code messages and not the RSMF document, Review Center will not recognize the RSMF document as coded.
Performing QC on RSMF documents
Before beginning the production of relevant documents, we recommend using the Documents tab to complete the QC process.
After you’ve finished coding messages, you can use Elasticsearch to identify all RSMF documents that contain messages coded as Responsive, Privileged, or with Notes. Before searching on message-level coding, you will need to rebuild your index. Once the index is rebuilt, you can run a search for messages within these RSMF documents. You can either add this Elasticsearch as a saved search for message-level searching or you can mass edit the document coding values to populate current saved searches at the document-level. Coding the documents will also populate the saved searches for production.
Using the newly created saved searches, review conversations for proper tagging.
Once it is released later in the Advanced Access program, you can use the Document preview panel to see message hits highlighted according to search criteria.
Imaging and production
Preparing for production
Before documents are produced, any sensitive information can be removed or obscured. To protect sensitive information, you can either apply markups or use RSMF slicing.
- To use RSMF slicing, open a document in the Short Message Viewer and apply filters to find the messages that are appropriate for production. Once they have all been located, you can slice the document to create a new one that only contains messages that need to be produced. To learn more, see RSMF Slicing.
- To apply markups, image the document and then manually apply markups to each message that contains privileged or sensitive information in the Image Viewer.
Producing RSMF documents
The RSMF documents are ready for production. For production workflows, we recommend following the imaging workflow and not exporting native RSMF documents with placeholders.
Troubleshooting
If an RSMF document will not build in the Elasticsearch index or you cannot code messages, the message-level metadata may not have been properly extracted from the RSMF. You can do the following to troubleshoot:
- If there are no document_uuid values after processing RSMF files, try reprocessing them.
- If there are no document_uuid values on the Documents tab after publishing RSMF files, try republishing them.
- If you are using Integration Points to export RSMFs to a new workspace and there are no document_uuid values in the destination workspace but there are document_uuid values in the source workspace, check for Integration Points errors and run Integration Points again if there was an error.
- If you are using ARM and there are no document_uuid values in the destination workspace but there are document_uuid values in the source workspace, check the ARM settings, including processing, and re-run ARM.
Mapping the document_uuid field
To create and map the document_uuid field:
- Navigate to the Fields tab.
- Click New Field.
- Enter or select the following options in the Field Information section:
- Name-enter document_uuid using your keyboard.
- Object Type-Ensure that Document is selected.
- Field Type-Select Fixed-Length Text from the drop-down menu.
- In the Field Settings section, edit the Maximum Length value to 36.
- Click on the Advanced Settings tab.
- On the Source field, click Select.
The Select Item - Source modal displays. - Select the document_uuid field from the list and click Set.
- Click Save.
The document_uuid field is created and mapped.Once the document_uuid is created, it can be added to a view or saved search so that you can troubleshoot RSMF files. To learn more, see Views and Creating or editing a saved search.