Feedback
Last date modified: 2026-Jun-04
Transferring (promoting) data between workspaces
We’ve streamlined our Staging boundaries to more effectively separate staging data from workspace and system data. With this change, you can no longer write to or access data outside of the four defined staging area folders. The four defined staging area folders: ARM, ProcessingSource, StructuredData, and TenantVM.
Folders removed in the update include FTA, Temp, Export, and dtSearch. In addition to any other folders you manually created. Refer to the
You can use Integration Points to transfer, or promote, data from one Relativity workspace to another Relativity workspace. This is as a one-way sync process from a source workspace to a destination workspace. This is not a back and forth syncing process between them.
Once you have tagged documents for inclusion in or exclusion from the data you want to transfer to review, you can access Integration Points to start the job or jobs that will send those documents to the review workspace.
This topic provides details on Integration Points as it is used to transfer data between workspaces. For information, see Integration Points.
Considerations
For large data transfer workflows, we recommend configuring integration point jobs into batches. The following suggestions can be used when creating job batches:
- When using Tag Documents with Job Name option, the job document count should be no more than 500,000.
- When Tag Documents with Job Name is not selected, no limit on document count applies.
- The recommended number of fields to be mapped should not exceed 100. Additionally, it is best to map as few long text fields as possible.
- The following file types cannot be transferred to a Relativity workspace:
- Stored/Searchable PDFs
- Native redactions—the native file will be transferred without redactions.
- Produced natives and PDF—the production flow allows the transfer of images only.
Exporting to a Relativity workspace
In addition to exporting to a .csv and load file, you have the option of transferring, or exporting, data from a source workspace to a destination workspace in Relativity. This is the most efficient way to move documents from one workspace to another. This process makes it so it does not require you to export and re-import your data.
Complete the following steps to promote data from one workspace to another.
On the Integration Points page:
- Click New Integration Point.
This opens the integration point wizard. - Setup the integration point with selecting Relativity as the destination. For more information, see Setup.
- Connect your Relativity workspace to another workspace. For more information, see Connect to Source.
- Map the source fields to the destination fields. For more information, see Map Fields.
- Click Save.
After you create an integration point and initiate the export process, you can monitor the job status on the Job History tab and resolve errors on the Job History Errors tab. For more information, see Monitoring job history and errors.
Considerations
Consider the following when exporting data from a source to a destination workspace using Integration Points:
- You can transfer document objects and non-document object metadata to a destination workspace. The non-document object must already exist in the destination workspace for non-document object metadata to be transferred.
- You can move original images, native documents, or metadata.
- You are not required to have Integration Points installed on the destination workspace.
- The data transfer process supports transfer of non-document objects linked to the Relativity Applications installed in the destination workspace.
- For example, if you want to push entities object to another workspace, make sure that the proper application is installed there. For example, Legal Hold.
- You need to have the Relativity Application permission in both the Workspace Security and Object Security sections set to View.
- The export process sorts documents and images by name, which is typically the Control Number.
- This process takes into account entire names, which means that for names with numbers, it is advised to preserve the number of digits in the names by filling with leading zeros.
- For example:
- Test2_1, Test2_2, Test2_10 will be sorted as: Test2_1, Test2_10, Test_2
- Test2_01, Test2_10, Test2_02 will be sorted as : Test2_01, Test2_02, Test2_10
- When transferred fields have associative objects, these objects need to be transferred first to ensure successful promotion of fields having references to them.
- The data transfer process does not transfer custom objects created by users in a workspace.
- The data transfer process cannot transfer complex objects that have relationships to other objects, such as Search Terms Report (STR), structured analytics sets, and Integration Points profiles, because related objects' ArtifactIDs may be different in the source and destination workspaces.
- When you select the Copy Images radio button, the field mapping section is disabled because only the control number is required and available in this scenario. If you want to transfer other field metadata, you must create a new integration point without choosing to copy images.
- Integration Points uses the following delimiters to configure the Import API for the destination workspace. Other delimiters typically configured with the Import API are not utilized:
- Multi-value delimiter: ASCII 029
- Nested-value delimiter: ASCII 030
Setup
To create an integration point specifically for exporting a workspace, follow the steps below:
- Navigate to the Integration Points tab.
- Click New Integration Point.
- Complete the fields in the Setup layout. For more information, see Setup fields.
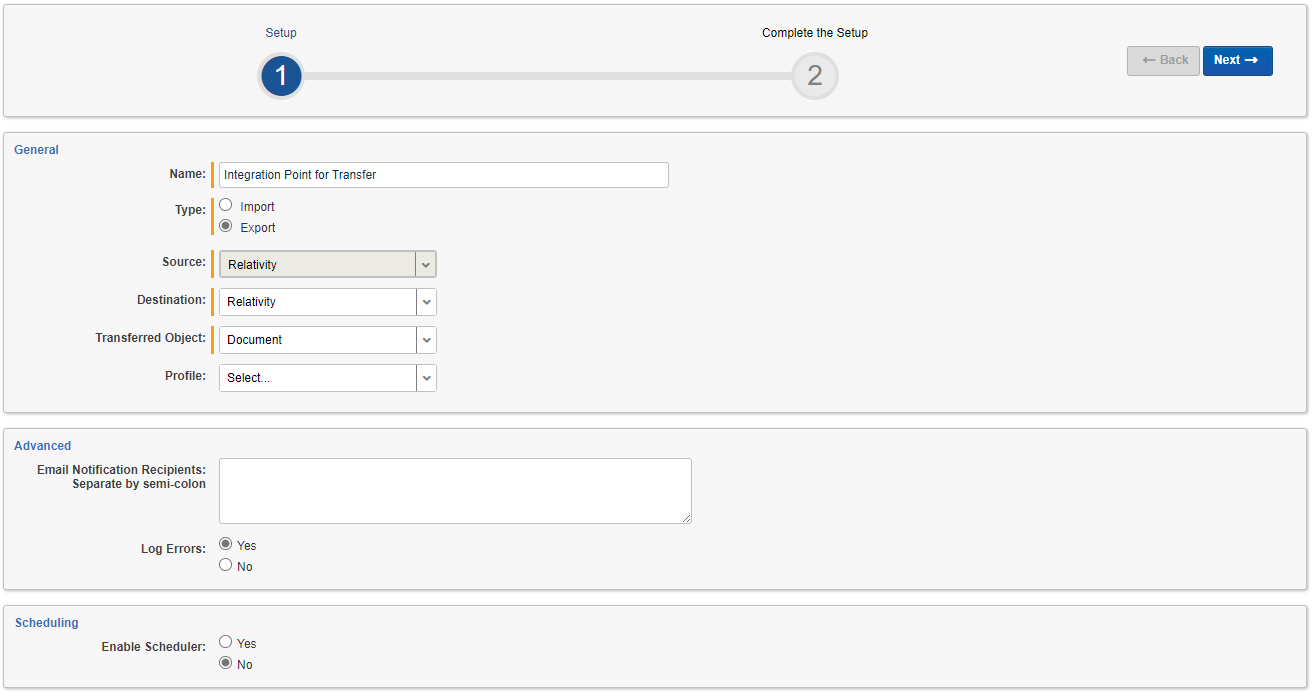
- Click Next to advance to the Connect to Source layout.
Setup fields
Complete the following fields in the Setup layout:
- Name—the name of your integration for reference purposes.
- Type—select Export to designate this as an export job. Selecting this sets the Source field to be Relativity.
- Source—this is automatically set to Relativity since you are exporting data out of a Relativity workspace.
- Destination—select Relativity.
- Transferred Object—select the available Document or non-document object meta data you want to transfer to the destination workspace. The non-document object must already exist in the destination workspace. The data transfer process will not transfer custom objects created by users in a workspace. Refer to the Notes above for additional information.You will need to create a new integration point for each object type that you want to export to the destination workspace.
- Profile—use this to complete the remaining Integration Points settings based on the settings of a saved profile. This includes all of the fields in the Connect to Source layout, as well as field mappings. If no profiles exist in the workspace, you do not have the option of selecting them. To apply a profile that you have already created, select it from the drop-down list. For more information on profiles, see Integration Points profiles.
- Email Notification Recipients—enter the email addresses of those who should receive notifications of whether the integration point export succeeded or failed. Use semi colons to separate email addresses.
- Log Errors—select Yes or No to denote whether Relativity tracks item-level errors.
- If you select Yes, each job also logs any item-level errors.
- If you select No, Relativity does not log these item-level errors.
Regardless of your selection, job-level errors are always recorded in Relativity.
- Enable Scheduler—gives you the option of scheduling additional exports. Selecting Yes makes the following fields available:
- Frequency—the interval at which Relativity runs this integration point.
- Daily—select this option to transfer data once every day.
- Weekly—select this option to transfer data on a weekly basis. You can specify how often in the Reoccur field, in which you will provide a number value in the Every # week(s) choice. You can then specify on which day of the week the data transfer will take place by checking any of the days of the week listed.
- Monthly—select the day of the month that you want this integration point to transfer data once every month.
- Reoccur—enter the number of month(s) in which this integration point repeatedly transfer data.
- Send On:
- Day __ the month—select the day of the month that you want this integration point to transfer data.
- The __ of the Month—select this option for this integration point to transfer data on the chosen day of every month. For example, "The Second Friday of the month."
- Start Date—the date that you want Integration Points to start transferring the data.
- End Date—(Optional) the date that you want Integration Points to stop transferring the data. Leaving the End Date blank causes the integration point to run indefinitely at the scheduled interval.
- Scheduled Time—the time at which this integration point transfers data. This time is local to your PC, not to the server.
Connect to Source
Continue to create your import integration point by connecting Relativity to the data source by following the steps below:
- Complete the fields in the Connect to Source layout. For more information, see Connect to Source fields.

- Click Next to advance to the Map Fields layout.
Connect to Source fields
Complete the following fields in the Connect to Source layout:
- Saved Search/Production/View—depending on the selected Transferred Object, one of the following fields displays:
- Saved Search—select an existing saved search to use from the drop-down list or click the ellipsis button for an alternative way to select a saved search.
- Production Set—select an existing production set to use from the drop-down list.
- View—select an existing view to use from the drop-down list.
- Destination Workspace—select an existing workspace to export your saved search or production to.
Relativity will validate whether the selected object is available in the destination workspace and transfer only objects linked to Relativity Applications installed in the destination workspace. If the selected object is not available in the destination workspace, an error message will appear.
- Location—select a folder or production set as the destination location.
- Folder—select the drop-down menu to expand the folder structure, locate the folder from which you want to export the data, and select it. This field is only available if you have selected Folder.
When creating an integration point based on a profile, if you change the saved search, folder, or production set on the Setup layout, the fields listed in the Selected Fields window below are not updated to reflect the new source that you selected. If you're not using a profile to creating the integration point, these fields are updated to reflect the newly selected source.
- Production Set—select a production set to export the data to. Click the plus sign to create a new production set. For successful operation, transfer Production Set with Append/Overlay mode.
- Folder—select the drop-down menu to expand the folder structure, locate the folder from which you want to export the data, and select it. This field is only available if you have selected Folder.
- Create Saved Search—select Yes to create a saved search in the destination workspace. This saved search's name will take the name given to the integration point. This choice is enabled only if Yes is selected for the Tag Documents with Job Name field.
- Tag Documents with Job Name—select one of the following options below. See Considerations for document count considerations:
- Yes (Source and Destination Workspaces)—to tag all documents in the scope of the job with a unique ID in both the source and destination workspaces, which allows you to easily identify these documents in both workspaces. This is the default option.
- Yes (Destination Workspace Only)—to tag all documents in the scope of the job with a unique ID in the destination workspace only, which allows you to easily identify these documents in the target workspace.
- No—to not tag documents with a unique ID in either workspace.
- The following fields are populated when you select Yes:
- Relativity Destination Case—the workspace ID where the documents were transferred to.
- Relativity Source Case—the workspace ID where the documents were transferred from.
- Relativity Source Job—Integration Points job Artifact ID that moved the document.
Map Fields
Map the attributes or fields so that Integration Points imports the targeted data into specific Relativity fields by following the steps below:
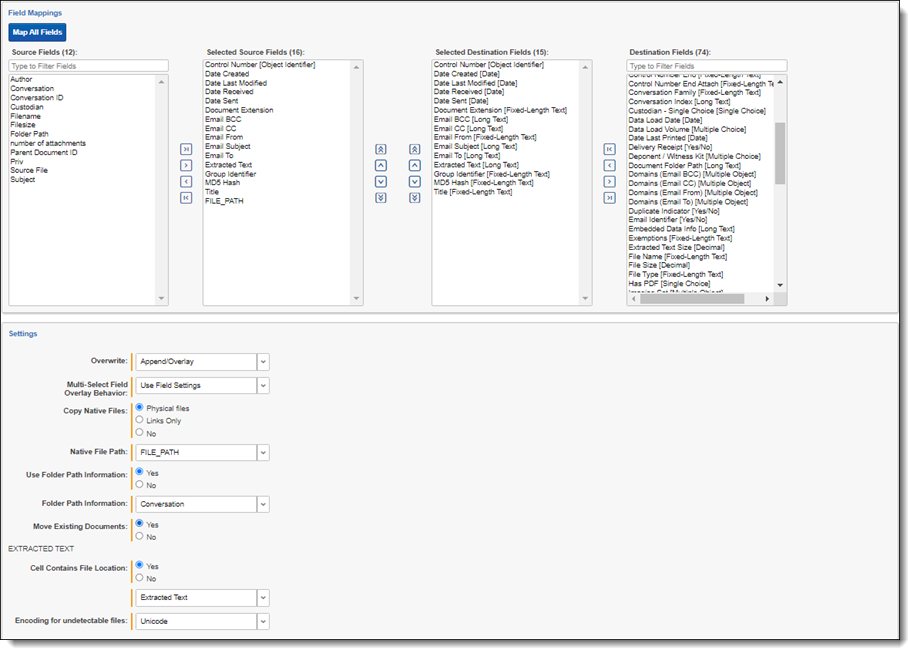
- Map fields in the Field Mappings wizard. For more information, see Field Mappings.
- Complete the fields in the Settings category. For more information, see Settings fields.
- Click Save to save this integration point with these export settings.
Field Mappings
In the Field Mappings wizard, you have the following options for mapping fields:
- Use the Shift+click and Ctrl+click method to select multiple fields at a time.
- Use the text search boxes above the Source and Destination lists to find a particular field.
- Use the single and double arrows or double-click a field to move selected fields between columns.
- Use the horizontal scroll bar in each column as needed to fully view long field names.
- Each column displays the total number of fields available in that column.
- This allows you to quickly compare the number of mapped fields to ensure they match.
- If they do not match, an error will display when you attempt to save the Integration Point.
- The field names in the Destination column include the type of each field listed.
- Click the Map All Fields button between the Source and Destination columns to automatically map all fields with matching names, except single or multiple object fields.
If you have Destination fields that are mapped to Fields in the Field Catalog, Relativity also tries to find name matches between these Catalog Fields.- The Field Mappings process excludes certain fields that are used internally by the Integration Points application.
- The following fields are excluded from the Source and Destination lists:
- Relativity Source Case
- Relativity Source Job
- Relativity Destination Case
- ErroredDocuments
- Job History
- Document.ProcessingFileID.
- You do not need to map all attributes or fields.
- Only the Unique Identifier and Object Identifier are required.
- The Unique Identifier should contain a value that no other item in the workspace contains.
- For example, use the GUID or distinguishedName attribute.
- The Object Identifier is the specific field on the object that holds the displayed identifier, which might not be unique.
- For example, the Full Name field is the Object Identifier of the Entity RDO but it might not be unique.
- These two identifier values can be the same.
- The Field Mappings process excludes certain fields that are used internally by the Integration Points application.
- Click the Map Saved Search button between the Source and Destination columns to automatically map fields that were configured in the Saved Search, which was selected as a data source on the previous screen. If you have Destination fields that are mapped to Fields in the Field Catalog, Relativity also tries to find name matches between these Catalog Fields.The Map Saved Search functionality only supports searches created with a Keyword Search. Other search conditions, such as dtSearch and Analytics Indexes, are not yet supported for this functionality.
Settings fields
Complete the following fields in the Settings category:
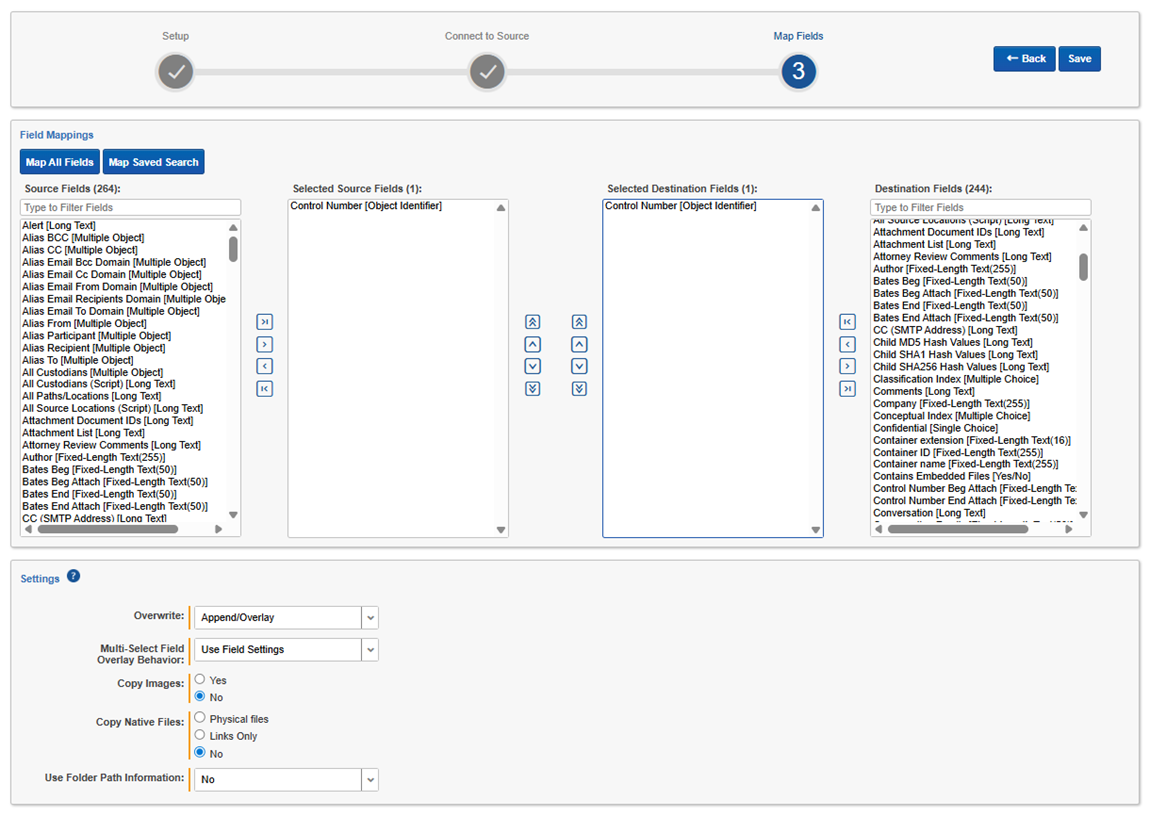
- Overwrite—determines how the system overwrites records once you transfer data to the review workspace.
- Append Only—transfer only new records into the review workspace.
- Overlay Only—update existing records only in the review workspace. Any documents with the same workspace identifier are overlaid. When you select this option, you must complete the Multi-Select Field Overlay Behavior field described below.
- Append/Overlay—adds new records to the review workspace and overlays data on existing records. When you select this option, you must complete the Multi-Select Field Overlay Behavior field described below.
- Multi-Select Field Overlay Behavior—determines how the system will overlay records when you push documents to the review workspace. This field is only available if you've selected either Overlay Only or Append/Overlay above. This field provides the following choices:
- Merge Values—merges all values for multi-choice and multi-object fields in the source data with corresponding multi-choice and multi-option fields in the workspace, regardless of the overlay behavior settings in the environment.
- Replace Values—replaces all values for multi-choice and multi-object fields in the source data with corresponding multi-choice and multi-option fields in the workspace, regardless of the overlay behavior settings in the environment.
- Use Field Settings—merges or replaces all values for multi-choice and multi-object fields in the source data with corresponding multi-choice and multi-option fields in the workspace according to the overlay behavior settings in the environment.
- Copy Images—determine whether you want to copy images to the destination workspace:
- Yes—click if you want to copy images to your destination workspace. Then select options in the Image Precedence and Copy Files to Repository fields.
- When you click Yes to copy images, it removes the option to include natives in your job.
- To get transfer images and natives to your other workspace, you must run two separate Integration points.
- The first job where you select images.
- The second job where you select natives. The second job you will just need to select Append/Overlay.
- No—click if you do not want to copy images to the destination workspace. Then select options in Copy Native Files and Use Folder Path Information fields.
- Yes—click if you want to copy images to your destination workspace. Then select options in the Image Precedence and Copy Files to Repository fields.
- Image Precedence—this field appears when Yes is selected for Copy Images. Select Original Images or Produced Images to copy to the destination workspace.
- Copy Files to Repository—determine if you want to copy physical image files to the destination workspace:
- Yes—click if you want to copy physical image files to the destination workspace.
- No—click if you want to add reference links in the destination workspace directing to images located in the source workspace. Links to the images will be accessible in the destination workspace Viewer.
- Production Precedence—this field displays when Produced Images is selected for Image Precedence. Use the pop-up screen to select and order the productions, and click OK on the screen to save.
- Include Original Images If Not Produced—this field displays when Produced Images is selected for Image Precedence. Select this checkbox to include the original image.
- Copy Native Files—if No was selected for Copy Images, determine how to copy native files to the destination workspaces by selecting one of these radio buttons:
- Physical files—select to copy any physical native files from the source workspace to the destination workspace.
- Links Only—select to add only reference links in the destination workspace that direct back to the source workspace documents. Do not use the Links Only option to overlay documents going from a review workspace to a repository workspace. This can replace the original file with just a link, causing data loss.
- No physical files will be copied to the destination workspace but native files will be accessible in the destination workspace Viewer.
- When transferring documents from a repository to a review workspace using Links Only:
- Links in the review workspace will break if you delete the original files or delete or archive the repository workspace.
- To avoid losing files: Before deleting or archiving the repository workspace, copy the actual files, not just links, to the review workspace first.
- No—select to not create additional copies of your native files.
- No physical native files or links will be pushed to the destination workspace.
- You will not be able to look at native files in the Viewer.
- Only metadata, such as extracted text or coding decisions, will be pushed. For example, if you have a document with native files and coding decisions, and you select the No option, only metadata, the coding decisions, will be transferred to the destination workspace. Refer to additional notes below regarding this choice:
- Doing this maintains a single copy of that data file no matter how many times you use the document in your workspace.
- You have the option of selecting No for an initial run of an integration point and then Yes for a subsequent run. Doing this saves you time on the initial job while then retaining copies of the native files on the final job.
- The benefit of selecting No for this field is that you save on storage and speed.
Be aware that when a non-administrator user copies native files by selecting the Links Only option, the System Created by column on the Job History tab will list the system administrator’s name instead of the non-administrator user's name.
- Use Folder Path Information—use a metadata field to build the folder structure for the documents that you transfer to the review workspace.
- No—select if you do not want to build a folder structure based on metadata. In this case, Relativity loads all documents directly into the folder indicated by the transfer destination, and you create no new folders in the destination workspace.
- Read From Field or Read From Folder Tree—select to use a metadata field to build the folder structure for the documents that you transfer to the review workspace.
- Folder Path Information—specify a metadata field to build the folder structure for the documents that you transfer to the review workspace.
- You have the option of creating folders or re-foldering documents when you select Append/Overlay for the Overwrite field.
- You have the option of re-foldering documents for the Overwrite field through the Move Existing Documents field.
- Move Existing Documents—re-folder documents that were previously imported into the destination workspace, but were only placed in the root case folder and not to any subfolders. This field is useful for situations in which you want to add new data to the destination workspace while overlaying existing data.
- Select No if you don’t want to re-folder existing documents.
- Select Yes to move existing documents into the folders provided in the Folder Path Information field. For example, you previously imported custodian Sally Smith's files into the destination workspace's root folder. Now, in addition to placing the documents from the saved search specified in this integration point in their subfolder, you also want to move those previously migrated documents into Sally Smith's subfolder, so you would select Yes.
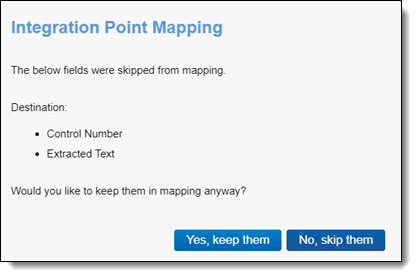
During the mapping process, Relativity validates whether the selected objects are available in the destination workspace in the final step of the wizard. When fields cannot be mapped from the Source to the Destination, a pop-up modal displays them. You can either choose to keep the fields in the Source column or skip them and remove them.
Another solution that Integration Points data transfer provides is automatically remapping fields when the destination workspace is changed. When you change the destination workspace in either the integration point or integration point profile, fields can vary between the source and destination workspace. When the destination workspace is changed, the new fields in the workspace are automatically mapped.
The artifacts are mapped based on their names only if the ArtifactIDs are different in the new destination workspace. They are mapped so that the integration points job will not fail. This means that if the source workspace fields cannot match to the new destination workspace fields, those unmatched fields are presented at the end of the mappings list for easy identification. Relativity also informs the you that the original source fields from the profile were mapped with corresponding fields from the destination workspace. The message will be similar to this, "We restored the fields mapping as destination workspace has changed."
After you create an integration point and initiate the export process, you can monitor the job status on the Job History tab and resolve errors on the Job History Errors tab. For more information, see Monitoring job history and errors.
Mapping saved searches
The Map Saved Searches button automatically maps the fields from the saved search. It also maps the object identifier fields, even when such field is not selected in the saved search. If any unsupported fields are manually mapped, clicking the Save button displays a pop-up modal stating that the job might fail.
Once Relativity saves the integration point, you will be able to run it and export the data based on the settings you specified. See Running the export job for details.
Working with transferred documents
To view the documents you transferred to the destination workspace, for which Tag Documents with Job Name option was enabled:
- Navigate to the destination workspace.
- Click the Documents tab and make sure you are on the Folders browser.
- Note the following fields on Documents view (if these fields are not yet added to the view, edit it and add them in the Fields tab):
- Relativity Source Case—the name of the workspace from which the tagged documents were transferred to the destination workspace.
- Relativity Source Job—the name of the Integration Point job that you used to transfer the tagged documents to the destination workspace.
- If option Create Saved Search had been selected for the transferred documents, you can also view them in the created saved search. To do so:
- Navigate to the Saved Search browser.
- Locate Integration Points folder and expand it.
- Click on the saved search with the name of the Integration Point job that transferred the documents.
You can now review these documents and apply coding decisions for responsiveness and/or issues designation.
Reusing coding decisions
You can re-use the coding decisions you made on reviewed documents and transfer them back into the source workspace through another Integration Point. For example, you could run another transfer job to conduct a privilege overlay on documents in the source workspace.
To do this, follow the steps below:
- Select the saved search you created to transfer documents back to the source workspace.
- Navigate to the Integration Points tab.
- Create a new integration point that specifies the following values, which differ from those you entered for the transfer job you ran previously:
- Destination Workspace—select the original source workspace, specifically the workspace from which you previously transferred documents to the review workspace.
- Saved Search—select the saved search you created to transfer documents back to the source workspace.
- Field Mappings—map only Control Number (Object Identifier) and Privilege Designation.
- Overwrite—select Overlay Only.
- Click Run.
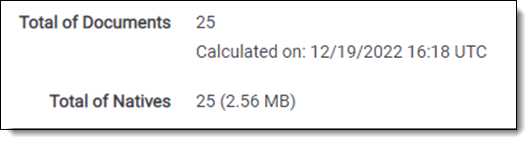
Calculating integration point job statistics on-demand
You can calculate the number of documents, as well as images and natives if applicable, to be transferred in the scope of a particular Integration Point.
- Navigate to the General tab of Integration Points > Integration Points Details for a particular integration point job.
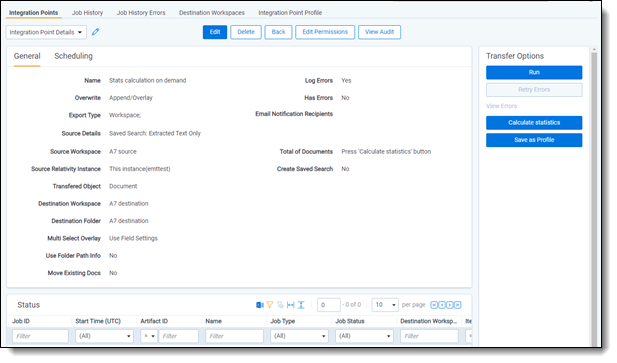 Before the first calculation for this integration point, you will see the "Press 'Calculate statistics' button" message in the Total of Documents field.
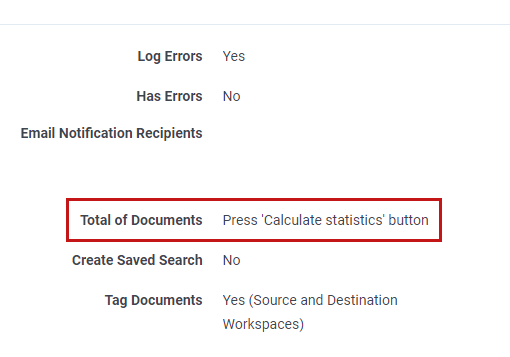
- Click the Calculate statistics button under Transfer Options in the right-hand panel.
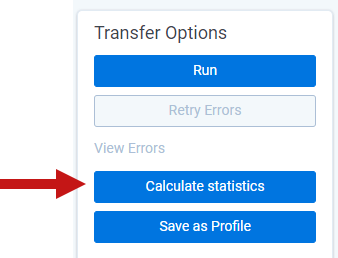
A message box displays indicating that this action will launch the calculation of Saved Search or Production content, depending on the chosen Integration Point, and that this operation can be time consuming, depending on the size of the content. The statistics calculation will run in the background so you can still use other Transfer Options or leave this page and return to it for the results later.
Calculation results appear on the details page and depend on Integration Point content. The total number of documents with a date and time mark of the last calculation will display. Depending on the transferred content, the total number and size of images or natives may also display.