


Feedback
Last date modified: 2026-Jul-14
Create and edit a saved search
You can create and edit saved searches in the Documents tab.
Considerations
Before creating or editing a saved search, consider the following:
- We recommend avoiding nesting complex saved searches.
- Nesting the saved search condition, can cause a timeout. For example, when the saved searches used as conditions themselves contain saved search conditions.
- If relational fields are needed, try to limit the number of nested searches or consider using a field tag.
- Limit the use of relational fields in searches that will be used as nested saved searches later in your workflows.
- We recommend limiting the usage of the is like operator in search conditions.
- It's likely to match a large number of documents.
- Other operators return results quicker than the Is like operator.
- If a search's execution time exceeds one minute, RelativityOne will slow it down in order to avoid impacting other users. As such, this may be a sign that your search is overly complex and would benefit from optimization.
- For any ARM restored workspaces, the Data Grid Text Migration application automatically creates a migration job to migrate the Extracted Text field to Data Grid. Any Extracted Text field included in a Data Grid Text Migration job that has Include in Text Index set to Yes is removed from the Keyword Search index at the beginning of the job before any text migration to Data Grid. As a result, Saved Searches using a Keyword Search and Extracted Text may fail. Be sure to update the Value and Operator fields of any Saved Searches that use the Extracted Text in a condition. For more information on text migration, see Data Grid Text Migration.
Create a saved search
To create or edit a saved search from the Search browser, follow these steps:
- From the Documents tab, click the Saved Search icon in the Browsers pane.

- From the central pane, click Create New Search. To edit a search, right-click the search name, and click Edit.
If you do not see the Create New Search button, you may have another saved search selected. Click the top-level folder in the browser to deselect another search.
- Complete the fields on the Information tab. For more details, see Information.
- From the Conditions tab, select Condition to add a new condition, or Logic Group to create a logic group. Use logic groups to group conditions. For more details, see Conditions.
- From the Fields tab, you can choose which fields you want displayed in your search results. You can also select an existing view, then add all the fields from the view in a single click. For more details, see Search fields.The Default Search View controls what fields are returned, by default, on an advanced or saved search. You can always include additional fields from the advanced or saved search field selector. This view also controls the field sort order. The Default Search View is only meant to control the default fields returned when running a saved search in Relativity. Since that is its purpose in Relativity there is no way to make any changes or additions to the Conditions portion of this view.
- Click the Sort tab, and then specify any sorting for the search results. For more details, see Sort.
- Click the Advanced tab to add additional information. See Advanced.
- Click Save & Search, Search, Save, or Save As.
Selecting Save As opens a pop-up modal to update the name of the saved search.
Search fields
In the Saved Search window, you will want to add the following in each section.
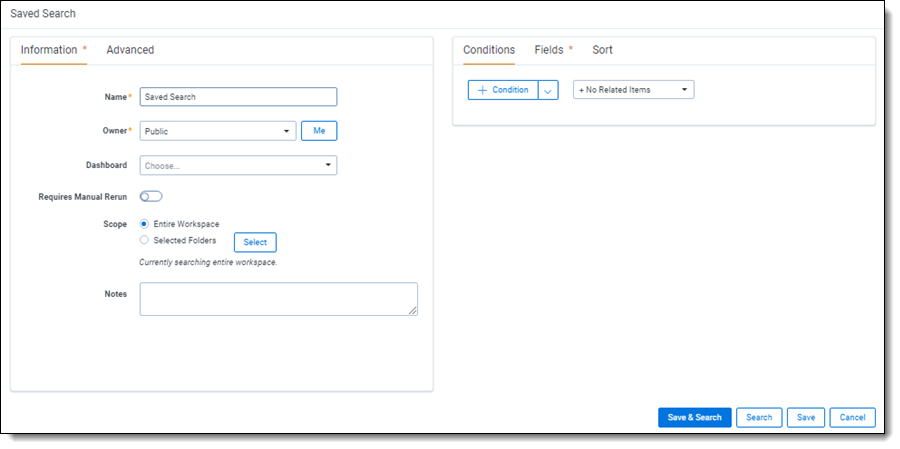
Information
The Information fields are:
- Name—enter a title for the search.
- Owner—select an owner from the drop-down list or click Me to make yourself the owner.
- Dashboard—select an existing dashboard to link the saved search. For more information, see Linking a dashboard to a saved search.
- Requires Manual Rerun—select this option if you want to require users to rerun a saved search when they return to it after navigating to other features in Relativity.
Selecting this option only affects the search that the current user is running. It does not affect any parent or nested searches tied to the current search. If you have a search that has Requires Manual Rerun checked and you include it as the criteria for another search, it will rerun.The Requires Manual Rerun option is for searches that might take a long time to run, and you do not need them to run automatically when you navigate back to the saved searches. This keeps you from having to manually cancel queries before you can navigate away from that search. - Scope—select one of these options to designate the document set for the search:
- Entire Workspace—searches all documents within a workspace.
- Selected Folders—select this option, and then click Select Folders. On the Select Folder pop-up, select the check boxes for the folders that you want to search. Clear the Include Subfolders checkbox on the pop-up if you do not want to include subfolders. Click Clear All to remove all selections.
- Notes—enter any notes you want to add to give more information about the search.
Advanced
The Advanced fields are:
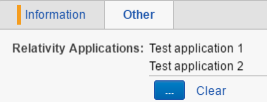
- Relativity Applications—Click Add to add Relativity applications you want to associate with a saved search.
- Keywords—enter any keywords you want to give additional information about the search.
- Query Hint—used to optimize views. Only use the query hint if instructed by the Relativity Customer Support team. Currently, you can use Hashjoin: (true/false) or Maxdop: (x) to populate the field. You must remove query hints before using a saved search in a Relativity script.
Conditions
The Conditions fields define the criteria of the search. Click on a filter card to edit the condition or click the x in the top right corner to remove the condition. The equation box along the top gives you a high-level view of the conditional statement you are creating. This tab has the following controls:
- Add Condition—enter a field name into the Search fields text box, or select a field by scrolling through the list.If there are previously created field categories, you can select a field category from the drop-down list to conveniently filter the fields list. To learn more, visit Field Categories.
- Index Search—select this to select a Keyword, dtSearch, or
- Saved Search—select this to select an existing Keyword, dtSearch, or
- Short Message Search—select this to use the short message search index which allows for a detailed search on RSMF documents by examining message-level metadata.
- <field name>—select an object field name to create a conditional expression for that field to apply to the overall search criteria.
- Add Logic Group—adds logic groups you can add conditions to by dragging and dropping the conditions into the logic group frames. Use the AND or OR operator to join logic groups.
- Includes drop-down—select an option for returning documents related to hit documents. Hit documents match the search criteria. The result set includes the related documents, but they do not need to match the search criteria. Select No Related Items if you do not wish to include any of these documents.
- No Related Items—default value. Use this setting if you do not wish to include any of these documents.
- Duplicates—use this setting if you want the result set to include documents with the same MD5 Hash values as the hit documents. Relativity uses the MD5 Hash value as a unique file identifier.
- Family—use this setting if you want the result set to include documents with the same group identifiers as the hit documents.
- <Custom Field>—your organization may use custom related fields. Contact your system admin for additional information.
Fields
The Fields tab displays the field columns you can add or remove from your search results.
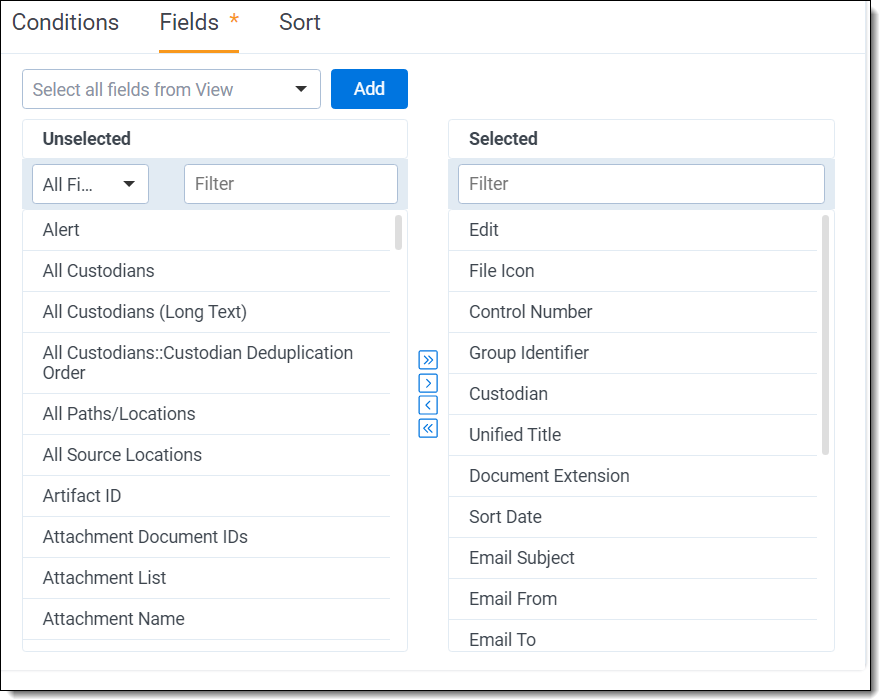
There are two fields panes:
- Unselected—fields you add to your search results.
To add a field, click the name, then click the Move selected left to right arrow in the center column. You can also click the Move all left to the right arrow to display all available fields.If there are previously created field categories, you can select a field category from the drop-down list to conveniently filter the fields list. To learn more, visit Field Categories. - Selected—fields selected that appear on the search results.
To remove a field, click the name, then click the Move selected right to left arrow in the center column. You can also click the Move all right to left to remove all fields from the search results. The position of the fields in the box is how they are ordered. You can drag and drop them to change their order.
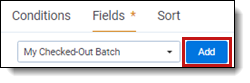
You can also add all fields from an existing view using the Select all fields from View drop-down menu.
- Click the Select all fields from View drop-down menu.
- Select a view. For example, My Checked-Out Batch.
- Click the Add button.
The fields append below any fields already displayed in the Selected pane. Use the move arrows to add additional fields or remove fields.
Sort
The Sort options define the default sort order used for the search results. Each row in a sort criterion has the following options:
- Sort Field—select a field from the left drop-down box. The search sorts on the field you select.
- Order—select ascending or descending from the right drop-down box.
- Up arrow/Down arrow—use to a reorder fields.
- Drag/Drop icon (six dots)—use to drag and drop field to new position in list.
- +Add Sort Field—use to add additional sort fields.
Pop-up pickers
You may have the option to select values from a pop-up picker when you choose certain fields or operators in the Conditions section. For example, pop-ups are available when you select the following operators:
- Any of these
- None of these
- All of these, only for multiple object fields
- Not all of these, only for multiple object fields
See Creating or editing a saved search. For information about setting batch conditions, see Batch fields as search conditions.
Select items pop-up picker
Use the following general steps to select items in the picker:
- Navigate to the Saved Search form or use the Search Conditions feature.
- Select a Field option for a condition.
- Select one or more items in the Available Items list.
A check mark indicates that you selected the item. - Click Apply.
System user fields
System user fields include the System Created By and System Last Modified By fields, which you can use in search conditions.
- Navigate to the Save Search form or use the Search Conditions feature.
- Select a system user field in the Field option for a condition.
- Select an operator, and perform one of the following tasks:
- If you selected any of these or none of these, select from the Available fields and move to the Selected fields column, then click Apply.
- Enter the username in the text box.
- Define any extra search criteria as needed.
Folder name field
You can select Folder Name as a field in a search condition to create more flexible queries than using the Scope section of the Saved Search form. You can combine conditions containing the Folder Name and other fields with AND or OR operators refining your search criteria.
- Navigate to the Save Search form or use the Search Conditions feature.
- Select Folder Name in the Field option for a condition.
- Select an operator, and perform one of the following tasks:
- If you selected any of these or none of these, select the checkbox next to one or more item, then Apply.
- If you selected another operation, enter the folder name in the text box.
- Define any additional search criteria as needed.
Search bar
The Search Bar, a UI controlled feature, exists along the top of item lists that support index search. This replicates the functionality of the Index Search condition in the Search Panel, including keyword search and dtSearch.
To run the index search,
- Enter your search terms in the search bar.
- Click Search, or hit Enter on your keyboard.
- Click Enter + Shift to add more than one search term on separate lines.

The Search Bar reflects the condition panel state after toggling index search conditions.
Recent Searches
You can use the Search Bar to generate highlights within a document in the Viewer.
To view Recent Searches within a document:
- Navigate to Documents.
- Select the desired index from the Keyword Search drop-down list.
- Enter the desired search terms in the field to the right of the drop-list and click Enter on your keyboard.
Keyword, proximity, fuzzy, and stemming searches can work depending on which type of search index you chose.
The list displays documents that match your search criteria. - Click the desired document to open it in the Viewer.
Highlighted terms match the entered criteria, along with any enabled Persistent Highlight Sets.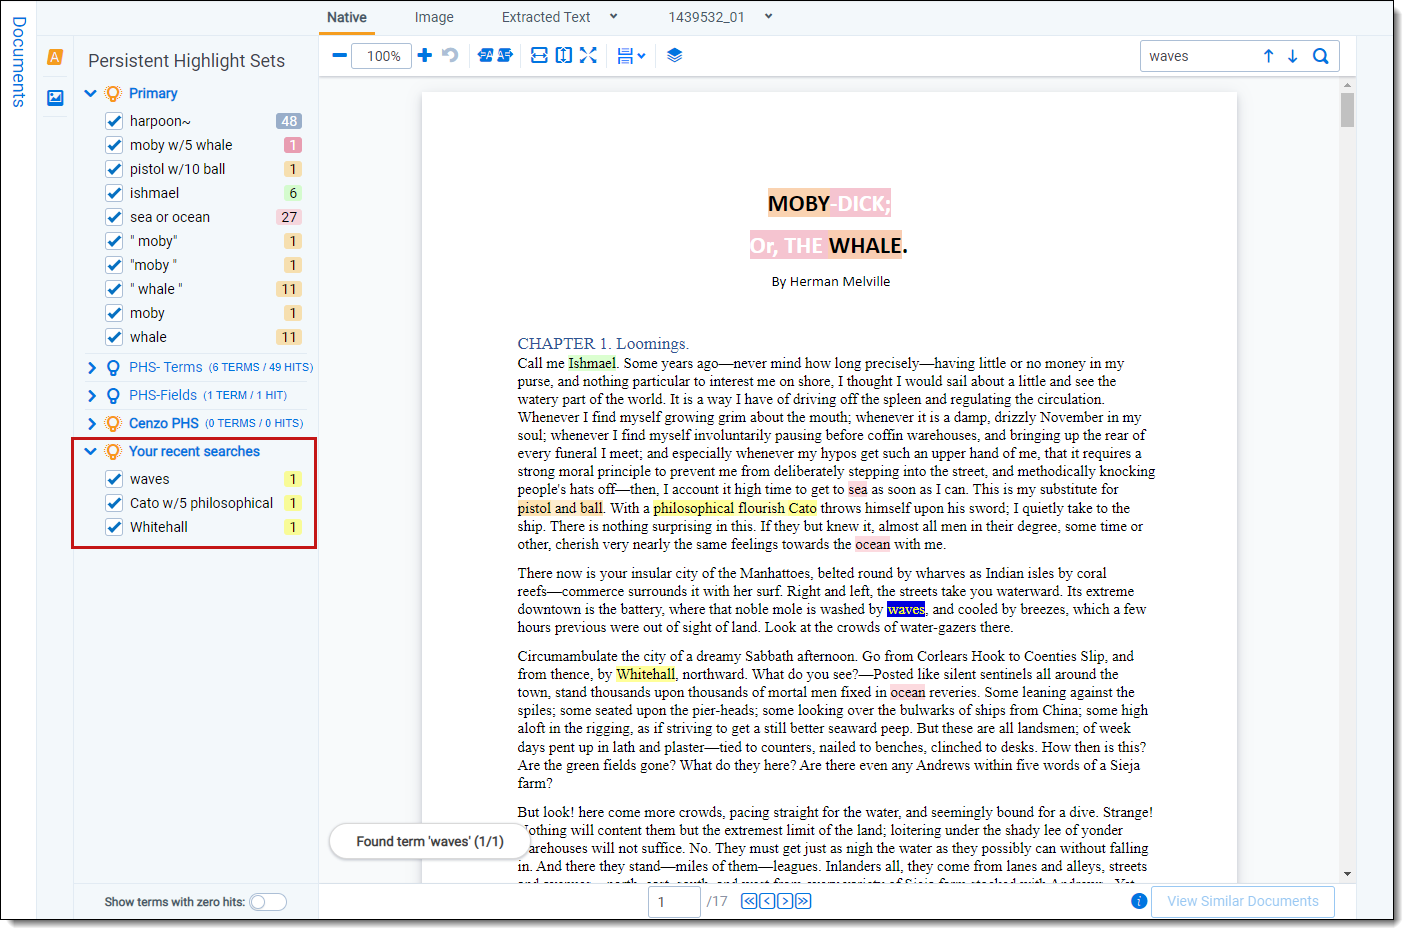
- Optionally, click theShow/Hide Persistent Highlight pane to display the Recent Searches and Persistent Highlight Sets. Click the show/hide icon, light bulb icon, to toggle the Recent Searches or Persistent Highlight Sets.
Recent Searches only apply when using the Search Bar or when running a saved search against a keyword index. Recent Searches do not apply when running a saved search against a dtSearch index.
Link a Relativity application to a saved search
To link a Relativity application to a saved search:
- Navigate to the Search Browser.
- Create a new search or edit an existing search.
- Click Add in the Advanced tab to display the Select Items - Relativity Applications modal. Available applications are in the left box and Selected applications are in the right box.
- Choose one or more applications. Use the arrows to move the applications from the available to selected boxes.
- Click Set.
You can clear your options by clicking the clear button.
To unlink a Relativity Application from a saved search, click Add and use the arrows to remove the application(s). Please note that you cannot leave the selected applications box empty. A warning in red appears along the bottom that reads: Selection cannot be empty. Either leave at least one application linked or clear all using the clear button.
Link a dashboard to a saved search
To link a dashboard to a saved search:
- Navigate to the Search Browser.
- Create a new search or edit an existing search.
- Choose a dashboard from the drop-down list.
- Click Save & Search, Search, Save, or Save As.
If you switch to a different dashboard while viewing the saved search, the link breaks. There are two ways to restore this link:
- Log out of your environment, then log back in.
- Edit the search and hit Save and Search again.
If you delete a dashboard, Relativity removes the link in the saved search.
If you delete a dashboard with dependencies, a message appears with a list of dependencies.
Rerun out-of-date saved searches
You may need to rerun a saved search when you return to it after navigating to other features in Relativity. Instead of seeing your search results, you see a message indicating that your search is out of date.
To enable the Run saved search feature, select the Requires Manual Rerun option in the Information section of the Saved Search form.
Perform one of these tasks:
- Click Run saved search to reload your search results. You can also click on the saved search in the browser to rerun the search.
- Click Edit Search to display the Saved Search form where you modify the search settings.
If you edit an item returned in your saved search, you need to rerun it. You must rerun the search even when the edited item still meets the search criteria, and the number of documents returned does not change.