


Feedback
Generate facts and case documents
aiR for Case Strategy transforms your key document set into a structured fact chronology, so you can understand who did what and when. As part of fact generation, facts extracted from the documents are grouped and in some cases, higher-level facts are constructed to deliver a succinct chronology that minimizes fact duplicates. Once generated, facts can be viewed in a chronological list, gathered to prepare a witness summary or a deposition outline, or used in customizable workflows.
Before using AI-based capabilities, we recommend learning about how the AI components in aiR for Case Strategy work so that you can leverage the features effectively. For more information, see Generative AI considerations in aiR for Case Strategy.
Facts
You can turn a set of documents of interest into a group of relevant facts containing concise document summaries. During fact generation, aiR for Case Strategy categorizes facts as primary, corroborating, or duplicates in the Fact Type field to help you locate important information in your case and avoid duplicates. To learn more about the Fact Type field, see Fact generation QC. Once generated, facts can be viewed on a chronology, gathered to prepare a witness summary or a deposition outline, or used in customizable workflows.
Generate facts
You can generate facts using aiR for Case Strategy on a saved search using the matter-specific information you enter in the prompt criteria fields.
While completing the prompt criteria fields, you can save your progress on a draft, referred to as a Working Copy, by clicking the Save and Close button and then resume completing the fields at another time. Only one draft can be saved for fact chronologies per user at a time. A user can only access a draft that they saved.
If you do not enter a Prompt Criteria Name, the draft is named Fact Chronology: Working Copy.
To generate facts using a saved search on the Case Home tab:
- Navigate to the Case Home tab.
- Click Create a Fact Chronology.If you previously saved a fact chronology draft, it will automatically populate the prompt criteria fields. Otherwise, the most recent prompt criteria fields you used for generating facts will be populated instead.

- Select a Saved Search to specify which documents are used to generate facts. To ensure high performance, there is a limit of 5,000 documents at a time.
- Optionally, click on Existing Prompt Criteria and select a previously run set of prompt criteria from the drop-down menu to populate that data in the modal.
- Edit or complete the fields in the modal. Each field has an individual limit of 4,096 characters except for the Prompt Criteria Name field which has a limit of 256 characters.
- Optionally, if you would like to save a draft of the prompt criteria and resume working on the fields later, click Save and Close.
- Click Generate Facts.
Errored documents during fact generation
If any documents error during fact generation, your organization is not charged for them, and the errored documents do not count towards your organization's aiR for Case Strategy total document count. Documents can error for a number of reasons including that the extracted text is empty or too large.
If there are documents that error during fact generation, the user that started fact generation is notified via email and a saved search is created to help you track those documents. The saved search is named after the entered Prompt Criteria Name value. Only the user that started the job can access the saved search initially.
Not all documents generate facts. If a document does not contain any relevant information, it will not generate a fact, nor will it cause a document error.
To make the saved search available to other users:
- Navigate to the Documents tab.
- Click on the Saved Searches icon in the browser.
- Right-click on the system-generated saved search in the list and select Edit. The saved search is named after the Prompt Criteria Name value.
- Click on the Owner drop-down menu and select Public.
- Click Save & Search.
The system-generated saved search is now accessible to other users in the workspace.
Prompt criteria
The prompt criteria in aiR for Case Strategy give the large language model (LLM) the broad context surrounding a matter. This includes an overview of the matter, people and entities involved, detail on the legal issues that facts must relate to, and any jargon or terms that might help in understanding the documents.
Most fields display information which can guide the voice and tone of what you write. Further description of the fields for generating facts is provided below.
- Prompt Criteria Name—Enter a name for this version of the prompt criteria. The name should be unique between jobs, and will be filterable when you are navigating the list of facts.
- Existing Prompt Criteria—Select a previously used set of prompt criteria from the drop-down menu to load that data into the respective prompt criteria fields. The drop-down menu displays existing prompt criteria created by any user. Optionally, you can search for the name of the Existing Prompt Criteria. The banner at the top of the modal updates whenever you select Existing Prompt Criteria to help you track the source of populated fields.
Prompt criteria that are used for generating facts can be reused while creating a witness summary or deposition outline and vice versa. Since there are some fields that are unique to each capability, only fields that each modal has in common are populated. - Matter Overview—Enter a concise overview of the case. Include the names of the parties involved, the nature of the dispute, and other important case characteristics.
- What are you trying to prove?—Outline your side of the argument and what you are trying to achieve in the case. This helps aiR for Case Strategy judge each fact as helpful or harmful to your case.
- Issues—Enter a list of issues and their descriptions. Issues should be in the following format: Issue name: Description. The issues you enter are used by aiR for Case Strategy to determine whether a document contains relevant facts and are also used to tag the facts it creates.
- People and Aliases—Enter the names and aliases of key individuals in the case. Include their role and any other affiliations.
- Noteworthy Organizations—Enter the name of organizations and other relevant entities involved in the case. Highlight any key relationships between the entities or their notable characteristics.
- Additional Context—Enter any additional information that does not fit the other fields. This section is typically left blank.
- Document Summary Instructions—Describe your desired content, structure, and/or formatting for the document summary. If you leave this blank, the job will create readable summaries of the document, but content, structure, formatting and style are not explicitly prescribed.
aiR Fact fields
Once facts are generated, a set of fields are populated with information based on your selected documents. aiR for Case Strategy creates up to 9 facts per document and the AI looks for any information that is relevant to your prompt criteria.
The following fields are populated on generated facts:
- Primary Fact Date—denotes the date when the fact occurred, or the start date for an event that occurred between certain dates, including the time. If an appropriate date cannot be found in the extracted text, this field will be left blank.
- Fact—a brief title for the fact.
- Description—a more detailed description of the fact.
- aiR Issues—displays the issues that aiR for Case Strategy has associated with each fact. The issues used are from the info you provide in the Issues field on your prompt criteria.
- aiR Entities—displays the entities that aiR for Case Strategy has associated with each fact. You do not have to mention people in the People and Aliases or Noteworthy Organizations field in order for them to be found and set in the aiR Entities field.
- Document Summary—displays an AI-generated synopsis of the document which this fact came from.
- Fact Documents—displays the control number for the document or documents which this fact came from. You can link a fact to more documents manually if you want, but note that document preview will only display the first document listed.
- Citation—the portion or portions of the document that are used to support each fact. If multiple excerpts were found, they are separated by record separator symbols. You can view the citation highlights on a document in the Document Preview panel.
- Fact Score—an AI-generated score for each fact on a 0-4 scale.
- 4—Very important; the fact is crucial and has a strong impact on proving the user's case.
- 3—Important; the fact has a significant impact and is very relevant to the case.
- 2—Moderately important; the fact has some impact and is somewhat relevant.
- 1—Slightly important; the fact has minimal impact but might still be somewhat relevant.
- 0—Not important; the fact has no relevance to the case. This score is very rare, as aiR for Case Strategy usually only extracts facts that it deems relevant.
- Arguments for Fact Score—an AI-generated rationale for the Fact Score to help you understand the scores better.
- Helpful/Harmful—an AI-generated decision on whether a fact is helpful, harmful, or neutral towards your case. This designation is based on your input in the prompt criteria in the What are you trying to prove? field.
- Keep Fact—a Yes/No field which you can use for QC'ing facts and recording whether a fact is useful without having to delete it.
- Prompt Criteria Name—the name which you entered in the Generate Facts modal. This field has a character limit of 256 characters.
aiR Fact ID—A unique string identifier generated when aiR for Case Strategy creates a fact. This ID can be used for overlaying information using Import jobs. It is also referenced by the Duplicate Group ID field and the aiR Sort ID field.
Fact generation considerations
Fact generation uses Generative AI to read the extracted text of the documents, describe the contents using a document summary, and to create and score the facts. We strongly recommend that you provide an appropriate amount of oversight by having an attorney working on the case review the facts and then confirm or correct their language as needed. For further Generative AI considerations, see the Considerations regarding the use of Generative AI section below.
If the same facts occur in multiple documents, duplicate or overlapping facts can be generated. aiR for Case Strategy will tag duplicate facts to help reduce the clutter, but if you avoid including duplicate content in the documents you select for fact generation, you can reduce their prevalence.
Running multiple fact generation jobs on the same document can also result in duplication, as prior facts are never deleted. We recommend that you filter fact lists using the Prompt Criteria Name, or consider deleting old facts if you have made improvements to your prompt criteria.
Fact Types and fact generation QC
The default aiR Facts view is designed to show the synthesized list of facts. The view has conditions to show only facts with Fact Type: Primary, Primary (Constructed) and Corroborating. Facts that are classified as duplicates are not displayed in this view. The aiR Facts QC view can be used to review how facts have been categorized by Fact Type and to evaluate and QC the duplicates. This view has several fields that provide additional information on how aiR for Case Strategy grouped facts together so you can verify the accuracy of the classification.
The following fields are unique to the aiR Facts QC view:
| Name | Description |
|---|---|
| Fact Type | When facts are generated, aiR for Case Strategy assigns one of the follow categories to classify each fact:
|
| Duplicate Group ID | This field groups together similar duplicate facts much like how relational fields operate on documents. The field's value is the aiR Fact ID of the original duplicate fact and each fact in the duplicate group shares that value. You can use this field to sort or filter facts based on their grouping to QC them. If a fact does not have any duplicates, then the value for this field is blank. |
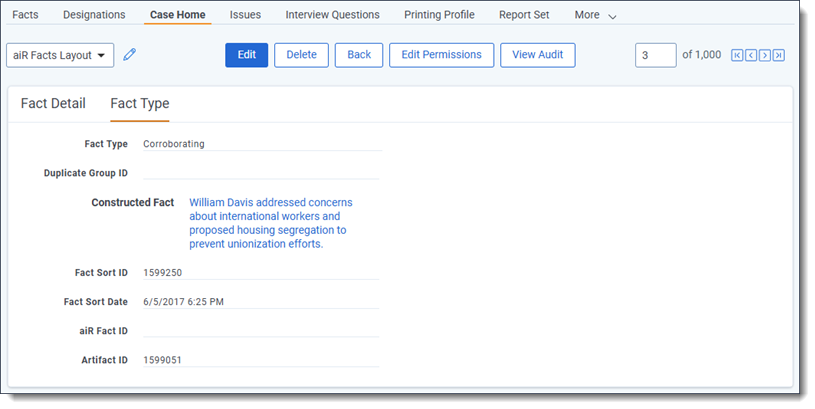
| Constructed Fact | This field links Corroborating facts to their Primary (Constructed) fact, creating a parent-child relationship. You can add the Constructed Fact field to a layout to view the Constructed Fact relationship from a Corroborating fact. The Constructed Fact field is available on the Fact Type tab section of the aiR Facts Layout.
Add an Object List on a layout to link the other direction, from the Primary (Constructed) fact down to its Corroborating facts. The aiR Facts Layout has the Corroborating Facts list below the Fact Detail or Fact Type sections. |
Viewing and editing the Fact Type
You can use the aiR Facts layout to view additional information about a fact, including its assigned Fact Type value. You can also edit facts from this layout and adjust the Fact Type value as desired.
To view and edit the fact type:
- Navigate to the Case Home tab.
- Click on a fact in the Fact column.
- Ensure that the aiR Facts layout is selected.
- Click on the Fact Type tab. You can see the assigned Fact Type value.
- Optionally, if you would like to edit the Fact Type, click Edit.
- Click on the Fact Type drop-down menu and select an option.
- Click Save.
The fact is updated with your Fact Type selection. Editing a fact's fact type does not change related fields such as Duplicate Group ID and Primary (Constructed) fact.
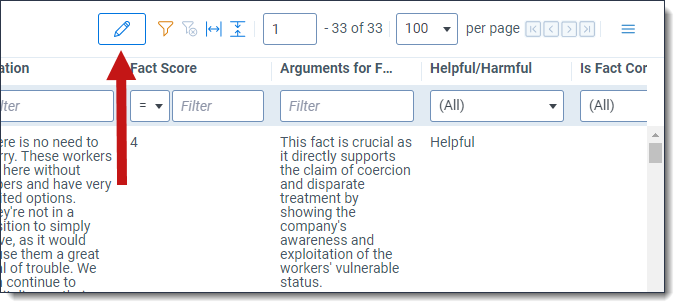
Editing facts using inline editing
Users can use inline editing on the Case Home tab to edit cells on-the-fly without needing to open each fact individually. Eligible fields for inline editing are identified with a yellow highlight at the top of the column.
Click the Inline Editing icon to enter and exit edit mode. While in edit mode, you can edit any eligible fields.
aiR Facts view
Once you've generated facts using aiR for Case Strategy, you can view the results using the new aiR Facts view on the Facts tab. aiR Facts is a default view and cannot be edited.
Optionally, you can create a copy of the aiR Facts view and add or remove fields to create a custom view that suits your needs.
To create a custom view, do the following:
- Navigate to the Views tab.
- Select the aiR Facts view from the list.
- Select Copy from the mass operations toolbar.
- Click Ok.
The aiR Facts (1) view is created and it is an editable view that contains all of the aiR Facts fields which you can further customize. - Select the aiR Facts (1) view from the list.
- Click Edit.
- Edit the Name field to ensure your new custom view has a recognizable name.
- Ensure the Fields tab is selected and then add or remove fields as desired from the Selected section. Each field in the Selected section will display in the custom view.
- Once you've finished editing the fields, click Save.
- Navigate to the Facts tab.
- Click on the Views drop-down menu and select the view you created to begin using it.
Witness summaries
Once you have generated a collection of facts, you can use them to build a witness summary. This document provides a snapshot of a witness’s involvement in a matter, using the input facts, information you provide about the most important issues, and your own objectives in the case.
Create a witness summary
While completing the prompt criteria fields, you can save your progress on a draft, referred to as a Working Copy, by clicking the Save and Close button and then resume completing the fields at another time. Only one draft can be saved for witness summaries per user at a time. A user can only access a draft that they saved.
If you do not enter a Prompt Criteria Name, the draft is named Witness Summary: Working Copy.
To create a witness summary:
- Navigate to the Case Home tab.
- Select the facts from the list that you would like to use to create the witness summary. A fact must contain a date and list the witness in its aiR Entities field to be usable. You can select up to 400 facts.
- Click Create a Witness Summary in the aiR for Case Strategy panel.
The Create a Witness Summary modal displays.If you previously saved a witness summary draft, it will automatically populate the prompt criteria fields. Otherwise, the most recent prompt criteria fields you used for creating a witness summary will be populated instead. - Optionally, click on Existing Prompt Criteria and select a previously run set of prompt criteria from the drop-down menu to populate that data in the modal.
- Edit or complete the fields in the modal.
- Optionally, if you would like to save a draft of the prompt criteria and resume working on the fields later, click Save and Close.
- Click Create a Witness Summary.
Once the witness summary is created, you can view it by selecting the witness summary in the Case Documents widget.
Deposition outlines
Once you have generated a collection of facts, you can use them to build a deposition outline. This document provides a starting point for an attorney to plan a witness interview, using both the input facts, information you provide about the most important issues, and your own objectives in the case to construct an appropriate plan.
Create a deposition outline
While completing the prompt criteria fields, you can save your progress on a draft, referred to as a Working Copy, by clicking the Save and Close button and then resume completing the fields at another time. Only one draft can be saved for deposition outlines per user at a time. A user can only access a draft that they saved.
If you do not enter a Prompt Criteria Name, the draft is named Deposition Outline: Working Copy.
To create a deposition outline:
- Navigate to the Case Home tab.
- Select the facts you would like to use to create the deposition outline from the list. Facts must contain a date and a witness in its aiR Entities field to be usable. You can select up to 400 facts.
- Click Create a Deposition Outline in the aiR for Case Strategy panel.
The Create a Deposition Outline modal displays.If you previously saved a deposition outline draft, it will automatically populate the prompt criteria fields. Otherwise, the most recent prompt criteria fields you used for creating a deposition outline will be populated instead. - Optionally, click on Existing Prompt Criteria and select a previously run set of prompt criteria from the drop-down menu to populate that data in the modal.
- Edit or complete the fields in the modal.
- Optionally, if you would like to save a draft of the prompt criteria and resume working on the fields later, click Save and Close.
- Click Create Deposition Outline.
Once the deposition outline is created, you can view it by selecting the deposition outline in the Case Documents widget.
Prompt criteria
Most fields display information which can guide the voice and tone of what you write. Further description of the fields for creating a deposition outline or witness summary is provided below.
- Prompt Criteria Name—Enter a name for your prompt criteria.If you load an existing prompt criteria and edit any of the fields, edit the Prompt Criteria Name so that it is unique. Alternatively, if you load an existing prompt criteria and do not edit the prompt criteria fields and edit the name, the previous name for the existing prompt criteria is lost.
- Existing Prompt Criteria—Select a previously used set of prompt criteria from the drop-down menu to load that data into the respective prompt criteria fields. The drop-down menu displays existing prompt criteria created by any user. Optionally, you can search for the name of the Existing Prompt Criteria. The banner at the top of the modal updates whenever you select Existing Prompt Criteria to help you track the source of populated fields.
Prompt criteria that are used for generating facts can be reused while creating a witness summary or deposition outline and vice versa. Since there are some fields that are unique to each capability, only fields that each modal has in common are populated. - Entity—Enter the name of the person that this deposition outline or witness summary is being created for. The Entity will be matched with the aiR Entities field to determine if a fact should be considered in the generation of a deposition outline or witness summary.
- Matter Overview—Enter a concise overview of the case. Include the names of the parties involved, the nature of the dispute, and any other important case characteristics.
- What are you trying to prove?—Outline your side of the argument and what you are trying to achieve in the case.
- Issues—Enter a list of issues and their descriptions. Issues should be in the following format: Issue name: Description. The issues you enter are used by aiR for Case Strategy to determine whether a document contains relevant facts and are also used to tag the facts it creates.
- People and Aliases—Enter the names and aliases of key individuals in the case. Include their role and any other affiliations.
- Noteworthy Organizations—Enter the name of organizations and other relevant entities involved in the case. Highlight any key relationships between the entities or their notable characteristics.
- Additional Context—Enter any additional information that does not fit the other fields. This section is typically left blank.
Deposition outline and witness summary considerations
Deposition outline and witness summary creation uses Generative AI to read the facts and issues and then write a document of significant length from them. It is critical that you provide an appropriate amount of oversight by having an attorney working on the case review the document, and confirm or correct their language. For further Generative AI considerations, see the Considerations regarding the use of Generative AI section below.
Working with deposition outlines and witness summaries
Once a deposition outline or witness summary has been created, you can download copy to your workstation or create a saved search to share the documents that it contains with others. A deposition outline or witness summary can also be edited using the text editor in the Case Documents widget.
Downloading a deposition outline or witness summary
You can download a .docx version of a deposition outline or witness summary to your workstation from the text editor. The downloaded document is text-based and does not include any hyperlinks.
To download a deposition outline or witness summary:
- Navigate to the Case Home tab and select the deposition outline or witness summary you wish to download in the Case Documents widget.
- Click on the Download Word Document icon in the text editor toolbar.
A copy of the deposition outline or witness summary is downloaded to your workstation.
Creating a saved search for a deposition outline or witness summary
The documents used in a deposition outline or witness summary can be shared via saved search to make it easy for the recipient to access the relevant documents. Once you've created a saved search, you can also export it using Import/Export. To learn more, see Exporting a saved search load file.
To create a saved search, add the Case Documents field as a condition and select the desired deposition outlines or witness summaries to include the relevant documents in the new saved search.
Editing a deposition outline or witness summary
Once you have created a deposition outline or a witness summary, you can view its contents by expanding the Case Documents widget and then selecting the deposition outline or witness summary in the widget list. You can then edit the document with the text editor.
Having multiple users edit the same deposition outline or witness summary at once is not currently supported.
After making an edit, a message denoting the unsaved changes displays in the editor and the Save button is available. Once you are finished editing, click Save. If you have unsaved changes and try to navigate away from the case document, a pop up displays. Click OK to discard any unsaved edits and navigate away from the current document or click Cancel to stay on the current case document so that you can save your edits.
Alternatively, you can enable autosave to save any edits you make every 15 seconds. After each autosave, the timestamp next to the autosave toggle updates to help you track when the last autosave occurred. With this option enabled, your changes are automatically saved when you navigate away from the current case document.

Document Preview panel
The Document Preview panel is available from the Case Home tab. You can use the Document Preview panel to view documents without having to open them in the Viewer.

Citation highlights in the Document Preview panel
Citation highlights display in the Document preview panel so you can locate key information at a glance without leaving the Case Home tab. Citation highlighting displays for all facts created after August 14, 2025. Some facts created prior to that date may not support highlighting. Citation highlights display in a light blue color.
If a document is manually added to a fact, citation highlights will only appear for the first linked document.

General writing guidelines
For the prompt criteria in all of the setup tabs, we recommend:
- Write as if less is more. Instead of pasting in a long review protocol as-is, summarize where possible and include only key passages.
- Phrase things in a positive way when possible. Avoid negatives such as not statements and double negatives.
- Do not include explanations of the law.
- Do not give the LLM commands, such as, “you will review XX." Instead, simply describe the case.
- Use whatever writing format makes the most sense to a human reader. For example, bullet points might be useful for the People and Aliases field, but paragraphs might make sense in another field.
- The LLM understands widely used slang and abbreviations, but it does not necessarily know jargon or phrases that are specific to an organization.
Size limitations
Based on the limits of the underlying LLM, aiR for Case Strategy has size limits for the documents and prompts you submit.
The documents and prompt criteria have the following size limits:
- Each Generate Facts field has an individual limit of 4,096 characters except for the Prompt Criteria Name field which has a limit of 256 characters.
- Each document's extracted text must be under 600 KB. Documents larger than 600 KB will not have facts generated because they exceed the limit of the LLM. Similarly, facts are not generated for documents with little or no extracted text.
- Each document's extracted text, when combined with the prompt criteria, must be less than 120,000 tokens which roughly corresponds to word count but this can be inflated for documents that contain a lot of numbers or punctuation.
- To ensure high performance, there is a limit of 5,000 documents at a time when generating facts.