


Feedback
Last date modified: 2026-Jun-23
Creating witness summaries and deposition outlines
After facts have been extracted using aiR for Case Strategy to create a fact chronology, you can create a witness summary and a deposition outline to aid your case. To learn more, see Creating a fact chronology.
Before using AI-based capabilities, we recommend learning about how the AI components in aiR for Case Strategy work so that you can leverage the features effectively. For more information, see Generative AI considerations in aiR for Case Strategy.
Witness summaries
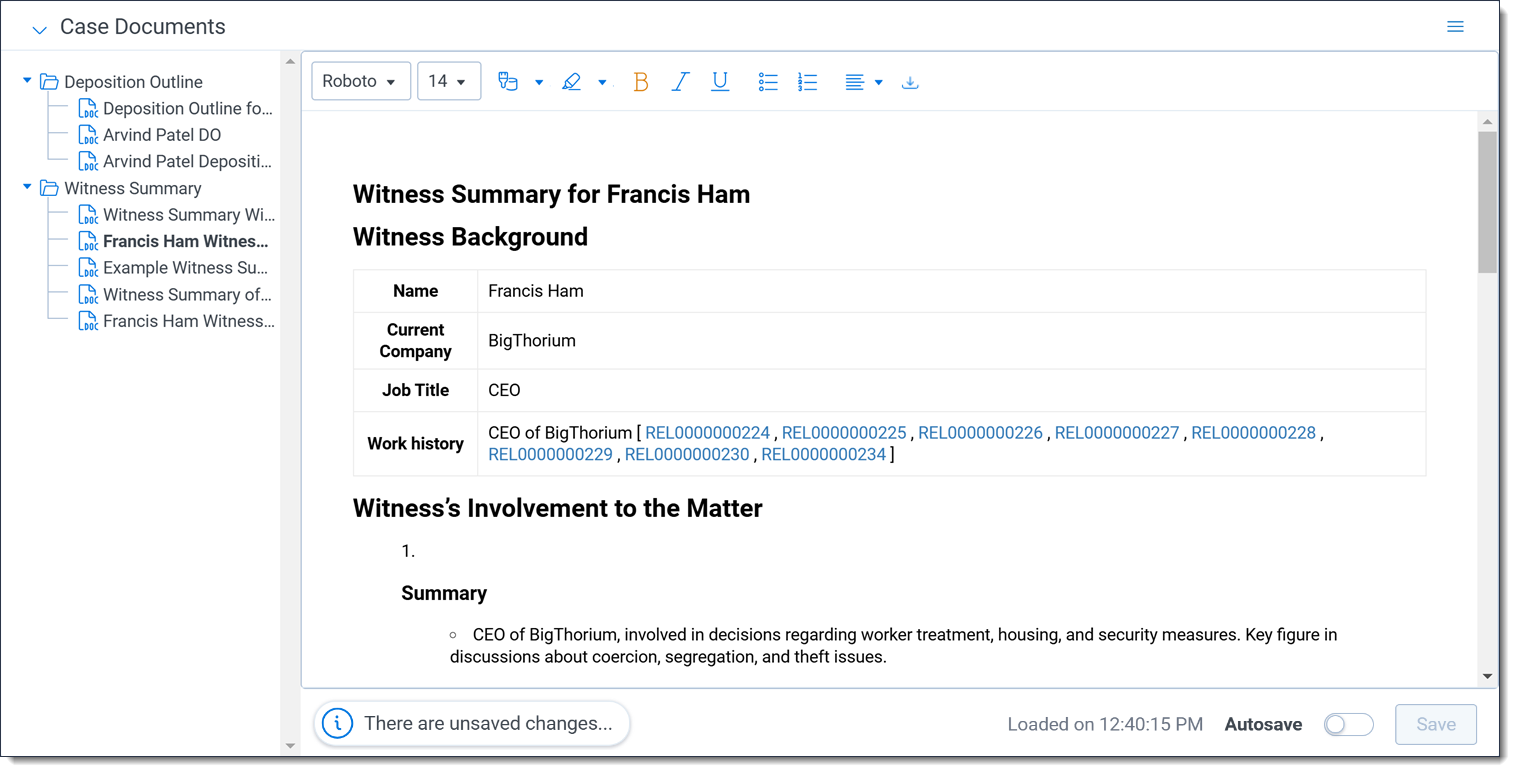
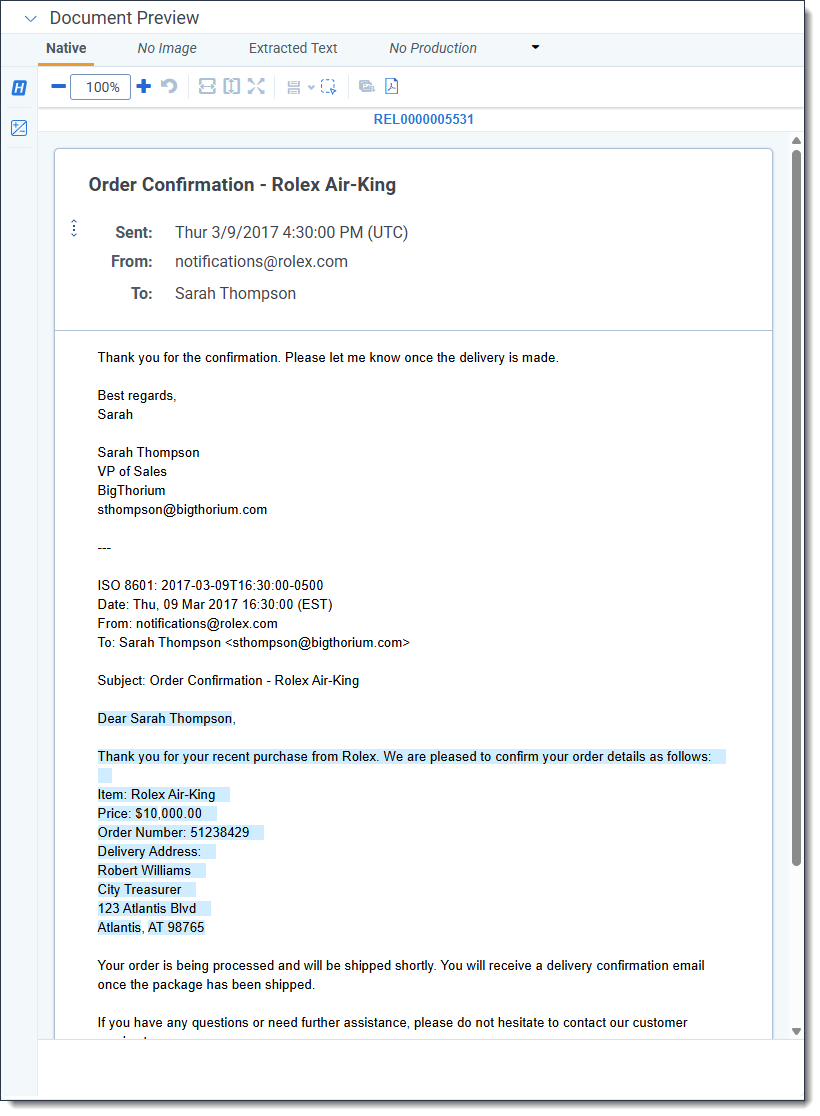
This document provides a generated summary intended to reflect a witness’s involvement in a matter, using the input facts, information you provide about the most important issues, and your own objectives in the case. You can click on any hyperlinked, document Control Numbers to open that document in the Document preview panel.
The ability to add hyperlinks to a witness summary is not currently supported but is planned for a future release.
Create a witness summary
While completing the prompt criteria fields, you can save your progress as a draft, referred to as a Working Copy, by clicking the Save and Close button and then resume completing the fields at another time. Only one draft can be saved for witness summaries per user at a time. A user can only access a draft that they saved.
If you do not enter a Prompt Criteria Name, the draft is named Witness Summary: Working Copy.
To create a witness summary:
- Navigate to the Case Home tab.
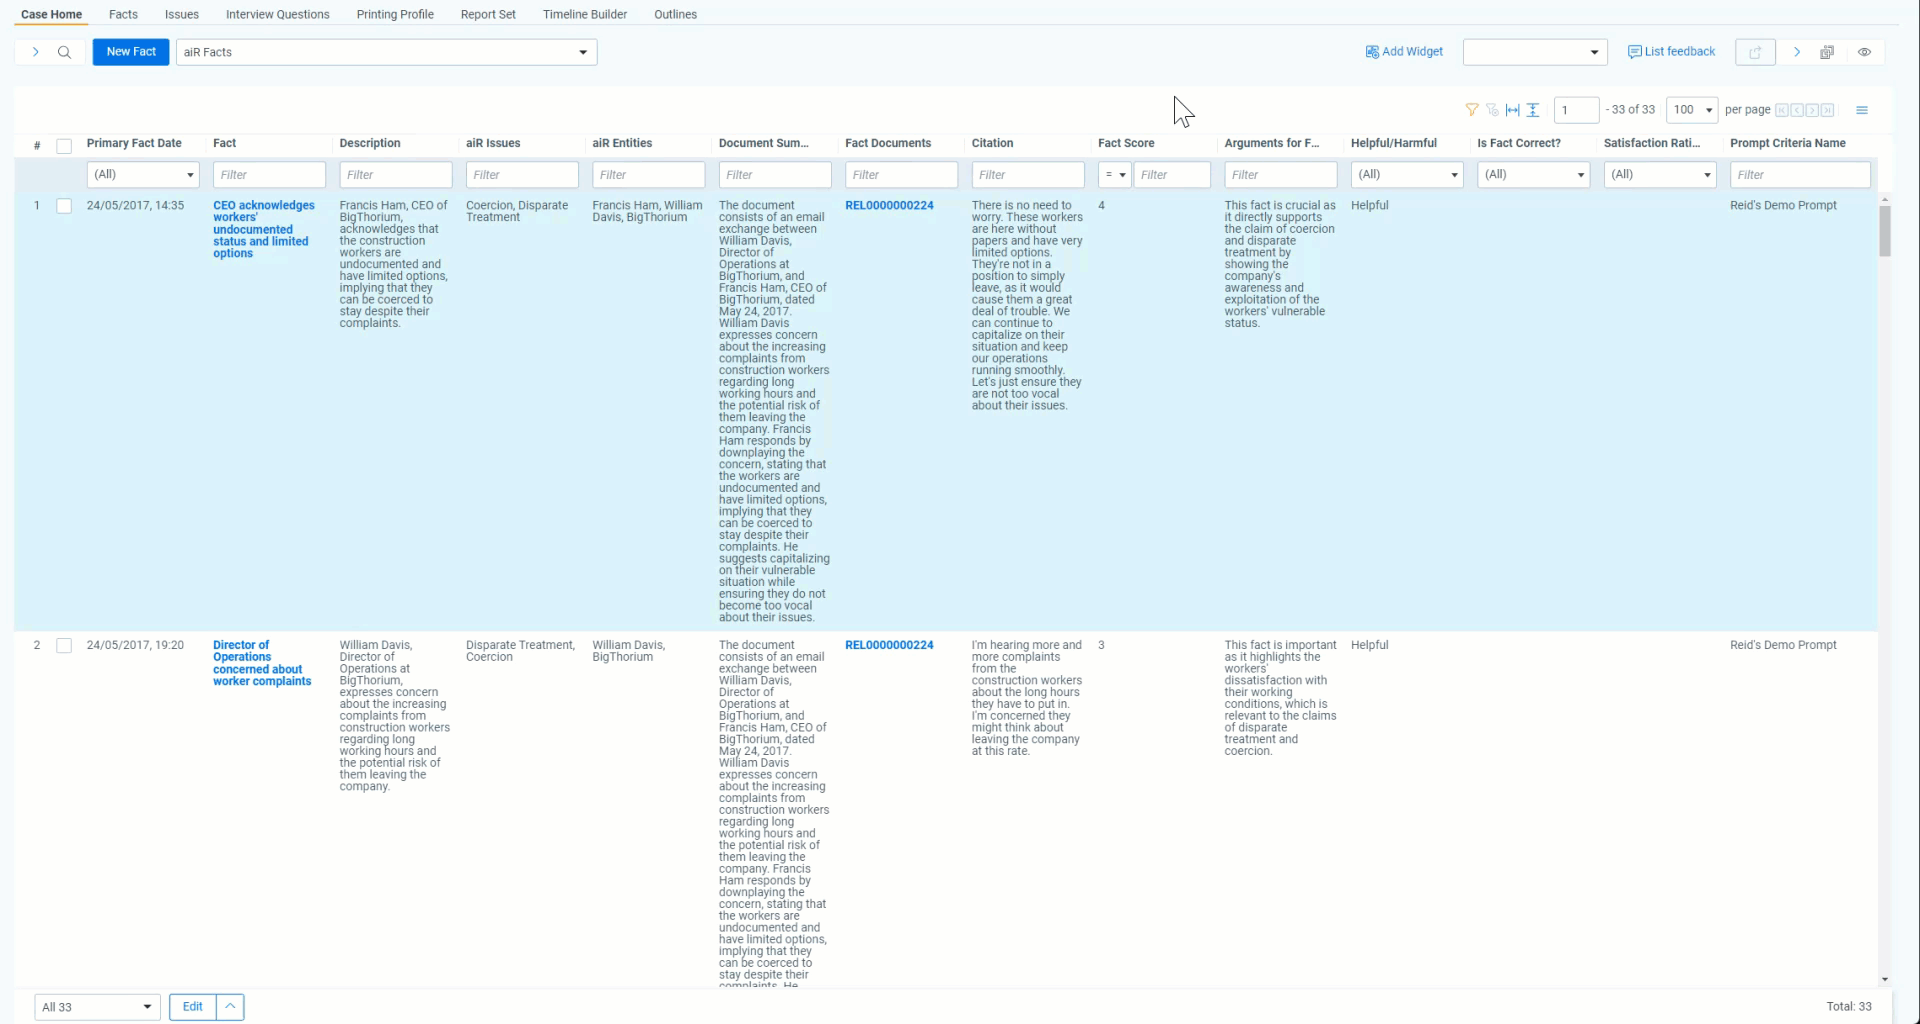
- Select the facts from the list that you would like to use to create the witness summary. You can select up to 400 facts. A fact must have the following to be usable:
- The Fact, Description, aiR Issues, and Citation fields must be populated.
- A witness must be included in the fact's aiR Entities field.
- Click Create a Witness Summary in the aiR for Case Strategy panel.
The Create a Witness Summary modal displays.If you previously saved a witness summary draft, it will automatically populate the prompt criteria fields. Otherwise, the most recent prompt criteria fields you used for creating a witness summary will be populated instead. - Optionally, click on Existing Prompt Criteria and select a previously run set of prompt criteria from the drop-down menu to populate that data in the modal.
- Edit or complete the fields in the modal.
- Optionally, if you would like to save a draft of the prompt criteria and resume working on the fields later, click Save and Close.
- Click Create a Witness Summary.
Once the witness summary is created, you can view it by selecting the witness summary in the Case Documents widget.
Deposition outlines
This document provides a starting point for an attorney to plan a witness interview, using both the input facts, information you provide about the most important issues, and your own objectives in the case to help construct a draft plan. You can click on any hyperlinked, document Control Numbers to open that document in the Document preview panel.
The ability to add hyperlinks to a deposition outline is not currently supported but is planned for a future release.
Create a deposition outline
While completing the prompt criteria fields, you can save your progress as a draft, referred to as a Working Copy, by clicking the Save and Close button and then resume completing the fields at another time. Only one draft can be saved for deposition outlines per user at a time. A user can only access a draft that they saved.
If you do not enter a Prompt Criteria Name, the draft is named Deposition Outline: Working Copy.
To create a deposition outline:
- Navigate to the Case Home tab.
- Select the facts from the list that you would like to use to create the deposition outline. You can select up to 400 facts. A fact must have the following to be usable:
- The Fact, Description, aiR Issues, and Citation fields must be populated.
- A witness must be included in the fact's aiR Entities field.
- Click Create a Deposition Outline in the aiR for Case Strategy panel.
The Create a Deposition Outline modal displays.If you previously saved a deposition outline draft, it will automatically populate the prompt criteria fields. Otherwise, the most recent prompt criteria fields you used for creating a deposition outline will be populated instead. - Optionally, click on Existing Prompt Criteria and select a previously run set of prompt criteria from the drop-down menu to populate that data in the modal.
- Edit or complete the fields in the modal.
- Optionally, if you would like to save a draft of the prompt criteria and resume working on the fields later, click Save and Close.
- Click Create Deposition Outline.
Once the deposition outline is created, you can view it by selecting the deposition outline in the Case Documents widget.
Prompt criteria
Most fields display information which can guide the voice and tone of what you write. Further description of the fields for creating a deposition outline or witness summary is provided below.
- Prompt Criteria Name—Enter a name for your prompt criteria.If you load an existing prompt criteria and edit any of the fields, edit the Prompt Criteria Name so that it is unique. Alternatively, if you load an existing prompt criteria and do not edit the prompt criteria fields and edit the name, the previous name for the existing prompt criteria is lost.
- Existing Prompt Criteria—Select a previously used set of prompt criteria from the drop-down menu to load that data into the respective prompt criteria fields. The drop-down menu displays existing prompt criteria created by any user. Optionally, you can search for the name of the Existing Prompt Criteria. The banner at the top of the modal updates whenever you select Existing Prompt Criteria to help you track the source of populated fields.
Prompt criteria that are used for extracting facts can be reused while creating a witness summary or deposition outline and vice-versa. Since there are some fields that are unique to each capability, only fields that each modal has in common are populated. - Entity—Enter the name of the person that this deposition outline or witness summary is being created for. The Entity will be matched with the aiR Entities field to determine if a fact should be considered in the creation of a deposition outline or witness summary.
- Purpose of the Deposition—Enter which party you are representing in a legal matter. Also, enter a description of what you are trying to accomplish in this deposition.
- Matter Overview—Enter a concise overview of the case. Include the names of the parties involved, the nature of the dispute, and any other important case characteristics.
- What are you trying to prove?—Outline your side of the argument and what you are trying to achieve in the case.
- Issues—Enter a list of issues and their descriptions. Issues should be in the following format: Issue name: Description. The issues you enter are used by aiR for Case Strategy to determine whether a document contains relevant facts and are also used to tag the facts it creates.
- People and Aliases—Enter the names and aliases of key individuals in the case. Include their role and any other affiliations.
- Noteworthy Organizations—Enter the name of organizations and other relevant entities involved in the case. Highlight any key relationships between the entities or their notable characteristics.
- Additional Context—Enter any additional information that does not fit the other fields. This section is typically left blank.
Deposition outline and witness summary considerations
Deposition outline and witness summary creation uses Generative AI to read the facts and issues and then write a document of significant length from them. It is critical that you provide an appropriate amount of oversight by having an attorney working on the case review the document, and confirm or correct their language. For further Generative AI considerations, see the Considerations regarding the use of Generative AI section below.
Interacting with related documents or facts
Deposition outlines and witness summaries are stored as case documents. Each case document maintains relationships to the documents and facts that support it to make it easy to find the material connected to a specific deposition outline or witness summary whether you're reviewing documents, analyzing facts, or preparing downstream work product.
You can access these related facts or documents in multiple ways: through views, filters, or saved searches. You can choose whichever workflow suits you best, but no matter which one you use, selecting a case document only shows the documents or facts associated with it.
Viewing the documents associated with a deposition outline or witness summary
Each deposition outline or witness summary automatically links to the documents it references.
To only view the documents associated with a specific case document, you can use any of the following approaches:
- Filter a view using the Case Documents field to show only documents linked to the selected deposition outline or witness summary.
- Add the Case Documents field as a condition in a search or view and select the case document you want to examine.
- Optionally, create a saved search if you need a reusable set of these documents to share or export.
Viewing the facts associated with a deposition outline or witness summary
Each fact has a Case Document Facts field that identifies the case documents it is linked to. This lets you see only the facts associated with a particular deposition outline or witness summary.
To view only the facts associated with a specific case document:
- Filter a Facts view using the Case Document Facts field.
- Add the Case Document Facts field as a search or view condition and select the case document you want to analyze.
Working with deposition outlines and witness summaries
Once a deposition outline or witness summary has been created, you can download copy to your workstation or create a saved search to share the documents that it contains with others. A deposition outline or witness summary can also be edited using the text editor in the Case Documents widget.
Downloading a deposition outline or witness summary
You can download a .docx version of a deposition outline or witness summary to your workstation from the text editor. The downloaded document is text-based and includes hyperlinks. If you click on a link, you are prompted to login to Relativity and then you can see the linked document in the Viewer.
To download a deposition outline or witness summary:
- Navigate to the Case Home tab and select the deposition outline or witness summary you wish to download in the Case Documents widget.
- Click on the Download Word Document icon in the text editor toolbar.
A copy of the deposition outline or witness summary is downloaded to your workstation.
Editing a deposition outline or witness summary
Once you have created a deposition outline or a witness summary, you can view its contents by expanding the Case Documents widget and then selecting the deposition outline or witness summary in the widget list. You can then edit the document with the text editor.
Having multiple users edit the same deposition outline or witness summary at once is not currently supported.
While reviewing a deposition outline or witness summary, you can click on a document with a Control Number hyperlink to open it in the Document preview panel without leaving the Case Home tab. While viewing a document in the Document preview panel, the citation highlights for that document display.
After making an edit, a message denoting the unsaved changes displays in the editor and the Save button is available. Once you are finished editing, click Save. If you have unsaved changes and try to navigate away from the case document, a pop up displays. Click OK to discard any unsaved edits and navigate away from the current document or click Cancel to stay on the current case document so that you can save your edits.
Alternatively, you can enable autosave to save any edits you make every 15 seconds. After each autosave, the timestamp next to the autosave toggle updates to help you track when the last autosave occurred. With this option enabled, your changes are automatically saved when you navigate away from the current case document.
Deleting a witness summary or deposition outline
You can remove a witness summary or deposition outline from the Case Documents widget.
- Optionally, click on the Witness Summary or Deposition Outline folder to ensure that its expanded.
- Hover your cursor over the case document that you wish to delete and click on the Delete icon.
The Delete Case Document modal displays. - Click Delete.
The selected case document is deleted.
Document Preview panel
The Document Preview panel is available from the Case Home tab. You can use the Document Preview panel to view documents without having to open them in the Viewer.
Citation highlights in the Document Preview panel
Citation highlights display in the Document preview panel so you can locate key information at a glance without leaving the Case Home tab. Citation highlighting displays for all facts created after August 14, 2025. Some facts created prior to that date may not support highlighting. Citation highlights display in a light blue color.
If a document is manually added to a fact, citation highlights will only appear for the first linked document.
General writing guidelines
For the prompt criteria in all of the setup tabs, we recommend:
- Write as if less is more. Instead of pasting in a long review protocol as-is, summarize where possible and include only key passages.
- Phrase things in a positive way when possible. Avoid negatives such as not statements and double negatives.
- Do not include explanations of the law.
- Do not give the LLM commands, such as, “you will review XX." Instead, simply describe the case.
- Use whatever writing format makes the most sense to a human reader. For example, bullet points might be useful for the People and Aliases field, but paragraphs might make sense in another field.
- The LLM understands widely used slang and abbreviations, but it does not necessarily know jargon or phrases that are specific to an organization.
Size limitations
Based on the limits of the underlying LLM, aiR for Case Strategy has size limits for the documents and prompts you submit.
The documents and prompt criteria have the following size limits:
- Each Extract Facts field has an individual limit of 4,096 characters except for the Prompt Criteria Name field which has a limit of 256 characters.
- Each document's extracted text must be between 0.05 - 600 KB. Documents that are outside this range will not have facts extracted because they do not meet the size limits of the LLM.
- Each document's extracted text, when combined with the prompt criteria, must be less than 120,000 tokens which roughly corresponds to word count but this can be inflated for documents that contain a lot of numbers or punctuation.
- To ensure high performance, there is a limit of 5,000 documents at a time when extracting facts.
Job email results
Once a memo job concludes, an email with additional information is sent to the user that started it. Each potential result is described below:
| Name Result | Description |
|---|---|
| Job completed successfully | The job ran successfully and no further action is needed. |
| Job has failed | The job has not completed successfully and no memos were created. Rerun the job again. |