Feedback
Last date modified: 2026-Jun-30
Working with indexes
Users with the permission to use Index Manager can create new indexes, rebuild existing ones, and delete indexes. See Permissions for details on the Index Management permission.
Refer to Best practices for recommendations on preparing your data for indexing.
Navigating the Index Manager
Refer to the following descriptions to learn more about the Index Manager modal.
Multiple users can use aiR Assist in the same workspace and use the same indexes, but each user's session and chat history remain private and separate.
- Search index box—Use to search for a particular index in the list. Begin typing the name and matching indexes display for selection.
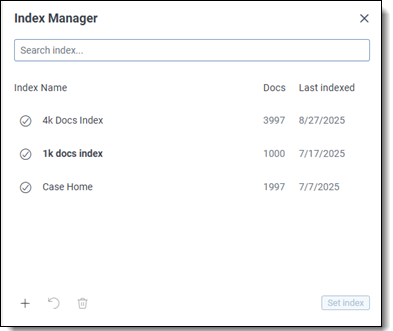
- Index name—name of the index entered during index set up. Hover over or click the index name to view index details, such as last indexed date/time and by whom, description, and whether all documents were indexed or errors were encounter.
- Docs—total number of documents in the index. When indexing is in progress, the percentage complete displays here.
- Last indexed—date the index was last indexed.
- Create index—click to create a new index (plus sign icon). See Creating a new index for more information.
- Rebuild index—click to rebuild (counter-clockwise circular arrow icon) the selected index. See Rebuilding an index for more information.
- Delete index—click to delete (trash can icon) the selected index. See Deleting an index for more information.
- Set index—click button after selecting an index to use for querying.
Indexing rules and limitations
To ensure quality and performance, the indexing process follows specific rules:
- File size limit: Documents with more than 5 MB of extracted text are automatically skipped during indexing.
- Text extraction requirement: Only documents with extracted text are included.
- Content used for generation: aiR Assist uses only the extracted text from indexed documents when retrieving information and generating responses.
Creating a new index
Use Index Manager to create up to five indexes for different data sources (Saved Searches) per workspace.
To create a new index using Index Manager:
- Click the aiR Assist icon in the side bar to open its chat panel.
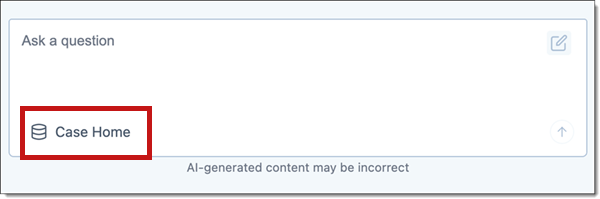
- From the chat panel, navigate to the Index Manager by clicking the index name in the Ask a question box.
- Click the Create Index (+) icon in the Index Manager list.
- Fill in the following fields:
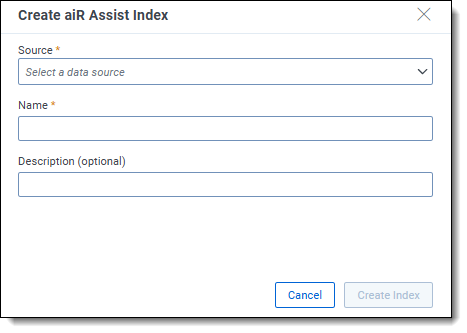
- Source—choose a public saved search as the document source for your index. The index will be built from the extracted text of documents in that saved search. Only public saved searches are available for use.
- Name—enter a unique, clearly descriptive name for the new index so its contents and purpose are identifiable by any user. Must be at least five characters long.
- Description (optional)—optionally add a description of the index, such as its use case or intended function. This information may assist other users in the workspace who might use it.
aiR Assist indexes are shared by all aiR Assist users within the workspace, so keep that in mind as you name and describe each one. - Click Create Index.
Indexing progress appears below the new index name. See Working with indexes for information.
You can access other indexes or create new ones while the index is building.
- The Ask a question box is not available while documents are being indexed.
- aiR Assist indexes are shared by all users within the workspace.
Rebuilding an index
If your data source (saved search) changes by either adding or removing documents to it, the index must be updated (rebuilt) to reflect those changes for aiR Assist to use the new information in its queries. Additionally, any changes made to metadata mapping, including enabling or disabling metadata, require rebuilding indexes so updates are reflected in the data used for analysis. See Metadata mapping for more information.
The Case Home index cannot be rebuilt or deleted from Index Manager, because it is managed by the aiR for Case Strategy application.
To rebuild an index from the Index Manager:
- Click the aiR Assist icon in the side bar to open its chat panel.
- Navigate to the Index Manager from the chat window by clicking the index name in the Ask a question box.
- Select the desired index to rebuild.
- Click the Rebuild curved arrow icon. The index cannot be used during rebuilding, but you can work in other indexes or create a new one.
- Click Rebuild to proceed.
Indexing progress appears below the new index name. See Monitoring the index build process for information.
Deleting an index
Use the steps below to easily delete indexes from the index list. Deleting an index does not erase past questions and answers, which remain accessible in your chat history.
The Case Home index cannot be rebuilt or deleted from Index Manager, because it is managed by the aiR for Case Strategy application.
To delete an index from the Index Manager:
- Click the aiR Assist icon in the side bar to open its chat panel.
- Navigate to the Index Manager from the chat window by clicking the index name in the Ask a question box.
- Select the desired index to delete.
- Click the Delete Index trash can icon.
- Click Delete to proceed with permanently deleting the selected indexes. After the deletion process begins, it cannot be reversed.
Monitoring the index build process
After initiating the index build process, the Index Manager displays indexing progress percentages in the Docs column. You may work in other indexes or start a new one while indexing is in progress. When the index build finishes, the Index Details display the name of the saved search on which the index was built as well as the number of documents indexed.
The index can complete in two possible states:
- Successfully built
A check mark within a circle displays next to the Index Name to show a successful build. The index is successfully built when all documents from the selected saved search are error-free. Index details show the name of the saved search used to create the index, the total document count, and a confirmation indicating all documents were indexed. The index is immediately available in aiR Assist.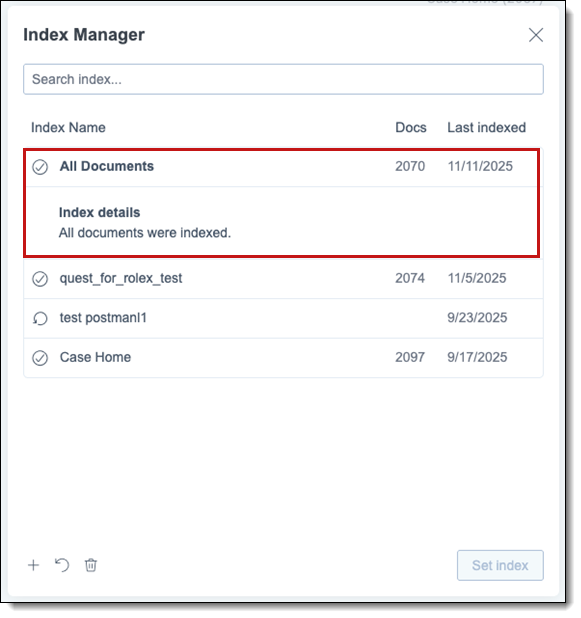
- Partially built (Document errors encountered)
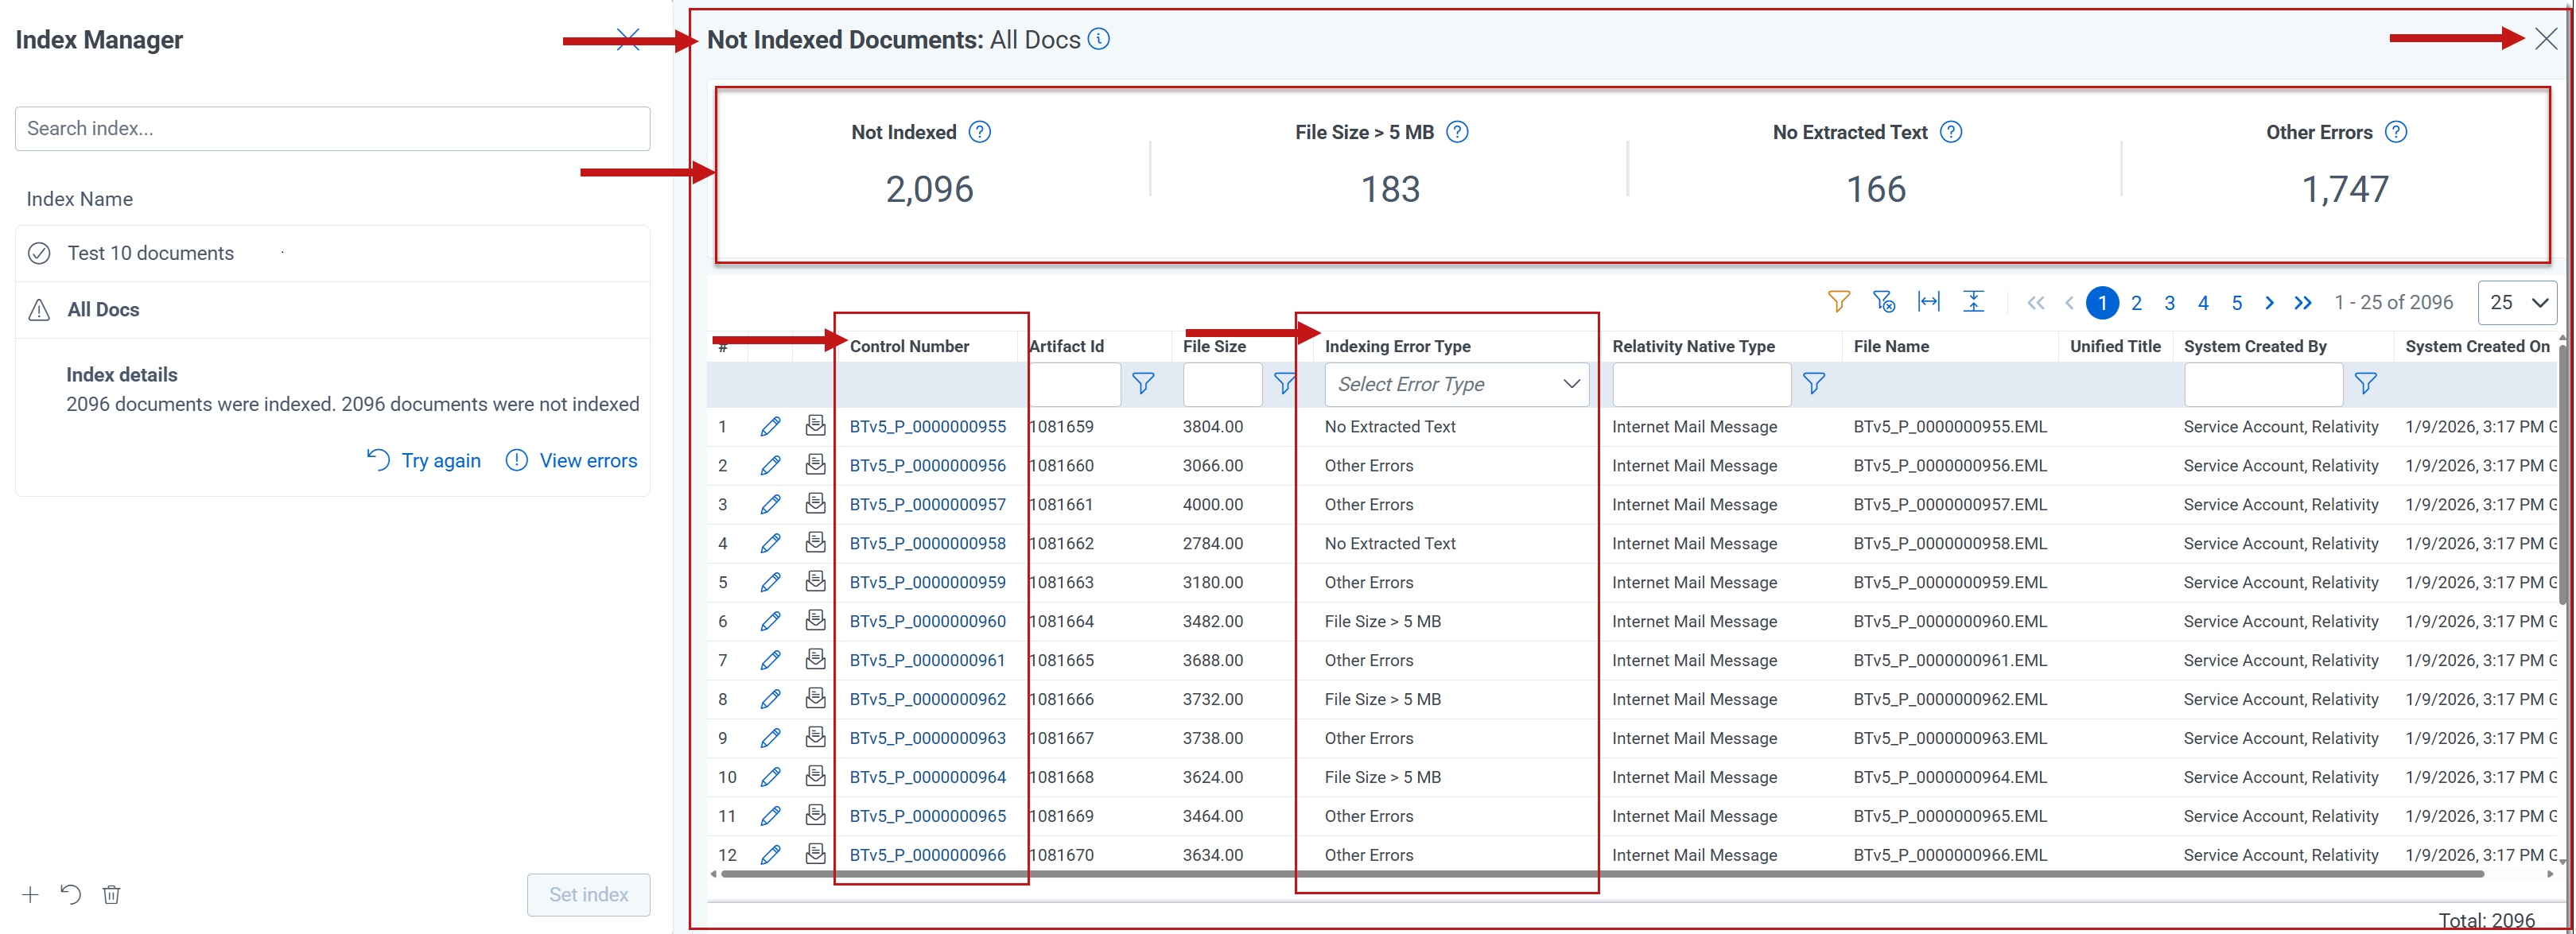
An exclamation mark within a triangle appears beside the Index Name to indicate a partial build, signifying that certain documents were not indexed. Index details show the name of the saved search used to create the index, total document count in the saved search that were indexed, and number of documents that remain unindexed. You may click View errors to review the list of errored documents or Try again to initiate an index rebuild. See Error handling and retrying index jobs and Working with indexes for more information.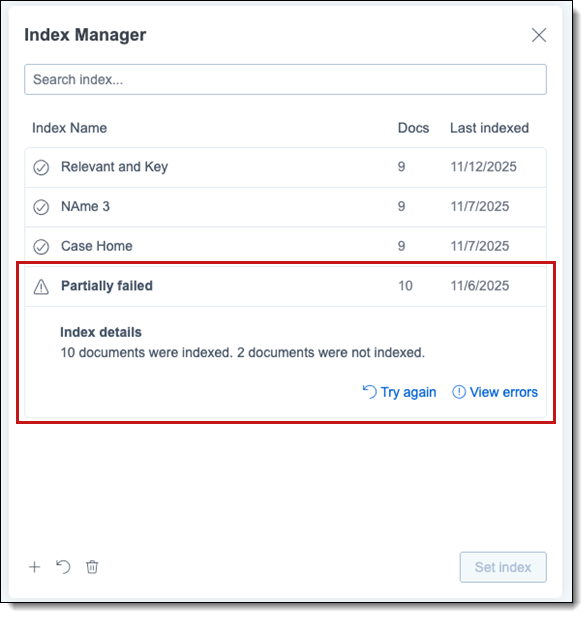
Error handling and retrying index jobs
aiR Assist provides error messages and offers retry options for indexes that are partially built. If an index fails, you can click Try again to rerun it, or you can click View errors to investigate the Indexing Error List. For more information, see Working with indexes.
- From the Index Manager, click on the name of the index that was partially built to view details.
- Do any of the following:
- Click Try again to rebuild the index to see if the errors are corrected.
- Click View errors to review the Indexing Error List.
- When View errors is clicked, the Indexing Error List appears next to the aiR Assist pane and covers any application you have open, such as the Documents List. The name of the selected index appears next to the Not Indexed Documents label.
- To filter the list, click one of the indexing error types in the panel above the list or use the Indexing Error Type column to select one from the list.
- To view the full list again, click Not Indexed in the panel.
- To view a document further in the Viewer, click its Control Number. Closing the Viewer returns you to the error list.
- To close the error list and return to the previously opened application, click the X on the error list.