


Feedback
Last date modified: 2026-Jun-30
Centralized Authentication
Centralized Authentication is a unified system for managing user authentication and identities across RelativityOne. Powered by the Okta Customer Identity platform, it delivers secure workflows and advanced features that help clients manage authentication with confidence and consistency. By centralizing authentication data, it streamlines administration and offers users a seamless sign-in experience across multiple RelativityOne instances.
Centralized Authentication supports a variety of authentication methods, including standard password-based login and Single Sign-On (SSO). For SSO, it is compatible with both Security Assertion Markup Language (SAML) and OpenID Connect (OIDC) protocols, allowing organizations to integrate with their preferred identity providers and authentication standards.
Already onboarded to Centralized Authentication? If your instance transitioned before the release, use the Community articles for your onboarding wave instead of this guide:
**January – June 2025 (Primarily password) See [V1]
**June – December 2025 (SSO + password) See [V2]
**January – June 2025 (Primarily password) See [V1]
**June – December 2025 (SSO + password) See [V2]
Prerequisites
Confirm your browser allows traffic to and from the new login page: login.relativity.one and *.okta.com
Centralized Authentication workflow
- The System Administrator sets up the authentication providers. This includes reviewing the password provider, creating new password providers, and registering an SSO provider.
- Existing users log in to RelativityOne using Centralized Authentication with their existing credentials.
- The System Administrator invites only new users or newly enabled users to the Relativity instance through Centralized Authentication.
- Users accept the invitation and set up their account and password.
If a disabled user is enabled after the transition to Centralized Authentication, the System Administrator must send that user an invitation to set up their account and password.
Setting up your Authentication Provider
The Authentication Provider page streamlines the management of authentication providers and allows you to create and edit password providers with ease.
System Administrators can set up one or both of the following types of authentication providers:
- Password–a two-factor authentication (2FA) method that includes a username, (the user's email address), and a password. See Password Provider setup.Simple password setup is currently permitted, however, disabling two-factor authentication is not recommended.
- SSO (Single Sign-On)–a method that allows users to use an external authentication provider so they have one set of login credentials to access multiple applications, including Relativity. See SSO setup.
SSO setup
System administrators can configure SSO provider connections using the guided self-service wizard that walks them through configuring their Single Sign-On provider, including testing the connection at the end. Additional, detailed information will be added here prior to the rollout to SSO customers.
To use your existing SSO provider with Centralized Authentication, you will need to re-register the SSO connections in Relativity using the wizard. For best results, open your identity provider in a separate window and/or work with someone who has access to it.
Password Provider setup
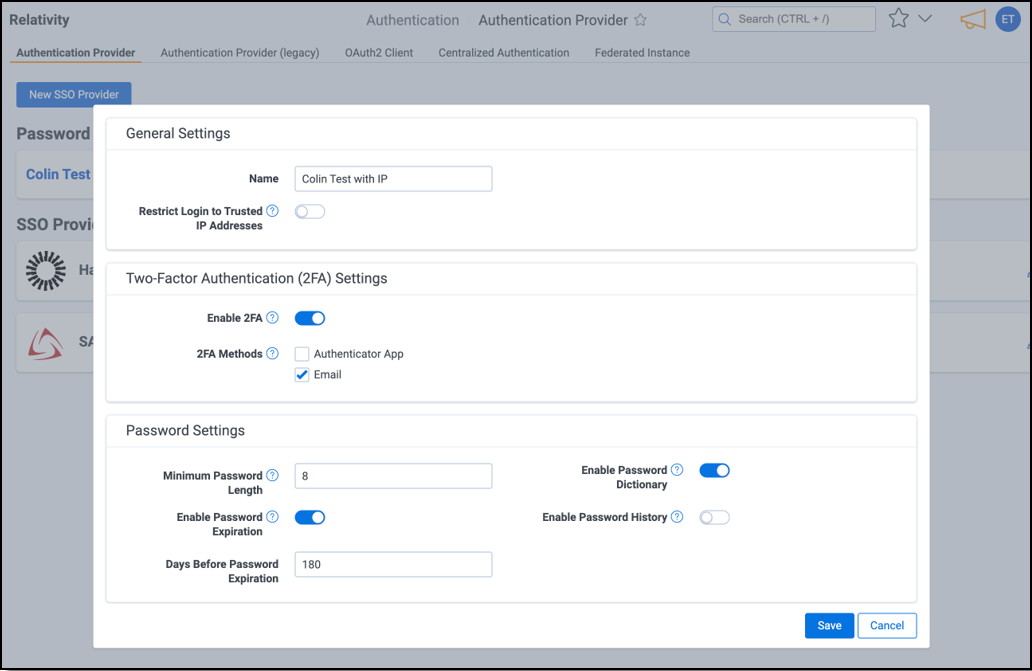
From the Authentication Provider tab, click the New Password Provider button and fill out the following fields:

- Under General Settings, enter a Password Provider Name
- In the Two-Factor Authentication (2FA) Settings section, confirm the settings in the following fields:
- Enable 2FA–this toggle is enabled by default to use two-factor authentication for a more secure password experience. If you disable this toggle, a warning is displayed as it does not align with RelativityOne Security Best Practices.
- 2FA Methods–select one or both two-factor authentication challenge methods: Email and Authenticator App. By default, the Authenticator App is selected.
- If both are selected, the user can select which one they want to use during the login process.
- To learn more, see the [Authenticator App section].
- In the Password Settings section, set the following fields:
- Minimum Password Length–enter the least number of characters permitted for user account passwords. RelativityOne security best practices recommends 10 or more characters.
- Enable Password Expiration–this toggle is enabled by default with the Days Before Password Expiration set to 180. If disabled, passwords never expire.
- You may update the desired number of days in the Days Before Password Expiration field.
- This value is calculated per user account based on the date the user last reset their password.
- Enable Password Dictionary–enable this toggle to prevent the most commonly used passwords from being used in password creation. If disabled, these passwords are permitted.
- Enable Password History–enable this toggle to prevent reuse of passwords. Enter the maximum number of previous passwords to be tracked in history in the Maximum Password History field. If disabled, users are permitted reuse previous passwords.
- Click Save.
Password requirements
| Legacy Requirements | Centralized Authentication Requirements |
|---|---|
|
Minimum character length – defined by customers (default 8) |
Minimum character length - defined by customers (default 14) |
|
4 of the 4 criteria:
|
No change |
Additional password considerations
| Feature | Legacy | Centralized Authentication |
|---|---|---|
| Maximum character length |
X (default 50) |
No enforced max (72 character evaluation limit) |
|
Maximum failed password attempts before password reset required (Brute Force Protection) |
X |
X (10 failed attempts) |
| Maximum password age |
X (default no expiration) |
X (default 180 days) |
| Maximum password history | X | X |
| Disallow commonly used passwords | Not supported | X |
| Set password for user | X | Not supported to mitigate risk of user account sharing. |
| Suspicious IP Throttling | Not supported | X |
| Breached Password Detection | Not supported | X |
After you complete the password setup, you can confirm user eligibility or enrollment status from the Centralized Authentication tab.
Edit a Password Provider
- In the Authentication Provider tab, select the Edit icon next to the Password Provider you want to update.
-
In the modal window, update any of the following:
- Provider Name
- Two-Factor Authentication (2FA) Settings
- Password Settings
- Trusted IP usage
- To change the 2FA challenge method, select your preferred option (for example, switch from Authenticator App to Email).
- To update Trusted IP addresses, add or remove addresses as needed.
-
Click Save to apply your changes.
Trusted IP Support
Trusted IP support allows you to restrict user logins to specified IP addresses or ranges to enhance the security posture of your environment.
Trusted IP Overview
Centralized Authentication support for trusted IPs will differ from legacy behavior in that they will be applied at the authentication provider level instead of the individual user level.
- Password Providers - trusted IPs are defined and managed at the password provider level.
- SSO Providers - trusted IPs on OIDC providers can no longer be managed within Relativity and should be configured on your Identity Provider.
- If a user attempts to log in from an unauthorized IP address, authentication will fail.
- The Bypass MFA on Trusted IP is no longer a supported workflow.
If you previously configured trusted IP addresses with legacy authentication, remove them to avoid unintended interaction.
Setting up Trusted IP addresses
Follow these steps to configure trusted IP addresses for a password provider:
- Navigate to the Authentication Provider tab.
- Click the edit icon next to the password provider you want to configure.
- Enable the Restrict Login to Trusted IP Addresses toggle.
- In the Trusted IPs field, enter one or more IP addresses or ranges. Separate multiple entries with a comma, space, or new line.
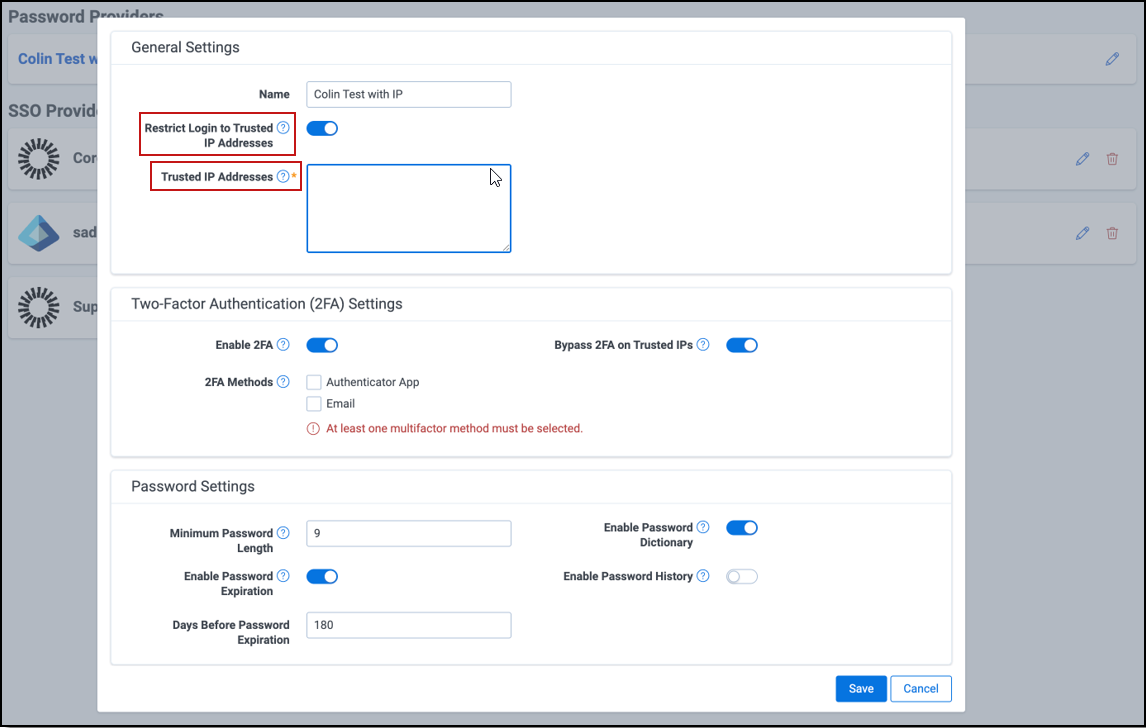
- Click Save.
Inviting users
If your instance is using Password Only and transitioned to Centralized Authentication between January 2025 - June 2025, please refer to V1 - Centralized Authentication - Setting Up Passwords and Inviting Users on the Community site.
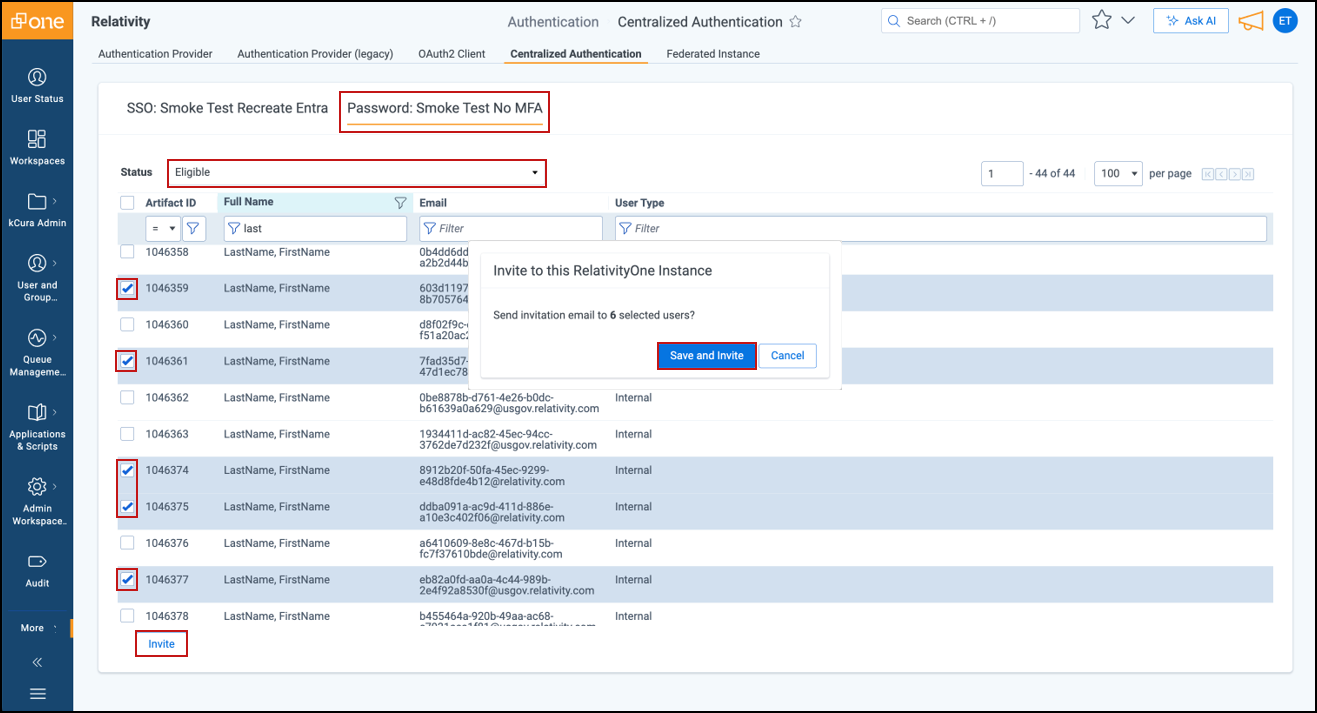
You can invite new users individually from their user record or in bulk from the Eligible tab on the Centralized Authentication page.
The following invitation instructions apply only to users who authenticate with a password provider. By default, users who authenticate through an SSO provider will not need to accept an invitation to use Centralized Authentication. System administrators will still need to create the user account in Relativity, and grant access through their identity provider; however, users can sign in directly using Centralized Authentication, and the system will authenticate them through their SSO identity provider.
Centralized Authentication tab invitation
- Navigate to the Centralized Authentication tab.
- Select the Authentication Provider you want to manage users for.
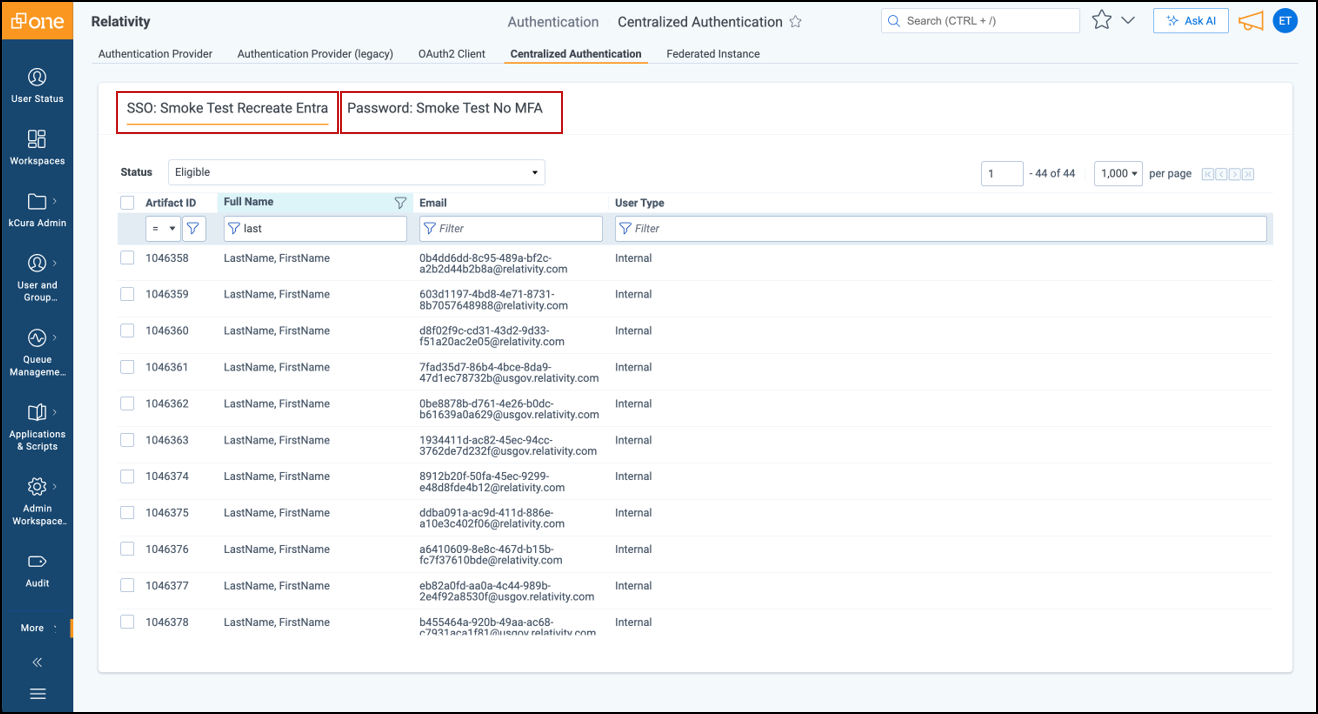
- For Password Providers:
- In the Status field drop-down, select Eligible to view users who can be invited to this password provider.
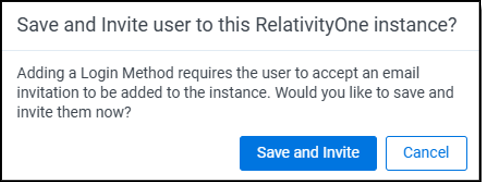
- Select one or more users and click Invite, then Save and Invite in the Confirmation window.
User tab invitation
- Navigate to the Users tab and click the Edit icon next to the user you want to invite.
-
Select the desired password provider from the drop-down menu.
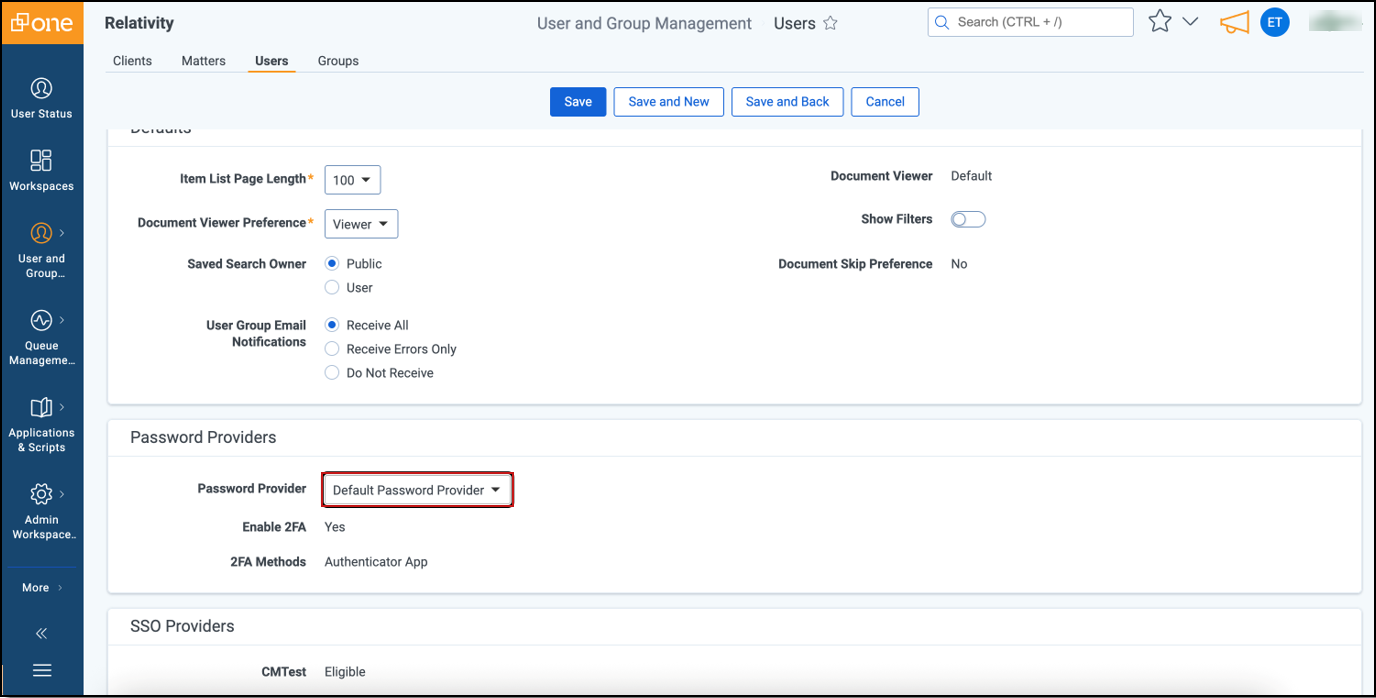 After you select the password provider, the system displays the configured MFA settings.
 - Click Save.
- Click Save and Invite to send the email invitation to the user to join this RelativityOne instance via Centralized Authentication.
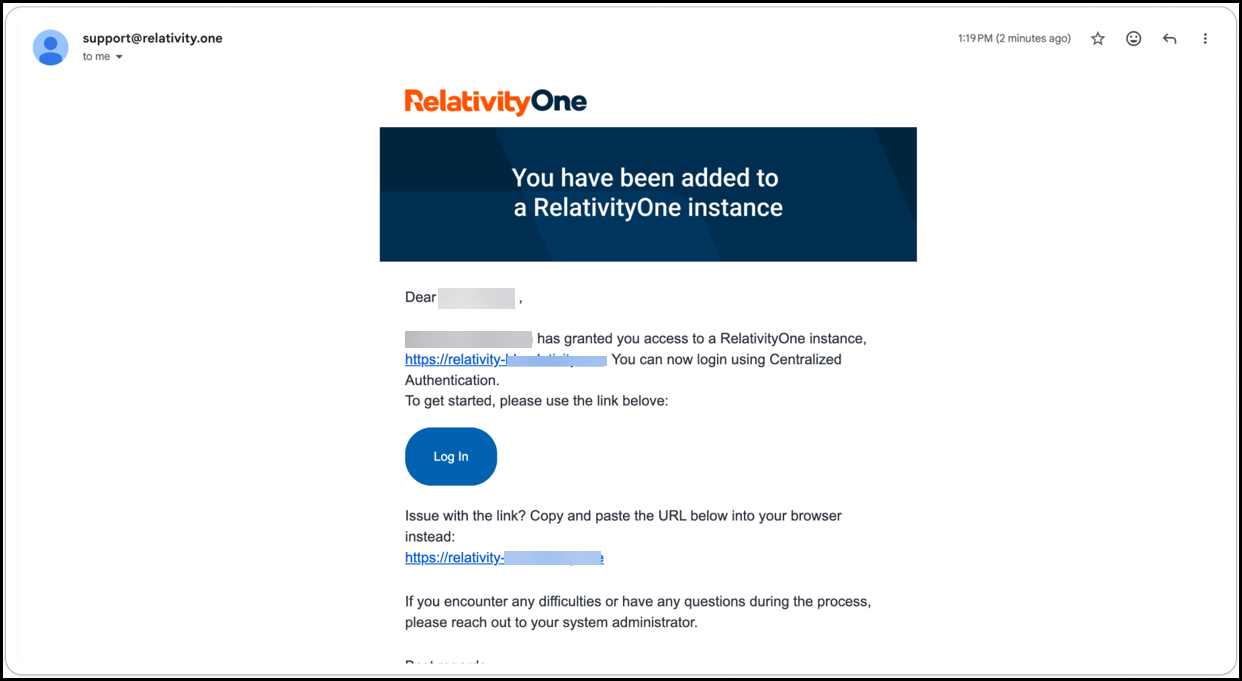
The user receives an email invitation from support@relativity.one with the subject, "Welcome to RelativityOne." See User accepts the invitation. Once invited, the user appears on the Pending list until they accept the invitation, at which point they move to the Enrolled list within the tab for this specific password provider.
Managing user transition
Administrators can track user transitions to Centralized Authentication and manage invitations directly from the Centralized Authentication tab. This overview helps you see which users are assigned to each authentication provider and monitor their progress.
Monitor progress by Authentication Provider
Navigate to the Centralized Authentication tab, then choose the authentication provider you want to review. The information you see changes based on the provider type.
Password Providers
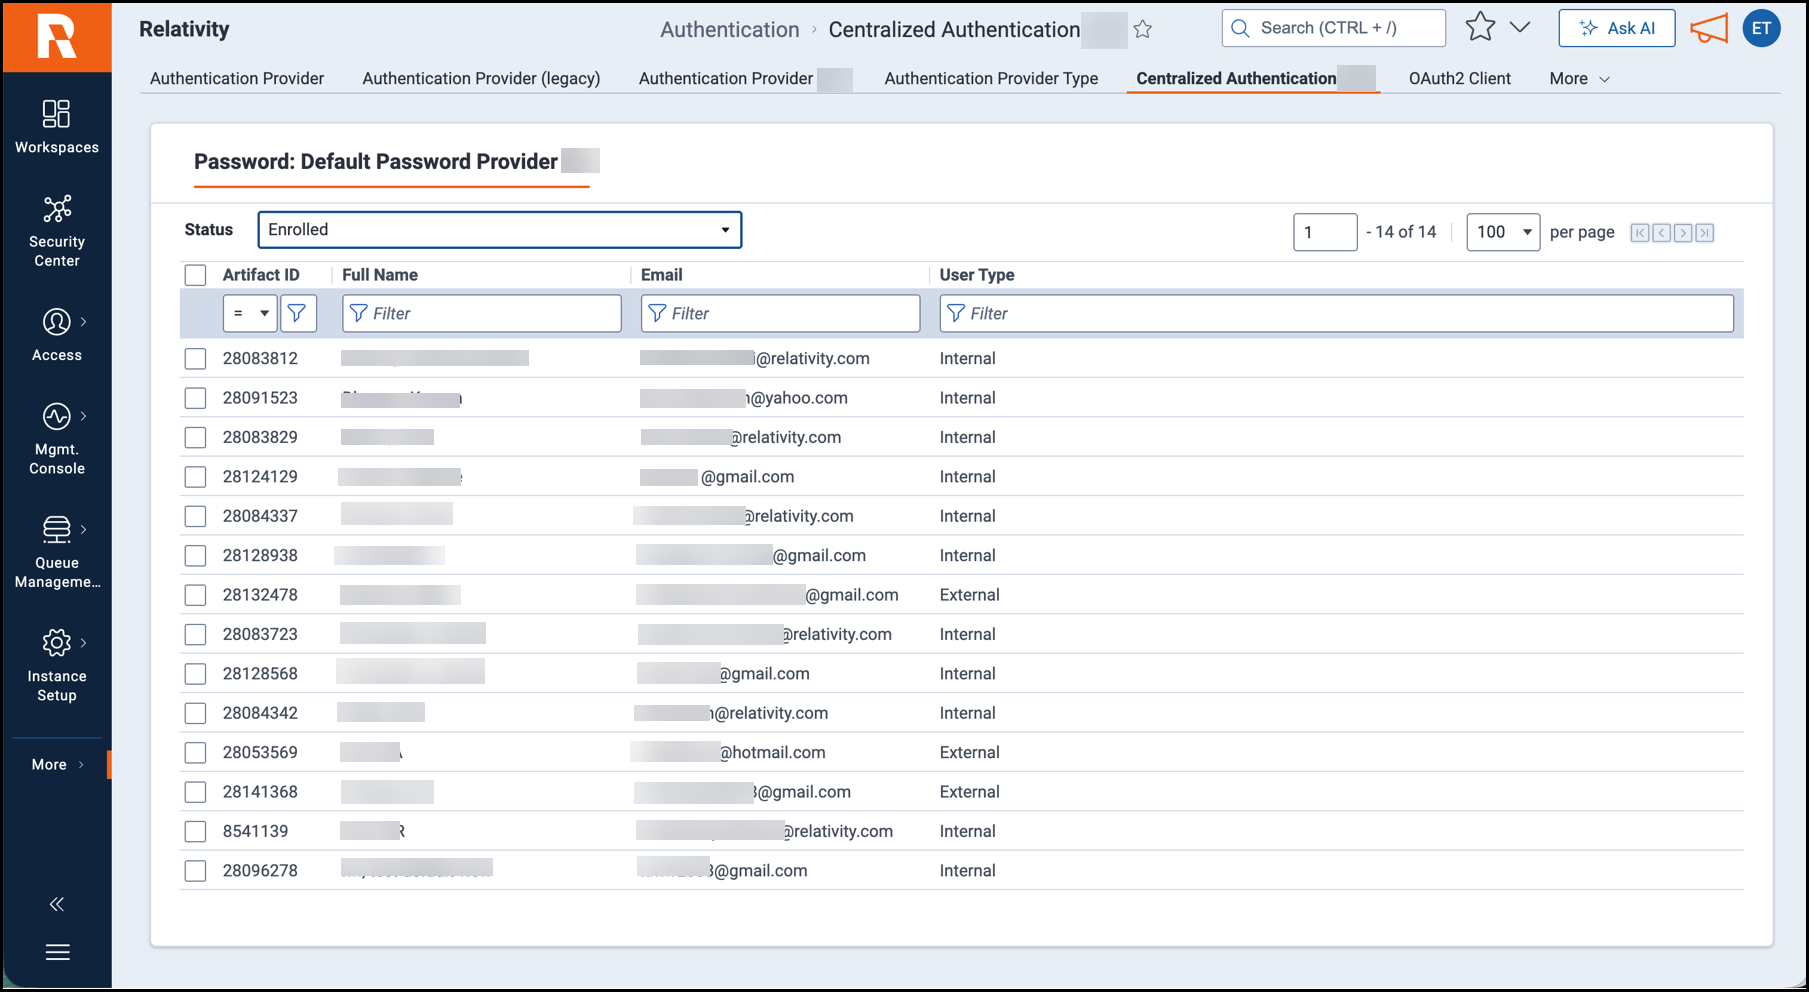
Status: View users in each category for the selected provider in the drop-down menu.
Eligible: Displays users not currently assigned to the provider. The list shows only enabled users and lets you filter by Artifact ID, Full Name, Email, or User Type.
Enrolled: Lists users who accepted the invitation to sign in with this provider. You can view details like Artifact ID, Full Name, Email, enrollment date, number of logins, last login date and time, and User Type.
Pending: Shows users who received an invitation but haven’t accepted it yet. The list displays Artifact ID, the Inviter’s name, the Invitee’s name, the invitation URL, when the invitation expires, and the creation date. Use the Invitation URL if a user can’t receive the invitation email.
If an invitation expires, select the user and choose Re-invite at the bottom of the screen to send a new invitation.

User accepts the invitation
With the transition to a global identity model, the login experience will differ slightly for new and existing Relativity users:
- New users will continue to receive an invitation to set up their password as part of the onboarding process.
- Existing users will receive a notification email and can access the new instance using their current credentials.
When the user receives the email invitation from support@relativity.one with the Subject, “Welcome to Centralized Authentication in RelativityOne,” they need to accept it.
- The user clicks the Accept invitation button or copies the hyperlink displayed into their browser which will take the user to the universal login page. The invitation expires after 7 days by default.
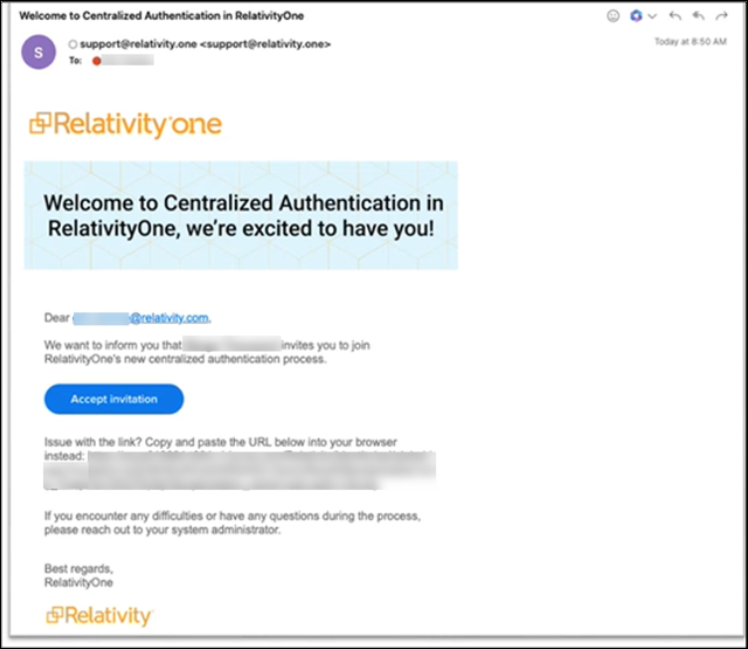
- In the "Accept your invitation" dialog, follow these steps:
- Click Set up.
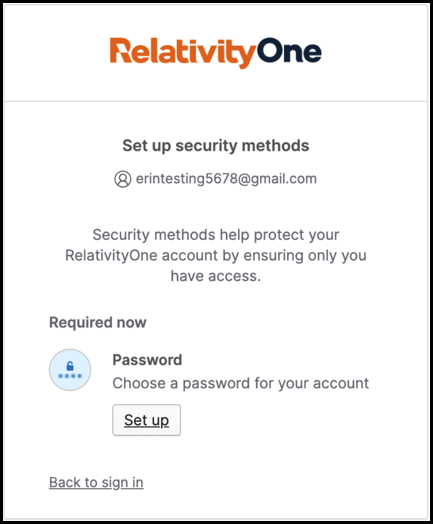
Set your password, re-enter your password, and click Next.
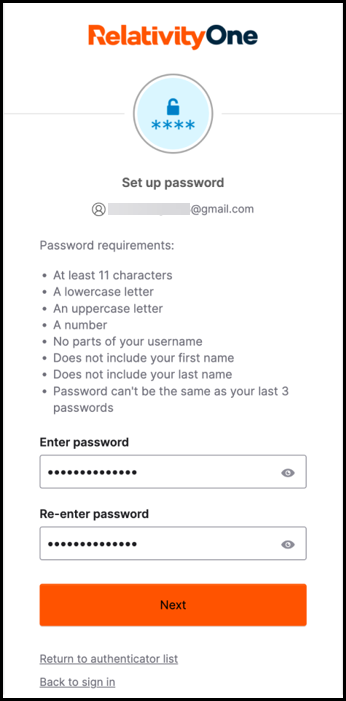
- The user will be prompted to configure an optional MFA factor. This step is not required, and the user can simply click Continue to proceed.
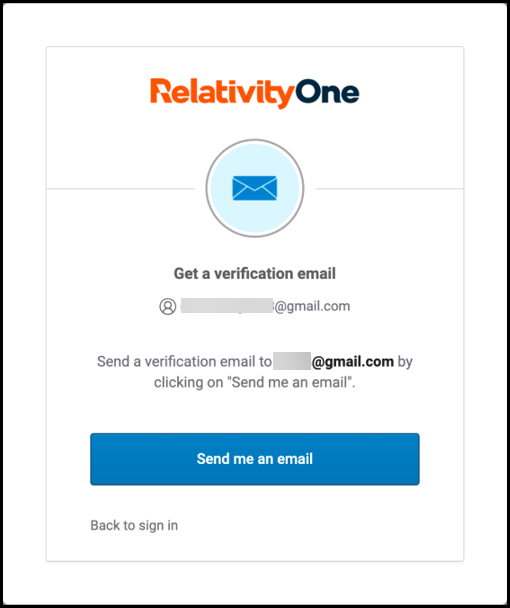
If multi-factor authentication (MFA) is enabled, complete the MFA challenge based on the method configured:
- Email: Enter the one-time passcode sent to your email, then select "Send me an email".
- Authenticator app: Select the Google Authenticator option, then use your preferred mobile authenticator app to scan the QR code displayed on the screen. Enter the one-time code generated by the app in the provided field and click Continue.
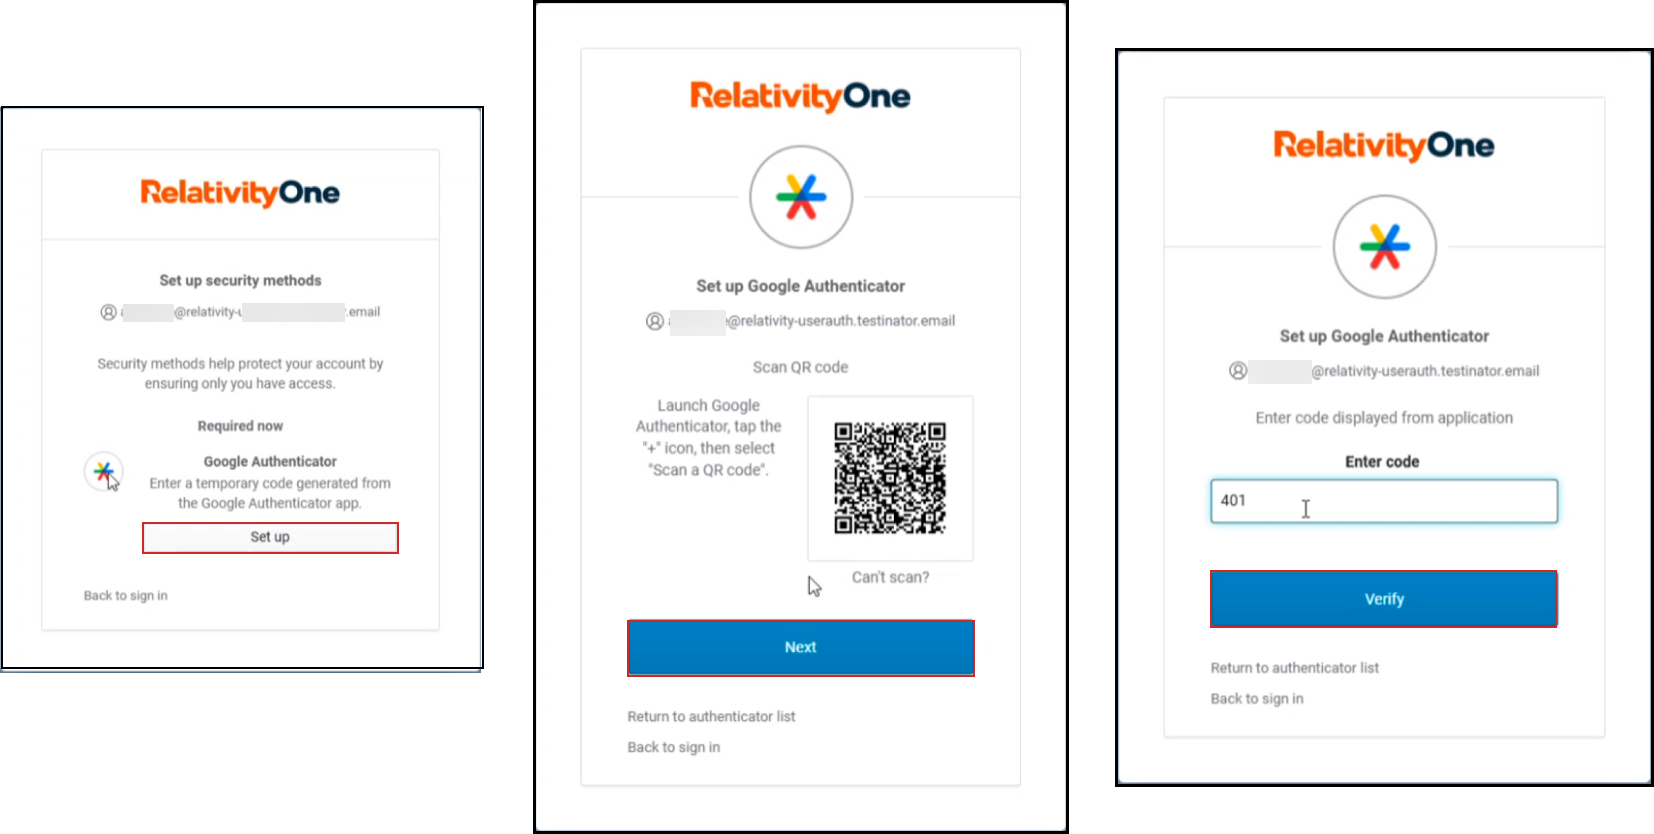
- Authenticator app: Select the Google Authenticator option, then use your preferred mobile authenticator app to scan the QR code displayed on the screen. Enter the one-time code generated by the app in the provided field and click Continue.
- Email: Enter the one-time passcode sent to your email, then select "Send me an email".
- Click Set up.
-
The user logs in to RelativityOne using Centralized Authentication. Admins can verify the user’s acceptance status by checking the Enrolled list for the associated authentication provider in Centralized Authentication.
Existing RelativityOne users
When an existing user is added to a new RelativityOne instance, they receive a welcome email from support@relativity.one with the subject line “Welcome to RelativityOne.” The email notifies the user that they have been added to another instance and confirms that they can log in using their current credentials.
Logging in to RelativityOne
Your organization will notice a slight change in the login process as Centralized Authentication rolls out to users.
Transition period to Centralized Authentication
During the transition period, your organization will use both the legacy authentication and Centralized Authentication workflows to allow time for reviewing settings, registering SSO providers, and performing testing. During this time, the user login process works as follows:
- Navigate to your RelativityOne URL.
- On the login page, click Centralized Authentication, then enter your Username and select Password as your method of verification.
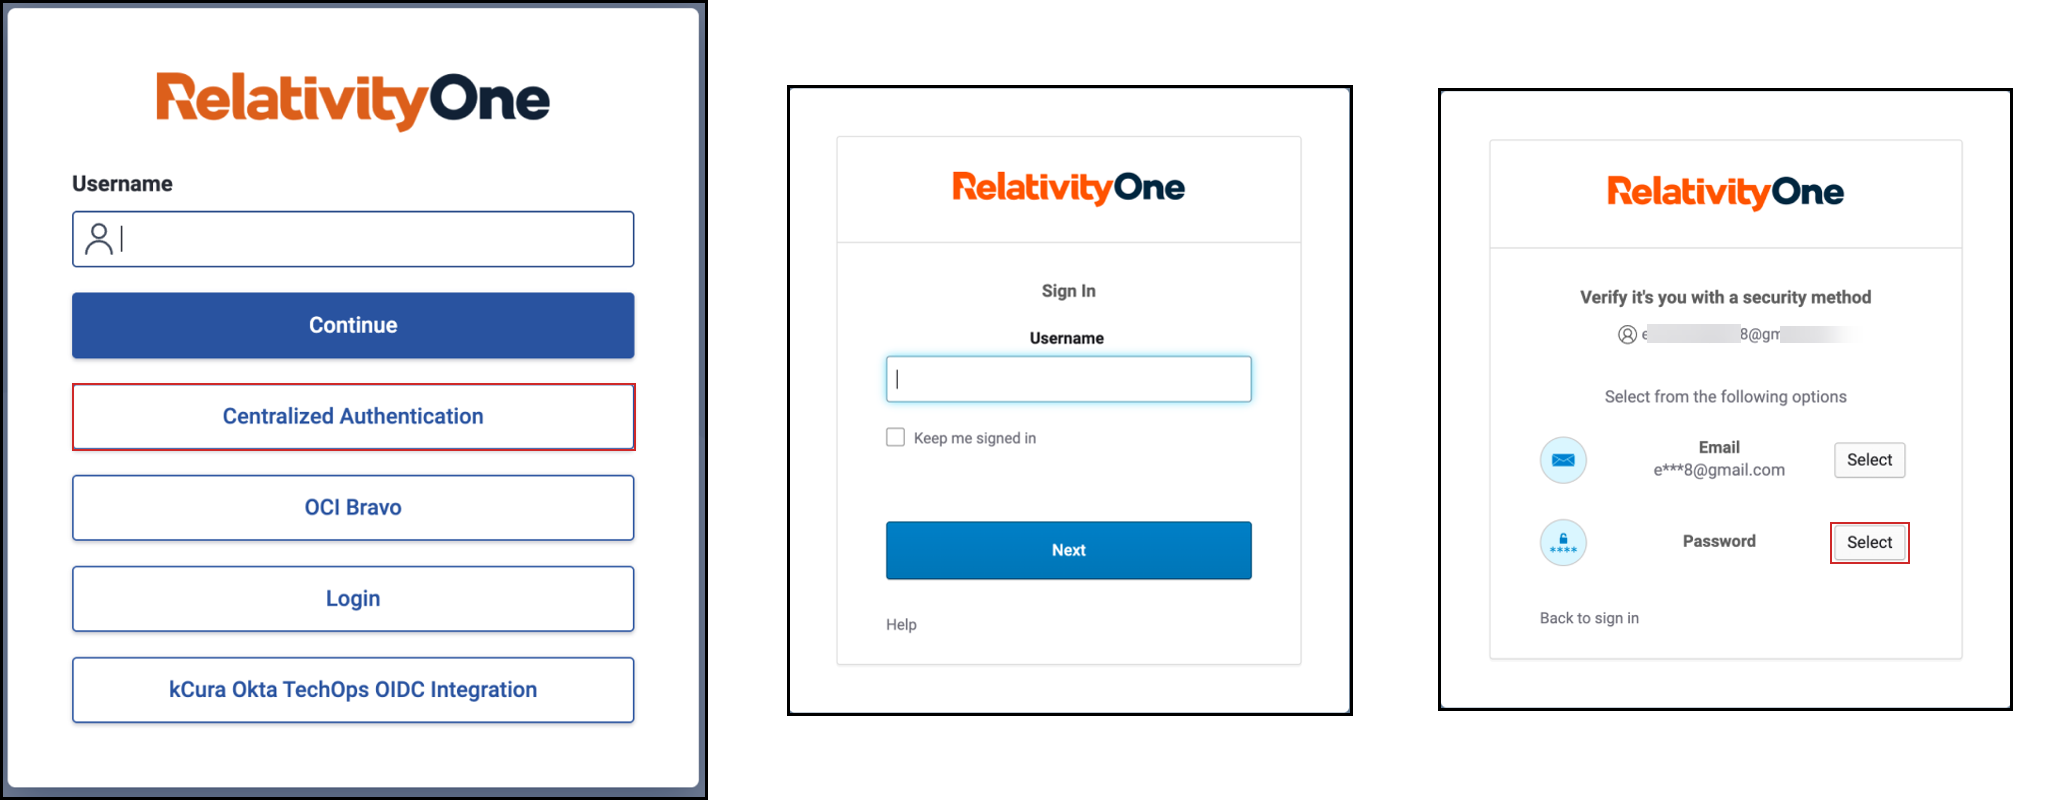 Users should login with their existing RelativityOne password. If MFA is enabled, you will be prompted either to send a verification email to receive a one-time code or to enter the code from your Authenticator app. You can enter your password or one time code first; the other option will be requested afterward.
User profile
During the initial login, users will be prompted to provide basic profile information, including Organization Type and Title. This is a one-time step to ensure profiles are complete and accurate.
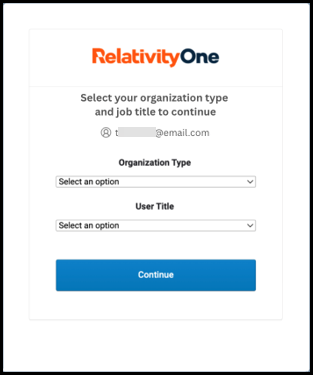
Over time, this will give administrators better visibility into their users and provide a stronger foundation for other product areas, such as enhanced reporting and more personalized interactions throughout the platform.
Centralized Authentication login
Once the transition period ends and your organization is fully using Centralized Authentication, the user login process will work as follows:
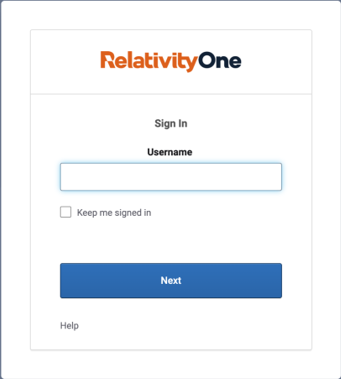
- Navigate to your RelativityOne URL.
 Relativity Support is not able to reset user passwords.To reset your password, go to the RelativityOne login page. After entering your email address (username) and clicking Next, the Forgot your password? link will appear. If you still do not see this option, please contact your RelativityOne system administrator for assistance, as only they can reset your password. Relativity Support cannot perform password resets on behalf of users.
- Using Password login: Enter an email address and click Next, then select your verification method (password, email, or authenticator app) and follow prompts to complete the process.
Reset a User’s Authenticator App
Follow these steps to reset a user's Authenticator App:
Users may need to reset their Authenticator app when switching phones or changing apps (for example, from Google Authenticator to Microsoft Authenticator).
- Navigate to the Users tab and open the user's detail page.
- Select Reset Authenticator App.
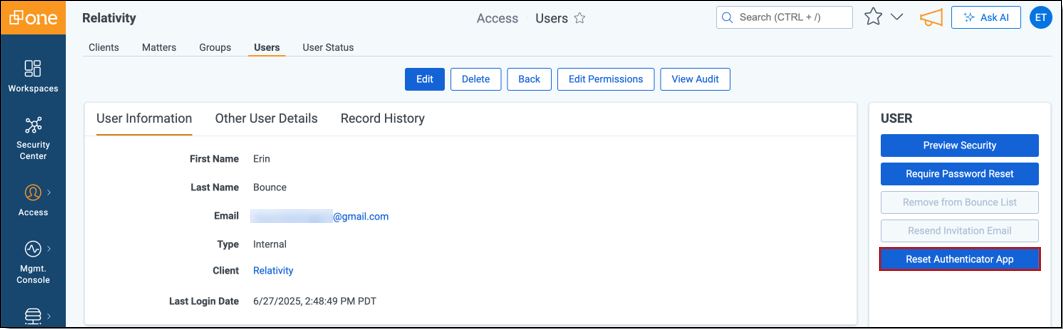
- After the reset, the system displays a success message.
- Notify the user that they need to sign in again.
What the user sees next
- The user signs in with their username and password.
- After entering their password, the system prompts them to scan a QR code to set up their Authenticator app.

- The user enters the one-time code generated by the app and signs in successfully.