


Feedback
Last date modified: 2026-Jul-10
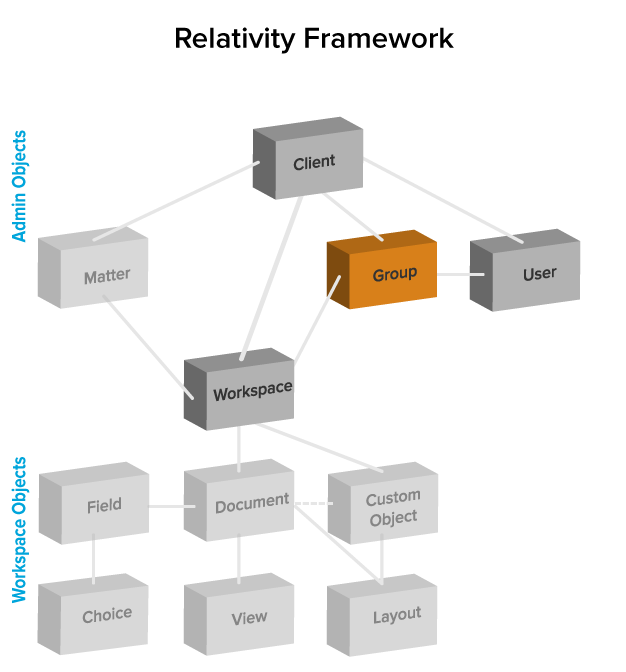
Groups
With groups you can organize users in Relativity. A user can be a member of one or more groups. You can grant groups permission to view admin tabs from Home. You can also add groups to workspaces and set permissions per group on a workspace-by-workspace basis.
System groups
Relativity workspaces include the following default system groups:
- Everyone - All users are members of the Everyone group. System admins can manage the permissions all users have on system level views and scripts. You are unable to revoke certain permissions for the Everyone group.
- System Administrators - Relativity system admins have rights to see every item in a Relativity environment. System admins have full access to all admin tabs. System admins can then create and edit new clients, matters, users, groups and views, among other capabilities. System admins also have the following script and applications-related permissions: view, run, preview, create/write, edit (unlocked scripts only), link, and import applications. Regardless of permissions, system admins can't edit locked scripts.
Relativity Lockbox is enabled for all RelativityOne customers. When the Relativity Lockbox feature is enabled (via the EnableCustomerLockbox instance setting), Relativity system admins must also belong to a group within a workspace in addition to the System Administrators group to access and administer security within that workspace. Refer to Support if you need more information on this feature.
Feature Permissions provide an alternative to Relativity's security management by shifting the focus from Object Types and Tab Visibility to feature-based permissions. This method is an alternative option. Any feature-specific permissions information already in this and other topics is still applicable. The Feature Permissions interface enables administrators to manage permissions at the feature level, offering a more intuitive experience. By viewing granular permissions associated with each feature, administrators can ensure comprehensive control, ultimately reducing complexity and minimizing errors. For details see Instance-level permissions and Workspace-level permissions .
The following table shows script permissions for each group.
| Role | View | Run | Edit (locked scripts) |
Edit (unlocked scripts) |
Preview | Write | Link |
|---|---|---|---|---|---|---|---|
| System Admin | √ | √ | √ | √ | √ | √ | |
| Standard User | √ | √ | √ |
Creating and editing groups
To create a new group or edit an existing group:
- Click your name in the upper right corner of Relativity, and then click Home.
- Click the Groups tab.
- Click New Group. To edit group information, click the Edit link next to an existing group name.If your groups list doesn't show Edit links, edit the All Groups view to display the Edit link.
- Add or edit the fields on the group details page. See Fields for details.
- Click Save to save the group information.
The group details page displays a list of users added to the group as well as group-accessible workspaces. For more information, see
Fields
The groups object contains the following fields:
Group Information
- Name - the group’s name, which is a required field for creating a group. As your Relativity environment grows, arbitrary group names like "Group 1" can produce a confusing administrative workflow. Name each group according to their purpose and permission level, such as "ACME Co. Reviewer" and "ABC Corp. Administrators."
- Client - a required field that makes the group a child object of the chosen client.
- Group Type - an uneditable field that displays one of the following categories:
- System Admin
- System Group
- Personal
- Everyone
- Workspace Admin
- Keywords - an optional field where extra group information may be recorded.
- Notes - an optional field where extra group information may be recorded.
Adding users to groups
You can add and/or remove users from groups from either the group details page or the user details page. The procedure is the same for both.
A job is executed when you add users to a group or when you remove them from one.
To add or remove users:
- Click your name in the upper right corner of Relativity, and click Home.
- Click the User and Group Management tab. You can complete the following steps from either the Users or Groups tabs:
- From the Users tab, click the name of a user and scroll down to the Groups section on the form.
- From the Groups tab, click the name of a group and scroll down to the Users section on the form.
- To add a user to the group, click Add in the Users or Groups section depending on the tab.
- Choose an item on the selection dialog, and click OK.
- Click Close on the message indicating that you have submitted a job.
 Relativity sends an email message notifying you when the job is completed. If an error occurs, the email message contains a link that you can use to retry the job. You must be logged into Relativity before you click the retry link. The Errors tab also displays the retry link.The (Admin) Errors tab has been permanently removed from RelativityOne, and the ability to read errors through the API has been disabled. Job-specific errors are now addressable directly within your workspaces. For more information, see Errors tab deprecation.
 - To remove a user from a group, click Remove. Click OK on the confirmation message, and then click Close.
You can preview the security of a group to determine whether or not the appropriate permissions are granted to that group over particular workspaces. For more information about previewing group security see Preview security.
Adding external users through groups
- At the instance-level, navigate to the Clients tab.
- Click the New Client button.

- Create a new client to associate the external group to and click Save.The 'client number' field can either be the 'client name' value again, or a unique identifier.

- Once the new client has been created, navigate to the Group tab and select New Group.

- Enter a Group name to associate the external users to and connect it to the newly created client.

- Add any users to this group who will need access to the workspace.
- Next, navigate to the workspace you want to give them access to and click on Workspace Details on the right side of the screen.

-
Select Add/Remove Groups and filter to the newly created group. Select Add, then Save.

-
Click on the newly created group and select the Copy option. After copying permissions, you can select the Preview option to confirm what level of access they will have within the workspace.

-
Select the template group from which you want to assign permissions.
Choices can vary depending on the workspace's template. Reviewer groups usually start with a Level 1, which grants the least permissions. More permissions are offered as the level increases. In contrast, Admin Groups often have most or all permissions within a workspace. If you are unsure, it is recommended to select the group with the lowest level of permissions. You can always copy a group with higher permissions later if you need to grant more capabilities.
Adding or removing groups from a client domain
You can add or remove objects from client domains if you activate the client domains feature.
Moving a group into a client domains may cause the group to lose previously configured permissions.
Relativity displays a warning message when a sys admin attempts to edit or copy permissions for any group in a client domain. This warning makes the sys admin aware that modifying permissions may have significant consequences. For example, changing permissions may allow client domain users to modify items outside their tenancy. The sys admin can click Manage Permissions to proceed with the update or Cancel to exit the pop-up window.
Use the following steps to add a group to a client domain:
- Navigate to the Groups tab.
- Select the group you want to add to the client domain from the list.
- Click Edit.
- Click Select next to the Client field in Group Information section.
- Select the client with client domains enabled from the list.
- A warning message requires you to confirm your decision by clicking Save.
- Click Save.
Use the following steps to remove a group from a client domain:
- Navigate to the Groups tab.
- Select the group you want to remove from the client domains from the list.
- Click Edit.
- Click Select next to the Client field in Group Information section.
- Select a client not associated with a client domain from the list.
- Click Save.