


Feedback
Last date modified: 2026-Jul-24
Setting workspace permissions
Permissions can be set based on features using the Features tab. Edit workspace permissions using the Workspace Security dialog accessible from the Workspace Details tab. Access the dialog using the following steps in a workspace:
- Click the Administration tab followed by Workspace Details.
- Click Manage Workspace Permissions in the Relativity Utilities console to open the Workspace Security dialog.

- Do any of the following:
- Perform group management. Refer to Group Management for more information.
- Modify the settings on the tabs as needed. Refer to the Features tab, Object Security tab, Tab Visibility tab, or Other Settings tab sections for specific information of each tab.
- Click Revert All if you need to undo all your unsaved toggle key changes. The features will return to their original toggle key settings.
- Click Review and Save after modifying settings.
- Review the unsaved changes displayed on the Review Permissions Changes modal.
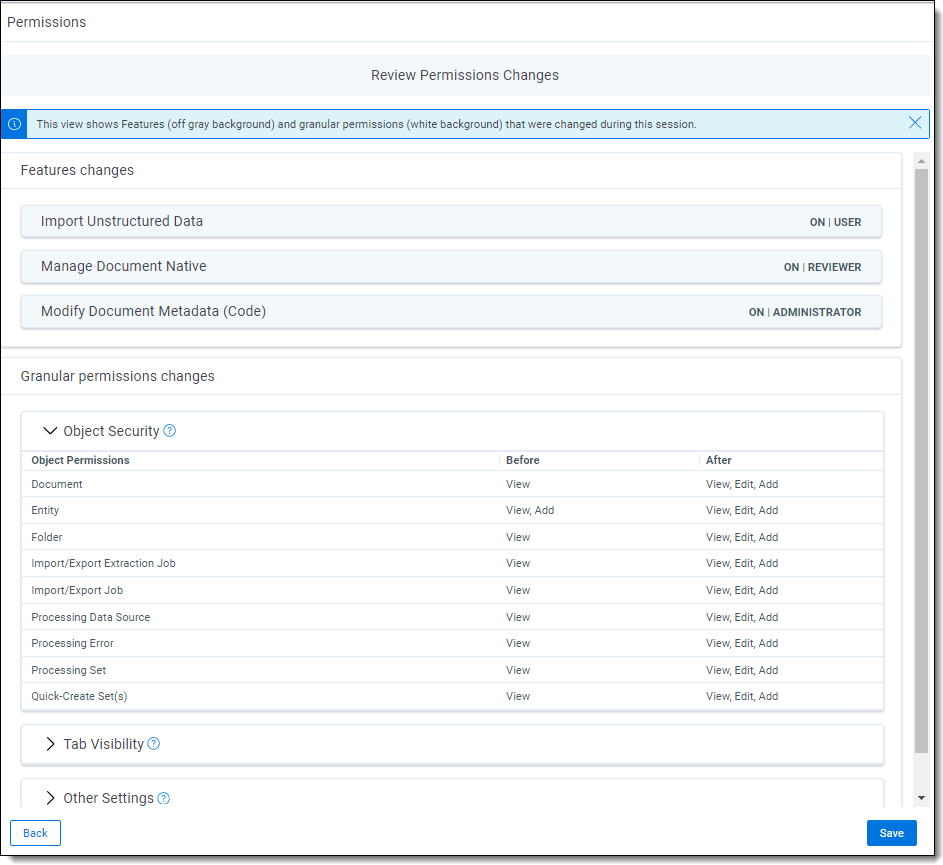
- Features changes—lists the features that were changed and how they were changed. Changes at the granular level may affect the status of the feature setting, so review this information carefully.
- Granular permissions changes—lists the changes made at the granular permissions level, including those resulting from feature changes or direct edits at the granular permission level.
- Click Save to finalize the changes.
To add and remove groups, you must have the Edit Security permission set for the Workspace object and the Add and Delete permissions set for the Groups object (instance level security).
Group Management
The Group Management tab displays all groups added to a workspace. The following actions are available for groups added to a workspace other than System Admins:
- View Users—displays a list of users in a group.
- Edit Permissions—opens the Object Security tab for you to begin editing the workspace permissions for a group.
- Copy—opens a list of groups whose permission settings you can transfer to the group. Select a group and click Copy Permissions at the bottom of the list to complete the transfer.Copying permissions from one group to another will cause all permissions to be overwritten. This includes item level security permissions for the target group.
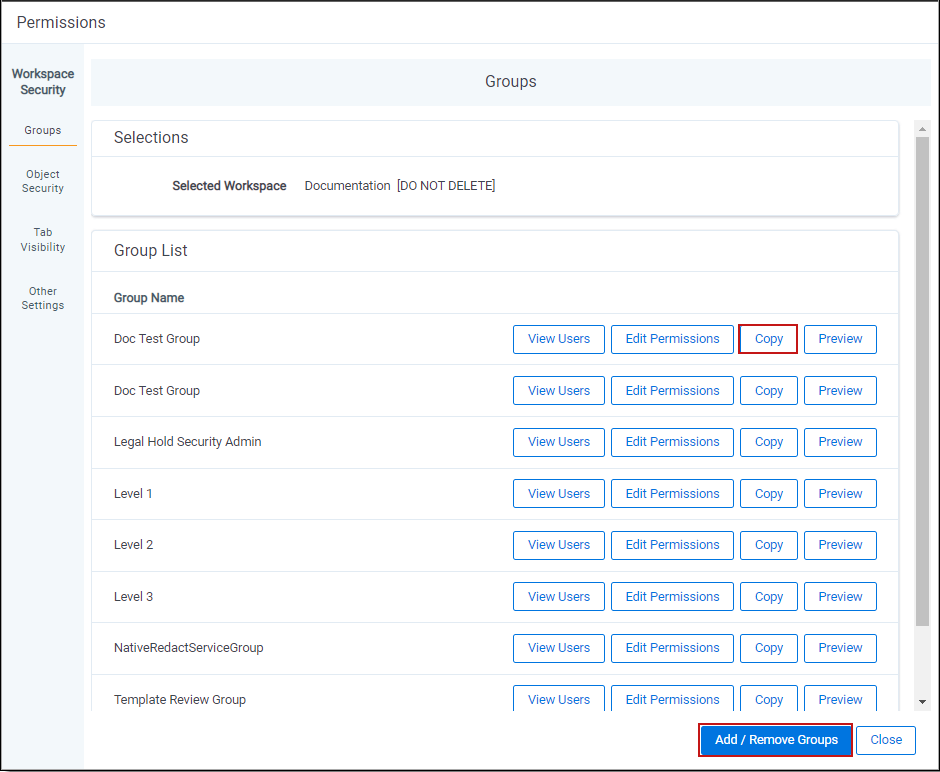
- Preview—preview currently applied security settings for a group. See Preview Security for more information.
- Add/Remove Groups—opens the Add/Remove Groups dialog on which you can search for and add or remove groups.
- To add and remove groups, you must have the Edit Security permission set for the Workspace object and the Add and Delete permissions set for the Groups object (instance level security).
- Relativity displays a warning message when a System Admin attempts to edit or copy permissions for any group in a client domain. This warning makes the System Admin aware that modifying permissions may have significant consequences. For example, changing permissions may allow client domain users to modify items outside their tenancy. The System Admin can click Manage Permissions to proceed with the update or Cancel to exit the pop-up window.
Add/Remove Groups
The Add/Remove Groups window displays the following lists:
- Available Groups—lists available groups in your Relativity environment not yet granted access to the workspace.
- Groups in Workspace—lists groups granted access to the workspace.

Adding groups to a workspace
To add one or more groups to a workspace, follow these steps:
If you are in a Workspace admin group, you must have the instance-level Edit permission to the Group object to add a group to a workspace.
- Click the Administration tab followed by Workspace Details.
- Click Manage Workspace Permissions.
- Click Add/Remove Groups on the Group Management tab.
- Select one or more groups from the Available Groups list in any order. Scroll the list or search for a specific group using the search bar.
- Click Add.
- Click Save.
Removing groups from a workspace
To remove one or more groups from a workspace, follow these steps:
- Click the Administration tab followed by Workspace Details.
- Click Manage Workspace Permissions.
- Click Add/Remove Groups on the Group Management tab.
- Select one or more groups from the Groups in Workspace list in any order. Scroll the list or search for a specific group using the search bar.
- Click Remove.
- Click Save.
Features tab
The Feature tab simplifies permission setup by reducing the number of steps needed. Instead of navigating through Object, Tab Visibility, or Admin tabs, you can enable a feature with a single action.
Each feature includes specific actions, which represent individual tasks users can perform within that feature. Granting access to actions lets you control permissions more precisely, allowing a group to perform certain tasks without providing full access to the entire feature.
A feature or action combines the required permissions drawn from the other three tabs. When you enable a feature, all associated permissions activate automatically. For an overview of features and actions, see
Considerations
Keep these factors in mind when setting Feature permissions:
- Granular permission settings on the Object Security, Tab Visibility, and Other Settings tabs are the primary source and propagate to features listed on the Features tab. Changes to these permissions from those tabs will also update in the corresponding features.
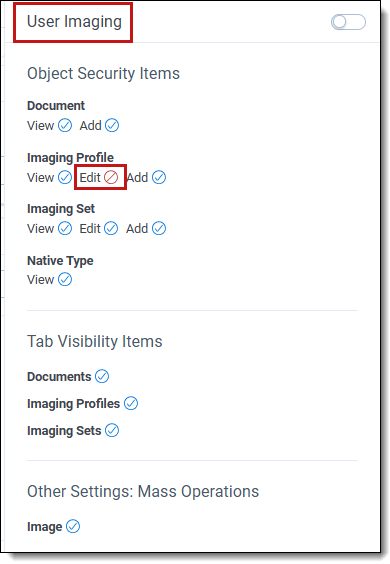
If you remove the Edit capability from Imaging Profile on the Object Security tab, it will be disabled within its corresponding User Imaging feature on the Features tab
- Changing a specific permission under the Object Security, Tab Visibility, and Other Settings tab associated with an enabled feature will result in the feature being disabled.
If the Imaging feature is enabled on the Features tab and you disable Edit for Imaging Profile on the Object Security tab, the Imaging feature on the Features tab is automatically disabled. Additionally, any other feature that included the Edit capability for Imaging Profile is also disabled.
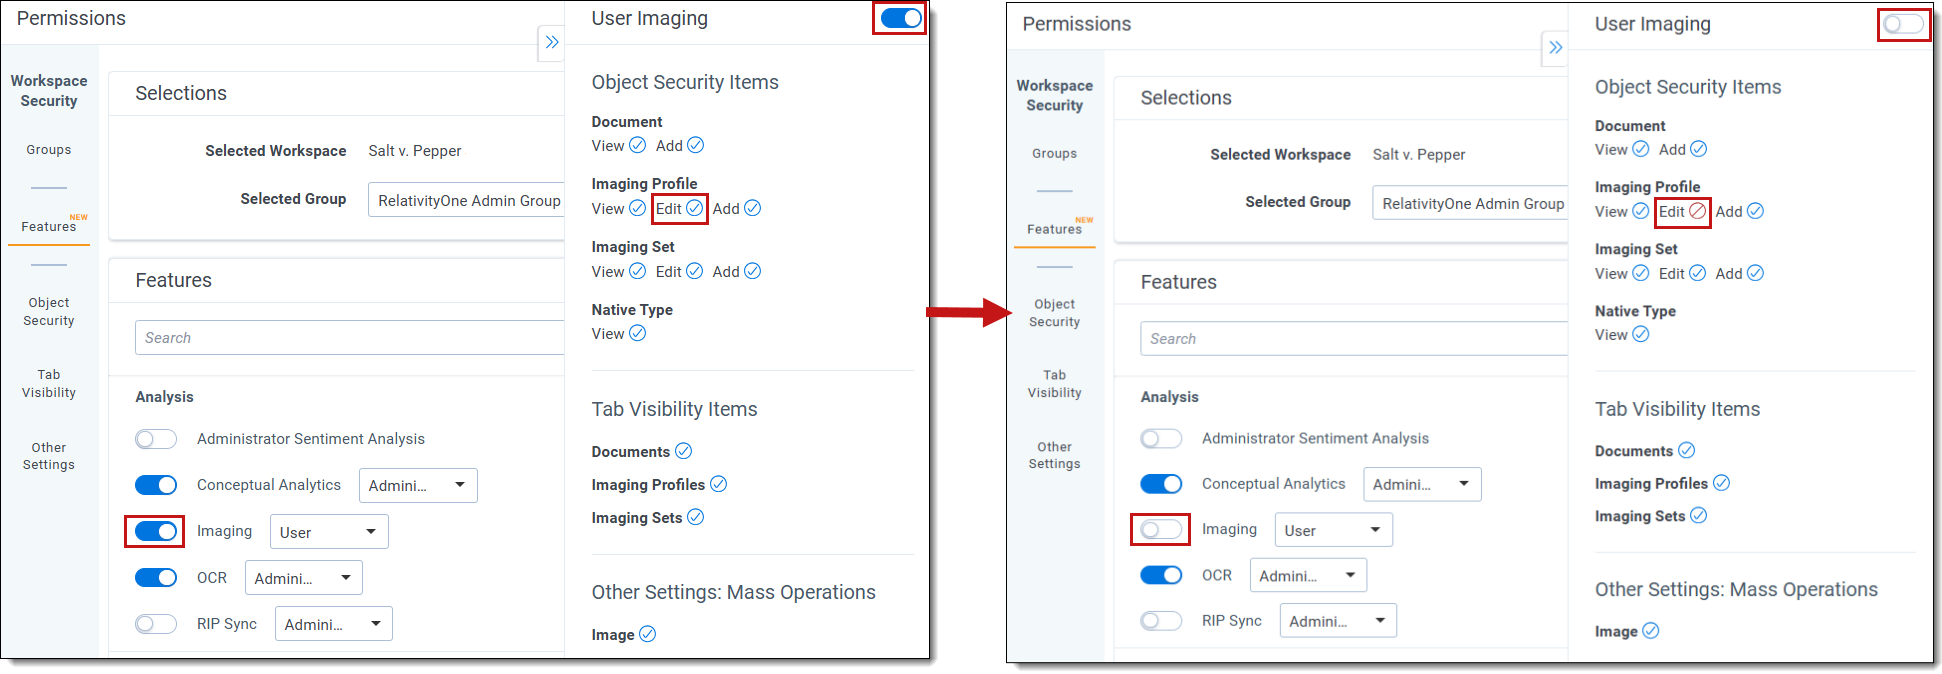
Therefore, if all granular permissions are enabled for a feature, the feature's toggle is enabled. If any of the granular permissions is disabled for a feature, the feature's toggle is automatically disabled.
- Disabling a feature on the Features tab disables its associated granular permissions for that feature. However, if a granular feature is part of another enabled feature, then it will remain enabled (blue check mark) on the disabled feature’s See Details panel.
The User Imaging and User Processing features are enabled, and they share the granular permission of View and Add Document. If you disable the User Imaging feature, the View and Add Document settings remain enabled (blue check mark) on the See Details panel of User Imaging because they are included in the enabled User Processing feature

- Disabling a feature revokes access to all granular permissions associated with the feature that are not currently granted as part of a different enabled feature. Therefore, enabling and then disabling a feature will not necessarily return the group to the state it was previously in. Be sure to examine the Review Permissions Changes dialog to confirm all permissions changes are as expected.
A group has access to two permissions. If you enable a feature for that group which includes those two permissions as well as two additional permissions, the group will then have access to all four permissions. Subsequently, if you disable the feature for the group, all four permissions will be disabled for the group (assuming none of the permissions are part of another enabled feature). The group will not revert to having access to the original two permissions.
Using the Features tab
The Features tab displays a list of features currently available for the selected group in the workspace. Click the toggle key next to one or more features to enable or disable them. You can also do the following from here:
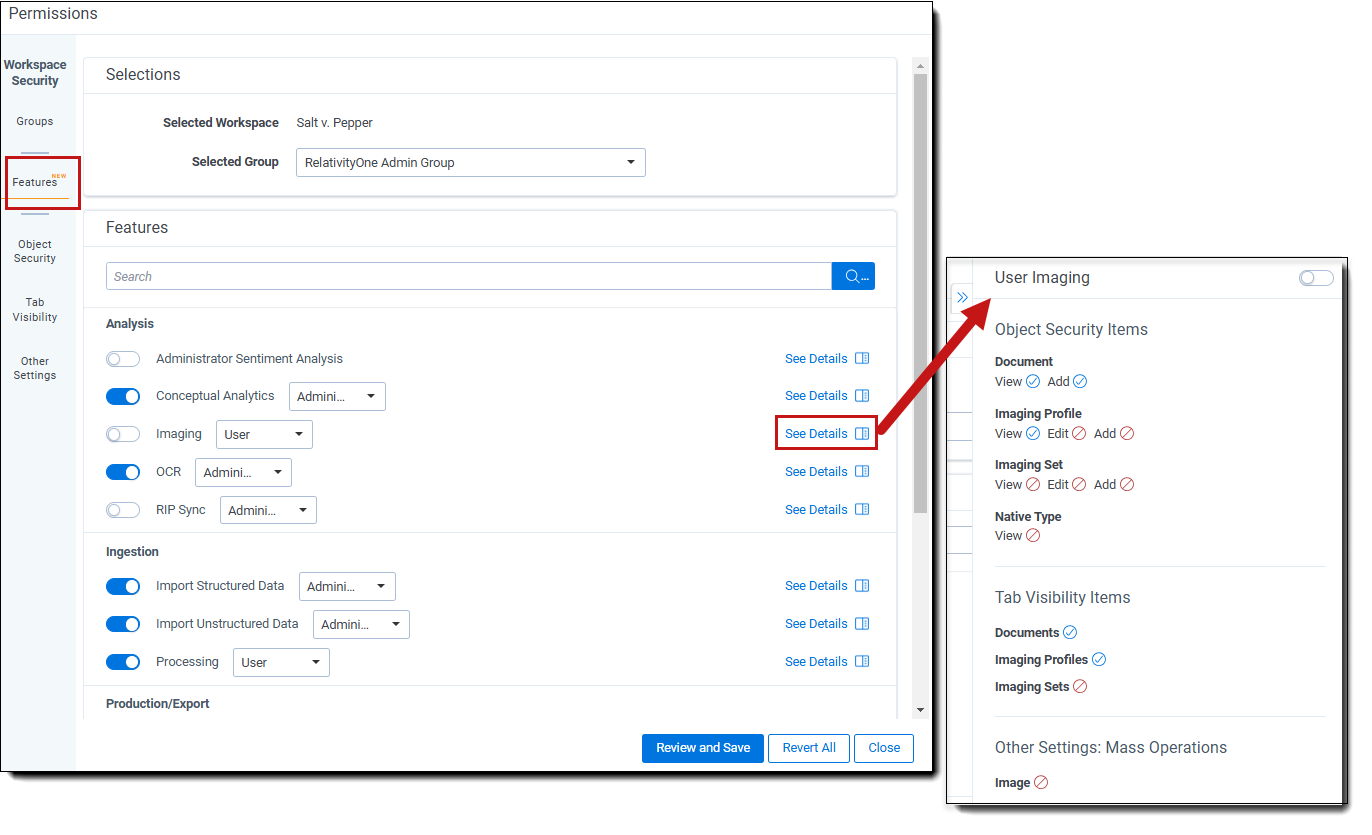
- Use the Search bar to locate a particular permission in the list.
- If available, click the list next to a specific feature to adjust the user role to configure for that feature. For example, Administrator, Reviewer, or User role.
- Click See Details to view the list of granular permissions associated with this feature and their settings. They are propagated from the Object Security, Tab Visibility, and Other Settings tabs. To collapse the details panel, click the double arrow
 button. The panel includes:
- User role for the feature is reflected in the panel heading. For example, the heading of “User Import Unstructured Data” indicates the permissions listed are for the User role.
- Ability to enable or disable the feature’s toggle key from here in addition to doing so from the main Features dialog.
- Current state of each granular permission for the feature. A blue check mark
 indicates the selected group has permission to use this feature (enabled). A red circle
  with a slash indicates the selected group does not have permission to use it (disabled). The state permissions may change based on the toggle key setting.
Frequently asked questions
Yes, you will be able to continue to use granular permissions. While Feature Permissions is designed to eliminate the need to manage permissions at the granular level via the Object Security, Tab Visibility, and Other Settings tabs, we understand that there may be unique situations which require the use of the more granular method. Therefore, that functionality will remain in RelativityOne for the time being.
First, ensure the user has Tab Visibility by looking for a blue check mark next to the tab name in the See Details pane of the feature. If confirmed and still not visible:
- Check item-level Security: if the tab is secured against the selected group, it will not be available in the application.
- Check the tab configuration: if the tab’s parent is not visible, it will not appear in the side panel or hamburger menu, but it will still be accessible via Quick Nav.
Feature availability is determined by your workspace configuration. Features will only show when the relevant applications are installed in the workspace. If any necessary components are missing, the feature will not be available.
Although this situation should be rare, it can occasionally arise. This typically occurs when the feature definition is changed to include a permission that the group does not have, often because a new permission has been introduced to the system. To resolve this issue, re-enable the feature for the affected group.
Granular permissions
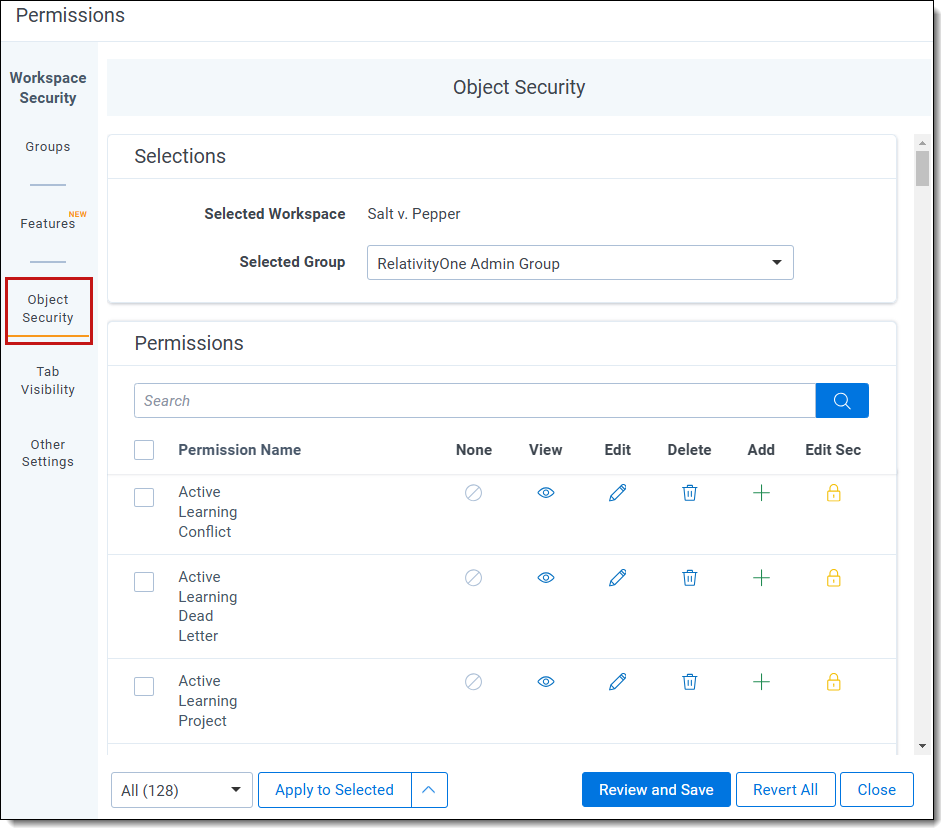
Use the Object Security tab to manage the following object-level permissions for a selected group:
- None
 —denies users access to the object.
 - View
 —view the object. This is the lowest level object permission.
 - Edit
 —edit and view the object.
 - Delete
 —delete, edit, and view the object.
 - Add
 —add new objects. This icon turns blue when the setting is unsaved; once you click Save, the blue icon becomes grey. This icon turns green when you give users this permission both when the setting is unsaved and saved.
 - Edit Security
 —grants users the ability to edit the security of objects. This icon turns blue if you click twice indicating a not applicable status.
See Object list for a list of securable objects.
Assigning object-level permissions
To assign object-level security permissions to a group:
- Click the Administration tab followed by Workspace Details.
- Click Manage Workspace Permissions in the Relativity Utilities console.
- Click Edit Permissions for a group on the Group Management tab. Or, click Object Security and select a group from the Current Group drop-down menu.
- Click the applicable object security permission(s) you want to apply to the selected group. Icons for selected security permissions appear in color, and names of objects for which you changed security permissions appear in italic typeface until you save the modified permissions.
- Click Save.
Assigning mass permissions to a single group
To update multiple permissions to a single group:
- Click the applicable object security permissions
- Click the down arrow on the menu below.
- Select the appropriate permission type.
- Click Apply.
Denying object access
To deny a group any access to an object, click the ![]() icon. After setting a group's permission level to None, the icon appears in color
icon. After setting a group's permission level to None, the icon appears in color ![]() .
.
Tab Visibility tab
The Tab Visibility tab lists all parent and child tabs in a workspace. Combine object-level permissions and tab visibility to give users the tools they need to complete their tasks.
To grant access to workspace tabs, select all tabs you want visible for a selected group. For a complete list of tabs, see Tab Visibility.
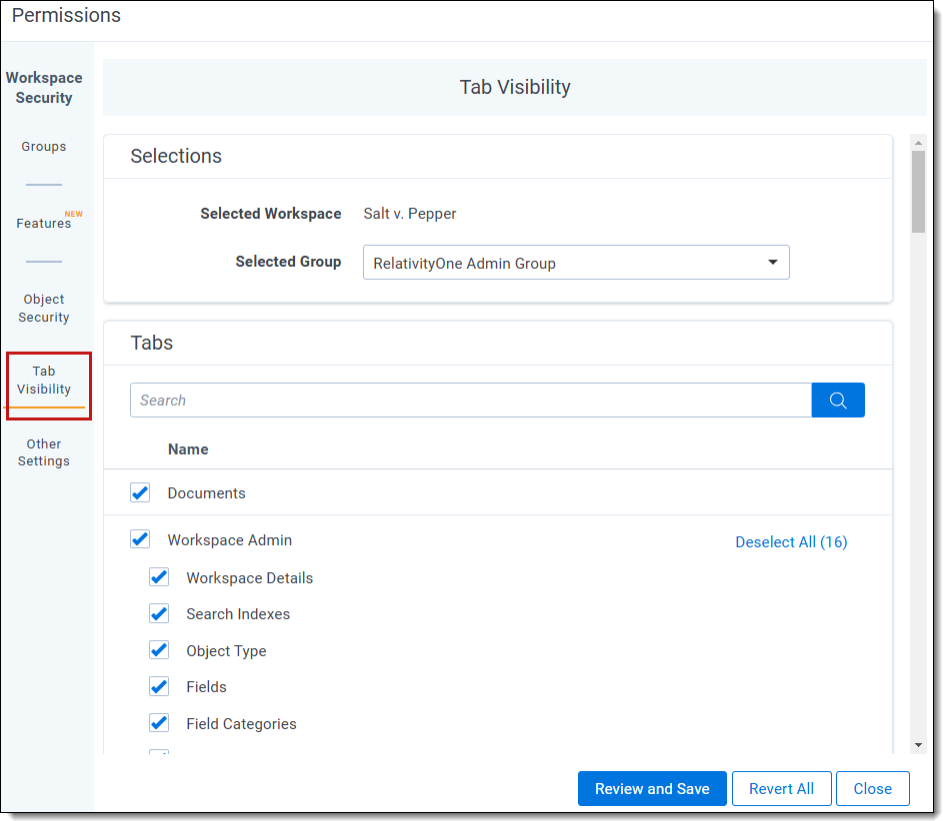
Selecting parent and child tabs
Indented tab names are child tabs of a parent tab. The following example shows the parent tab of Processing and its child tabs. To select a parent tab and all child tabs, click Select All (#) for the parent tab. The link changes to "Deselect all (#)", which clears all check marks.

When you select at least one child tab, the related parent tab is automatically selected. If you only want the child tab selected, click the parent tab to clear its selection.
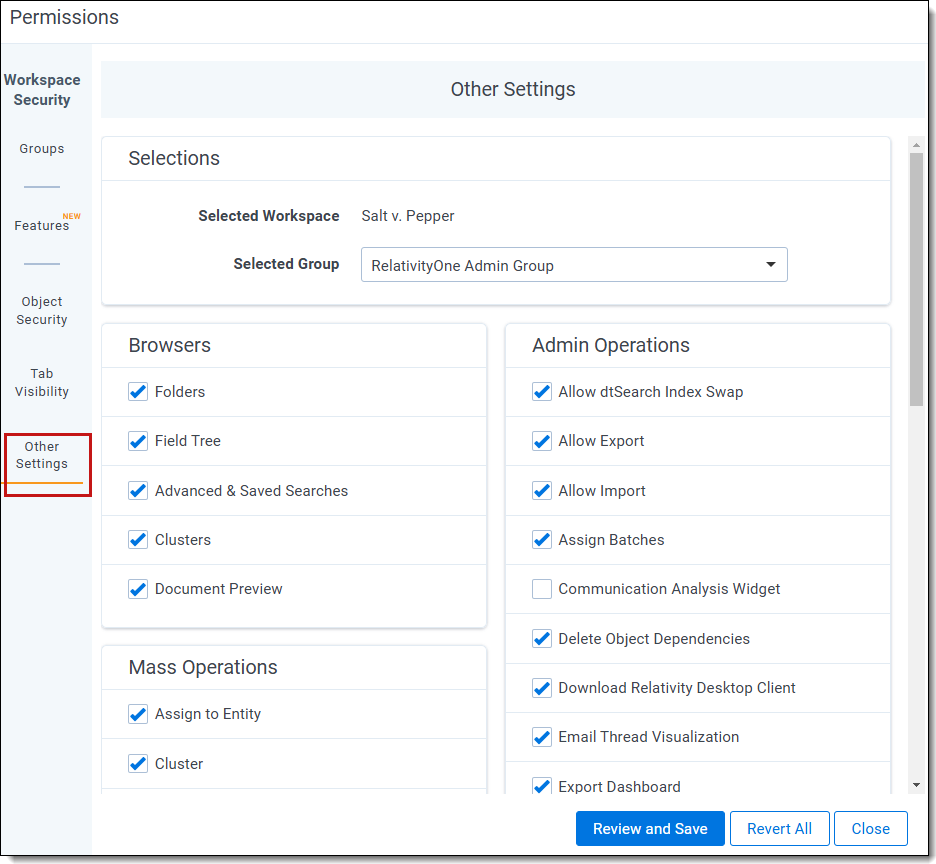
Other Settings tab
The Other Settings tab lets you control browser visibility and access to mass operations and admin operations for a group in a workspace.
Saving permissions for a group
In the Workspace Security dialog you can switch between the Object Security, Tab Visibility, and Other Settings tabs before saving modified security permissions for a selected group. If you modify security settings on any of these three tabs, and try to close the dialog or click the Group Management tab, Relativity prompts you with the following options:
- Save—saves all permissions changes and applies them to the selected group.
- Revert—discards all unsaved permissions changes and reverts to the group's last saved permissions.
- Cancel—cancels the attempted dialog close or tab change action.
After making security changes on the Object Security, Tab Visibility, and Other Settings tabs, click Save at any time to apply the selected permissions settings.