Last date modified: 2026-May-22
Review (Advanced Access)
The Review phase of a RelativityOne FOIA workflow involves assessing records for responsiveness, sensitivity, and compliance with applicable exemptions. Reviewers determine whether responsive records may be released in full or require partial redaction. During this phase, Relativity leverages AI-assisted review to support timely and accurate release decisions.
Table of Contents
| Agency portals | Public portal | Agency administration |
|---|---|---|
| FOIA Portal |
Review details for the coordinator
Click the Review step in the workflow panel to open its details.
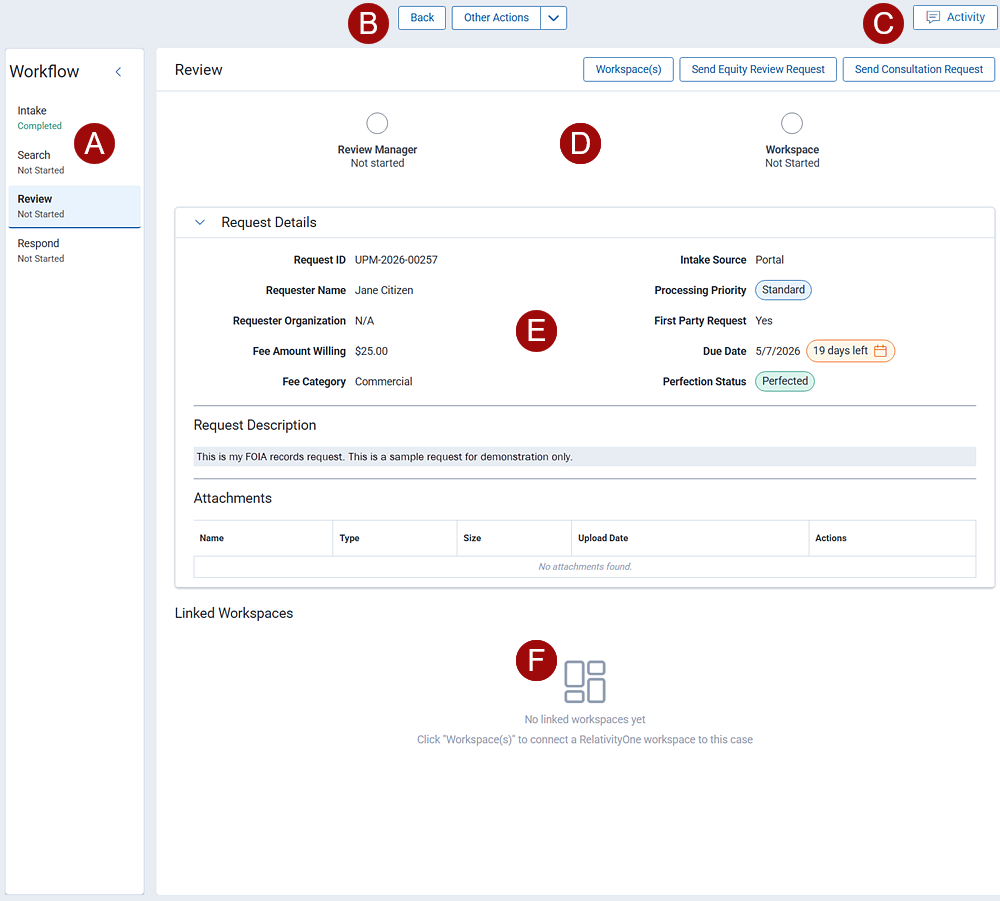
Noteworthy navigational points:
A. Workflow steps—the RelativityOne FOIA workflow consists of four steps: Intake, Search, Review and Response. As you complete the tasks for a step, the workflow automatically advances you to the next. You can also click from one step to another to view details.
B. Action buttons—includes Back, which redirects you to the previous screen, and Other Actions, consisting of the following:
- Email Requester—opens an email template you can use to contact the requester.
- Extension—opens a template for extending the processing due date. Extensions can only be taken on perfected requests. Select one or more circumstances for the extension, then select the type, or number of days to extend the processing.
- Toll Clock—opens a modal to enter a justification for changing the clock.
C. Activity—opens the Activity History panel. The panel displays a list of activities for the request.

![]()
Options include:
1. Log Communication—manually log activity for the request. For example, you might log an email you received outside of the FOIA environment that is relevant to the request. Fields include:
- Communication Type—select the type of communication from the drop-down menu.
- Contact—enter a contact name.
- Subject/Title—enter a subject or title.
- Details—describe the communication.
2. Add Notes—add comments, questions, and notes.
3. Export CSV—export the activity list in CSV format.
4. Filters—search or filter the activity list.
D. Progress bar—indicates the status of workflow sub-steps. A green circle indicates the sub-step is complete for the workflow step. This may be because the requester did not request further review, such as not requesting a fee waiver, or the agency reviewer completed all of the tasks within the sub-step. A blue circle indicates the task is partially completed.
E. Request details—the request details including requester input, and attachments.
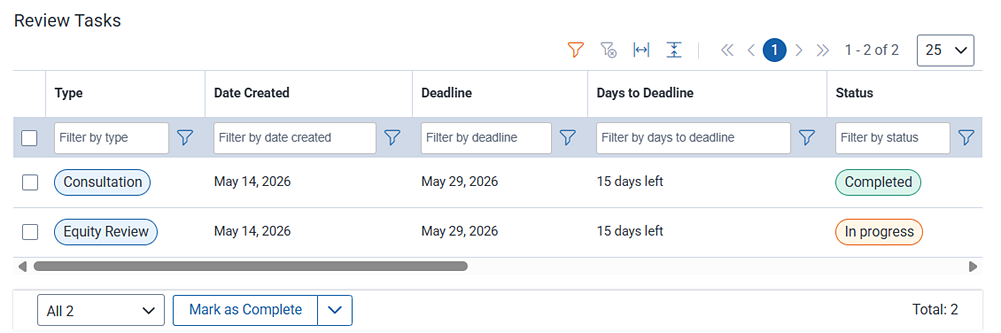
F. Review Tasks—as review tasks are assigned, they appear in this section, along with their status.
G. Linked Workspacess—a list of linked workspaces associated with the search documents.
During the Review phase, coordinators can link to or create new workspaces and request input from other agencies.
Review sub-steps
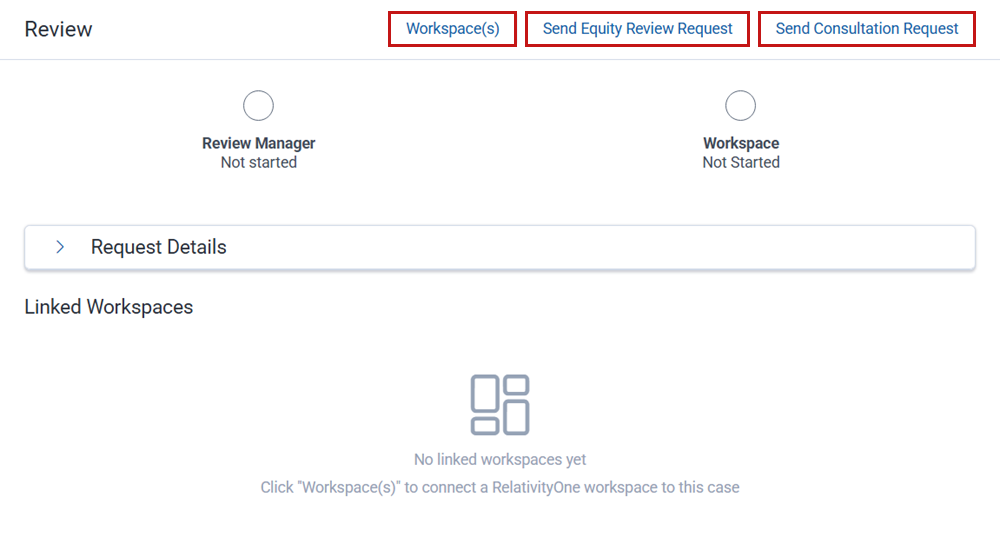
There are three sub-steps for the Review step: Workspace(s), Request Equity Review, and Request Consultation.
Workspace(s)
During the Review phase, you will decide where to store documents that are being evaluated for release. You can select an existing workspace or create a new workspace. From the Review landing page, click Workspace(s) to get started.
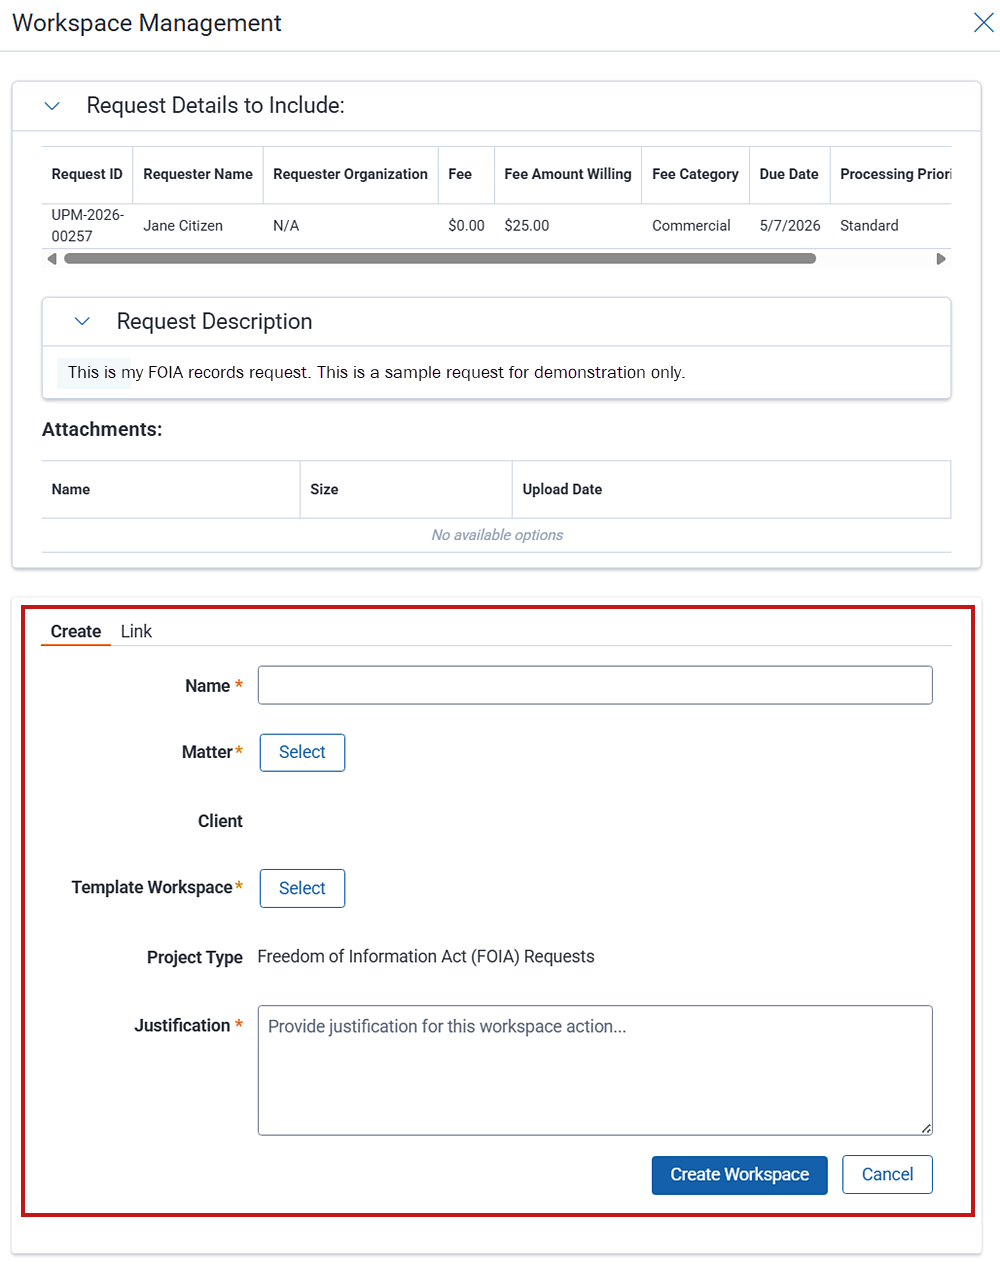
The Workspace Management modal opens.
The top half of the modal displays the request details and any attachments. The lower half of the modal is where you can create a new workspace to store records, or link to an existing workspace.
Creating a new workspace
To create a new workspace, confirm the Create tab is active.
Steps:
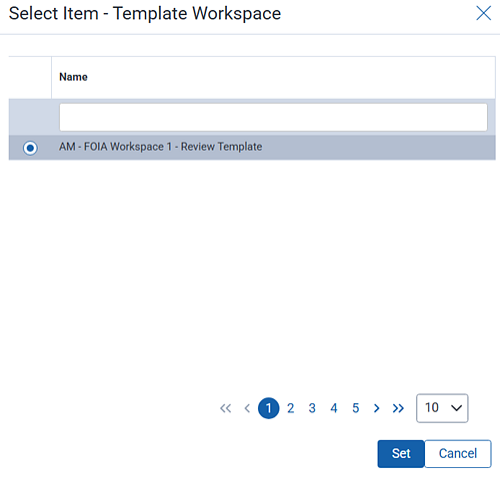
- Complete the following fields:
- Name—provide a name for the workspace.
- Matter—select a matter.
- Client—Relativity automatically populates this field for you. Clients are tied to matters.
- Template Workspace—the top entry on the workspace list is the default RelativityOne FOIA workspace template. You can select this option or select any other workspace listed. Click Set to save your template choice. The name will be similar to FOIA Workspace Review Template but may not be exact.

- Use the Notes on Decision box to add any comments for future reference.
- Click Create Workspace to save and exit the modal. You will see a confirmation message that indicates Relativity is creating the new workspace. A new message appears when the workspace is ready. Click OK to return to the Review landing page.
On the Review landing page, you can now see your workspace in the Linked Workspaces section.
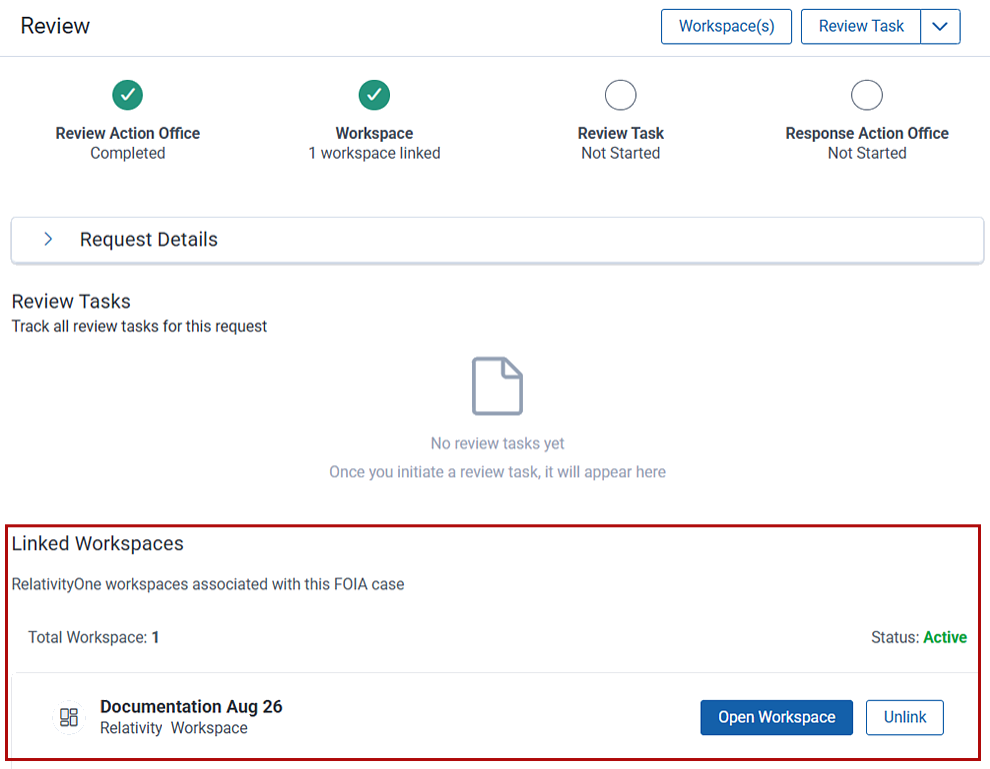
Linking to an existing workspace
To link to an existing workspace, click the Link tab.
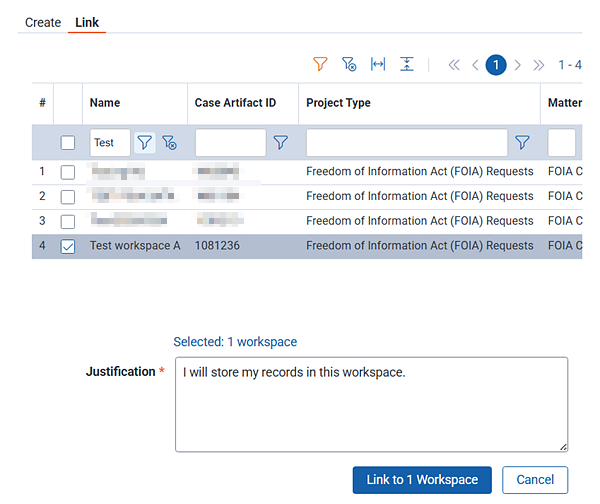
Steps:
- Select one or more existing workspaces.
- Use the Notes on Decision box to enter comments for future reference.
- Click Link to [] Workspace to save and exit the modal.
You are returned to the Review landing page where the workspace appears in the Linked Workspace section.
Request Equity Review
Requesting an equity review is a pre-release quality control step for materials returned during a FOIA records search. Stakeholders review the content to ensure accuracy, relevancy, and compliance with policy requirements.
The template contains prompts that you can use to customize your email, along with merged fields that pulled data directly from the existing record. You can use the template as is or edit it to suit your specific need.
You can edit templates to customize them for your agency. See Letter Template Management for details.
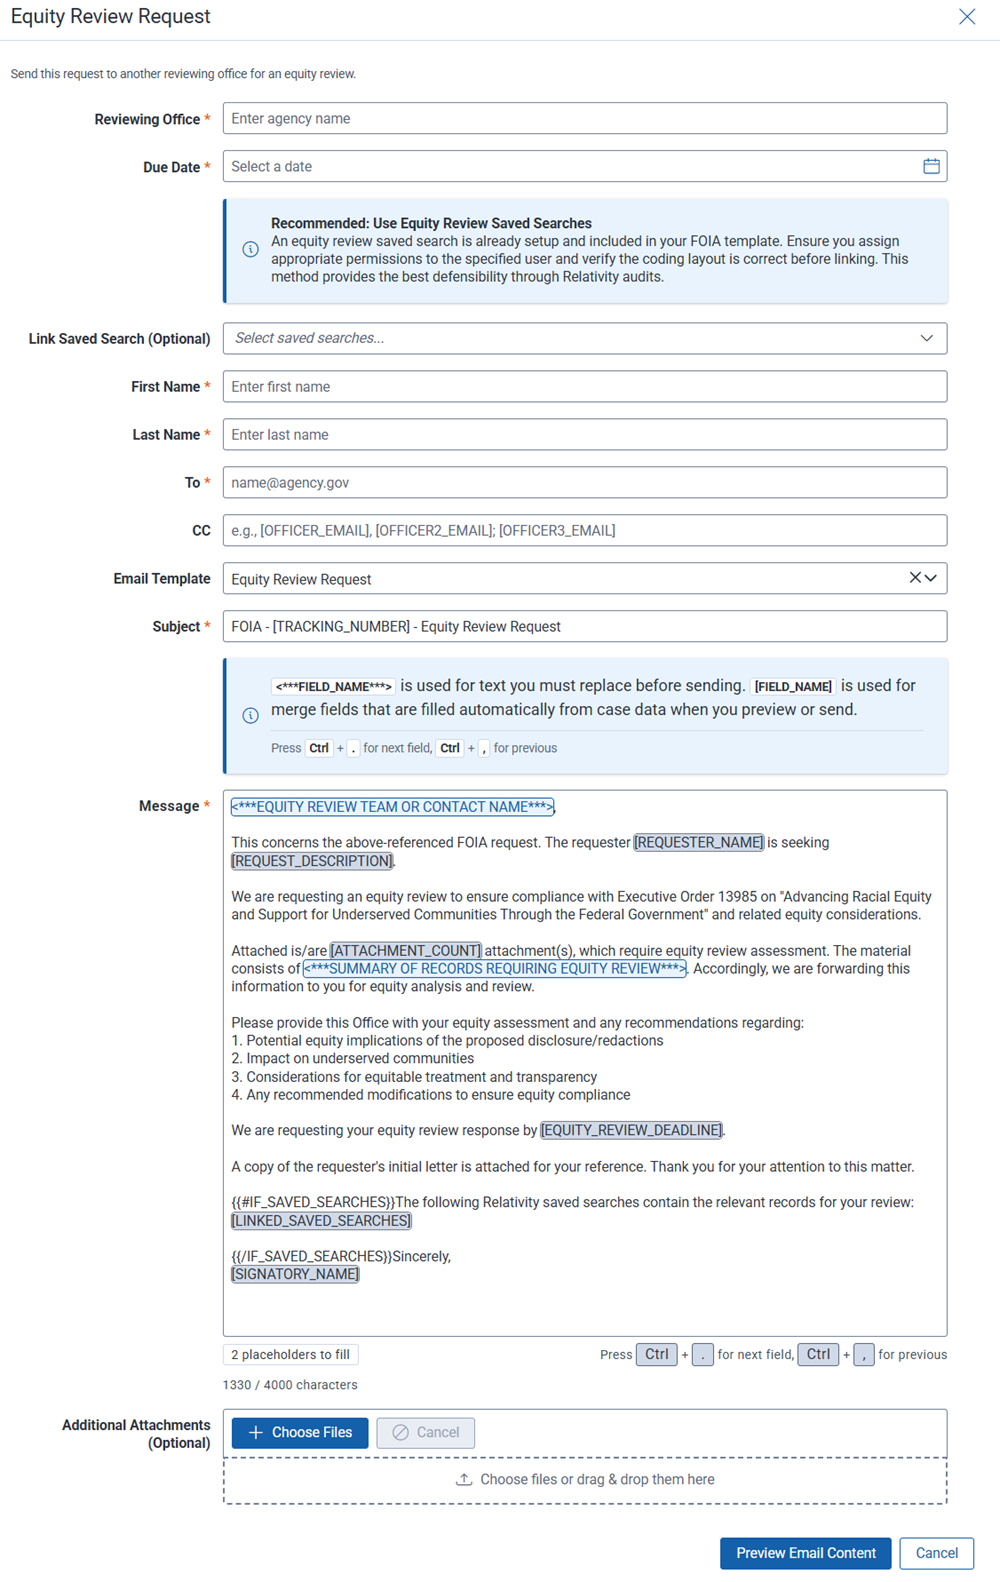
- <***ABC***>—indicates data that you must provide. Replace the prompt with content specific to your request.
- [ABC]—indicates merged content that is pulled directly from the preexisting record. Relativity will populate these prompts for you.
Steps:
- Complete the following fields:
- Reviewing Office—the name of the office that will perform the equity review.
- Due Date—the expected date for completing the review.
- Linked Saved Search (Optional)—select one or more saved searches specific to this request. Ensure that you assign appropriate permissions to the specified user and verify the coding layout is correct.
- First Name—of the equity reviewer.
- Last Name—of the equity reviewer.
- To—the email address of the reviewer.
- CC—the email addresses of any other users receiving a copy of the email.
- Email Template—Relativity provides a default template that includes merged fields, or fields that are populated with details from the original request. Merged fields are contained in brackets with the field name. For example [ASSIGNED_TO]. You can also change the email template to another Relativity-provided template, or a custom template if your Relativity administrator created one. See Letter Template Management for more information on custom templates. You can also edit the email content to further customize it to fit your needs.
- Subject—the subject line for your email.
- Edit the email content as needed, replacing any <***PLACEHOLDER***> blocks with your own wording. The bracketed [BRACKET_BLOCK] blocks represent merged fields where Relativity replaces them with details from the request as the email is generated. You do not need to address any of these blocks. You can remove blocks by selecting and deleting them. Just below the email template is a placeholder count that lets you know how many placeholder blocks need attention. Use the keyboard commands shown to move from one placeholder to another.

- Add any attachments for the reviewer.
- Click Preview Email Content.
- Click Confirm and Send to send the email. Click Back to Edit to return to the template. Note that you cannot recall the email after it's sent.
Request Consultation
During the review phase, you may need to request input from another agency. Use the default Relativity email template, or use a custom template of your own.
The template contains prompts that you can use to customize your email, along with merged fields that pulled data directly from the existing record. You can use the template as is or edit it to suit your specific need.
You can edit templates to customize them for your agency. See Letter Template Management for details.
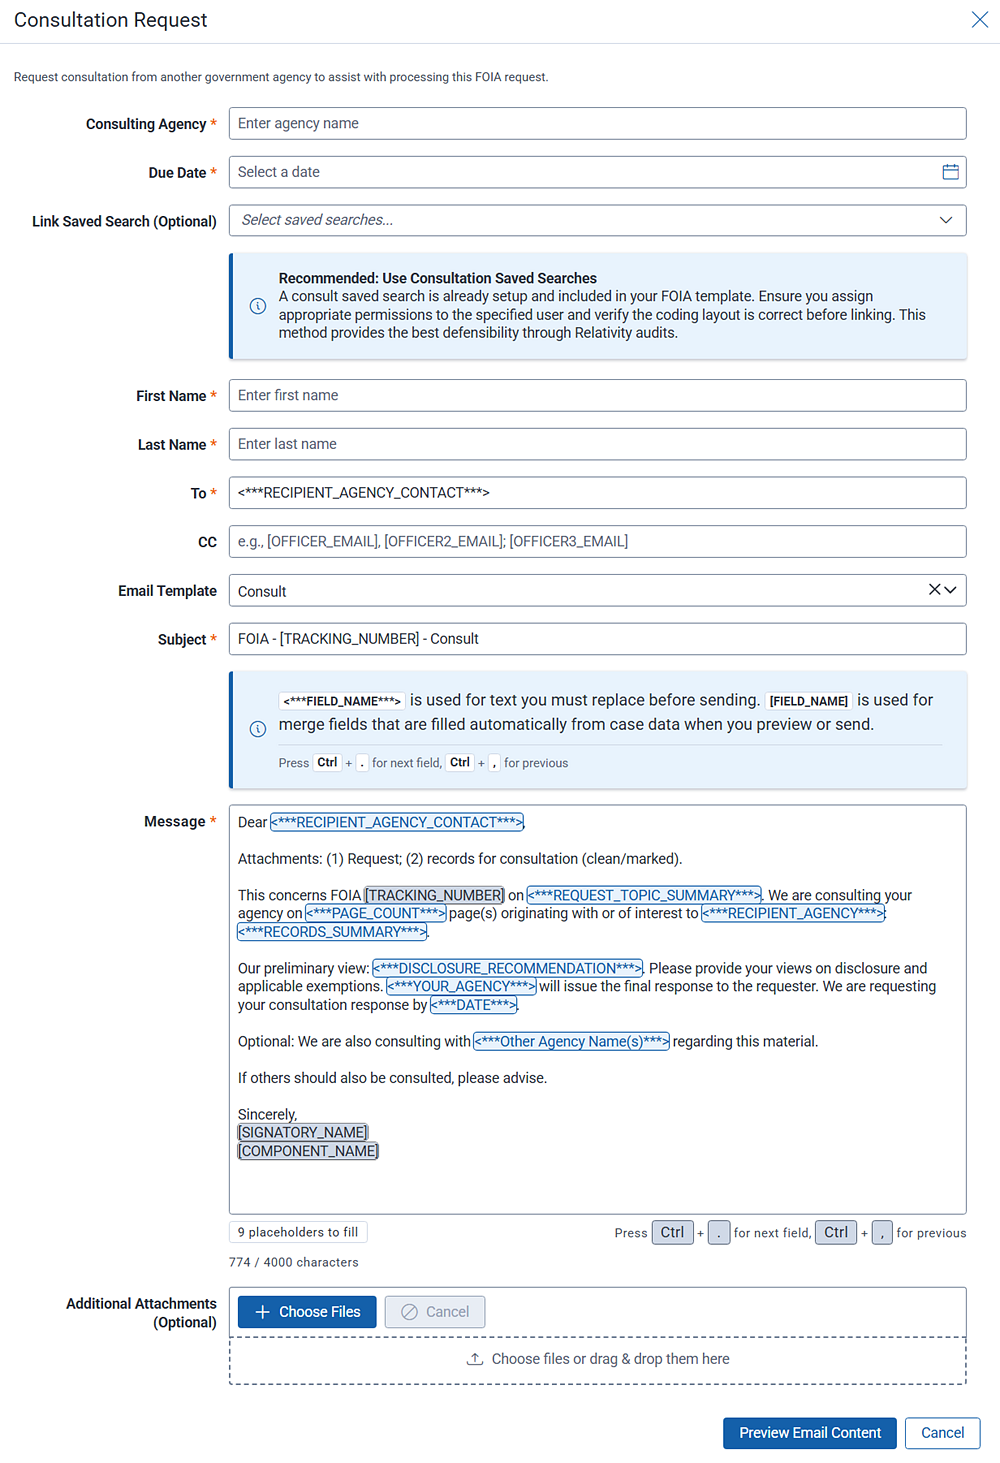
- <***ABC***>—indicates data that you must provide. Replace the prompt with text specific to your request.
- [ABC]—indicates merged content that is pulled directly from the pre-existing record. Relativity populates these prompts for you.
Steps:
- Complete the following fields:
- Consulting Agency—enter the name of the agency from which a consultation is being requested.
- Due Date—enter the due date for the consultation.
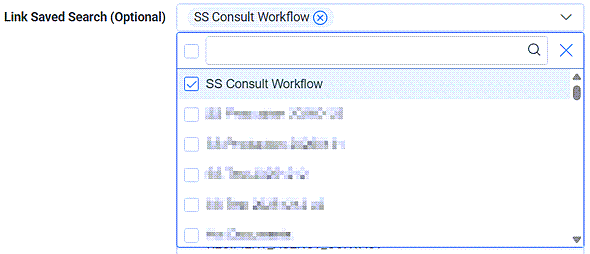
- Link Saved Search (Optional)—select a saved search from the drop-down menu. Relativity automatically creates a consult saved search and includes it in your FOIA template. You can select other saved searches as well. You are not limited to the consult saved search.
- First Name—enter the first name of the consultation agent.
- Last Name—enter the last name of the consultation agent.
- To—replace <***RECIPIENT_AGENCY_CONTACT***> with the email address of the agency contact.
- CC—enter another email address if you want to copy this email.
- Subject—there is no action required for this field. Relativity automatically populates the tracking number for you.
- Edit the email content as needed, replacing any <***PLACEHOLDER***> blocks with your own wording. The bracketed [BRACKET_BLOCK] blocks represent merged fields where Relativity replaces them with details from the request as the email is generated. You do not need to address any of these blocks. You can remove blocks by selecting and deleting them. Just below the email template is a placeholder count that lets you know how many placeholder blocks need attention. Use the keyboard commands shown to move from one placeholder to another.

- Add any attachments for the reviewer.
- Click Preview Email Content.
- Click Confirm and Send to send the email. Note that you cannot recall the email after it's sent.
- Additional Attachments (Optional)—upload any attachments you want to include in your request.
- Click Confirm and Send to send the consultation request. Click Back to Edit to return to the template. Note that you cannot recall the email once you send it.
Fees
Content for this section if not yet available.
Response Manager
In this step, you assign a response manager, or the person responsible for post-review tasks such as releasing documents to the public portal and sending final correspondence.
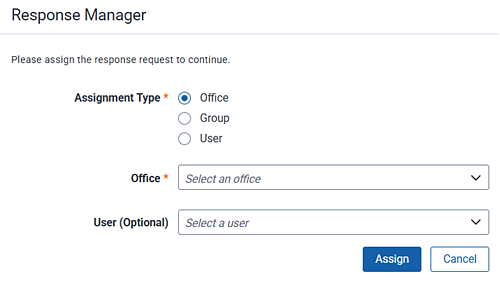
Steps:
- Click the Response Manager sub-step. The Response Manager modal opens.

- Select an Assignment Type.
- Office—use this option to assign the processing to an office or organization.
- Office—select an office or organization from the drop-down menu.
- User (Optional)—select a user from the drop-down menu. Users are filtered based on the office you select.
- Group—use this option to assign the processing to a predefined group.
- Group—select a group from the drop-down menu.
- User—use this option to assign the processing to a single user.
- User—select a user from the drop-down menu.
- Office—use this option to assign the processing to an office or organization.
- Click Assign.
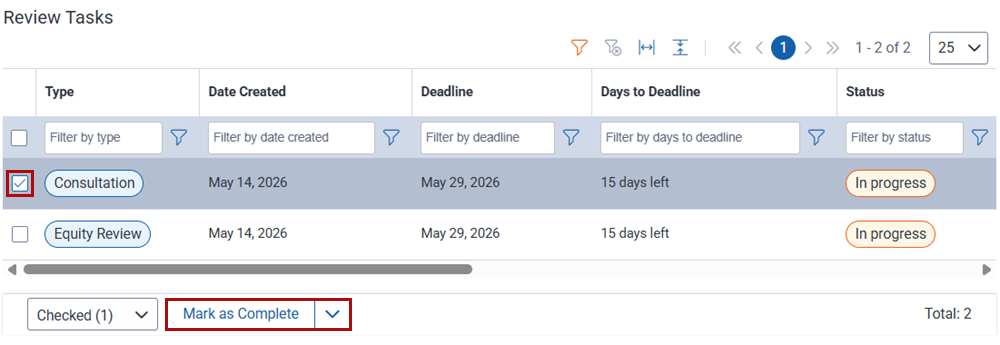
You are returned to the Review landing page. Notice now, there are tasks listed that indicate the current status of the review effort. Depending on how many custodians you assigned, you may see multiple tasks listed. The Status shows In Progress and will not change until the task is marked complete.
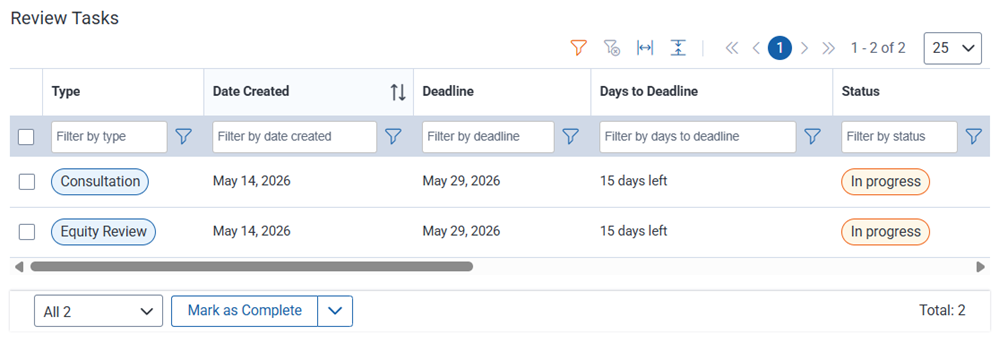
To mark a task as complete:
- Check the box(es) next to the task(s) you are updating. Alternatively, you can select All from the document count drop-down menu. Selecting All updates all of the review tasks at once.
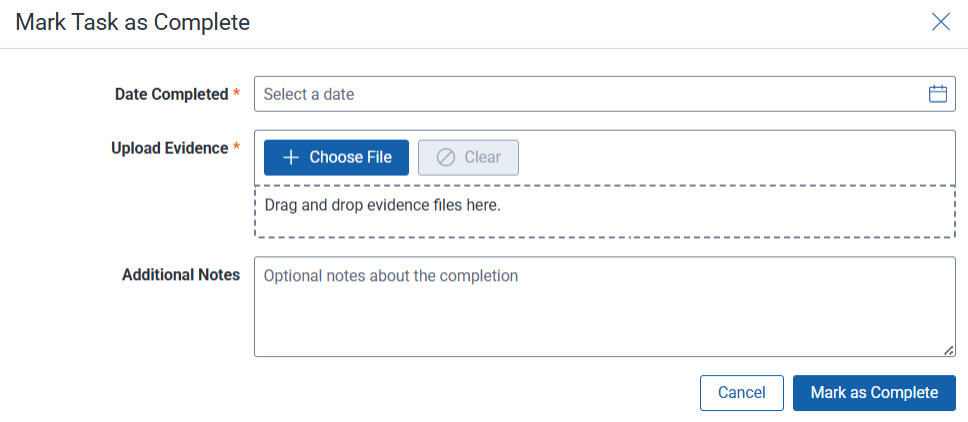
- Select Mark as Complete from the Mass Action drop-down menu. When you select Mark as Complete, the Mark Task as Complete modal opens.

- Complete the following fields:
- Date Completed—select a date from the calendar picker as the completed date.
- Upload Evidence—select Choose File to select a file, or drag a file into the Drag and drop section. Evidence files typically consist of documents that support decisions made during the review phase by the reviewers.
- Additional Notes—enter any comments for future reference.
- Select Submit.
The Review landing page is updated with the new status.
Once all sub-steps are complete, and consultation requests returned, the Review phase is complete. The workflow moves to the Response step.