


Feedback
Last date modified: 2026-Jul-09
FOIA Admin
The FOIA Admin portal provides tools for configuring agencies used in workflow steps, defining case number formats, setting working days, and managing email templates.
Public Portal Settings
You can customize the information your agency presents and collects at each step of the FOIA process. The Public Portal is specific to the agency accessing it.
Highlights include:
- Portal Status—if enabled, agency information is visible to other agencies and the public in forms and templates.
- Public Agency Profile—displays agency information, including processing times and specialties.
- Public Portal Form—agencies can add, edit, or remove fields on the public-facing submission form.
To edit public portal settings, click Edit Configuration.
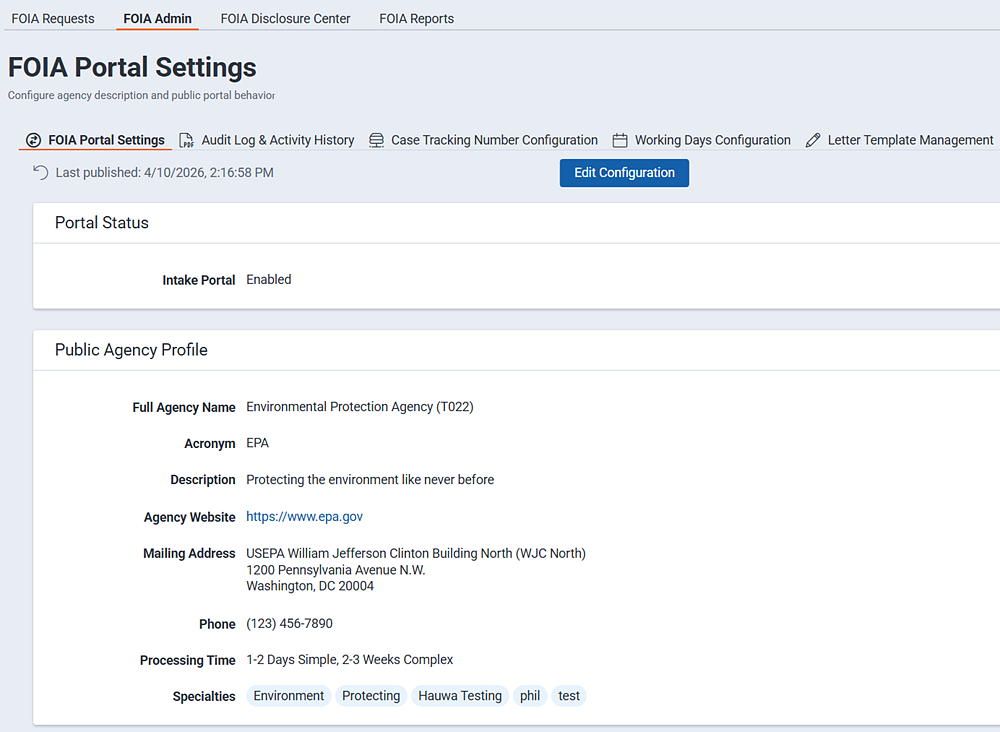
Portal Status
This option is enabled by default. When it is disabled, the agency’s information is hidden. You cannot submit new requests to the agency or view past requests in the reading room.
Public Agency Profile
Use the fields in this section to provide information about the agency, its typical processing times, and any specialties the agency handles.
Fields include:
- Full Agency Name—the agency name that appears in public-facing forms and templates.
- Acronym—specific to the agency.
- Description—provides insight to who the agency is and what it does.
- Agency Website—the agency's website address.
- Mailing Address—the agency's mailing address.
- Phone—the agency's public contact phone number.
- Processing Time—the agency's typical processing time. You can enter multiple time frames, for example, processing times for simple versus complex requests.
- Specialties—the agency’s specialties. Specialties are short, descriptive keywords or subject matter tags that define an agency’s primary areas of focus or the types of records it handles.
Public Portal Form
Records requests are submitted through the Public Portal (submission) Form. When you open the form, you begin by selecting the government agency that will process your request. Agencies can customize the submission form to fit their own requirements, for example, relabeling existing fields to better match the agency's terminology, or creating entirely new custom fields to capture additional information. Because customizations are agency-specific, the submission form you see depends on the agency you select. If you switch to a different agency, the form updates to reflect that agency's configuration.
Default sections and fields:
Contact Information
- Section Label (cannot be hidden)
- Help Text (cannot be hidden)
- Intake Source
- Requester's First Name
- Requester's Last Name
- Your Organization
- Email Address
- Phone Number
- Fax Number
- Mailing Address 1
- Mailing Address 2
- City
- State or Province
- Zip or Postal Code
- Country
Request Information
- Section Label
- Help Text
- Request Date
- Case Narrative
- FOIA Team Notes
Fees & Fee Waiver
- Section Label
- Help Text
- What type of requester are you?
- Fee amount willing to pay
- Request a fee waiver
- Fee waiver justification
Expedited Processing
- Section Label
- Help Text
- Request expedited processing
- Justification for expedited processing
Additional Information & Attachments
- Section Label
- Help Text
- Attachments
Review & Submit
- Section Label
- Help Text
- Review
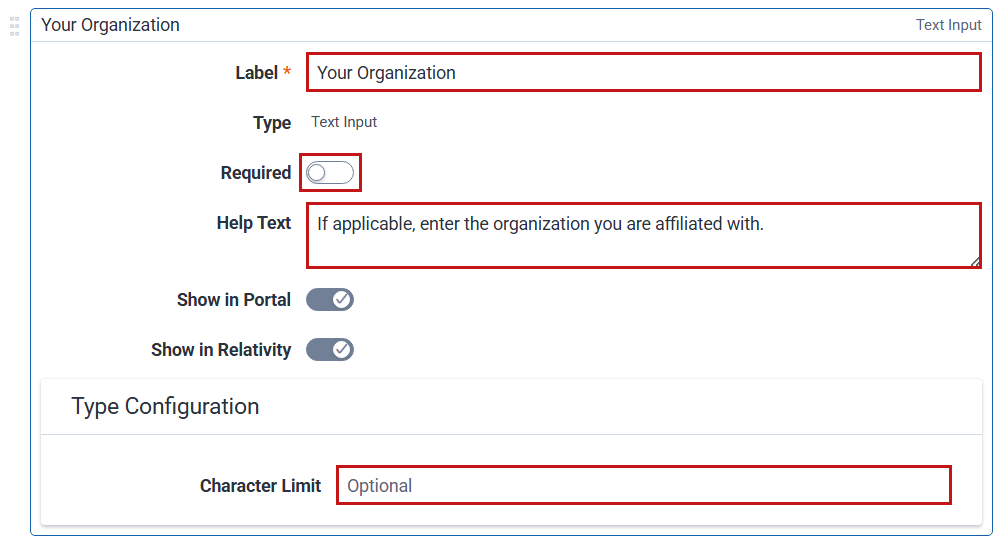
Editing a field's properties
Click Edit to the right of the field name to open its properties.
Editing default field properties is limited to:
- Label—the field name that appears on the form.
- Required—slide the toggle to the right to require the field.
- Help Text—provide instructions describing the information expected for the field.
- Show in Portal—slide the toggle to the right to show the field on the public form.
- Show in Relativity—slide the toggle to the right to show the field in Relativity.
- Character Limit—limit the number of characters the requester can enter. (Not all fields display the character limit option.)
Adding a new field
To add a new field, click New Field at the bottom of the target section.
Complete the field properties:
- Label—the field name displayed on the form.
- Field Type—select from the drop-down menu options.
- Required—slide the toggle to the right to require this field.
- Help Text—enter a brief sentence to let users know what kind of answer you are expecting.
The field list now displays the custom field, along with a tag that indicates it's custom and not part of the default fields. Use the handles on the right side of the screen to grab and drag a field to a new location.

Deleting a custom field
To delete a custom field, click Edit. Click Delete Custom Field. You cannot delete system fields.
Case Tracking Number
You can change the formatting of case numbers assigned to FOIA requests to customize them for your agency.
![]()
Steps:
- Click Edit Format. Change the component order and set field defaults by the following:
- Change the order of numbering components if desired. You can view a sample the current format in the Current Format Preview box. Grab and drag the handles on the right side of the screen to move a component to a new location. The preview box updates in real time so you can view your changes.
- Static Text
- Year
- Sequence

- Delimiter—by default, a hyphen separates the case number components. Select (none) from the Delimiter drop-down menu to remove the hyphen.
- Static Text—this value is often used as a prefix to the case number. You can set this to any meaningful value you like, along with changing its order (see Component Ordering).
- Year Format—set the year format to two or four digits.
- Starting Number—set the starting number for the case number. This is the first number in the sequence. You can specify how often the sequence resets in the Reset Frequency setting.
- Field Length—set the number of digits for case numbers.
- Reset Frequency—use this value to specify how often the numbering sequences reset back to the starting number. You can set it to yearly, quarterly, monthly, or never.
- Click Save & Activate to save your changes.
Working Days
Set your standard working days and hours for FOIA processing. Federal holidays are automatically applied to the working days schedule, but you can add other days as well.

Steps:
- Click Edit Configuration.
- Working Hours—set the ending time and time zone for FOIA processing. The ending time represents the cut-off time for the day. Any processing after this time is considered next-day processing.
- Federal Holidays and Non-Working Days—federal holidays are applied by default. Click the delete icon to remove a predefined holiday. Click Add Holiday to add other non-working days to your schedule.
- Click Save to commit your changes.
Email Templates
Relativity provides email templates that help your agency communicate with the public and other organizations. These templates are fully customizable, allowing you to edit and tailor them to your agency’s requirements. Each template includes two types of prompts: one that you select and replace with your own content, and the other that indicates a merged field where Relativity merges data from the FOIA request directly into the email.
Prompts will appear in one of the following formats:
- <***ABC***>—indicates data that you must provide. Replace the prompt with content specific to your request.
- [ABC]—indicates merged content that is pulled directly from the pre-existing record. Relativity populates these prompts for you.
The Templates browser is located on the left side of your screen. If you do not see the browser panel or browser icon, make sure you are on the Letter Template Management tab. If the browser panel is collapsed, click the browser icon to expand it.
To edit a template:
- Select a template from the Templates browser. The email appears in the preview pane.
- Click the Edit icon (it looks like a pencil) located in the upper right corner of the preview pane.
- Edit the text as needed. Click Save when you are done.
To insert a merged field:
- Click the Insert Merge Fields button at the top of the template content. A list of available fields appears.
- Select the fields you want to insert, and click Insert.

To insert a prompt:
- Place your cursor in the prompt location.
- Type <***PROMPT***>, replacing PROMPT with a brief annotation or keyword describing what the user should enter. If you have more than one word, use underscores to separate the words. For example, <***ENTER_YOUR_PETS_NAME***>. As you close the angle brackets, the prompt becomes highlighted, making it easy to see.

Adding a custom template
While the default email templates promote consistent communication, there may be times when you need to further tailor that communication to meet specific policies. In those cases, you can create custom templates and save them for repeated use. Custom templates are specific to the agency creating them and appear in template drop-down menus once saved. They can be selected by anyone in your agency. You cannot delete custom templates.
To create a custom template:
- Click the Add icon in the Templates browser.

- Complete the following fields:
- Template Name—give your template a descriptive and meaningful name so that you can easily search for it later.
- Template Description—enter a description of the template, its intended use, and audience.
- To—Relativity provides a merged-field suggestion for this field, but you can enter your own prompt if you prefer. For example, <***ENTER_EMAIL_ADDRESS_HERE***>.
- CC—add a merged field or your own prompt.
- Subject—Relativity provides a merged-field suggestion for this field, but you can enter your own prompt if you prefer. For example, <***IMPORTANT!_PLEASE_READ***>.
- Template Body—use merged fields and prompts, along with your own content, to customize the message.
- Click Save to save your template.
Agency & Component
Configure agency information, components, and contacts for use in FOIA workflow steps.
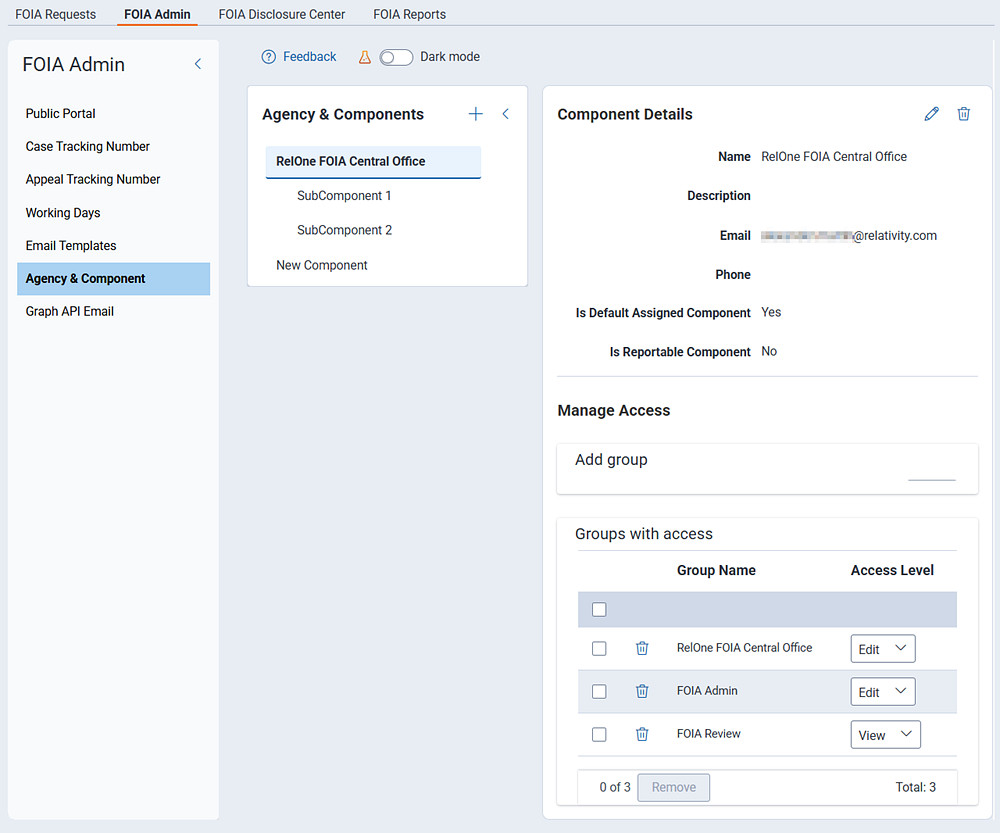
To add a component to an agency:
- Decide where the new component will reside. If you want to create a component directly under the top tier, click the Add [+] icon next to the Agency & Components heading. If you want to add a component under an existing sub-component, hover over the name and click the Add [+] icon when it appears.

- The Component Details panel opens.
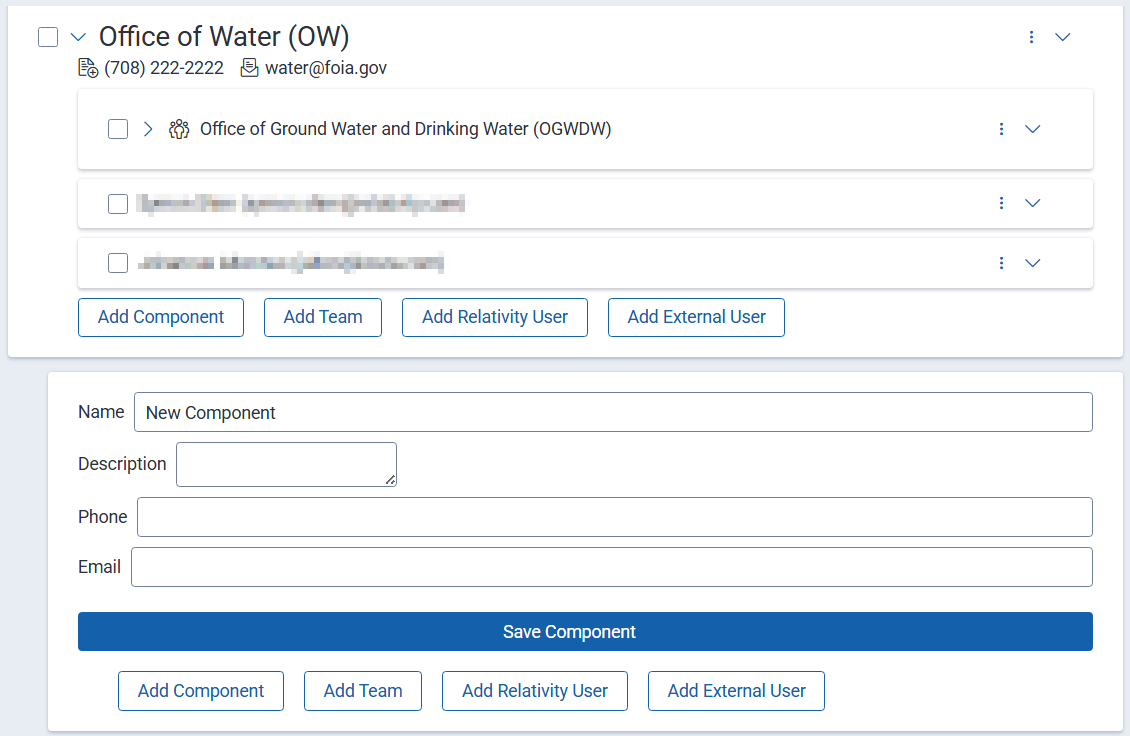
Complete the following fields: - Component Details:
- Name—enter a name for the agency or component.
- Description—provide a meaningful description so users will understand what this component is responsible for.
- Email—provide an email address for this component.
- Phone—provide a phone number for this component.
- Is Default Assigned Component—select this option to make this component the default when you create or assign tasks. By selecting No, the option is not the default and you must select it from a list of options.
- Is Reportable Component—select this option to make the component visible in reporting and analytics. Selecting No excludes it from reports.
- Click Save to commit your changes.
- Manage Access:
- Add Group—select a group from the drop-down menu to associate it with this component (or sub-component). Administrators can add groups at the top agency level.
- Set access—assign a level of access for the group. Options include View, Edit, or Custom.

- Custom—selecting the Custom option opens an additional panel where you can set granular permissions for FOIA processes. For example, you may want to limit this group to Intake tasks only. In this case, you can select which Intake tasks are available to the group and leave the remaining tasks unchecked, or blocked.
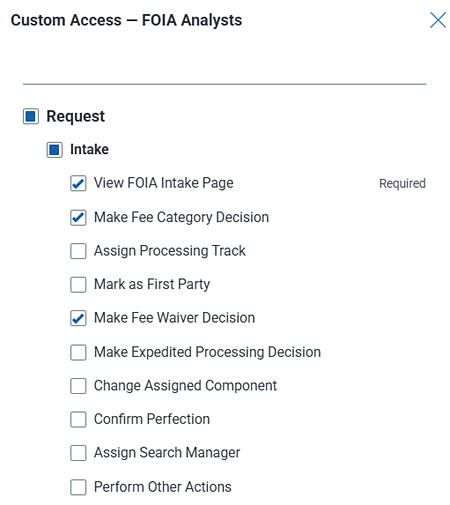
- Custom—selecting the Custom option opens an additional panel where you can set granular permissions for FOIA processes. For example, you may want to limit this group to Intake tasks only. In this case, you can select which Intake tasks are available to the group and leave the remaining tasks unchecked, or blocked.
- Click Add to save your selections.
- Groups with access:
- As you add groups, they appear in this section. To change the group's access, select another Access Level from the drop-down menu. To delete a group, check the box next to the group name and select the Trash icon.
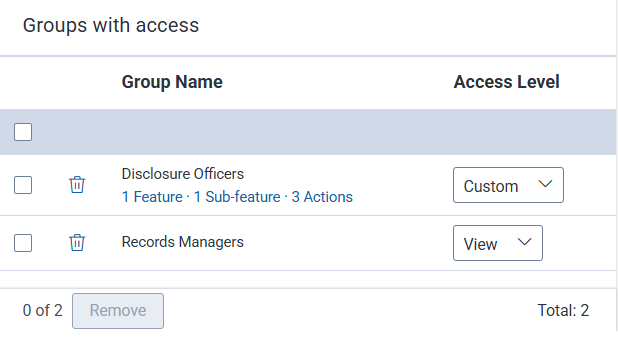
- As you add groups, they appear in this section. To change the group's access, select another Access Level from the drop-down menu. To delete a group, check the box next to the group name and select the Trash icon.
To delete any of the components, click the component name to open its details in the Component Detail panel. Click the Trash icon at the top of the pane. Select Delete on the confirmation message.