


Feedback

Last date modified: 2026-Sep-08
The Response phase of a Relativity FOIA workflow consists of releasing a final decision on the FOIA request, and producing appropriate records. Records are released to the publicly accessible Reading Room.
 Navigating the Response screen
Click the Response step in the workflow panel to open its details.
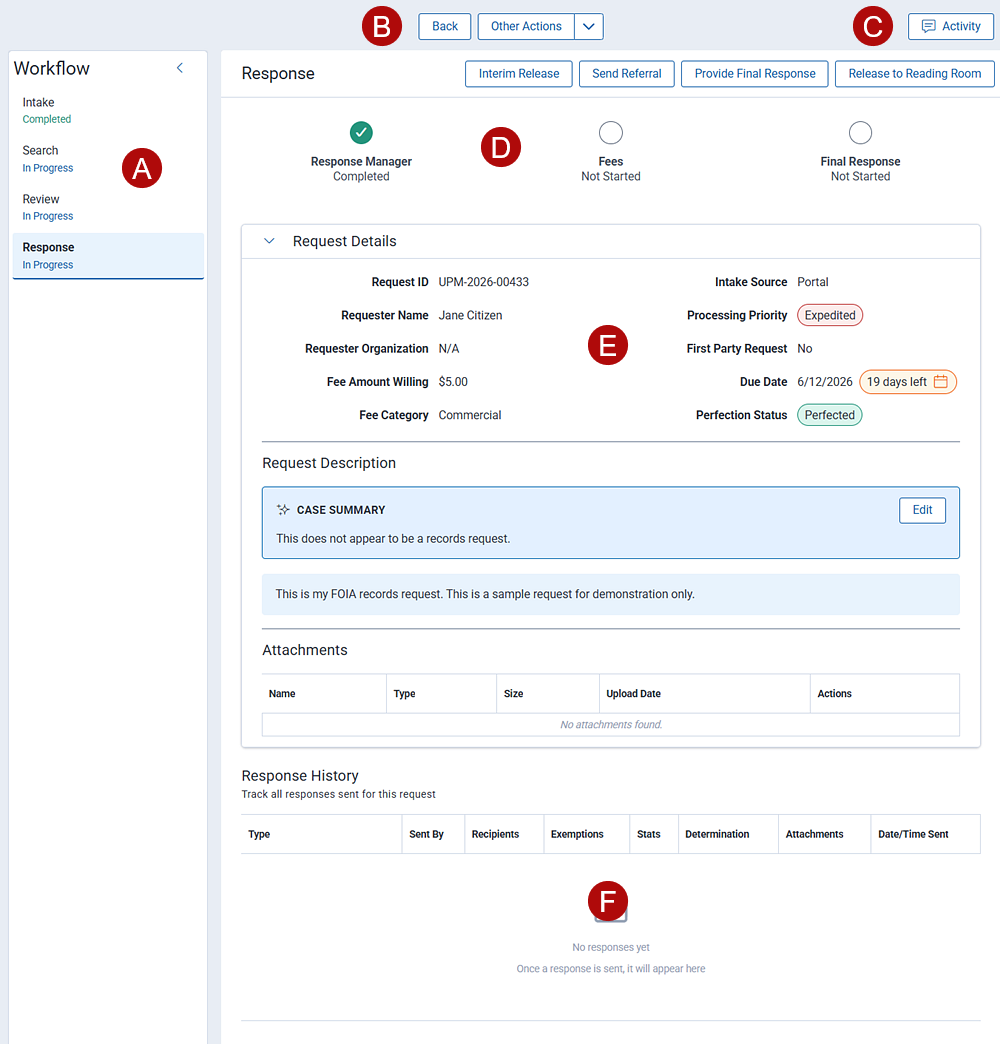
Noteworthy navigational points:
A. Workflow steps—the Relativity FOIA workflow consists of four steps: Intake, Search, Review, and Response. As you complete the tasks for a step, the workflow automatically advances you to the next. You can also click from one step to another to view details.
B. Navigation buttons—navigate to the last screen, previous record, or next record.
C. Activity—opens the Activity History panel. The panel displays a list of activities for the request.

Options include:
1. Log Communication—manually log activity for the request. For example, you might log an email you received outside of the FOIA environment that is relevant to the request. Fields include:
2. Add Notes—add comments, questions, and notes.
3. Export CSV—export the activity list in CSV format.
4. Filters—search or filter the activity list.
D. Quick Actions—quick access to:
E. Progress bar—indicates the status of workflow sub-steps. A green circle indicates the sub-step is complete for the workflow step. This may be because the request did not warrant further review, such as not requesting a fee waiver, or the agency reviewer completed all of the tasks within the sub-step. A blue circle indicates the task is partially completed.
F. Request details—the request details including requester input, attachments, and reviewer actions.
G. Custom Fields—this section displays the Request Type field, which defines the type of request and how it is processed.
Options include:
H. Request description—contains the original request description, along with an AI-generated case summary. You can edit the case summary to add your own narrative or additional notes.
I. Attachments—lists attachments provided throughout the workflow.
J. Response History—displays a list of responses and correspondence associated with the request.
As a response coordinator, you issue the final determination for the FOIA request, then release responsive records to the Reading Room.
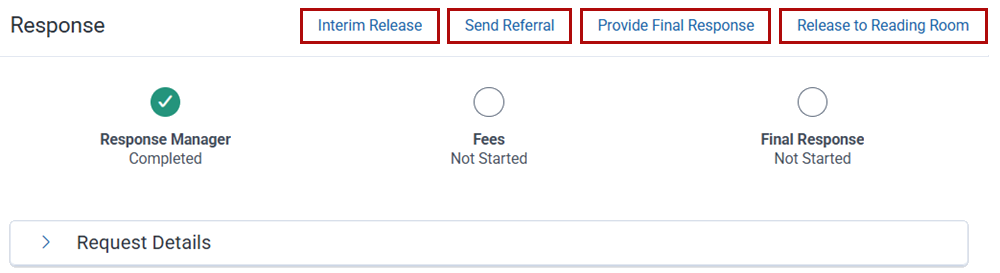
There are four sub-steps for the Response step: Interim Release, Referral, Final Response, and Release to Reading Room. Access the steps by selecting an option from the Response Task drop-down menu.
An interim release refers to the partial disclosure of records before the agency has completed its full review. For example, with large requests, documents may be released in batches as they are reviewed and cleared by the agency.
If you perform an interim release of documents through the Interim Release step, you must return to this step to finalize the FOIA request and send the final response. Use the Final Response step only when no interim release has been performed. Cases that include one or more interim releases cannot be closed through the Final Response step.
To close out a request that contains interim documents, open the Interim Release step and navigate to Step 3.
Jump to the Step 3 instructions
Click Interim Release. The Interim Release modal opens.
Step 1 of 5:
Step 2 of 5/6:
If you select one or more production sets, there will be an additional screen added to the step, changing the screen count to six. If you do not select a production set, the screen count remains at five.
Production Sets
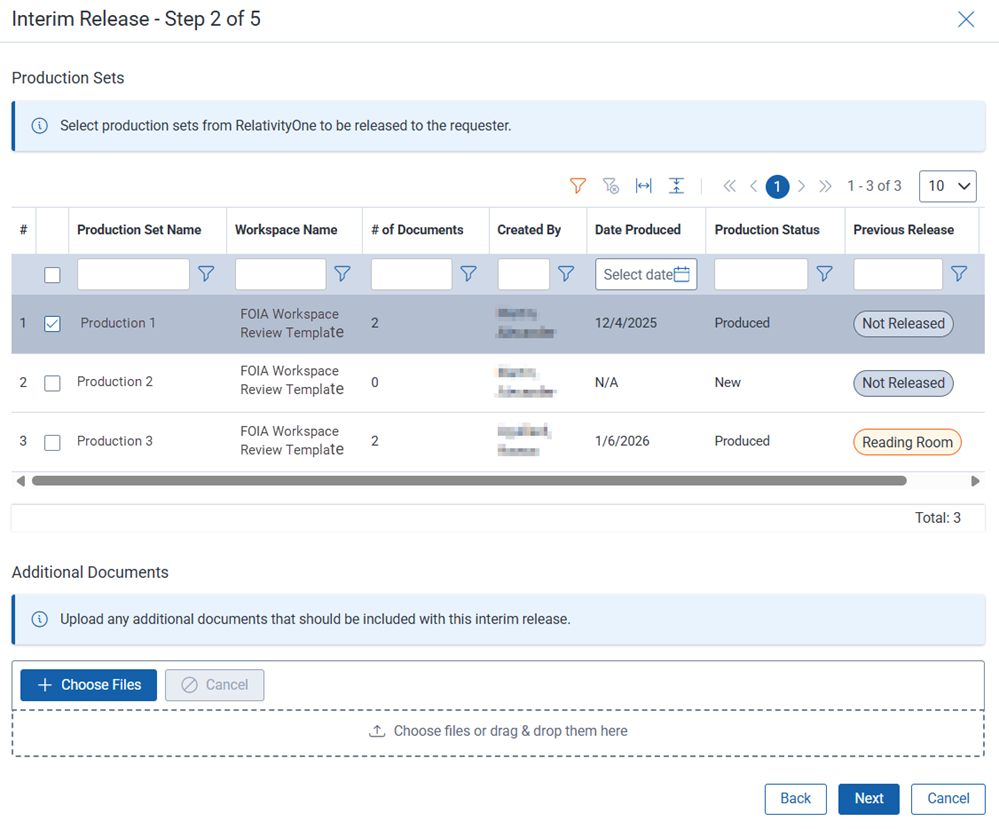
If you are closing out a request that had interim documents released, start at Step 3 in the instructions below the image.
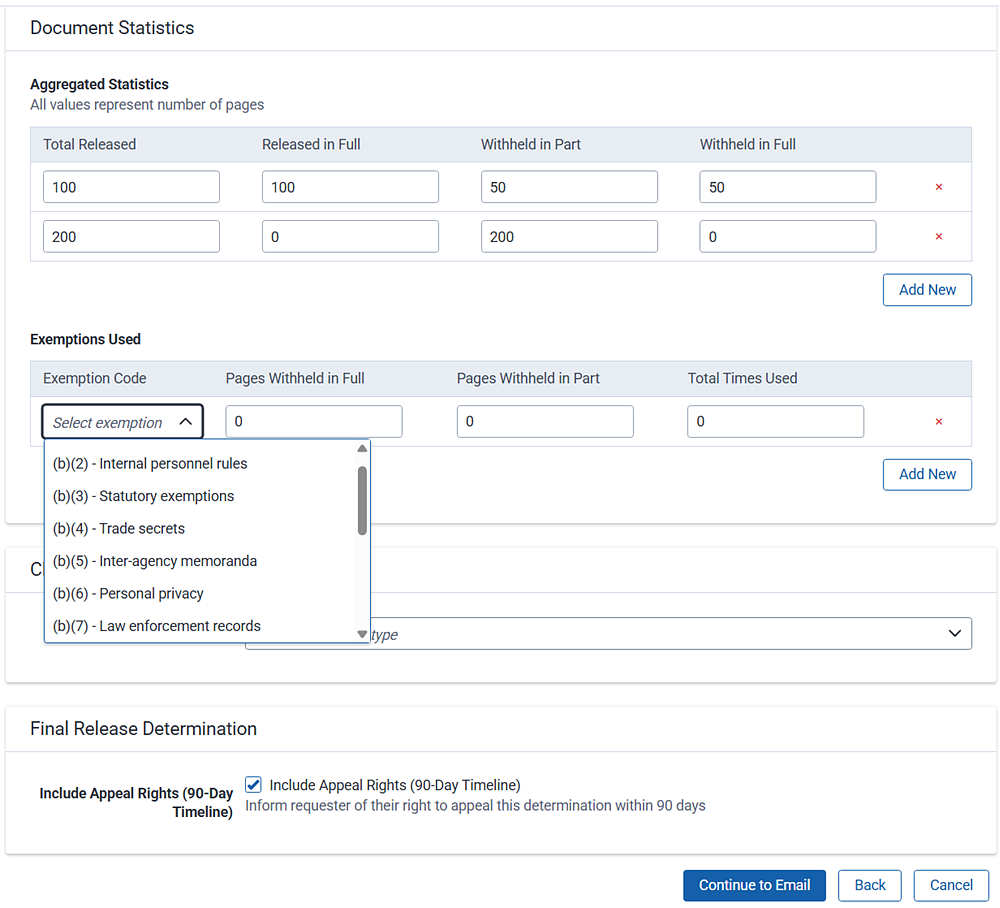
Document Statistics and Exemptions Used


Step 4 of 6:
If you selected one or more production sets, this screen is added to the step. If you did not select a product set, you will not see this screen.
Interim Release
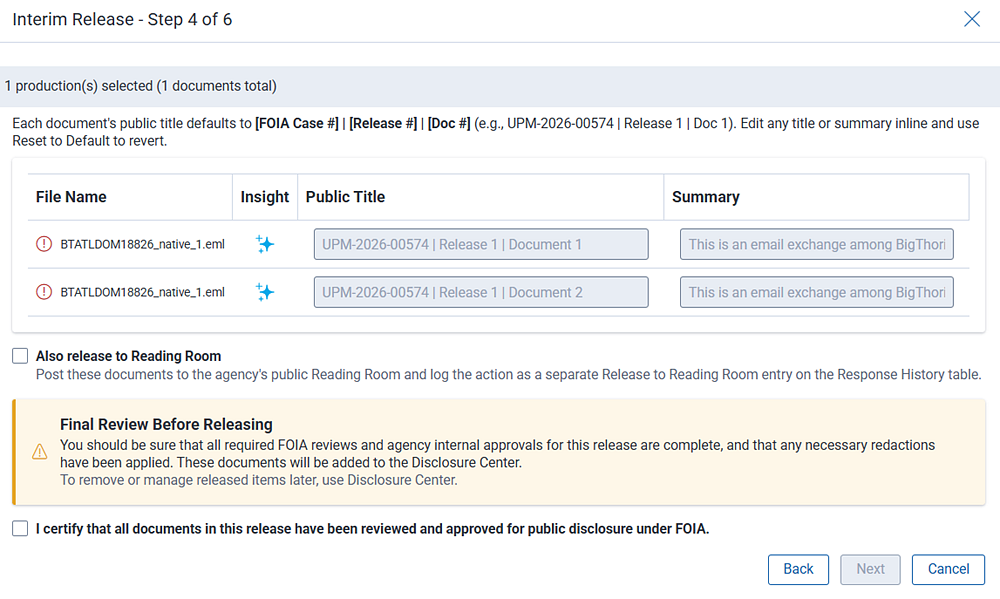

This screen shows the documents marked for release to the Disclosure Center. See FOIA Disclosure Center for information on reviewing and managing released documents.
Other options include:
I certify that all documents in this release have been reviewed and approved for public disclosure under FOIA—you must check this box to confirm you have followed all agency policies for releasing the documents. You cannot proceed without confirming the required approvals, redactions, and so forth have been met.
Click Next.
Step 4 of 5, or 5 of 6:
Interim Release email
In this step, you construct the interim release email that you will send to the requester. Use the template as a base. The template contains prompts that you can use to customize your email, along with merged fields that pull data directly from the request. You can use the template as is or edit it to suit your specific needs.
You can edit templates to customize them for your agency. See Letter Template Management for details.
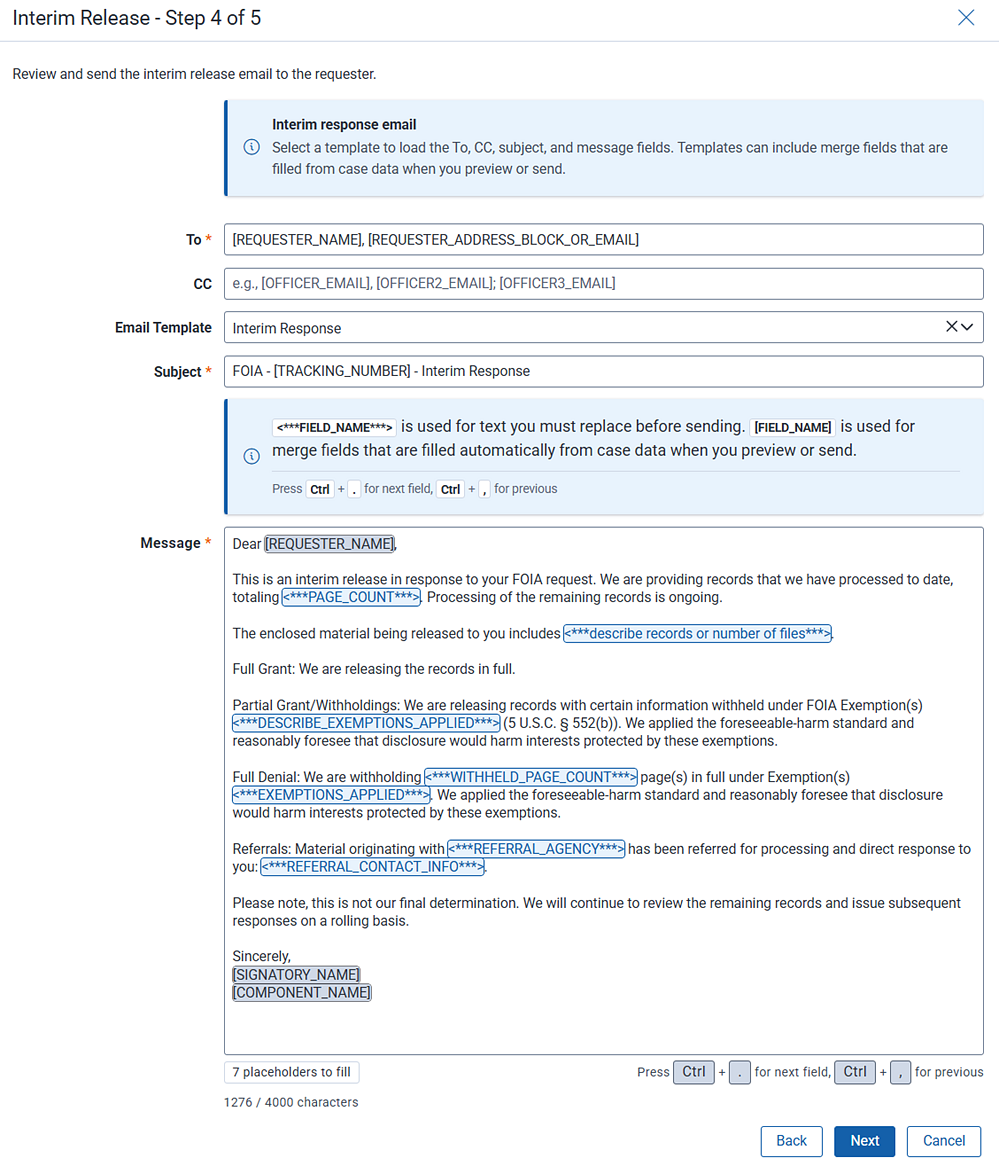
Steps:

Step 5 of 5, or 6 of 6:
Send Interim Release
Review your email and if satisfied, click Send Interim Response. Use the Back button to return to the template if you need to make any changes. Note that you cannot recall the email after it's sent.
In some instances, you may want another agency to process the documents and issue the final response. The Referral Request template is designed to streamline this process by providing a template with prompts and merged fields that correspond to the request. You can link to additional resources, add attachments, and customize the message body to suit your needs. This template helps ensure convenience and consistency throughout your communications.
The template contains prompts that you can use to customize your email, along with merged fields that pull data directly from the existing record. You can use the template as is or edit it to suit your specific need.
You can edit templates to customize them for your agency. See Letter Template Management for details.
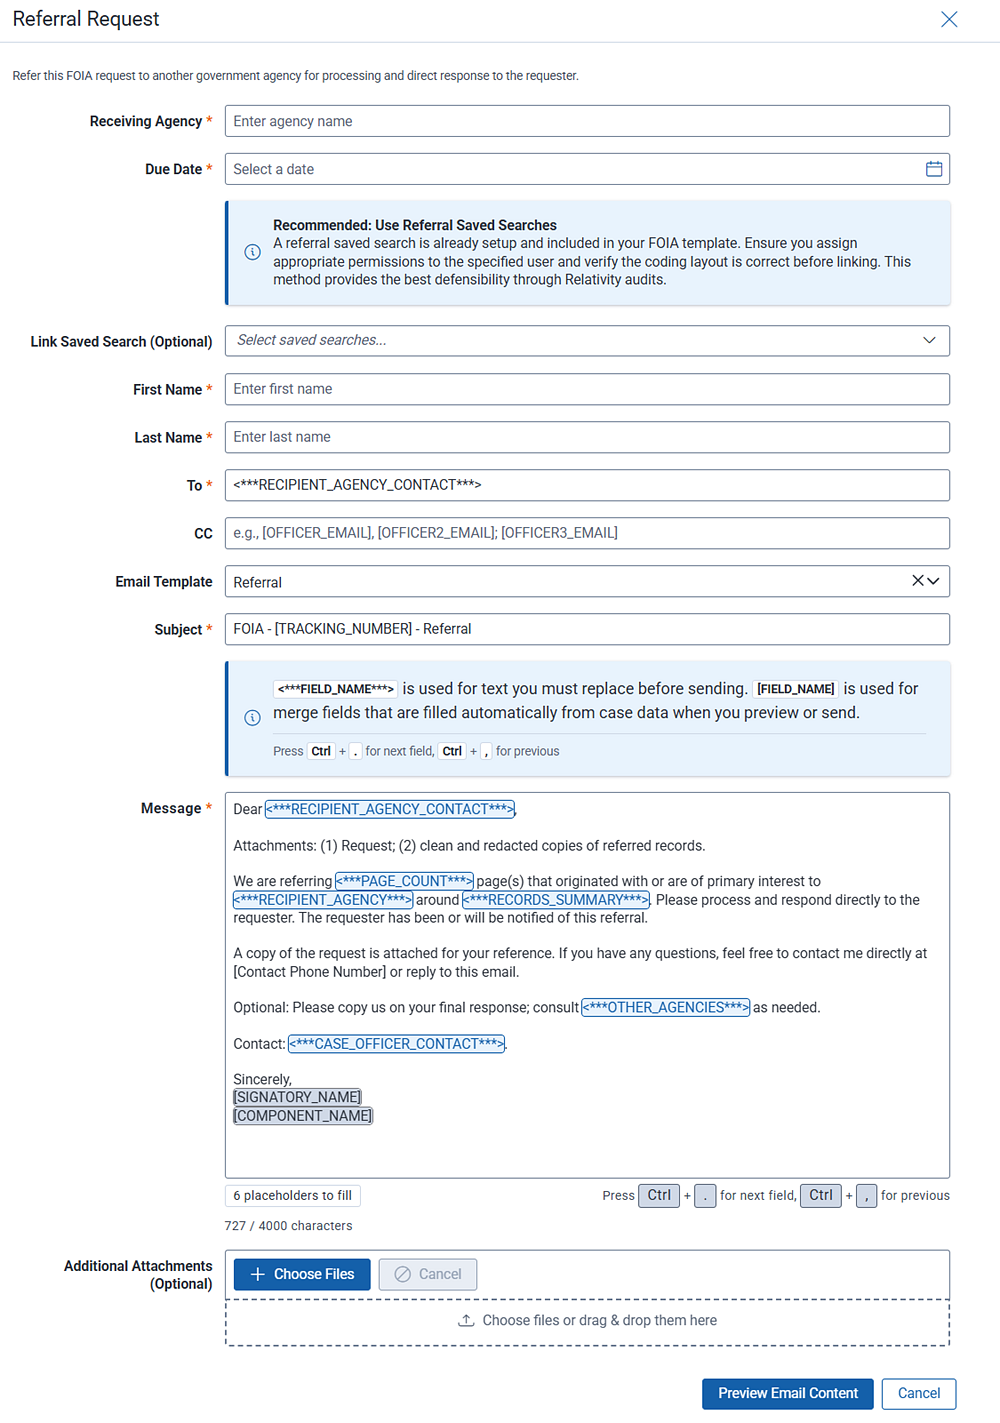
Click Send Referral to get started. The Referral Request template opens.
Steps:
Use the final response modal to review workflow steps and ensure each has been completed for closing the case.
If you performed an interim release of documents using the Interim Release step, you must return to that modal to finalize the FOIA request and send the final response. Use the Final Response step only when no interim releases have been performed. Cases that include one or more interim releases cannot be closed through the Final Response step.
To close out a request that contains interim documents, open the Interim Release step and navigate to Step 3 in the instructions.
Jump to the Step 3 instructions for the Interim Release step
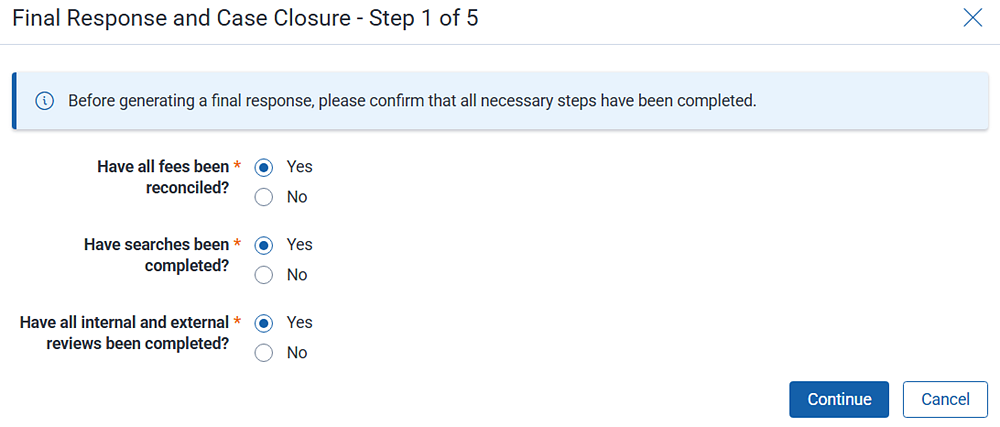
Steps 1 of 6:
Review the key points to confirm you are ready to provide your final response.
Closure Disposition
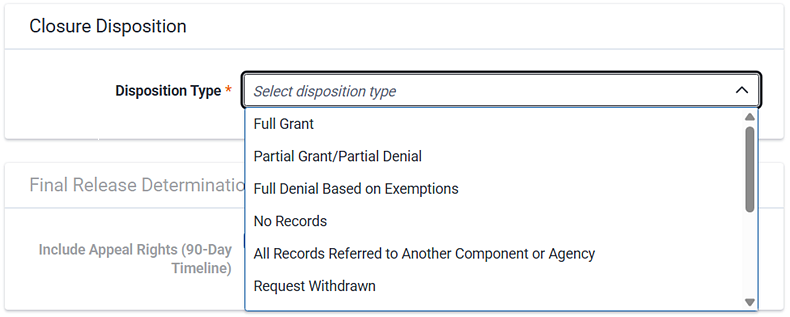
Disposition Type—select the disposition type that describes the documents being released for this request.
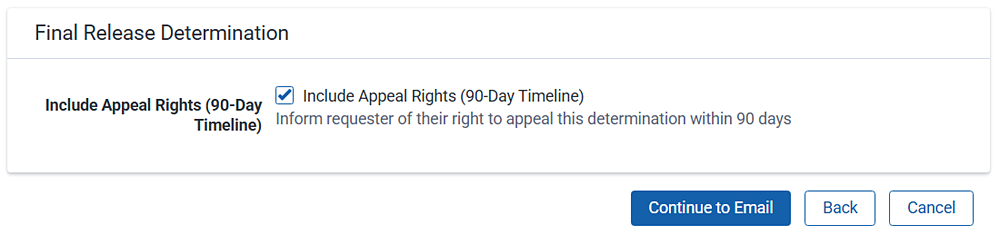
Final Release Determination
Step 2 of 5:
Production sets
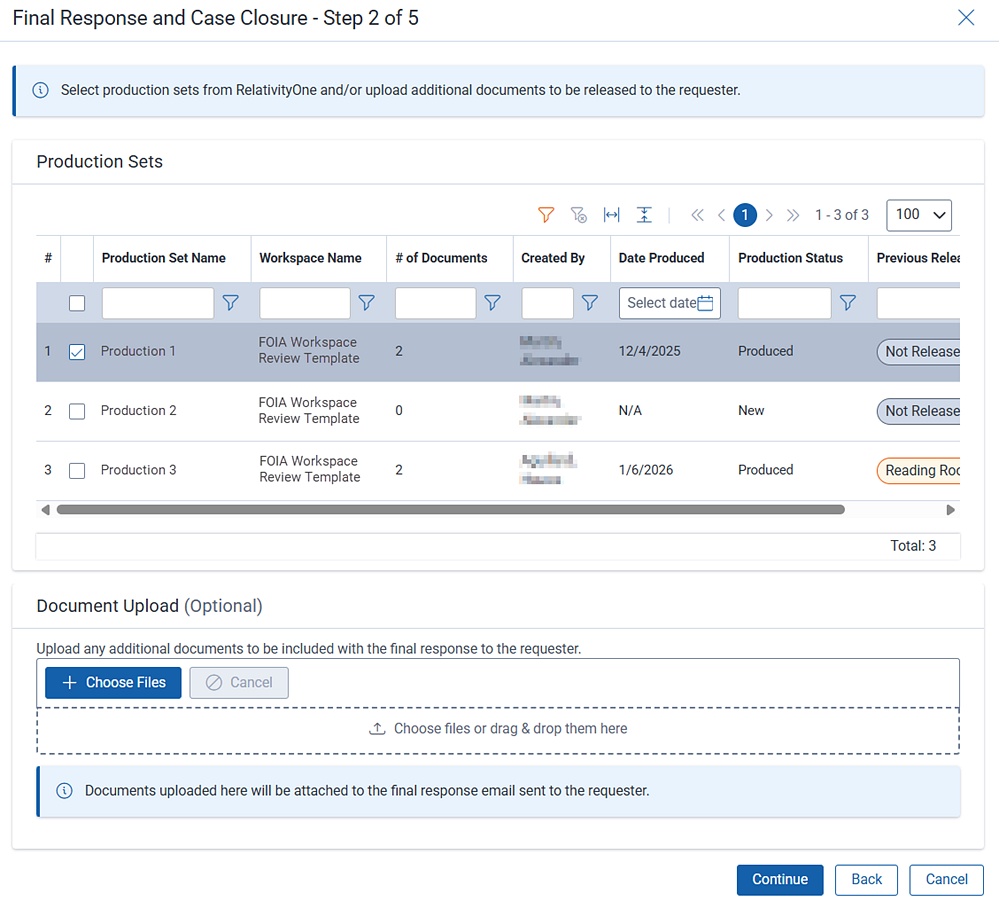
Step 3 of 6:
Document Statistics
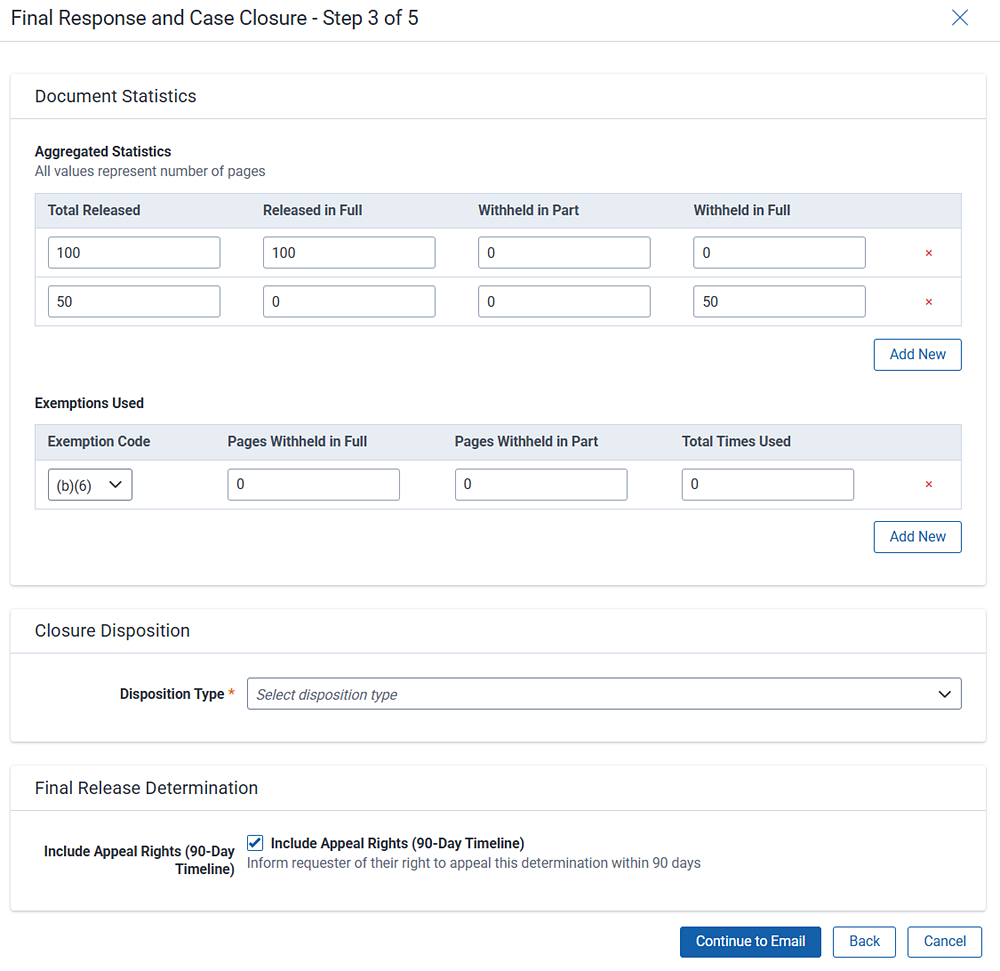
Step 4 of 6:
Document review
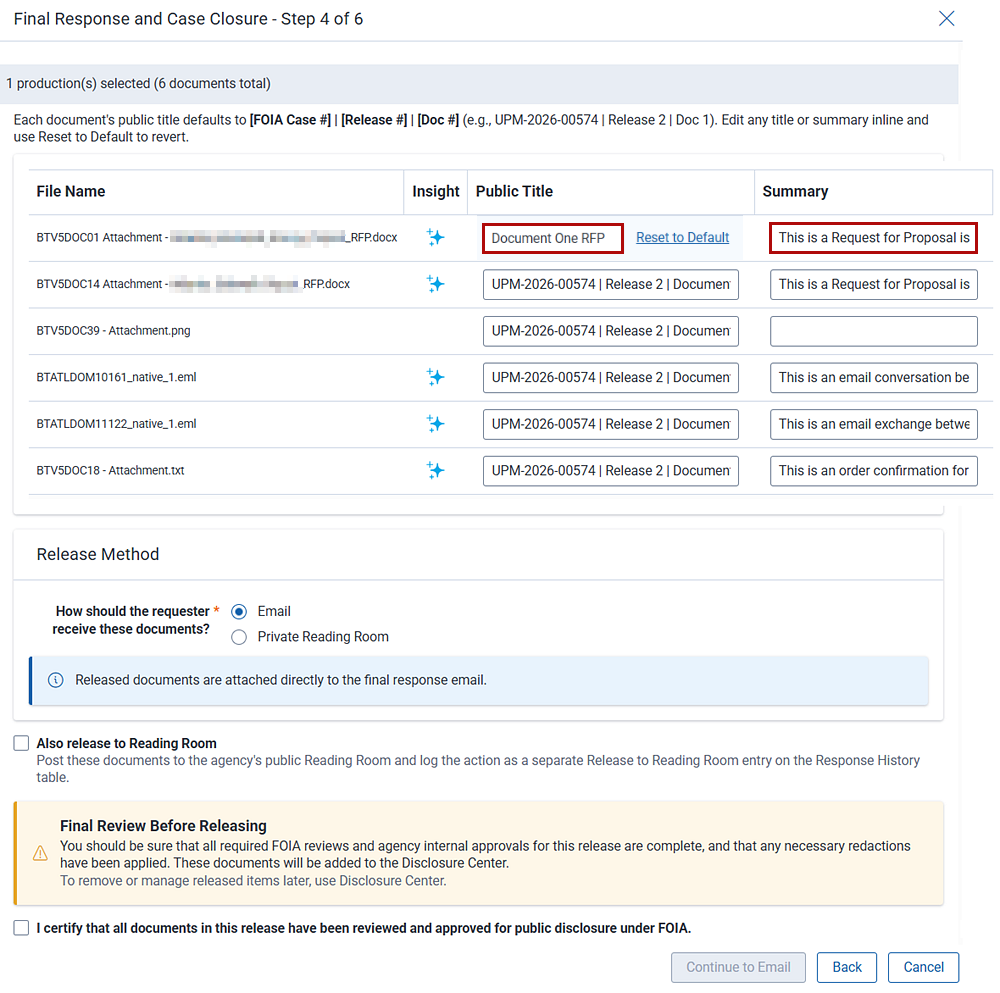

Before releasing documents, you can give them friendly titles and summaries to make them easier to navigate. You can also specify how you are going to release the documents. For example, to the Reading Room or through email.
Release Method
Public Reading Room
Also release to Reading Room—select this option to post the documents to the agency's public Reading Room, in addition to email or private reading room methods.
Final Review
Step 5 of 6:
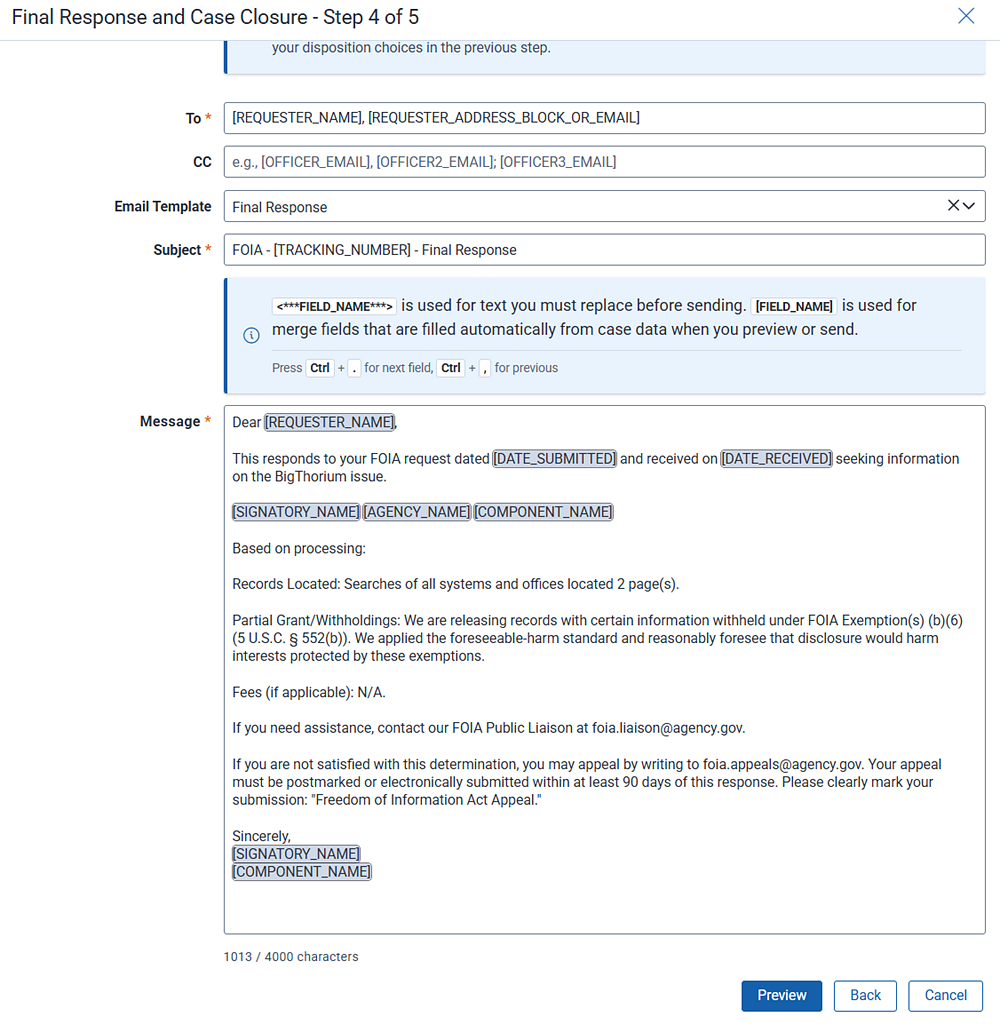
Final Response Email
In this step, you construct your final response email that you will send to the requester. Use the template as a base.
The template contains prompts that you can use to customize your email, along with merged fields that pull data directly from the existing record. You can use the template as is or edit it to suit your specific needs.
You can edit templates to customize them for your agency. See Letter Template Management for details.
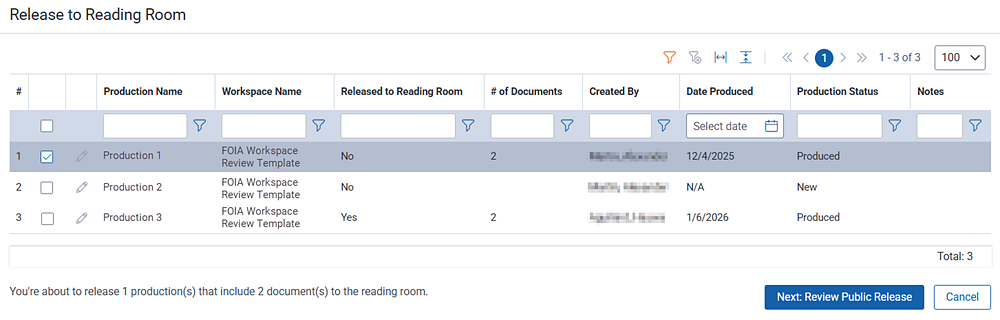
The final task for fully closing a FOIA request is to release the documents to the Reading Room.
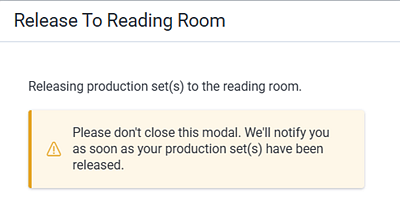
Click Release to Reading Room. The Release to Reading Room screen opens.
Production sets and documents
Steps:
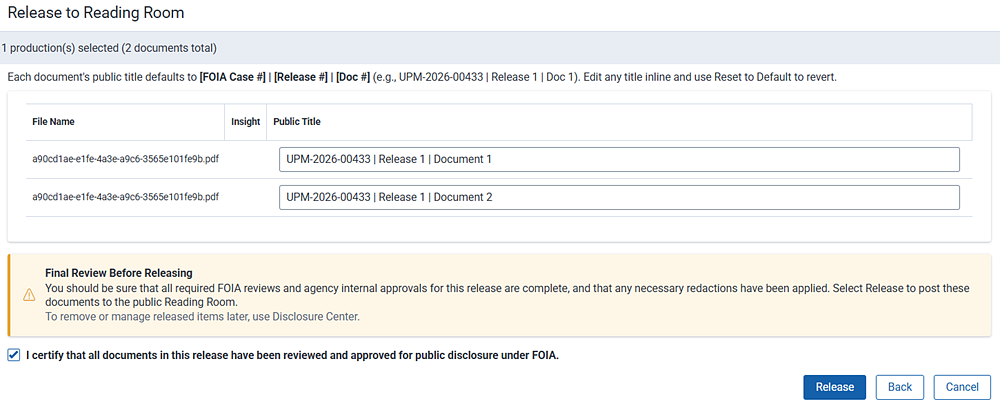
Final Confirmation
Steps:
You have completed the FOIA workflow for this request. Return to the Relativity FOIA home page.
