


Feedback
Last date modified: 2026-Jun-15
Microsoft 365 - Inactive mailboxes data source
This topic provides details on how to capture Microsoft 365 Inactive mailboxes with Collect.
Outlook mailboxes become inactive mailboxes when an account is deleted while under a preservation hold. When deleted, Microsoft does not throw the mailbox away. Microsoft keeps it in inactive state until the related preservation or retention hold is over.
After all retention policies or holds are removed in Microsoft, the inactive mailbox changes to a soft‑deleted mailbox. The 30‑day deletion period starts only after the mailbox reaches the soft‑deleted state.
This documentation contains references to third-party software, or technologies. While efforts are made to keep third-party references updated, the images, documentation, or guidance in this topic may not accurately represent the current behavior or user interfaces of the third-party software. For more considerations regarding third-party software, such as copyright and ownership, see Terms of Use.
Considerations
Note the following considerations about Microsoft 365 Inactive mailboxes data sources:
- The inactive mailbox connector uses Microsoft's Purview API.
- Purview Cases will be created in your Microsoft Purview instance to facilitate the search and export of inactive mailboxes.
- Relativity collects all available files including preserved files. You do not need to take extra steps to collect preserved files as they are automatically included in the collection. .
- Inactive mailbox export requires an account with the eDiscovery Manager role and an Azure AD app registration that has the required delegated permissions.
- Microsoft APIs do not support verifying that an inactive mailbox exists prior to collection. You will see failed collections in cases where the mailbox no longer exists.
- Relativity collects inactive mailboxes as .pst files.
Collection size
Microsoft 365 collections can be large. When collection jobs become too large, performance decreases.
| Large collections | Best practices |
|---|---|
| 200 GB per search | Reduce search size |
| Multi‑TB exports | Limit the number of custodians per job. Collect max 30 custodians per job. |
| Long date ranges with many mailboxes | Using smaller date ranges. |
Task checklist
The table lists the order to perform the necessary tasks for setting up the data source for Collect.
Separate Microsoft data sources inside Collect can use the same Microsoft Azure app registration.
This means you only need to create one Microsoft Graph application and provide one Client ID and one Client Secret. You can then enter that same set of credentials for Microsoft data sources within Collect.
| Order | Application | Task |
|---|---|---|
| 1 | Azure | Registering the Collect application |
| 2 | Azure | Obtaining a client secret |
| 3 | Azure | Setting API permissions |
| 4 | Azure | Adding a redirect URI |
| 5 | Collect | Creating the data source in Collect |
| 6 | Collect | Configuring the data source in Collect |
Accessing Microsoft 365 tenants
Register the Collect application to access Microsoft 365.
When registering the application, the Microsoft 365 administrator creates a Microsoft Application ID and secret. Relativity uses this ID and secret to configure data sources in Collect and provides access to the Microsoft 365 tenants.
You can register the application through Azure Portal or by registering the delegated permissions through the Microsoft App Registration Portal. After registering the application, request administrator consent. From there, it is possible to revoke application access.
Use this information to create a Microsoft integration point. For more information, see Importing data through Integration Points.
Depending on your RelativityOne license, commercial or government, and your Microsoft tenant, Microsoft 365 or Microsoft 365 Government, you will be able to collect from either Microsoft 365 or both Microsoft 365 and Microsoft 365 Government data sources. Commercial users can only collect from Microsoft 365 tenants. Government users can collect from Microsoft 365 and Government 365 tenants. These data sources act the same, but have different icons within Collect.
Registering the Collect application
Start with registering your application in the Azure portal by following the steps below.
The listed permissions and roles are required and supported by Relativity.
- Relativity does not support substitutions or reduced permissions.
- You can submit requests for alternative or reduced permissions as product feedback.
These steps must be completed by a Microsoft 365 administrator.
- Open your Azure Portal.
- Click Microsoft Entra ID (formerly known as Azure Active Directory).
- Click App registrations.
- Click New Registration to display the Register an application page.
- Enter an application name in the Name field.
- Accept the default setting, Accounts in this organizational directory only, as the supported account type.
- Click Register.
- Once the application is registered, make note of the Application (client) ID and Directory (tenant) ID for use later when configuring the data source in RelativityOne Collect.
Obtaining a client secret
Next, obtain the client secret for the registered application in the Azure portal. For more information, see relevant Microsoft documentation on the Microsoft site.
These steps must be completed by a Microsoft 365 administrator.
- From the registered application's page, click the Certificates & secrets option in the left navigation bar.
- Click the Client secrets tab.
- Click New client secret.
- Enter a description for the client secret in the Description text box.
- Select 730 days (24 months) from the Expires list. The client secret will expire after this time frame.
- Once the client secret expires, you must create a new client secret in the Azure portal as described in these steps.
- Then you must update your Microsoft 365 Collect data sources with it. For more information, see Expired Azure client secrets.
- For any additional assistance with client secrets, please contact the Azure Admin in your organization.
- Click Add to create a new secret.
- Copy the Secret Value to the clipboard by clicking the copy icon and paste it to a safe location. You will use the Secret Value later when creating the data source in Collect.
Microsoft will only show this secret this one time, and there is no way to recover a secret.
- Give your Relativity Admin the Application ID and the Client Secret for setup of Collect. This application secret is also needed for setting up a Microsoft Entra ID integration point.
Expired Azure client secrets
If your Azure client secret expires, follow these steps:
- Get a new secret as outlined in the steps above.
- Go to Collect Admin in RelativityOne.
- Select the desired data source that has expired, and click Edit.
- Input the new client secret value in the Application Secret field.
- Click Save.
You must repeat these steps for all Microsoft data sources that you have set up.
Setting API permissions
Each data source has its own set of permissions necessary to allow access to the tenants. To add the correct permissions based on your selected Microsoft 365 data source, follow the steps below.
These steps must be completed by a Microsoft 365 administrator.
- From the registered application's page, click the Manage > API permissions option in the left navigation bar. The User.Read permission is automatically added by default.
- Click Add a permission.
- Click Graph API.
- Select Delegated Permissions.
- Select the eDiscovery.ReadWrite.All permission from the Permission list.
- Click Add permissions.
- Click Grant Permission.
The window will show all permissions granted.- Make a note of the application ID that Microsoft assigned to the app registration.
- This ID is also required for setup of data sources in Collect.
- Click Add a permission.
- Select APIs my organization uses.
- Search for MicrosoftPurviewEDiscovery.
- If MicrosoftPurviewEDiscovery does not appear in the APIs my organization uses list, you must first register the app in Microsoft Entra ID.
- For more information, see Microsoft's Register the MicrosoftPurviewEDiscovery app in Microsoft Entra ID documentation.
- Select Application Permissions.
- Select the eDiscovery.Download.Read permission from the Permission list.
- Click Add permissions.
- Click Grant Permission.
The window will show all permissions granted.- Make a note of the application ID that Microsoft assigned to the app registration.
- This ID is also required for setup of data sources in Collect.
- Verify that all permissions have been granted.
- Click Add permissions.
- Click Grant Permission.
- Click Accept to grant the permissions.
All API permissions have been granted and you can start creating the data source in RelativityOne.
Adding a redirect URI
After setting up API permissions, you must add a Redirect URI to the Azure Application Registration. Add the Redirect URI with the following steps:
- In the left-side menu console, click Authentication. It may appear as Authentication (Preview).
- Click Add Redirect URI.
- Click Web.
- Enter your Redirect URI.
- Your Redirect URI is your RelativityOne tenant domain URL plus /collect-services/api/v1/Authentication/ms-auth-response.
- For example, https://acme.corp.relativity.one/collect-services/api/v1/Authentication/ms-auth-response
Finding Azure credentials
If an application is already created and you need to find the application information to complete the Source Connection step, follow the steps below in the Azure Portal. For more information, see relevant Microsoft documentation on the Microsoft site.
- Open your Azure Portal.
- Click Microsoft Entra ID (formerly known as Azure Active Directory).
- Navigate to Enterprise applications.
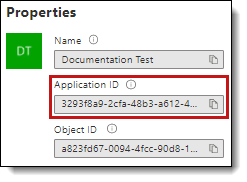
- In the list of applications, locate and click on your application.The application page displays.
- Navigate to Properties.
- Click the copy icon next to the Application ID. The ID is copied to your clipboard to use as needed.
Limiting application registration access to accounts
Limit the access of Collect to specific Microsoft user accounts and mailboxes by using New-ServicePrincipal -AppId <Client Application ID in AAD> -ObjectId <Service principal object ID in AAD> -DisplayName <name>. For more information, see Microsoft documentation.
Revoking application access
Revoke the application from the Azure portal or by using a PowerShell script. For more information, see Microsoft's documentation.
Revoking access via Azure Portal
To revoke access from the Azure portal:
- Open your Azure Portal.
- Navigate to Enterprise Application.
- Under All applications, search for your application and click its link.
- Under Manage > Properties, click Delete.
Collect no longer has access.
Revoking access via Powershell
Revoke access in Powershell using the Remove-MsolServicePrincipal script. See the Powershell example below of retrieving and deleting an application registration.
Get-MsolServicePrincipal -AppPrincipalId 19ab8a2e-ccce-4fa8-a9ee-eb16e220d602
ExtensionData : System.Runtime.Serialization.ExtensionDataObject
AccountEnabled : True
Addresses : {}
AppPrincipalId : 19ab8a2e-ccce-4fa8-a9ee-eb16e220d602
DisplayName : Relativity-Development-Application
ObjectId : 51798fb3-e72c-4373-8c63-6e7d0dd63ad7
ServicePrincipalNames : {19ab8a2e-ccce-4fa8-a9ee-eb16e220d602}
TrustedForDelegation : False
Remove-MsolServicePrincipal -AppPrincipalId 19ab8a2e-ccce-4fa8-a9ee-eb16e220d602
Creating the data source in Collect
The Collection Admin tab is where you create, edit, and remove data sources from your workspace. You need to setup each data source once. You must create your data sources prior to setting up your custodian targets.
In RelativityOne, navigate to Collect.
- Click the New Collection Source Instance button.
- Enter in a unique name for the data source.
- Select a Microsoft 365 Inactive Mailbox data source.
Collect automatically collects any data that is preserved due to an in-place hold or litigation hold. Data on a hold is stored in a preservation library and separate folders. For more information, see Microsoft Retention Policies.
- Enter the required information in Settings. For more information, see Settings fields
- Click Save.
After clicking Save, Relativity verifies the parameters and connectivity to the Microsoft 365 data source.
If successful, Relativity saves the data source. If the connection fails, a message appears indicating that the connection failed. If verification fails, verify that the values are correct. The data source will save when it is corrected and is verified.
Once the set up is complete, the data source information on the Collect Admin page.
Settings fields
To connect Relativity to a Microsoft Outlook data source, you need to gather and enter the information for the following fields:
- Tenant ID—enter the Tenant ID or Primary domain of the Microsoft 365 tenant the collection is intended for. The domain name usually ends with .onmicrosoft.com. To locate the tenant ID or primary domain name, see Microsoft documentation.
- Application Id—enter the Application ID created during registering the Collect application in Microsoft 365.
- Application secret—enter the Application secret created during registering the Collect application in Microsoft 365. For more information, see Accessing Microsoft 365 tenants.
- Refresh token—after entering in the three pieces of information, click Generate Refresh Token.
- An authentication window appears.
- In the authentication window, you must get a refresh token from a Microsoft account with the Microsoft eDiscovery Manager role assigned.
Data source details
Each data source details page includes an Action console. Each data source has different actions.
On the Microsoft Teams data source page, click Validate Connection in the Actions console to validate the client ID, certificate, and other credentials with Microsoft 365.
Configuring the data source in Collect
In RelativityOne, configure the data sources chosen in the Collection Details step.
Data source criteria
Add criteria to collect specific data. To configure the data sources, complete the following fields:
- Select and unselected tabs—choose the data sources to collect from by moving unselected data sources to the selected list.
- Field—choose the field to filter on within the data source.You must add start and end dates when you are configuring the Outlook Calendar data source to complete the Data Sources step.
- Operator—choose an operator, such as equals, contains, greater than, or less than.
- Value—enter a value to find in the selected field.
After selecting field options, you must click Add Criteria.
Details to know about criteria:
- Each criteria is then separated by an AND operator.
- Leave the data source criteria empty to collect all data from the sources.
Criteria
Filter a data source's data that you want to collect by adding criteria. This section covers the different criteria for each data source. It also includes what can be searched within each data source. The criteria options change based on the Microsoft 365 Outlook data source.
Inactive mailbox criteria
The following table lists the filter criteria supported for mailbox collections.
You must register Relativity in Microsoft 365 before using this data source. For information on registering Relativity in Microsoft 365, see Accessing Microsoft 365 tenants.
The following table lists the filter criteria supported for mailbox collections.
| Criteria | Operators | Description | Example |
|---|---|---|---|
| Email Received Date | Does Not Equal, Equals, Greater Than, Greater Than or Equals, Less Than, Less Than or Equals | When you use the Email Received Date property in a query, the search returns all messages that equal or does not equal, greater or less than the date entered. | If you search “Less Than 1/1/2020,” your results include all emails received before January 1, 2020. |
| Email Sent Date | Does Not Equal, Equals, Greater Than, Greater Than or Equals, Less Than, Less Than or Equals |
When you use the Email Sent Date property in a query, the search returns all messages that equal or does not equal, greater or less than the date entered. |
If you search “Greater Than 1/1/2001,” your results include all emails sent after January 1, 2001. |