


Feedback
Last date modified: 2026-Jun-16
Before you collect from a Google data source, Workspace or Gemini, you must complete the following tasks:
|
Instance |
Process | Procedure |
|---|---|---|
| Google Workspace | Google Workspace account setup | |
| Google Workspace user account setup | ||
| Restricting collections to the selected user accounts | ||
| RelativityOne | Google Workspace data source | |
| Google Gemini data source |
The procedure is the same for any Google Workspace data source and Google Gemini.
Google Workspace account setup
Connecting your Google Workspace to Collect takes some setup in Google and Relativity. Begin with the credential setup in Google.
Create a Google Cloud project
Create a Google Cloud project to create, enable, and use all Google Cloud services. You will use this account to manage APIs.
To create a Google Cloud project:
- Open the Cloud Resource Manager page
- Click Create Project.
- Enter information into the fields:
- Project name—enter a memorable name for your project.
- Organization—enter the name of your organization.
- Location—enter the parent organization or folder.
- Click Create.
Enable required APIs for the project
Continuing in this process, you now need to enable the required Google Cloud Console APIs and associate them to a new project.
To start enabling APIs in the Google Cloud Console:
- In the Google Cloud Console, select the newly created project.
- Enter Google Vault API in the search bar and search.
- Click the Google Vault API option.
- Click Enable.
You will then see the Google Vault API/Service Details page. - Enter Admin SDK API in the search bar and search.
- Click the Admin SDK API option.
- Click Enable.
You will then see the Admin SDK API/Service Details page. - Enter Cloud Storage API in the search bar and search.
- Click the Cloud Storage API option.Be sure to choose Cloud Storage API. Cloud Storage API is different than Cloud Storage.
- Click Enable if the API is not already enabled by default.
Set up OAuth2 consent screen
Follow the steps to create a OAuth2 consent screen in Google Cloud Console.
- In the Google Cloud Console and select newly created project.
- Select APIs & Services>OAuth consent screen.
- Click Get started.
- Enter the App information.
- App name—enter a name for the Collect app you're using. For example, Relativity Collect.
- User support email—select the email address for users to contact you with questions about their consent.
- Click Next.
- Select Internal audience type and click Next.
- Enter an email address in the Contact Information field.
Google uses this email address to notify you about any changes to your project. - Click Next.
- Complete the Finish step by selecting the check box and click Continue.
- Click Create.
Your Oauth configuration has been created.
Add scopes
Next, you must add scopes.
- In the Google Cloud Console, navigate to Data Access.
- Click Add or remove scopes.
- Enter filter and select required scopes one at a time, or enter them in a text box.
The scopes are:- https://www.googleapis.com/auth/ediscovery
Google Vault API | .../auth/ediscovery | Manage your eDiscovery data - https://www.googleapis.com/auth/devstorage.read_only
BigQuery API | .../auth/devstorage.read_only | View your data in Google Cloud Storage - https://www.googleapis.com/auth/admin.directory.user.readonly
Admin SDK API | .../auth/admin.directory.user.readonly | See info about users on your domain - https://www.googleapis.com/auth/admin.directory.group.readonly
Admin SDK API | .../auth/admin.directory.group.readonly | View groups on your domain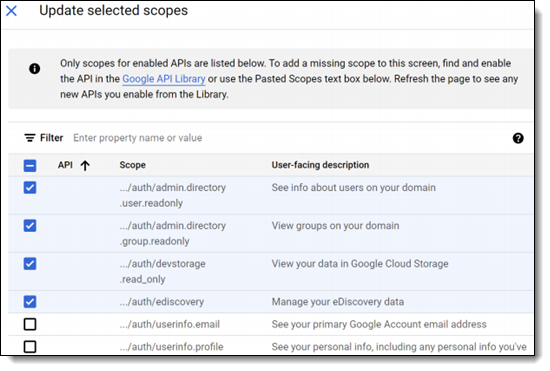
- https://www.googleapis.com/auth/ediscovery
- Click Update.
- Click Save.
Your data access changes are then saved.
Create credentials
Next, create credentials.
- In the Google Cloud Console, navigate to APIs & Services > Credentials.
- Click Create Credentials.
- Click OAuth Client ID credentials.
- Enter the following information in the fields:
- Application type—select Web application.
- Name—enter a name for the credentials.
- Authorized redirect URIs—enter the URI (Uniform Resource Identifier) based on the RelativityOne Data Center Geo you intend to run collections from.
When copying and pasting the URI, please ensure there are no whitespaces or typos in the address, as they will cause a connection failure with Google. RelativityOne Data Center Geo URIs
- Asia (East)—https://services.esas.relativity.one/collect-oauth-authorization/index.html
- Asia (Southeast)—https://services.seas.relativity.one/collect-oauth-authorization/index.html
- Australia—https://services.auea.relativity.one/collect-oauth-authorization/index.html
- Brazil (South)—https://services.brso.relativity.one/collect-oauth-authorization/index.html
- Canada (Central)—https://services.cact.relativity.one/collect-oauth-authorization/index.html
- Europe (North)—https://services.noeu.relativity.one/collect-oauth-authorization/index.html
- Europe (West)—https://services.wseu.relativity.one/collect-oauth-authorization/index.html
- Germany (West Central)—https://services.dect.relativity.one/collect-oauth-authorization/index.html
- India (Central)—https://services.inct.relativity.one/collect-oauth-authorization/index.html
- Japan—https://services.jpes.relativity.one/collect-oauth-authorization/index.html
- Korea (Central)—https://services.krct.relativity.one/collect-oauth-authorization/index.html
- Switzerland—https://services.chno.relativity.one/collect-oauth-authorization/index.html
- United Arab Emirates—https://services.aeno.relativity.one/collect-oauth-authorization/index.html
- United Kingdom (South)—https://services.ukso.relativity.one/collect-oauth-authorization/index.html
- United States (Central)—https://services.ctus.relativity.one/collect-oauth-authorization/index.html
- United States (East)—the United States (East) geo has six URIs associated to the pod to which your RelativityOne tenant is assigned. Contact Relativity Support to confirm which URI to use.
- RelativityOne pod esus025000—
- https://services.esus.relativity.one/collect-oauth-authorization/index.html
- RelativityOne pod esus025064—
- https://services-02.esus.relativity.one/collect-oauth-authorization/index.html
- RelativityOne pod esus025128—
- https://services-03.esus.relativity.one/collect-oauth-authorization/index.html
- RelativityOne pod esus025192—
- https://services-04.esus.relativity.one/collect-oauth-authorization/index.html
- RelativityOne pod esus008064—
- https://services-05.esus.relativity.one/collect-oauth-authorization/index.html
- RelativityOne pod esus022064—
- https://services-06.esus.relativity.one/collect-oauth-authorization/index.html
- United States (Government)—
- https://services.vaus.relativityone.us/collect-oauth-authorization/index.html
- RelativityOne pod esus025000—
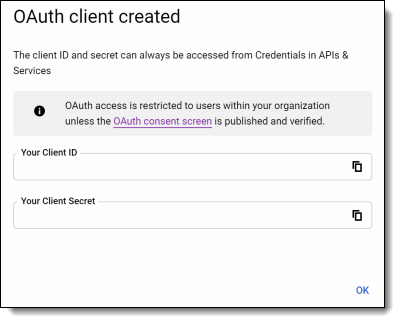
- Click Create.
After clicking Create, you will have your Client ID and Client Secret. Copy both of them, because you will need them later when creating the Google data source in Collect.
Set reauthentication policy
In this required step, you must configure Google's reauthentication policy as follows:
- Open the Google Cloud Console.
- Select the newly created project.
- Click on the Navigation menu.
- Select Security > Access and data control > Google Cloud session control.
- On the Google Cloud session control, select a reauthentication policy.
- Never require reauthentication
- Require reauthentication. If you select Require authentication, you must also select Exempt Trust apps.
- Click Save.
For more information on setting reauthentication policy and the options, see Google's documentation.
Google Workspace user account setup
Collections require user account on which behalf Relativity exports data. This can be a dedicated or an existing user account.
Create admin role for Vault API
To create the admin role for the Vault API:
- Open the
- Click Account>Admin roles to open the up the page.
- Click Create New Role.
- Enter the role name. We recommend Relativity Collect.
- Click Continue to select privileges.
- Select the following privileges:
- Services - Google Vault > Manage Matters
- Services - Google Vault > Manage Searches
- Services - Google Vault > Manage Exports
- Click Continue.
- Click Create Role.
Create admin role for the user accounts listing
To create the admin role for the users accounts listing:
- Open the
- Click Account>Admin roles to open the up the page.
- Click Create New Role.
- Enter the role name.
We recommend Users Reader for Collect. - Click Continue.
- Select the Admin API privileges - Users > Read privilege.
- Click Continue.
- Click Create Role.
Create admin role for the groups listing
To create the admin role for groups listing:
- Open the
- Click Account>Admin roles to open the up the page.
- Click Create New Role.
- Enter the role name.
We recommend Groups Reader for Collect. - Click Continue.
- Select the Admin API privileges - Groups > Read privilege.
- Click Continue.
- Click Create Role.
Enable required privileges
To enable required privileges:
- Open the
- Navigate to Directory > Users to open the list of users.
- Select or create the user you want to use.
- Click the Admin roles and privileges pane.
- In the Roles section, click the edit pencil icon, or anywhere in the Roles tables.
- Assign the following roles to the user in All organizational units scope.
- Relativity Collect
- Users Reader for Collect
- Groups Reader for Collect
Restricting collections to the selected user accounts
You can restrict collections to the selected group of users by leveraging admin role scoping to organizational units.
To limit collections, you will need to create an organizational unit and add the users to the unit. Once created, Collect will only collect data from the users within the organizational unit.
This configuration step is for Google Workspace data sources only and is optional.
Create an organizational unit
An organization unit restricts RelativityOne’s collections only to the selected custodians. Create an organization unit and add selected custodians to the unit so only their information is collected.
To create an organizational unit, open Google Admin Console and follow the steps below:
- Open the
- Navigate to Directory > Organizational Units.
- On the Manage organizational units page, click Create organization unit.
- In the Create new organizational unit pop-up menu, enter the Name of organizational unit.
- (Optional) Enter description of the organizational unit.
- Select the Parent Organization Unit (POU).
If this field is not populated, add a POU. To create a POU, follow the steps in - Click Create.
Once the organizational unit is created, the next step is to add targeted users you want to collect from to the unit.
Add users to the organization unit
To add users to the organizational unit, follow the steps below:
- Click the navigation menu.
- Navigate to Directory > Users.
- Select the users who should have collections restricted
- Click the More options drop-down menu.
- Click Change organizational unit.
- In the Change organizational unit pop-up menu, select appropriate organizational unit.
- Click Continue.
- Click Confirm.
You can upload a .csv file to bulk update users. For more information, see Google’s documentation.
Scope user privileges to the organizational unit
To update the scope of the user's role:
- Open the
- Navigate to Directory > Users.
- Select or create a user account.
- Select and expand the Admin roles and privileges pane.
- Click the pencil icon.
- Select a Role name to update.
- Edit the scope of the role to the appropriate organization unit.
- Click Save.
Groups Reader privilege can only be scoped to All organizational units. This privilege is only required to enable collections from Google Workspace Groups and it can be omitted. Doing so will disable Groups collections on behalf of this user account.
Google data sources
Once you complete setting up a Google admin and user account, you can configure Google data sources in RelativityOne.
Once in RelativityOne, you can connect the following Google data sources:
- Workspace—this includes Google Chats, Drive, Gmail, and Groups. For more information, see Google Workspace data source.
- Gemini—this is Google's generative AI tool. For more information see Google Gemini data source.