


Feedback
Last date modified: 2026-Feb-05
Viewing or editing Collection data
You can view and edit collection details. You can also use the Collect console to start and stop collections and view reports.
Collection details
You can display the collection details by clicking the name of a collection on the Collections tab. Collection also displays these details immediately after you add a new collection.
On the Collection Details page, use the buttons at the top of the page to edit, delete, go back, edit permissions, or perform other collection tasks. Editing a collection takes you to the first step in the wizard. For more information, see Using the Collect wizard .
Once a collection has started, the collection details are read-only and cannot be changed.
- Collection Details—displays the information that you entered or selected when you created the collection:
- Name—lists the name given to the collection.
- Collection Matter—the matter used in the collection.
- Job Number—the number assigned to the job for reporting purposes.
- Description—the description of the collection used for reporting purposes.
- Processing Source Location—the file repository that collected data is stored for future processing of documents or for storing collected data.
- Auto Processing Workspace—the processing workspace if you toggled the field on.
- Auto Processing Profile—the processing profile if you toggled the field on.
- Auto Processing Document Numbering Prefix Option—the prefix option if you selected one.
- Job Status—status of the collection. Statuses are New, Not Started, Started, Completed, Error, and Completed with Errors.
- Error Message—the message if collection job did not complete due to errors.
- Zip Collected Files—if you selected to zip collected files this box is checked.
- Zip Password—the password that everyone needs to use to decompress the ZIP64 container files.
- Receive Email Notifications—if you toggled on to send or receive collection job status emails this checkbox is checked.
- Notification Address—the email address of the person that will receive collection job statuses.
- Collection Console—displays buttons that you can use to perform the tasks listed. See Collect console.
- Data Sources—lists all the collection activities associated with this collection.
- Custodian—the custodian associated with the collection.
- Source Instance—the name of the data source associated with the collection.
- Data Type Name—the name of the target associated with the collection.
- Status—displays one of the following statuses:
- Not Started—the collection has not been started.
- Started—the collection is in progress.
- Completed—the collection is done.
- Completed with Errors—the collection of the target completed and one or more targets had errors. For more information, see the Errors report.
- Failed—the collection failed. For more information, see Graph Error Codes.
- Error—lists the error message if the status is Failed.
- Collected Items—the number of files collected from the target without error. If nothing is collected, a 0 is listed.
- Collected Item Total—the number of files that there are to collect without errors. If nothing is collected, a 0 is listed.
- Target—the custodian target associated with the data source.
- Result Link—a Comma Separated Values file download listing all individual items collected from the target. It contains all the associated metadata for each collected item as well. If no results, the file is empty. For more information, see Viewing or editing Collection data.
Google Workspace results download as a .xml file that you can convert into a .csv file using a third-party tool.
- Error Link—a Comma Separated Values file download listing any individual items that couldn't be collected because of errors during the collection. The report provides as much metadata as it can along with as much error information as we can get from the source to help identify what caused the error. If no errors, the file is empty. For more information on errors, see the Errors report.
Google Workspace results download as a .xml file that you can convert into a .csv file using a third-party tool.
- Previews—the status and estimated number of items and size of collection. This is available after starting a preview. For more information, see Preview.
- Custodian Details—the status of the custodian and the source instance. This card also includes the filter criteria, items, size, and errors.
Viewing collected data
When Relativity collects the data, Relativity accepts the path names and file names that the source provides. On occasion, the collection source modifies the path name or file name.
There is a difference between viewing grouped and individual collections data. To view grouped collections data, for sources like Bloomberg Chat, Google Chat, Slack, and Teams, click the Get Results link to view your collection data. Although the Data Sources table will show N/A in the Collected Items and Collected Item Total columns, the collected data is still available in the download. These columns show N/A because more than one set of custodian data is included in the collection.
Collect console
After completing a setup, run the collection with the collection console. Verify connection, start or stop a collection, and view a collection report from the Collection console on the Collection Details page.
Preview
After setting up your collection job, you can preview the job. This is an inventory phase without running a full collection. You can see the estimated number of discovered items and collection size for each custodian target. These preview options help you decide to move forward or adjust your collection job.
Only available for Microsoft 365 Outlook mailboxes, calendars, contacts, and OneDrive. For more information, see Microsoft 365 - Outlook data source and Microsoft 365 - OneDrive data source.
Inactive mailboxes are not included in preview.
Inactive mailboxes are not included in preview.
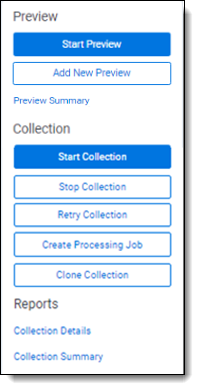
Start Preview
Click the Start Preview button to gain insight into the number of items and size of the collection as the collection is currently set up.
From here, you can start your collection or add a new preview.
Add New Preview
Click the Add New Preview button to adjust your collection job setup. In the Add New Preview modal, you can add a new preview based on previously started collect details or a blank wizard. You can add up to five previews.
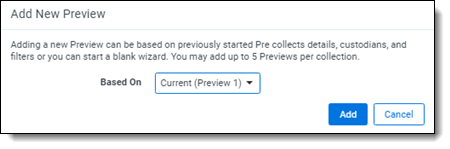
Selecting the Blank Wizard option takes you back to the Collection Details step. You then need to complete the collection wizard with a new setup.
From here, you can start your collection.
Collection
Once you decide to move forward with your collection, you will use this section of the console to start, stop, and adjust your collection job.
Start Collection
Click the Start Collection button the begin the collect project.
Stop Collection
Click Stop Collection to end the collection project that is currently running. Once you click this button, a warning pop-up message appears to confirm that you want to stop. Once you stop a collection, the collection cannot be restarted.
Retry Collection
The Retry Collection button is only available when a collect job does not complete because of errors. Click Retry Collection to start another collect job that only retries the targets that have failed. You cannot retry targets that completed successfully.
Create Processing Job
Click Create Processing Job to create a processing set from the collected documents from the data sources. Locate these documents in the Processing Source Location set in Collection Details.
When you click the Create Processing Job button, a pop-up window displays with two fields:
- Select a workspace—select a workspace within your instance to select a Processing profile to use when creating a processing job.
- Select a Processing Profile—select a processing profile available in the drop-down menu. The available profiles are from the selected workspace.
- Select a Document Numbering Prefix Option—select Use Processing Profile Document Number Prefix or Use Processing Profile Document Number Prefix to apply to each file in the processing set once it is published to a workspace.
- Clone Profile—toggle off to use the selected processing profile. Toggle on to clone the selected processing profile and use the clone profile in conjunction with the created processing set.
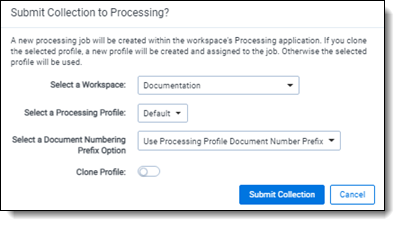
After selecting a processing profile and deciding on cloning the profile, click the Submit Collection button. Once you submit the collection, Relativity creates a processing set with the same name as the collection job. The processing set includes all data that was collected in the collection job.
Clone Collection
Click Clone Collection to duplicate the open collect job. You can clone any collect job that has a status other than New.
After clicking the Clone Collection button, a pop-up modal displays the progress and completion of the clone.
Once the job is cloned, it is placed in the Not Started status and you can find it in the Collections list under the same name with "Cloned - YYYY-MM-DD HH.MM.SS" amended to the end. All collection totals for the cloned job associated targets are reset to zero. The Collection Detail Custodian Target fields are reset to zero. The cloned collect job also generates the new targets.
Reports
Collect includes comprehensive reporting capabilities that you can use to view information about your collections. You can generate these reports in the collection console within a collection project. Click on the name of a report to download. When generating a report, Relativity downloads different files through your browser. For more information on specific reports, see Reports.
Delete collections
A collection will not delete if they have an existing custodian tied to it.
When you delete a collect job, Relativity deletes all of the related custodian targets for the job. The custodian targets table remain the same. The targets within Custodian Targets are not related to any specific collect jobs. Relativity creates job-specific copies of the custodian targets for the job when it's created.