


Feedback
Last date modified: 2026-Jun-10
Microsoft 365 - OneDrive data source
This topic provides details on how to capture Microsoft 365 OneDrive with Collect.
This documentation contains references to third-party software, or technologies. While efforts are made to keep third-party references updated, the images, documentation, or guidance in this topic may not accurately represent the current behavior or user interfaces of the third-party software. For more considerations regarding third-party software, such as copyright and ownership, see Terms of Use.
Considerations
Consider the following when using the OneDrive data source:
- Relativity cannot collect shared, or public, OneDrive folders.
- It also cannot collect OneDrive data for inactive user accounts.
- Collect retrieves the latest version of the document, even when versioning is enabled in Microsoft.
- When a user is under a preservation hold, multiple numbered versions of edited files may exist in the preservation library. Collect retrieves all versions of files residing in the preservation library.
After taking everything under consideration, you can begin the task checklist.
Collection size
OneDrive collections depend heavily on the size and structure of personal drives. Large drives benefit from targeted scoping.
| Category | Details |
|---|---|
| Hard limits (enforced) | 30 targets per job |
| Planning thresholds (guidance) | 2 GB/hour per account (avg) Large personal drives benefit from scoping |
| When to split | Large drives across many custodians |
| Notes | Throughput higher than Teams, lower than email |
Focus on limiting scope for large drives. Splitting by custodian groups or folders helps maintain predictable performance.
Task checklist
The table lists the order to perform the necessary tasks for setting up the data source for Collect.
Separate Microsoft data sources inside Collect can use the same Microsoft Azure app registration.
This means you only need to create one Microsoft Graph application and provide one Client ID and one Client Secret. You can then enter that same set of credentials for Microsoft data sources within Collect.
| Order | Application | Task |
|---|---|---|
| 1 | Azure | Registering the Collect application |
| 2 | Azure | Obtaining a client secret |
| 3 | Azure | Setting API permissions |
| 4 | Collect | Creating the data source in Collect |
| 5 | Collect | Configuring the data source in Collect |
Accessing Microsoft 365 tenants
Register the Collect application to access Microsoft 365.
When registering the application, the Microsoft 365 administrator creates a Microsoft Application ID and secret. You will use this ID and secret to configure data sources in Collect and provide access to the Office 365 tenants.
You can register the application through Azure Portal or by registering the application permissions through the Microsoft App Registration Portal. After registering the application, request administrator consent. From there, it is possible to revoke application access.
Use this information to create a Microsoft integration point. For more information, see Importing from Microsoft Entra ID.
Depending on your RelativityOne license, commercial or government, and your Microsoft tenant, Microsoft 365 or Microsoft 365 Government, you will be able to collect from either Microsoft 365 or both Microsoft 365 and Microsoft 365 Government data sources. Commercial users can only collect from Microsoft 365 tenants. Government users can collect from Microsoft 365 and Government 365 tenants. These data sources act the same, but have different icons within Collect.
Registering the Collect application
Register your application permissions through Azure Portal to access tenants.
Start with registering your application in the Azure portal by following the steps below.
The listed permissions and roles are required and supported by Relativity.
- Relativity does not support substitutions or reduced permissions.
- You can submit requests for alternative or reduced permissions as product feedback.
These steps must be completed by a Microsoft 365 administrator.
- Open your Azure Portal.
- Click Microsoft Entra ID (formerly known as Azure Active Directory).
- Click App registrations.
- Click New Registration to display the Register an application page.
- Enter an application name in the Name field.
- Accept the default setting, Accounts in this organizational directory only, as the supported account type.
- Click Register.
- Once the application is registered, make note of the Application (client) ID and Directory (tenant) ID for use later when configuring the data source in RelativityOne Collect.
Obtaining a client secret
Next, obtain the client secret for the registered application in the Azure portal. For more information, see relevant Microsoft documentation on the Microsoft site.
These steps must be completed by a Microsoft 365 administrator.
- From the registered application's page, click the Certificates & secrets option in the left navigation bar.
- Click the Client secrets tab.
- Click New client secret.
- Enter a description for the client secret in the Description text box.
- Select 730 days (24 months) from the Expires list. The client secret will expire after this time frame.
- Once the client secret expires, you must create a new client secret in the Azure portal as described in these steps.
- Then you must update your Microsoft 365 Collect data sources with it. For more information, see Expired Azure client secrets.
- For any additional assistance with client secrets, please contact the Azure Admin in your organization.
- Click Add to create a new secret.
- Copy the Secret Value to the clipboard by clicking the copy icon and paste it to a safe location. You will use the Secret Value later when creating the data source in Collect.
Microsoft will only show this secret this one time, and there is no way to recover a secret.
- Give your Relativity Admin the Application ID and the Client Secret for setup of Collect. This application secret is also needed for setting up a Microsoft Entra ID integration point.
Expired Azure client secrets
If your Azure client secret expires, follow these steps:
- Get a new secret as outlined in the steps above.
- Go to Collect Admin in RelativityOne.
- Select the desired data source that has expired, and click Edit.
- Input the new client secret value in the Application Secret field.
- Click Save.
You must repeat these steps for all Microsoft data sources that you have set up.
Setting API permissions
Each data source has its own set of permissions necessary to allow access to the tenants. To add the correct permissions based on your selected Microsoft 365 data source, follow the steps below.
These steps must be completed by a Microsoft 365 administrator.
- From the registered application's page, click the API permissions option in the left navigation bar. The User.Read permission is automatically added by default.
- Click Add a permission.
- Click Microsoft Graph.
- Select Application Permissions.
- Select the following permissions from the Permission list. Refer to Azure Application Registration Permissions for Collect below for more information about these permissions.
- Files.Read.All
- Sites.Read.All
- User.Read.All
- Click Add permissions.
- Click Grant Permission.
- Make a note of the application ID that Microsoft assigned to the app registration. This ID is also required for setup of data sources in Collect.
- The window will show all permissions granted. Verify that all permissions have been granted.
- Click Accept to grant the permissions.
Azure Application Registration Permissions for Collect
The Collect application in RelativityOne is a tool designed to streamline the data collection process for eDiscovery. Its primary purpose is to gather data from various sources, such as cloud-based applications and other data repositories, in a manner that is secure, defensible, and efficient. Collect aims to reduce the time and effort involved in data collection, ensuring that the data is accurate and complete, while maintaining chain of custody and compliance with legal and regulatory requirements.
Due to the architecture of the Collect application, Delegated permission can’t be used and are not supported. The Collect application requires the use of Microsoft Graph API Azure Application permissions to facilitate the collection of data that occurs in processes running in the background.
The Collect application requires specific Graph API Application permissions be granted to an Azure Application Registration to facilitate efficient and comprehensive data collection for e-discovery and compliance purposes.
Following is an explanation of each Azure application Graph API permission required and why it is needed to support collections of M365 data. For a PDF of this information, see Azure Application Registration Permissions for Collect.
- Calendars.Read: This permission allows Relativity to access calendar events. For e-discovery, it's important to capture calendar data as it can provide crucial context, timelines, and evidence related to the case or investigation.
- Contacts.Read: This permission allows access to contacts and is necessary to gather information about communications and relationships between individuals, which can be critical in understanding the full scope of interactions and connections in an investigation.
- Files.Read.All: This permission enables Relativity to access all files in OneDrive and SharePoint. It is essential for collecting documents, spreadsheets, presentations, and other files that might contain relevant information for a legal matter or compliance review. This permission is also required to support collection of linked OneDrive and SharePoint files in Outlook emails and Teams chats.
- Mail.Read: This permission allows access to emails, which is one of the core components of e-discovery. This permission allows Relativity to read email messages in users' mailboxes to identify, preserve, and analyze communications that are pertinent to the case.
- Sites.Read.All: This permission allows Relativity to access all SharePoint sites, including content and metadata. It ensures that any relevant information stored in SharePoint sites can be collected and reviewed.
- User.Read.All: This permission provides access to read the properties and membership of users. It is useful for identifying and understanding the roles, permissions, and activities of different users within the organization, which can be relevant for investigations and compliance checks.
- ChannelMessage.Read.All: This permission provides access to all messages in Microsoft Teams channels. It allows Relativity to capture and review conversations and discussions that take place in Teams channels, which may contain pertinent information for legal or compliance purposes.
- Chat.Read.All: This permission enables Relativity to read all chat messages in Microsoft Teams. This includes private chats between users. Access to these messages is essential for gathering complete communication records and ensuring that no relevant information is overlooked in an investigation.
- Group.Read.All: This permission allows Relativity to read all groups in the directory, including their properties and memberships. It helps in understanding the structure and membership of various groups within the organization, which can be important for context in e-discovery and compliance scenarios.
- TeamsTab.Read.All: This permission allows Relativity to read the properties of all tabs in Microsoft Teams. Tabs can contain important resources, documents, and tools that users interact with. Access to this information can provide additional context and insights into the work and communications of users.
- Team.ReadBasic.All: This permission allows Relativity to read basic properties of all Teams. It helps in identifying and understanding the different Teams within the organization, their purposes, and their memberships, which can be relevant for investigations and compliance checks.
- ChannelMember.Read.All: This permission provides access to the membership information of all Teams channels. It allows Relativity to see who is part of each channel, which can be important for understanding who had access to certain communications and information during an investigation.
- Full_access_as_app Permission: The Microsoft Graph API doesn’t support accessing Outlook Online Archives (Archived Mailboxes). We utilize Microsoft’s Exchange Web Services (EWS) API to collect Archived Mailboxes.
Finding Azure credentials
If an application is already created and you need to find the application information to complete the Source Connection step, follow the steps below in the Azure Portal. For more information, see relevant Microsoft documentation on the Microsoft site.
- Open your Azure Portal.
- Click Microsoft Entra ID (formerly known as Azure Active Directory).
- Navigate to Enterprise applications.
- In the list of applications, locate and click on your application.The application page displays.
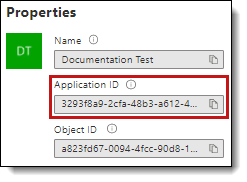
- Navigate to Properties.
- Click the copy icon next to the Application ID. The ID is copied to your clipboard to use as needed.
Revoking application access
Revoke the application from the Azure portal or by using a PowerShell script. For more information, see Microsoft's documentation.
Revoking access via Azure Portal
To revoke access from the Azure portal:
- Open your Azure Portal.
- Navigate to Enterprise Application.
- Under All applications, search for your application and click its link.
- Under Manage > Properties, click Delete.
Collect no longer has access.
Revoking access via Powershell
Revoke access in Powershell using the Remove-MsolServicePrincipal script. See the Powershell example below of retrieving and deleting an application registration.
Get-MsolServicePrincipal -AppPrincipalId 19ab8a2e-ccce-4fa8-a9ee-eb16e220d602
ExtensionData : System.Runtime.Serialization.ExtensionDataObject
AccountEnabled : True
Addresses : {}
AppPrincipalId : 19ab8a2e-ccce-4fa8-a9ee-eb16e220d602
DisplayName : Relativity-Development-Application
ObjectId : 51798fb3-e72c-4373-8c63-6e7d0dd63ad7
ServicePrincipalNames : {19ab8a2e-ccce-4fa8-a9ee-eb16e220d602}
TrustedForDelegation : False
Remove-MsolServicePrincipal -AppPrincipalId 19ab8a2e-ccce-4fa8-a9ee-eb16e220d602
Creating the data source in Collect
The Collection Admin tab is where you create, edit, and remove data sources from your workspace. Setup only needs to be done once for each data source. You must create your data sources prior to setting up your custodian targets.
In RelativityOne, navigate to Collect.
- Click the New Collection Source Instance button.
- Enter a unique name for the data source.
- Select Microsoft 365 OneDrive.
Collect automatically collects any preserved data that has an in-place hold or litigation hold. Microsoft stored data on a hold in a preservation library and separate folders. For more information, see Microsoft Retention Policies.
- Enter the required information in Settings. For more information, see Settings fields.
- Click Save.
After clicking Save, Relativity verifies the parameters and connectivity to the Microsoft 365 data source. If successful, Relativity saves the data source. If the connection fails, a message appears indicating that the connection failed. If verification fails, verify that the values are correct. Relativity will save the data source when you correct it and it's verified.
Once the set up is complete, the data source information on the Collect Admin page.
Settings fields
To connect Relativity to a Microsoft OneDrive data source, you need to gather and enter the information for the following fields:
- Domain—enter the Tenant ID or Primary domain (domain name usually ends with .onmicrosoft.com) of the Microsoft 365 tenant the collection is intended for. To locate the tenant ID or primary domain name, see Microsoft documentation.
- Application Id—enter the Application ID created during registering the Collect application in Microsoft 365.
- Application secret—enter the Application Secret created during registering the Collect application in Microsoft 365.
Depending on your RelativityOne license, commercial or government, and your Microsoft tenant, Microsoft 365 or Microsoft 365 Government, you will be able to collect from either Microsoft 365 or both Microsoft 365 and Microsoft 365 Government data sources. Commercial users can only collect from Microsoft 365 tenants. Government users can collect from Microsoft 365 and Government 365 tenants. These data sources act the same, but have different icons within Collect.
Data source details
Each data source details page includes an Action console. Each data source has different actions.
On the Microsoft Teams data source page, click Validate Connection in the Actions console to validate the client ID, certificate, and other credentials with Microsoft 365.
Configuring the data source in Collect
In RelativityOne, configure the data sources chosen in the Collection Details step.
Data source criteria
Add criteria to collect specific data. To configure the data sources, complete the following fields:
- Select and unselected tabs—choose the data sources to collect from by moving unselected data sources to the selected list.
- Field—choose the field to filter on within the data source.
- Operator—choose an operator such as equals, contains, greater than, or less than.
- Value—enter a value to find in the selected field.
After selecting field options, you must click Add Criteria.
Details to know about criteria:
- Each criteria is then separated by an AND operator.
- Leave the data source criteria empty to collect all data from the sources.
Criteria
Filter a data source's data that you want to collect by adding criteria. This section covers the different criteria for each data source. It also includes what you can search within each data source. The criteria options change based on the Microsoft 365 Archived mailbox data source.
The following table lists the filter criteria support for OneDrive collections.
You must register Relativity in Microsoft 365 before using this data source. For information on registering Relativity in Microsoft 365, see Accessing Microsoft 365 tenants.
When using search criteria to filter for Microsoft 365 OneDrive, different operators can return different results. Knowing the search operators is crucial.
The keyword search criteria uses the Search In operator. When using the Search In operator:
- Search for a phrase by entering the phrase without any OR operators into the Value text box.
Example: acme corp contract - Search for individual keywords by entering the keywords and separating them with an OR in the Value text box.
Example: cat OR dog OR mouseEnter the OR operator with all capital letters. You should add keywords and phrases in lower case only. - Keywords hit on matches and if a word is prefixed with a keyword.
Example: "Work" will return "workday" and "workplace"
| Criteria | Operators | Description | Example |
|---|---|---|---|
| File Extension | Equal, Does Not Equal, Contains | When you use the File Extension property in a query, the search returns all files that contain the entered file extension. | If you search “Contains docx,” your results include all Microsoft Word files saved with that extension. |
| File Path | Equal, Does Not Equal, Contains |
When you use the File Path property in a query, the search returns all messages equals/does not equal or contain the folder path entered. |
If you search “Contains documents/Relativity,” your results include all files within the listed folder and any folder beyond the file path entered. |
| File Name | Equal, Does Not Equal, Contains | When you use the File Name property in a query, the search returns all files that equals/does not equal or contain the value entered. | If you search “Equals Important_Document,” your results include all files with that text in the filename. |
| Creation Date | Equals, Does Not Equal, Greater Than, Greater Than or Equals, Less Than, Less Than or Equals | When you use the Creation Date property in a query, the search returns all messages that equal/doesn’t equal, greater/less than the date entered. | If you search “Greater Than 1/1/2001,” your results include all messages created after January 1, 2001. |
| Modification Date | Equals, Does Not Equal, Greater Than, Greater Than or Equals, Less Than, Less Than or Equals | When you use the Modification Date property in a query, the search returns all updated files that equal/doesn’t equal, greater/less than the date entered. | If you search “Less Than 1/1/2020,” your results include all files modified before January 1, 2020. |
| Keyword Search | Search In | When you use the Keyword Search property in a query, the search returns all files containing the searched text. | If you search “Relativity,” your results include all files that contain the searched text in the file. |
Collecting preserved files
When running a collection with Microsoft OneDrive, Relativity collects all available files, including preserved files. You do not need to take extra steps to collect preserved files as they are automatically included in the collection.
When a user account is placed under a preservation hold, Microsoft creates a preservation library for OneDrive. The contents of the preservation library are automatically included in collections.
When files are on a preservation hold in Microsoft 365, Microsoft preserves original copies of any deleted or modified items. Microsoft stores preserved files in the Preservation Library. Collect automatically collects from these file locations.
Relativity collects all versions of the document available in the preservation library. Collecting all versions of a document means that Relativity collects multiple versions of the same file with the corresponding SHA-256 hashes for each version of the data. If there were changes in the file version, the hash should be unique. For more information on hash identifiers, see Hash identifier - SHA-256.