


Feedback
Last date modified: 2026-May-28
RelativityOne Security Center
As organizations workforces are increasingly dispersed, you want to be sure you’re keeping your data secure. Security Center provides a single-threaded view into the most pressing areas of concern for securing your data.
These areas include:
- User two-factor Authentication—two-factor authentication (2FA) provides an additional layer of protection in the event that passwords are compromised. In Security Center, admins have the ability to track two-factor authentication usage and send users notifications to enable 2FA to make sure user endpoints are secure.
- Login Map—the Login Map provides you with insight into where your users are accessing data from. You will be able to see logins across geographies and identify calls to action, such as logins that do not currently have two-factor authentication set up.
- User Activity—Security Center provides insight into the status of active and inactive users and allows you to disable or delete them to ensure your data is secure.
- Lockbox access—transparency and trust are core tenets of Relativity’s security program. The Lockbox Access tab in Security Center provides a centralized way to review and manage Relativity employee access to your RelativityOne instance and its workspaces. Relativity Lockbox ensures that Relativity support staff can only access your workspaces with your explicit permission. Using the Security Center, you can not only perform real-time audits of Relativity support access and revoke that access if needed, but also view historical records of all prior support access events for full transparency.
- Relativity employee workspace access—this report provides transparency and real time insight into Relativity Support activity in your Relativity instance to help you work with our Support teams. It offers a list of easy-to-read audits of Relativity staff activity that you can export to CSV format for external review.
- Threat Intel—the Threat Landscape Update (TLU) report is a review of the threat actors, malware, techniques, campaigns, and other threat information currently active that has an impact on the legal services industry. The report publishes weekly.
Only RelativityOne System Administrators have access to the Security Center dashboard.
See the following related pages:
Permissions
Security Center is a modernized feature permission at the instance level. You can only grant or revoke access to Security Center by enabling or disabling the Security Center feature permission directly. The underlying granular permissions are locked and controlled by the feature toggle.
Existing groups and their permission configurations are not impacted at this time. However, aligning your groups with the Security Center feature permission is recommended. If a group's permissions are out of alignment, a blue banner and lightbulb icon appear in the Permissions UI with migration tooling to help.
For details on modernized feature permissions and the full list of granular permissions controlled by Security Center, see
System administrators
System administrators can access the Security Center dashboard and view activity data for all users and workspaces in the Relativity instance.
Security Center is a Modernized Feature permission. To grant or revoke access, enable or disable the Security Center toggle on the Features tab in the Permissions UI at the instance level. The Tab Visibility tab can no longer be used to independently manage Security Center access.
For the full list of granular permissions controlled by this feature, see
If the Relativity instance has client domains configured, system administrators are shown the client of the relevant user for each item in the Security Center data.
Client domain administrators
If the Relativity instance is configured with client domains, users in a client domain administrator group can also access the Security Center dashboard. With this configuration, they see only data related to the associated client domain. Client domain administrators cannot access Security Alerts and Security Configurations.
To grant access to Security Center to users in a client domain administrator group:
- From the Instance Details tab, click Manage Permissions
- On the Features tab, select the admin group for the client domain
- Enable the Security Center permission toggle for the group
- Click Review and Save
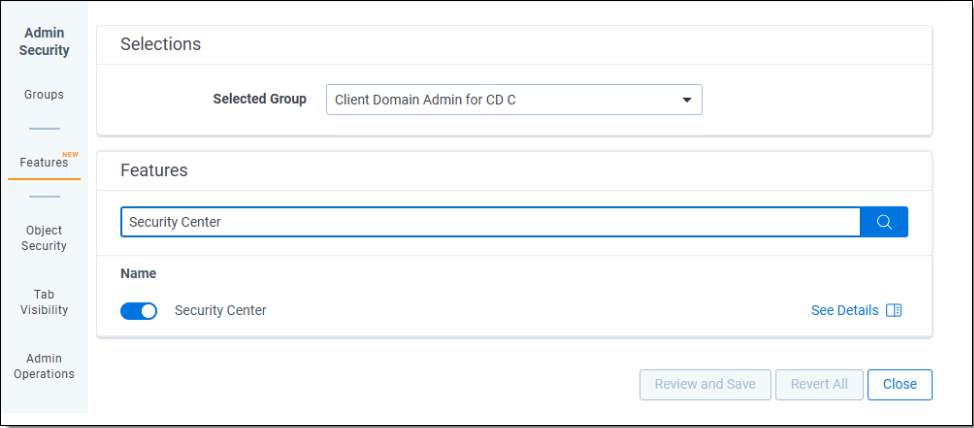
When you view Security Center as a client domain administrator, you see a notification when data is being filtered.

This is now the only way to grant Security Center access (the Tab Visibility tab can no longer be used to independently enable the Security Center tab).
Security Center dashboard
The dashboard in Security Center includes the following charts:
- 2FA Enabled Users - this ring chart displays the percentage of users that have 2-factor authentication (2FA) enabled and the percentage that do not in your Relativity instance. When you click on the 2-factor Authentication tab it will filter to display users matching your selection.
- User Activity - this ring chart displays the percentage of users that are active and the percentage that are inactive (those who haven't logged in for 30+ days) in your Relativity instance. When you click on the User Activity tab, it will filter to display users matching your selection.
- Lockbox Access - this ring chart displays the percentage of workspaces that are accessible to Relativity staff and the percentage that do not grant Relativity staff access in your Relativity instance. When you click on the Lockbox Access tab, it will filter to display users matching your selection.
| Lockbox feature | Control Mechanism | Enabled State |
|---|---|---|
| Customer Lockbox | EnableCustomerLockbox instance setting (editable by System Admins) | When enabled, System Administrators must be granted explicit access to workspaces. |
| Relativity Lockbox | EnableRelativityLockbox instance setting (editable by System Admins) | When enabled, Relativity employees must be granted explicit access to workspaces. |
| Lockbox Hardening | Enabled or disabled by contacting Relativity support. | When enabled, Relativity employees cannot modify user details or group memberships within workspaces. |
If all three lockbox controls are enabled, it will significantly enhance data protection. The risk of unauthorized data access increases with each control disabled.

User 2-factor authentication
2-factor authentication (2FA) provides an additional layer of protection in the event that passwords are compromised. In Security Center, admins have the ability to track two-factor authentication usage and enforce 2FA to make sure user endpoints are secure.
The User 2-factory Authentication section displays a list of users, their email addresses, and whether they have 2FA enabled.
Notifying users who do not have 2-factor authentication (2FA) enabled
To send a system generated email to users who do not have 2-factor authentication enabled:
- In the User 2-factor Authentication section, select the checkbox to the left of the Artifact ID for users you want to notify.
The checkbox will only display for users that do NOT have 2-factor authentication enabled (meaning, 2FA Enabled is set to No). You can filter this list either using the 2FA Enabled Users chart above, or through the standard Relativity column filters and sorting functionality.
- Click Notify from the pull-down menu below the table. A window will display asking you to confirm whether you want to notify the selected users via email.
- Click Notify again. A confirmation window displays and a system-generated email will be sent to the selected users advising them to enable it. You will also receive a confirmation email at your listed Relativity user email address.
- Click Close to close the confirmation window.
Enforcing 2-factor authentication (2FA)
To enforce 2-factor authentication for users:
- In the 2-Factor Authentication section, select the checkbox to the left of the Artifact ID for users.
The checkbox will only display for users that do NOT have 2-factor authentication enabled (meaning, 2FA Enabled is set to No). You can filter this list either using the 2FA Enabled Users chart above, or through the standard Relativity column filters and sorting functionality.
- Click Enforce 2FA from the pull-down menu below the table. A window will display asking you to choose the method of enforcing 2FA for the selected user(s) Default Password Provider login method.

- Choose from the following 2FA Mode options:
- Always required - 2FA will always be required for the selected user(s) Default Password Provider login method.
- Required only for non-trusted IPs - 2FA will be required for login with non-trusted IPs for the selected user(s) Default Password Provider login method after defining trusted IP ranges. See
- Choose a Method for enforcing 2FA.
- Authenticator App - Enable Two-Factor Authentication will be set to True for the selected user(s) Default Password Provider login method. For authenticator app, users will follow the instructions on the app or enter the app's passcode. You will also receive a confirmation email at your listed Relativity user email address.
- Email - For email, the system will email a passcode to the user during logon, and it's different each time. You will also receive a confirmation email at your listed Relativity user email address.The link in the email sent to users is valid for 5 minutes, and only the most recently-sent email can be used. The link expiration time is not configurable. See
- Click Enforce 2FA again.
A confirmation window displays. - Click Close to close the confirmation window.
Login map and activity details
The login map and activity details grid provide you with insight into where your users are accessing data from. You can review a 7-day summary of Relativity user logins across geographies and identify calls to action, such as examining logins that do not currently have 2-factor authentication or SSO set up.
Refer to the following for more information:
Login map controls
| Controls | Icon | Description |
|---|---|---|
| Home button |

|
Clicking the Home button returns you to the initial view of logins across the world. |
| +/- button mouse scroll button |

|
Click on the country or use your mouse's scroll button to zoom in or out on the view for the selected area or use the + or - control on the map. |
| Login clusters |

|
The circles graphically depict geographical clusters of logins for your instance of Relativity.
Clicking on a circle will zoom in on that cluster of login data. |
| 7-day login summary key | - | Displays the number and percentage of your organization's logins that are 2FA-enabled (for example, 29 out of 50 2FA-enabled (58%) for North America). |
Using the login map
The initial view is across the entire world and displays a key with a login summary for each of the major geographical areas (such as North America, Europe, or Asia). Circles are shown for each of these major geographical areas that visually depict these geographical clusters of logins.

To drill down on the displayed login data:
- Click on the cluster shown for a geographical area (such as the Pacific Southwest) to zoom in on the selected geographical area's data. The Login Activity Details grid below will update to show only users within the selected area.

- Click on a cluster for a country (such as Australia) to zoom in and show multiple clusters of data within that country. The Login Activity Details grid below will update to show only users within the selected country.

- Click again on one of the regional clusters shown within the country (such as New South Wales) to zoom in and show clusters of login data within that state or province. The Login Activity Details grid below will update to show only users within the selected region.

- Click again on one of the clusters shown within a city (such as Sydney) to center on that city. The Login Activity Details grid below will update to show only users within the selected city.

The Login Activity Details grid
Below the login map, the Login Activity Details grid lists which users have logged in from the selected map region. Use the Login Timestamp to select a date range to adjust your search. Additionally, the Login Method and Continent columns have a drop down menu listing available search criteria. The name of the grid and its contents update automatically to match any region you select above on the login map.

If you are a System Administrator, you see the client associated with each user login in the grid.
User activity
The Security Center in Relativity gives you the ability to monitor and manage user activity. This includes both active, and inactive users, who haven't logged in for 30 days or more. From there, you can disable or delete those users to help keep your data secure.
In the User Activity section of the Security Center, you can see a list of your instance users, along with their last login date and activity status (active [Y] or inactive [N]). To export user activity data in CSV format, click the Download CSV button at the top of the grid. The timestamp displayed in the Last Login column is captured in UTC time.
A user who has never logged into RelativityOne after their user account was created is considered inactive in the Security Center.
Disabling users
To disable users:
- In the User Activity section, select the checkbox to the left of the Artifact ID for inactive users you want to disable.
Active and inactive users can be selected. Disabling or deleting active users will result in their RelativityOne access being revoked.
- Select and click Disable from the pull-down menu below the table. A window will display asking you to confirm whether you want to disable the selected users.
- Click Disable again.
A confirmation window displays and the selected users will be disabled. You will also receive a confirmation email at your listed Relativity user email address. - Click Close to close the confirmation window.
Deleting users
To permanently delete users:
- In the User Activity section, select the checkbox to the left of the Artifact ID for inactive users you want to delete.
Active and inactive users can be selected. Disabling or deleting active users will result in their RelativityOne access being revoked.
- Select and click Delete from the pull-down menu below the table. A window will display asking you to confirm whether you want to permanently delete the selected users.
- Click Delete again.
A confirmation window displays and the selected users will be deleted. You will also receive a confirmation email at your listed Relativity user email address. - Click Close to close the confirmation window.
Lockbox access
The Lockbox Access section includes a Just-In-Time (JIT) access visibility grid that lists each instance of Relativity staff access granted to your environment. This grid shows who on the Relativity team was given access, the support ticket ID associated with that access, the Access Start date/time, and the Access End date/time for each event. Both active (currently ongoing) access requests and historical (ended) access events are displayed for a complete audit trail of support access. Each entry is tied to a specific support request and is updated in real time, giving you full visibility into which Relativity employees have accessed (or are currently accessing) your instance and why - via the support ticket reference.
JIT access detail behavior
Each access record in the Lockbox Access grid can be expanded to view detailed information. Selecting a record opens a details pane showing the Relativity User (the support representative), the Support Ticket that authorized the access, the groups in your instance that the user was added to, and all workspaces the user can access via those group memberships.
If an access has ended (the Access End is a past date), the details pane will indicate that the user has “No Live Access” for that ticket request
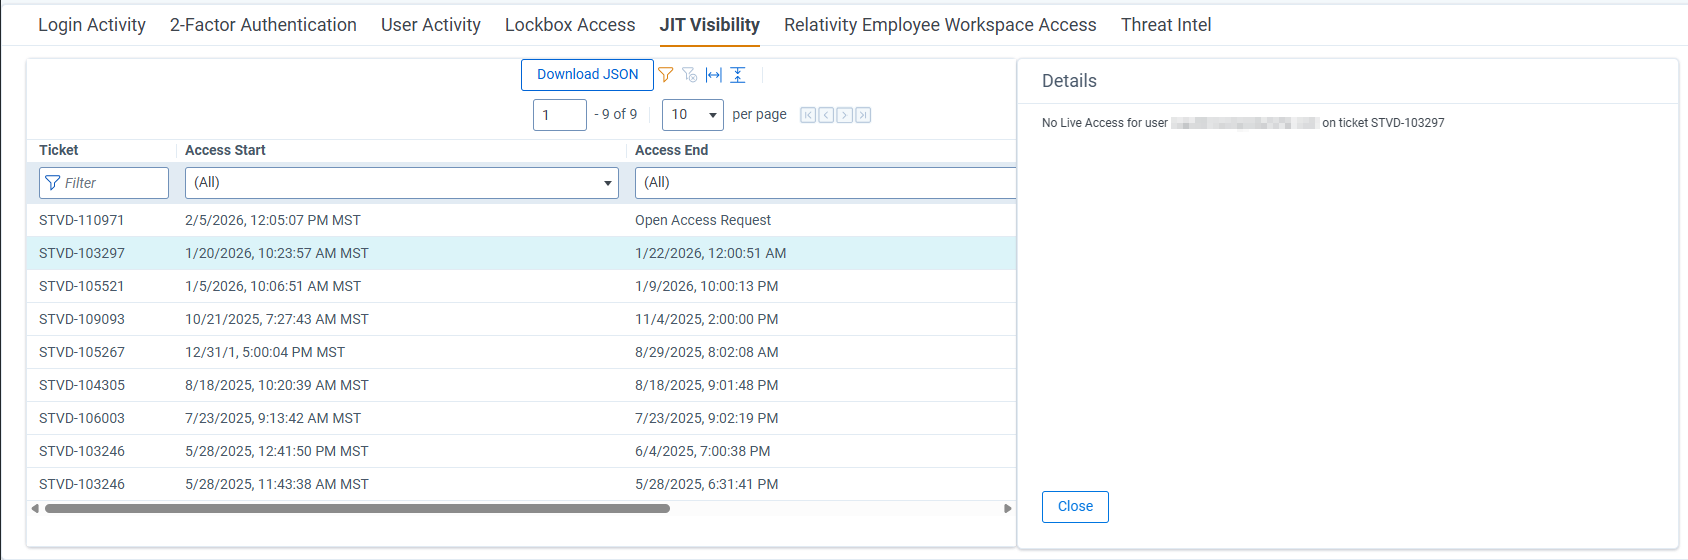
If an access is currently active (the Access End shows “Open Access Request”), the details pane will list the active access details.
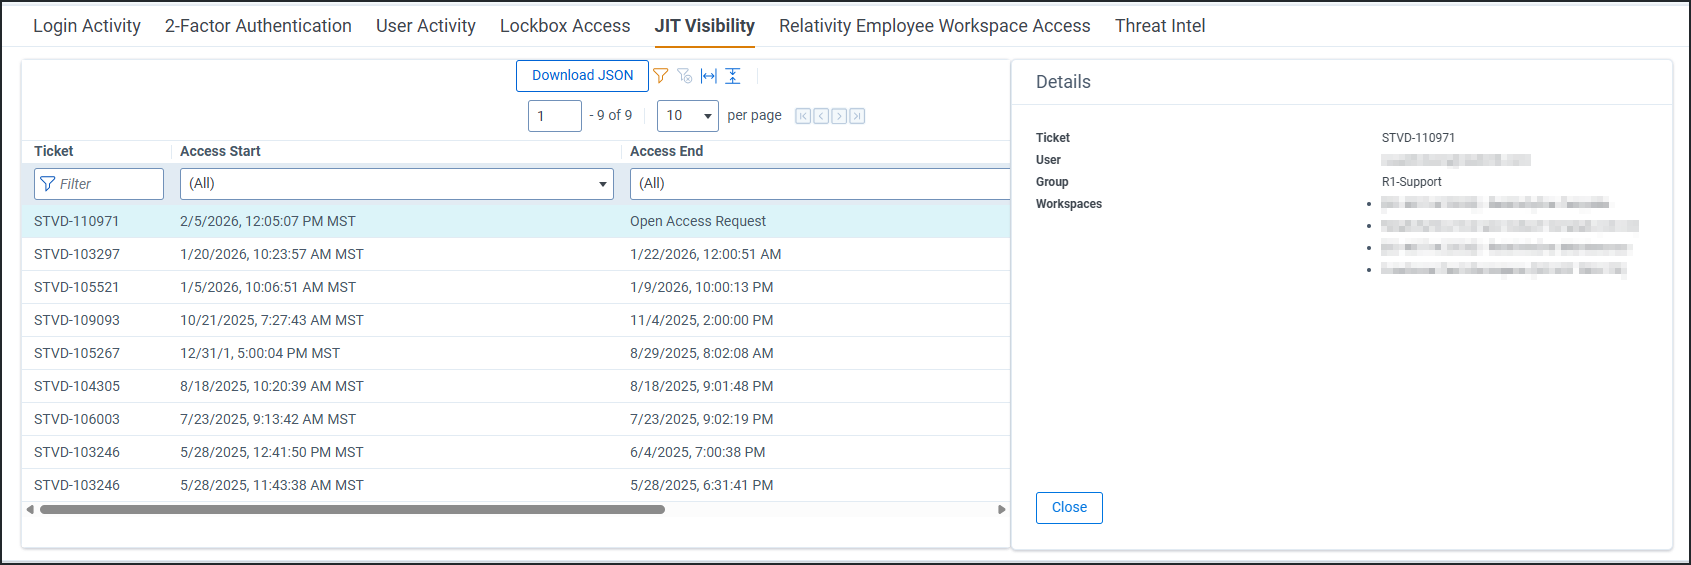
To export the Lockbox Access records for offline review or auditing, click the Download JSON button at the top of the Lockbox Access grid. This will download a JSON file containing all the listed access events and their details. You can use this file to programmatically analyze support access history or integrate the data with your own auditing systems.
Viewing Relativity staff access to a workspace
To view Relativity staff access in a selected workspace or instance:
- In the Lockbox Access section, locate the entry associated with the workspace or support access event you want to inspect (use filtering or search if necessary).
- Click on that access record (or the expand icon if one is present) to open the details pane. This pane displays the Relativity staff user’s name, the support ticket ID, the access start and end times, and (if the access is currently active) the specific groups and workspaces to which the user has access.
- Review the information. If the access has already ended, the details pane will show that there is No Live Access currently for that user/ticket.
- When finished, close the details pane (for example, by clicking Hide or the close icon).
Removing Relativity staff access to a workspace
To remove Relativity staff access to a workspace:
- In the Lockbox Access section, select the checkbox to the left of the workspace Artifact ID's you want to select.
- Click Remove Access below the table. A window will display asking you to confirm whether you want to permanently remove access for all Relativity staff to the selected workspaces.
- Click Remove Access again.
A confirmation window displays and the selected workspaces will no longer be accessible to Relativity staff users. You will also receive a confirmation email at your listed Relativity user email address. - Click Close to close the confirmation window.
Removing access will immediately revoke the Relativity user’s access to the selected workspaces by removing them from the workspace groups. The Access End time in the JIT access grid will update to the time of removal, and the entry will then show “No Live Access” for that user.
Relativity employee workspace access
The Relativity Employee Workspace Access grid provides real time insight into Relativity Support activity in your Relativity instance. It offers a list of easy-to-read audits of Relativity staff activity in all active workspaces you have created. You can also export the audits to CSV format for external review.
This grid reports on individual actions taken by Relativity staff. For a list of workspaces where Relativity staff have been granted access, see Lockbox access.
The Relativity Employee Workspace Access grid shows Relativity staff actions in all active workspaces you or your organization have created, as these workspaces are the most likely to contain sensitive data. It does not list actions taken in default administrative workspaces such as Admin Case.
Access data columns
The columns shown in the Relativity Employee Workspace Access grid are as follows:
- Audit ID — the unique ID of the action taken. This ID is also used by the Audit application. For more information, see
- Timestamp — the date and time the action occurred.
- User — the name of the Relativity employee associated with the action.
- Action — the type of action taken.
- Workspace — the name of the workspace where the action took place.
- Client — as a System Administrator, you can view the client associated with each user action.
- Description — a brief description of the action.

By default, the Relativity Employee Workspace Access grid shows access data for the previous week. To specify a date range other than the previous week, enter a new date in either the From or the To field, then click Refresh.
To export the access data to CSV format, click the Download CSV button at the top of the grid.
Threat Intel
Our Cybersecurity team, CALDER7, provides a weekly report that can be downloaded or viewed in our Threat Intel tab. For more information, refer to our Threat and prevention team.
