


Feedback
Last date modified: 2026-Jun-05
User access permissions to file shares
The Staging Area permissions managed in Staging Explorer, released in late January, introduce a new model for managing file share access. You must complete the transition to the new model by July 1. Otherwise, all users except System Admins will lose access to file shares until you configure the new permissions and confirm the transition. Due to the new permissions model, the StagingPaneOnlyPerClientDomain setting will be deprecated. Please review the new workflow in Assigning user group access permissions and begin setting up access for your RelativityOne Staging Explorer user groups in the Staging Explorer tab to prepare for the transition. Also, see this Community article on upcoming changes.
Assigning user group access permissions
Follow the instructions below to assign permissions to user groups for accessing specific file shares in the Staging Explorer pane. As a result, each user will only be able view file shares they are allowed to access.
Make sure that Ads blocking browser extensions bypass the following domains: .Launchdarkly.com, .relativity.com, and .relativity.one. Otherwise, you won't be able to view the Staging Explorer pane in RelativityOne.
- Log in to RelativityOne.
- Type Staging Explorer in the search box and select it. A list with all available file shares opens.
- Select Manage Access next to a specific file share to set permissions to it for a user group.

- At the top of the opened dialog, there is the file share path you are managing access permissions for. Complete the following fields:

- Select groups—choose a group to grant access for. For details how to add a user to a group, go to Adding users to groups.
- Set access—assign a specific role to the selected group:
- View—allows users to view structure and contents of a file share.
- Download—allows users to download files from the Staging area to their local environment.
- Upload—allows users to upload files and folders into the Staging area.
- Download and Upload—allows users to both upload and download files and folders within the Staging area.
- Edit—allows users to create, rename, move, copy, zip, unzip, or delete files and folders within the Staging area.
- Admin—provides full control over permissions, visibility, and configuration of a file share. Admins can assign groups and manage access at the instance level.
- All (...)—select how many entries are shown or apply actions to all listed groups.
- Click Add to add the selected group with the chosen role to the access list. To remove a group, select the checkbox by its name and click Remove.

- To edit access permissions for a group, choose a new role for it from the Access Level drop-down menu.

- Click Save to complete managing access for the file share. Click Cancel to discard changes and exit.
After you apply the above changes:
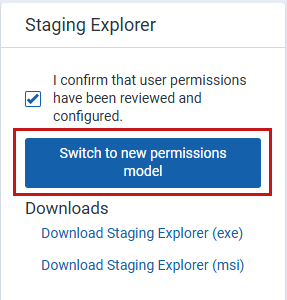
- Select the I confirm that user permissions have been reviewed and configured. checkbox in the Staging Explorer pane. Then, you must click the Switch to new permissions model button for the new permission model to take effect. If the StagingPaneOnlyPerClientDomain instance setting is set to True, it will no longer be considered—permissions will now be managed using the new approach.

- Confirm the user groups have appropriate access level.

If you are unable to access specific file shares, please reach out to your Relativity system administrator to confirm that the required permissions have been properly configured. If permissions are confirmed and the issue persists, contact Customer Support with details of the problem and the validation performed.
For details of a specific permission, refer to Advanced Filtering Audit records.
Former workflow in RelativityOne for user access to file shares
In the default RelativityOne setup, users can access file shares if they're in a group that is added to a workspace that's associated with a resource pool with file shares. In some cases, if a user has access to multiple client domains, you may only want that user to see file shares for his own client domain in the Staging pane and not any file shares from other client domains to which he has access. Refer to the following sections for more information on each scenario.
The normal workflow in RelativityOne is that a group and its users will inherit access ability to any file shares within the resource pool that is associated with the workspace to which the group has access, as shown on the Figure 1.
For example, User A is in Group A that is added to Workspace A, which is associated with a Resource Pool containing file shares. As a result, User A can view and access all file shares in the Staging pane via the group's access.

Figure 1: User able to view resource pool file shares
In this scenario:
- User is in a group, other than "System Administrators," that is added to at least one workspace that is associated with the resource pool containing the file shares. Once the user is assigned to the group, they will have access to any file shares associated with resource pools in the workspace with which the group is associated. For more information on adding users to groups, see Adding users to groups.
- Instance Setting of StagingPaneOnlyPerClientDomain either does not exist or, if it exists, it’s set to False.
Granting user access to specific file shares
If you have a user who has access to multiple client domain workspaces and you only want them to be able to access file shares for his own client domain in the Staging pane, then you must configure the proper permissions. The process involves setting the StagingPaneOnlyPerClientDomain instance setting to True and configuring groups with item-level permissions to the resource pool that contains the file shares to be accessed.
Based on the default workflow in RelativityOne, as described above, a group and its users will inherit access ability to any file shares within the resource pool that is associated with the workspace to which the group has access. Therefore in this workflow, if a user has access to multiple client domain workspaces, then that user will be able to view their file shares.
For example, User A has access to his own Client A Domain, but he can also access the workspace for Client B Domain if he’s added to Group B in Client B Domain, as shown below. As a result of being added to Group B, he’ll be able to view the file shares associated with Workspace B in Client B Domain. In this situation, StagingPaneOnlyPerClientDomain instance setting either does not exist or it is set to False, and item-level permissions to the resource pool are not configured.

Figure 2: User able to view other client domain file shares.
To ensure that User A only views and accesses file shares from his own domain in the Staging pane and still retain access to the workspace for another client domain but not view its file shares, you must:
- Set the StagingPaneOnlyPerClientDomain Instance Setting to True.
- Add the user to a group that has been given item-level permissions to the resource pool and its associated file shares, as shown in Figure 3.
In this scenario, User A is added to Group A, which has been given item-level permissions to the resource pool and associated file shares in their Client A Domain. By being added to Group B2, User A is still able to view Workspace B but cannot view its file shares. For User B to only view her client domain’s file shares, User B is added to Group B1, which has been given item-level permissions to Client B’s resource pool so User B can view her domain’s file shares.

Figure 3: User prevented from viewing other client domain file shares.
Access to the resource pool does not automatically make the Resource Pool object visible to users. In order to see the resource pool, users must have access granted to the Resource Pool object tab in Admin Mode settings.
For more information on how security and permissions operate in RelativityOne, see Security and permissions.
To grant access to specific file shares, the user must be in a group, other than the System Administrator group, that is given item-level permissions to the resource pool containing the associated file shares.
Step 1 Configure the StagingPaneOnlyPerClientDomain Instance Setting
The default RelativityOne set up does not contain the Instance setting StagingPaneOnlyPerClientDomain. Therefore, the application will respond as described in the Former workflow in RelativityOne for user access to file shares section. So, you must add the StagingPaneOnlyPerClientDomain instance setting and configure it as indicated below.
- Navigate to Instance Settings.
- Click New Instance Setting.
- Enter the following information in the fields specified:

- Name—enter StagingPaneOnlyPerClientDomain.
- Section—enter Relativity.DataTransfer.
- Value Type—select True/False.
- Value—select True. This value must be set to True if you want to prevent users from accessing file shares in other client domain workspaces. If it is set to False, the opposite occurs and users will inherit access to any file shares associated with workspaces to which they have access, as shown in Figure 2.
- Click Save.
Step 2 Create the Group
Although you can use any existing group, we recommend creating a new, specific group for these users so you can better manage the file share access permissions.
- Navigate to Groups.
- Click New Group.
- Enter the fields as needed. For more information on creating groups, see Creating and editing groups.
- Click Save. This group will be added to the resource pool in a later step.
Step 3: Add Users to the Group
Next, add users to the group who need to access the file shares in the Staging pane of the Staging Explorer.
- From the Groups tab, click Add.
- Select one or more users to add to the group as needed and click Apply. For more information on adding users, see Adding users to groups.
- Click Apply.If a user belongs to more than one group with item-level access to other resource pools, they will inherit access to all file shares associated with those resource pools. Review the item-level permissions for each resource pool to ensure only the desired groups have been granted access to the associated file shares.
Step 4: Add the Group to the Resource Pool with Item-level Permissions
Finally, add the group to the resource pool with item-level permissions.
- Navigate to Resource Pools.
- Select the Resource Pool associated with the client domain that contains the file shares you want to allow users to access.
- Click the File Repositories tab to review the available file shares assigned to the selected resource pool.

- Click the box next to the desired file share from the list and click Edit Permissions.
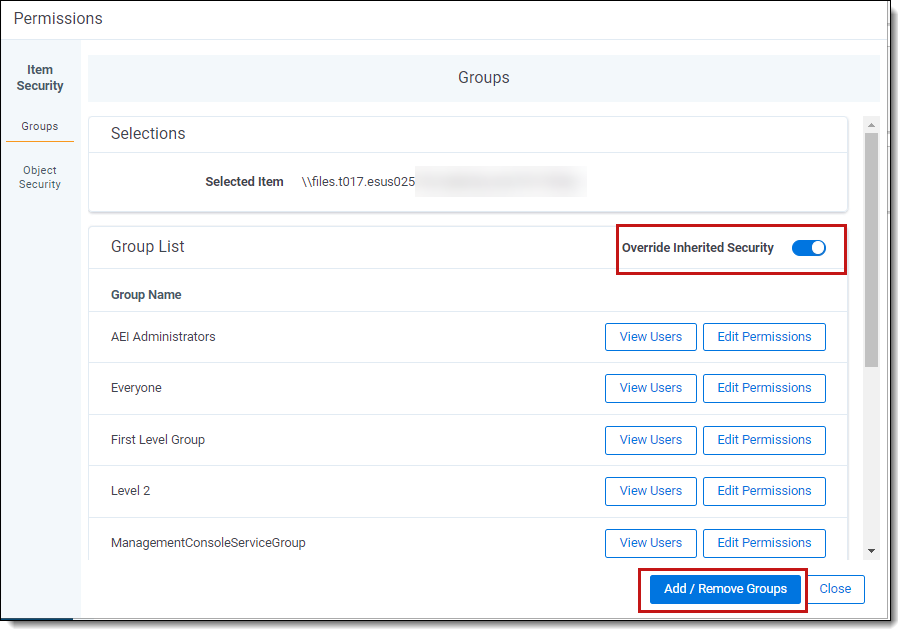
- Click the Add/Remove Groups button on the Groups tab of Item Security.If the Add/Remove Groups button is not displayed, toggle the Override Inherited Security option ON.
- Select the group that you added in the previous section and click the arrow to move it to the Groups in Workspace pane.
- Click Save.
The group and the users within it now have item-level permission to the resource pool and its associated file shares. They will only be able to access the specific file shares configured and will still retain access to workspaces for another client domain but not be able to view their file shares. See Security and permissions for Item-level permissions for more information.
- Access to the resource pool does not automatically make the Resource Pool object visible to the users. To see the resource pool, they will need to also have access granted to the Resource Pool object tab in Admin Mode settings.
- The resource pool will not be assigned to the new workspace if you move the workspace to another client domain or delete the workspace.