Installing, launching, and updating Staging Explorer
For information on Staging Area folders, refer to the Staging Area topic and Staging Area FAQ article in Community.
Use the sections below to learn how to install Staging Explorer as well as how to launch and update it.
Before you begin using Staging Explorer, review Best practices, limitations, and data transfer performance considerations for information to keep in mind.
System requirements
The following minimum system requirements are required to use the Staging Explorer.
| Required item | Requirement |
|---|---|
| Operating system | Windows 8.1 or above |
| Windows Server operating system | Windows Server 2012 R2, Windows Server 2016, Windows Server 2019, or Windows Server 2022 |
| System memory | 4 GB RAM |
| Software | .NET version 4.7.2 |
| Transport Layer Security | TLS 1.2 |
Recommended browser settings
Ensure the Relativity instance is configured as a trusted site and the following settings are enabled or allowed in the browser on the user's machine running Staging Explorer. Refer to your browser’s help documentation or contact your IT department for the specific location of these settings if they differ from these steps.
- Open the browser's Control Panel.
- Go to Network and Internet > Internet Options.
- For Security settings:
- Enable File Download
- Enable JavaScript
- Add *.relativity.com as a Trusted site
- For Privacy settings:
- Allow First party Cookies
- Allow Third party Cookies
Supported browsers
RelativityOne supports the following internet browsers*.
| Browser requirements | Supported Version |
|---|---|
| Chrome | Latest release** |
| Firefox | Latest release** |
| Safari | Latest release** |
| Edge | v79+ (Chromium-based) |
*Screen resolutions of 1366x768 (minimum) to 2560x1440 (maximum) are supported
**Recent earlier versions will likely still function as expected but full support is reserved for the latest release
- Using your internet browser to zoom to any size other than 100% while using the Viewer is not supported and can cause unexpected behavior.
- Internet Explorer is not supported.
Port requirements
To ensure that transfers can occur, take the following into consideration:
- You must make firewall changes to allow outbound connections to the server on TCP port 443, which is required to be opened.
- Staging Explorer does not support proxy servers.
The opening of the required port for the Windows firewall is typically handled on the end user's machine. However, if you use any third party firewalls, you must manually open the port referenced above. Improperly configuring the port results in transfer failures. For more information, contact Customer Support.
For more detailed port considerations, see this Community article.
Refer to the RelativityOne technical overview for detailed information about network access considerations for data transfer in RelativityOne, including firewall privacy considerations and a list of FQDN.
Installing Staging Explorer
Depending on your organization's requirements, Staging Explorer can be installed via an executable (.exe) file or a Microsoft Software Installer (.msi) file.
To install Staging Explorer, follow these steps.
- You must have the minimum security permissions to launch Staging Explorer. See Permissions for more details.
- You must be a local admin on your machine to install Staging Explorer or have the installer pushed via a Group Policy Object (GPO) to install the application.
- Be sure to use the most recent version of the application to maintain optimal performance and security.
- Launch RelativityOne, and log in with your RelativityOne credentials.
- Navigate to Staging Explorer.
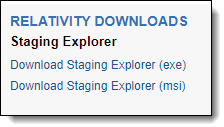
- In the Relativity Downloads console, click the appropriate download file format for your organization: Download Staging Explorer (exe) or Download Staging Explorer (msi).
- Once the download is complete, launch the .exe or .msi file to run the installation wizard.
- Click Install to begin the installation wizard and follow the prompts.
- Accept the default installation Destination Folder displayed.
- You must select (check) the Enable firewall rules on this computer check box on Firewall Settings dialog, and then click Next.
- Click Install to begin the installation process.
- Click Finish when the setup is complete.
Launching Staging Explorer
To launch Staging Explorer, follow these steps:
- You must have the minimum security permissions to launch Staging Explorer. See Permissions for more details. The Client Domain Admin group does not have Staging Explorer access by default. A System Admin needs to add the correct permissions.
- Your default browser must be supported by RelativityOne.
- Before you begin using Staging Explorer, review Best practices, limitations, and data transfer performance considerations for information to keep in mind.
- See Uploading files or Downloading files to begin transferring files.
- Only one Windows user can run an instance of Staging Explorer on a machine at a time.
- Navigate to the installation path and click RelativityOne Staging Explorer. If you saved its shortcut to your desktop, then click its icon.
- Enter the desired Instance URL in the Instance Selection dialog box and select Connect with a browser.Make sure your default browser is supported by RelativityOne. Refer to Supported browsers.
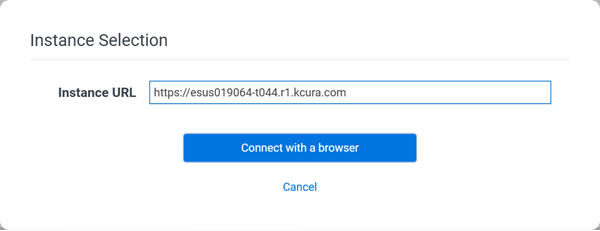 Domain URL is sufficient, for example: https://kcura.relativity.one or https://relativity-uk.relativity.one.
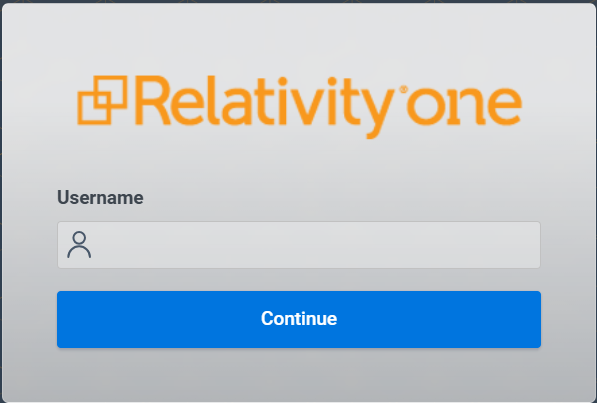
 - In the newly opened page, enter your credentials and log in – the same way that you would log in directly to RelativityOne. If you have already been logged in to the selected instance within the open browser session, you will not have to authenticate again and will be redirected to the authentication completion page automatically.Users log in with the same provider method as they have with Relativity. The Staging Explorer browser log in method now supports all of Relativity authentication providers, such as password, Integrated Authentication, OpenID Connect, and SAML.
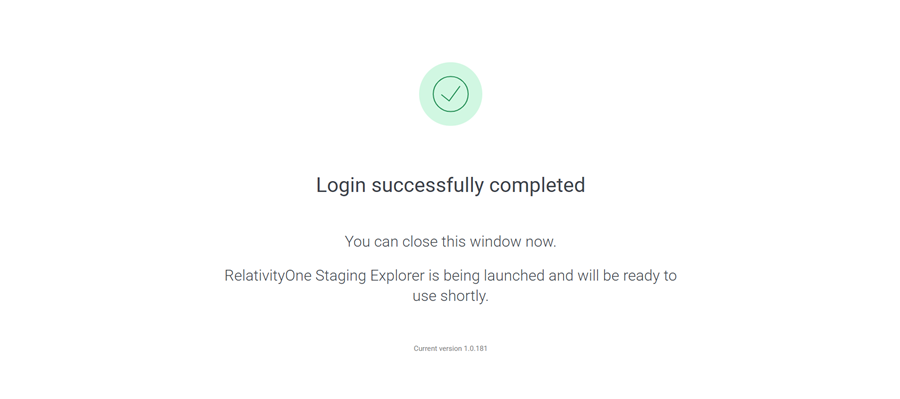
- Next, you will be redirected to the authentication completion page, informing you that the login has been successfully completed. If the authentication process does not complete successfully, a page is displayed with additional guidelines to follow to complete the authentication.
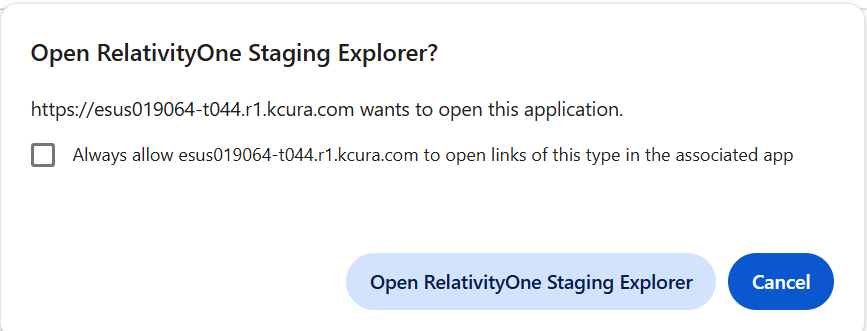
- If a browser message box appears, asking to allow the site to open Staging Explorer, click Open RelativityOne Staging Explorer to proceed. If you do not do this, then Staging Explorer will not be able to complete the authentication process.To always allow your system to open the link to Staging Explorer, select the "Always allow" checkbox, and the message box will not appear anymore.
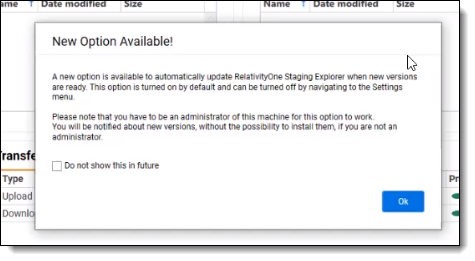
- If applicable, the New Option Available window is displayed. Select Do not show this in the future if you do not want the window to be displayed the next time Staging Explorer is opened.
- When you open Staging Explorer, a connection status icon will indicate if you are connected to Relativity and/or the internet.
- The system checks for connectivity to the fileshare and will display a message if an error is encountered. Follow the information on the message to correct it. Otherwise, you will not be able to access the fileshare and its contents.
- If applicable, Staging Explorer will open to the last Staging fileshare you visited.
- If the fileshare does not exist, the root folder of that fileshare will open.
| Icon | Status Description |
|---|---|
 | Connected to the internet and Relativity |
 | Connected to the internet but not Relativity |
 | Not connected to the internet or Relativity |
Manually updating Staging Explorer
To manually update Staging Explorer:
- You must have the minimum security permissions to update Staging Explorer. See Permissions for more details.
- Be sure to use the most recent version of the application to maintain optimal performance and security.
- If the current version of Staging Explorer you are using is marked critical, it will no longer run and you will be prompted to update to the newest version.
- If a new version of Staging Explorer is available for download, a blue banner is displayed at the top of the application. If the version update is critical, a yellow banner appears.
- If you have Automatic Update enabled in Settings, the update will be completed automatically.
- Launch RelativityOne, and log in with your RelativityOne credentials.
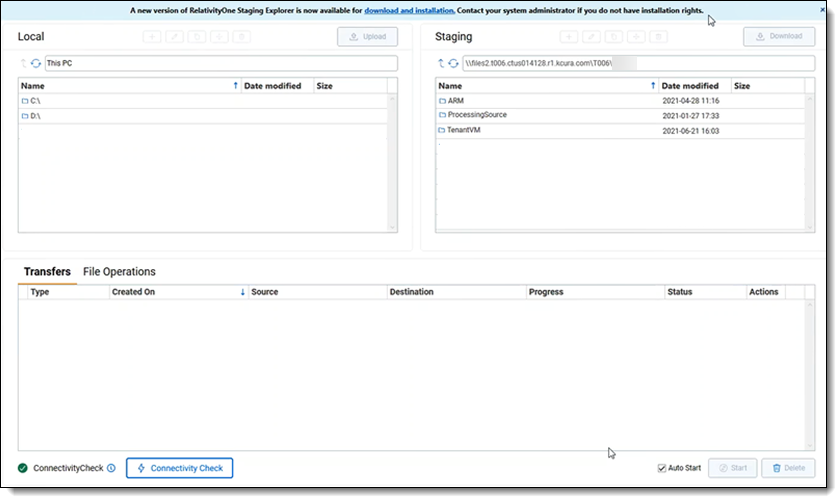
- If a message appears indicating a new version is available, click the download and installation link. The update will be completed automatically.
- Launch Staging Explorer. See Launching Staging Explorer for more details.
Automatically updating Staging Explorer
You can configure the application to automatically apply software updates instead of having to update it manually. This ensures that you are using the most recent version of the application to maintain optimal performance and security.
- Launch the Staging Explorer.
- Click the Settings button in the user drop-down menu next to your name. The Settings window is displayed.
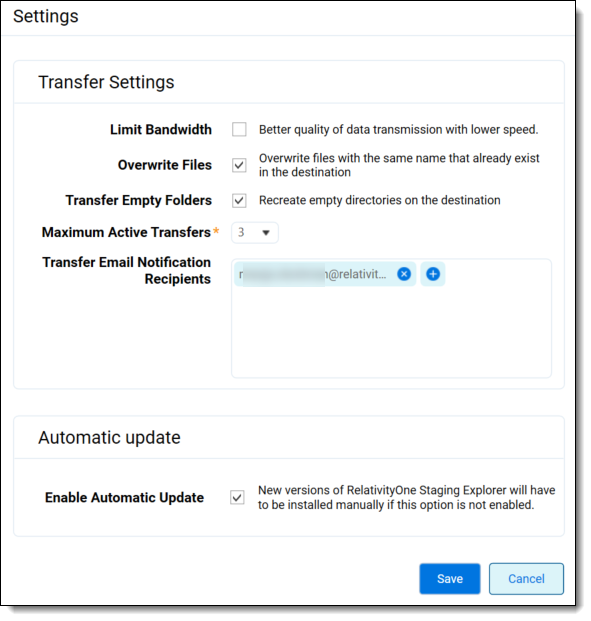
- Select Enable Automatic Update to automatically have Staging Explorer update to the newest version available. If you change your mind and want to do the updates manually, clear the checkbox.
- Click Save.


