


Feedback
Last date modified: 2026-Jul-14
Microsoft preservation source manual setup
An Azure Admin must complete all steps to create and configure preservation hold credentials before creating a preservation data source in Relativity. For more information, see Microsoft preservation source manual setup.
You must complete all steps to use Preservation in-place.
The steps are as follows:
- Register the application.
- Assign API permissions.
- Generate certificate.
- Assign application roles.
- Run PowerShell script to create a Service Principal.
After completing the setup, you can set up the Microsoft 365 data source in Relativity. For more information, see Microsoft preservation source manual setup.
See these related topics:
Minimum supported access
The permissions, roles, and Exchange Online configuration steps described in this topic are the minimum supported requirements for Preservation in place.
Relativity does not support alternative permission models, substitute roles, or reduced access scopes for these operations. Changing or omitting required permissions may result in failed holds or unsupported preservation behavior.
Register the application
Follow the steps below to set up app-only authentication in Entra ID. For more information, see Microsoft's documentation for setting up app-only authentication in Entra ID.
The person performing the steps below should be a Microsoft Azure admin and familiar with setting up certificates.
Start with registering your app by following the steps below:
The person completing the application registration process needs to be an Azure Administrator with sufficient privileges.
- Open your Azure Portal.
- Click More Services.
- Search for and select Microsoft Entra ID, formerly known as Azure AD.
- In the left-navigation menu, select Manage > App registrations.
- Click New Registration.
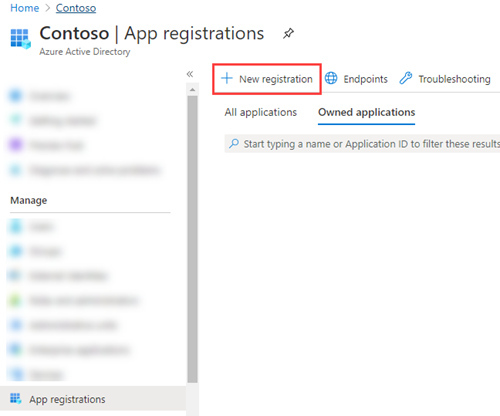
This will open the Register an application page. - Enter an application name in the Name field.
- Select Accounts in this organizational directory only as the supported account type.
- Click Register.
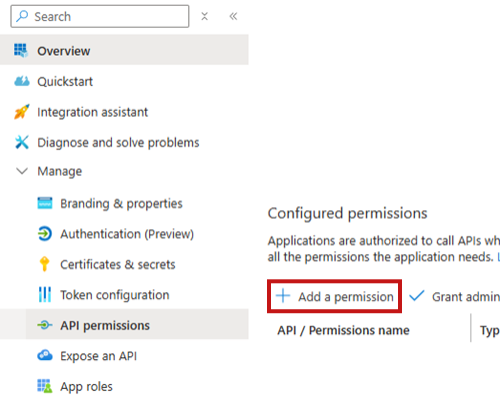
Assign API permissions
You must add the Sites.Read.All and Exchange.ManageAsApp API permissions to your application.
- Sites.Read.All—needed to do OneDrive and SharePoint Discovery in Relativity.
- Exchange.ManageAsApp—needed so that the application can run cmdlets in Exchange Online in each tenant organization.
To add the Sites.ReadAll permission,
- In the left-hand navigation, select Manage > API Permissions.
- Click Add a permission.
- Click Microsoft Graph.
- Select Application Permissions.
- Select theSites.Read.All option from the Application Permissions section.
- Click Grant admin consent for <Organization>, Yes.
The Sites.ReadAll permission should now be added to your application.
To add the Exchange.ManageAsApp permission,
- In the left-hand navigation, select Manage > API Permissions.
- Click Add a permission.
- Click APIs my organization uses.
- Click Office 365 Exchange Online.
- Select Application Permission.
- Select the Exchange.ManageAsApp permissions.
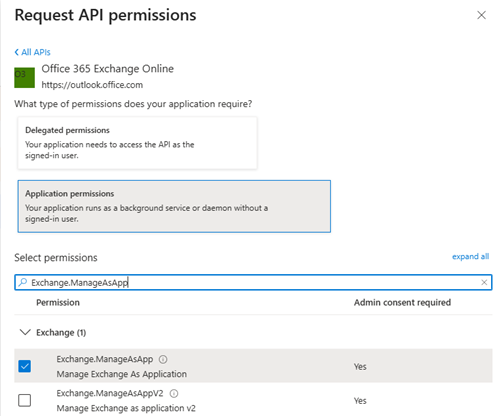
- Click Grant admin consent for <Organization>, Yes.
The Exchange.ManageAsApp permission should now be added to your application.
Next, you must generate a self-signed certificate. For more information, see Generate certificate.
Generate certificate
You must create a self-signed certificate. Use the script below. The script below will create two files:
- mycert.pfx—use the .pfx file to upload to Relativity.
- mycert.cer—use the .cer file to upload to the application in Azure.
The script creates a certificate that is valid for one year. After a year, you must replace this certificate with a new valid certificate.
To generate a self-signed certificate,
- Copy the following PowerShell script. For more information on creating a x.509 certificate, see Microsoft's documentation.Copy
# Create certificate
$mycert = New-SelfSignedCertificate -DnsName "contoso.org" -CertStoreLocation
"cert:\CurrentUser\My" -NotAfter (Get-Date).AddYears(1)
-KeySpec KeyExchange
# Export certificate to .pfx file
$password = ConvertTo-SecureString "test" -AsPlainText -Force
$mycert | Export-PfxCertificate -FilePath mycert.pfx -Password $password
# Export certificate to .cer file
$mycert | Export-Certificate -FilePath mycert.cer
You can also use a purchased or generated certificate from your organization. - Replace the "contoso.org" value in the -DnsName "contoso.org" string with the matching the domain name in your Microsoft Entra admin center.Relativity does not validate or need this value to be RelativityOne's Instance DNS.
- Replace the "test" value in the $password = ConvertTo-SecureString "test" string with a secure password.
- Run the script in Windows Powershell.
- On your application page, select Certificates & secrets.
- Click Upload certificate.
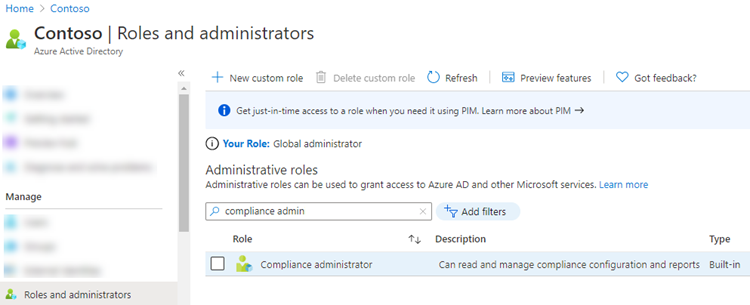
Assign application roles
To assign the required application roles,
- In the top-most search bar, enter Entra ID Roles and administrators.
- Search for and select the following roles:
- Compliance Administrator—can read and manage compliance configuration and reports in Microsoft Entra ID and Microsoft 365.
- One of the following Exchange roles:
- Exchange Administrator—can manage all aspects of the Exchange product.
- Exchange Recipient Administrator—can read and manage mailboxes and recipient attributes in Exchange Online, but cannot manage Exchange settings, configure mail flow rules, or delete and modify groups.
- Compliance Administrator—can read and manage compliance configuration and reports in Microsoft Entra ID and Microsoft 365.
- Click the Add assignments button.
- Select the Preservation in-place app you created.
- Click Add.
You now have the Compliance Administrator and Exchange Administrator roles assigned to the application. For information on roles, see Microsoft’s documentation.
You will use the information created for the next steps.
Run PowerShell script to create a Service Principal
After setting up an app in Entra ID in the Register the application section, you need to create a Service Principal to associate with the app.
You may need to install the AzureAD and ExchangeOnlineManagement modules.
Exchange Online PowerShell is required only where Microsoft requires it to support preservation and mailbox hold operations. Relativity uses Microsoft‑supported modules and roles and does not rely on legacy or unsupported APIs.
To install the modules, add the following to PowerShell:
Copy
Install-Module Microsoft.Graph.Authentication
Import-Module Microsoft.Graph.Authentication
Install-Module Microsoft.Graph.Applications
Import-Module Microsoft.Graph.Applications
Install-Module ExchangeOnlineManagement
Import-Module ExchangeOnlineManagement
To create the Service Principal and assign it to the application, add the following to PowerShell.
You must have a Global Admin run the following PowerShell script.
Copy
## Authenticate with Microsoft (including providing answer for MFA)
$AppId = "Application-ID-FROM-AZURE-AD"
$appName = "AppNAME-FROM-Azure-AD"
$spDisplayName = "your_sp_displayname"
# access token is passed to Connect-AzureAD
# the user logging, will require admin permissions.
Connect-MgGraph
$AADApp = Get-MgServicePrincipal -Filter "displayName eq '$appName'"
# create service principal in scc
connect-ippssession
New-ServicePrincipal -AppId $AADApp.AppId -ObjectId $AADApp.Id -DisplayName $spDisplayName
$SP = Get-ServicePrincipal -Identity $spDisplayName
Add-eDiscoveryCaseAdmin -Confirm:$false -User $appId
disconnect-exchangeonline -Confirm:$false
Use the copy button to copy the script.
Replace these values in the script with your information:
- $AppId—replace "Application-ID-FROM-AZURE-AD" with the Application ID that you created during app registration. For more information, see Register the application.
- $appName—replace "AppNAME-FROM-Azure-AD" with the Application Name that you created during app registration. For more information, see Register the application.
- $spDisplayName—replace "your_sp_displayname" with a display name for your service principal. This can be any name that you want to use to identify the service principal, for example RLH_PIP_ServicePrincipal.
Next, you can open Relativity and use the information to create the Microsoft 365 data source. For more information, see Microsoft preservation source manual setup.