


Feedback
Last date modified: 2026-Jun-12
OAuth2 clients
The OAuth 2.0 authorization framework enables a third-party application to obtain access to an HTTP service. OAuth2 clients allow you to configure external services and applications to authenticate against Relativity in a secure manner. For example, a client application can present the user with the Relativity login page to get an access token to call Relativity APIs. The application can then call the APIs to perform tasks for customizing e-discovery workflows and automation. For background information on OAuth2, see OAuth2 Specification.
This documentation contains references to third-party software, or technologies. While efforts are made to keep third-party references updated, the images, documentation, or guidance in this topic may not accurately represent the current behavior or user interfaces of the third-party software. For more considerations regarding third-party software, such as copyright and ownership, see Terms of Use.
OAuth2 clients can be used in conjunction with Relativity authentication providers and federated instances in different enterprise integration scenarios, including:
- Relativity as an authentication portal for another instance of Relativity
- Relativity as an authentication portal for another website
- Authenticating to Relativity's APIs from a standalone application without needing a Relativity user's username and password
- Embedding the Relativity login form in a native desktop application
- Embedding the Relativity login form in a mobile application
To set up an OAuth2 client in Relativity, you must correctly determine the grant type required for your application. The OAuth2 client setup information also includes a client ID, a redirect URI, and a client secret key. These details will be used to validate your application and authorize the API calls.
For security reasons, the client secret is only visible at the time of creation or reset. Be sure to copy and securely store the secret when it is first displayed, as it cannot be retrieved later. If the secret is lost, you must reset it to generate a new one.
See this related pages:
Creating or editing an OAuth2 client
To create OAuth2 clients or edit information for an existing OAuth2 client:
- Open the OAuth2 Client tab.
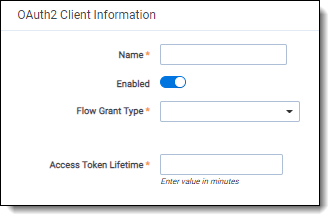
- Click New OAuth2 Client to create a new OAuth2 client, or click Edit next to the OAuth2 client you want to edit. The OAuth2 Client Information form appears.
- Complete the fields on the form. Fields in orange are required.
- Name—the descriptive name of the OAuth2 client. The name must be unique.
- Enabled—yes/no value indicating whether the client will be given access to Relativity.
- Flow Grant Type—the mechanism for acquiring an authentication token also known as OAuth2 grant type. Relativity supports the following grant types:
- Client Credential—for applications such as background processes that may need to get an access token for their own account, outside the context of any specific user. This grant type requires a client secret.
- Code—for apps running on a web server. The grant type is used to obtain both access tokens and refresh tokens and is optimized for server-side applications. The client must be capable of interacting with the resource owner’s user-agent (typically a web browser) and capable of receiving incoming requests (via redirection) from the authorization server. This grant type requires a client secret.You can't change the flow value when editing an OAuth2 client.
- Implicit—for lightweight browser-based or mobile applications typically implemented using a scripting language such as JavaScript. The implicit grant type is used to obtain access tokens (it does not support the issuance of refresh tokens) and is optimized for public clients known to operate a particular redirection URI. The client receives the access token as the result of the authorization request. This grant type does not require a client secret.
- Resource Owner—suitable in cases where the resource owner has a trust relationship with the client, such as the device operating system or a highly privileged application. The authorization server should take special care when enabling this grant type and only allow it when other flows are not viable. This grant type can be used for clients capable of obtaining the resource owner’s credentials (username and password, typically using a command line prompt). It is also used to migrate existing clients using direct authentication schemes such as HTTP Basic or Digest authentication to OAuth by converting the stored credentials to an access token. This grant type requires a client secret.
- Redirect URLs—the URLs that the user can be redirected back to after the request is authorized. Specify values only if Implicit or Code are selected in the Flow field. The URLs must include the http or https protocol prefix.
- Context User—Relativity user context for OAuth2 client authorization. This enables an administrator to restrict the access privileges on an OAuth2 client based on the user's permissions as well as audit. Context User is required if Client Credentials is selected as the OAuth2 flow, and can't be specified for other flows. An OAuth2 client continues to function even if the context user's Relativity account is disabled. The client remains operational as long as the OAuth2 client itself is enabled.
- Access Token Lifetime—the duration (in minutes) for which access tokens issued to the clients are valid. The recommended value varies depending on the specified OAuth2 flow:
- Client Credentials and Code Flow must have a short lifetime. It is recommended that the value match the Identity Server default of 1 hour (60). For more information, see Identity Server documentation (https://docs.duendesoftware.com/identityserver/reference/models/client/).
- Resource Owner access token must also have a lifetime of 1 hour because a client secret and a refresh token are available.
- Implicit flow tokens must match Relativity’s token lifetime of 10 hours (600), after which the user must log in again.
- Allow Refresh Tokens - Enabling refresh tokens will require updates to the application. You must test any changes in a sandbox instance before deploying to production.To obtain a refresh token, it is necessary to use an Authorization Code with a Proof Key for Code Exchange (PKCE) flow.
- Trusted IPs - An optional feature for the OAuth2 client object. Enter each IP address on a new line, and use CIDR notation to specify a range of IP addresses. The system checks trusted IPs whenever a token is requested using the OAuth2 client's ID and secret. If the request comes from an IP address outside the specified range, the system returns a 400 error with the message "invalid_client. IP address not allowed."Changes to Trusted IPs take up to 5 minutes to apply.
- Click Save. The form displays the new OAuth2 client with these generated field values:
- Enabled—yes/no value indicating whether the client will be given access to Relativity.
- Flow Grant Type—the mechanism for acquiring an authentication token also known as OAuth2 grant type.
- Redirect URLs—the URLs that the user can be redirected back to after the request is authorized.
- Access Token Lifetime—the duration (in minutes) for which access tokens issued to the clients are valid.
- IsSystem— specifies whether the OAuth2 client is part of an internal Relativity application.
- Client ID – the unique identifier for the Client autogenerated by Relativity.
- Client Secret – the unique secret used by the client. Also auto generated by Relativity if you select Client Credential, Resource Owner, or Code as the value of the Flow field.The client secret is only displayed once, immediately after creation or reset. You will not be able to view it again. Be sure to copy and securely store the secret at that time. If you lose the secret, you must reset it to generate a new one.
Resetting a client secret
You can reset an OAuth2 client secret for the following Flow values (grant types):
- Client Credential
- Resource Owner
- Code
To reset an OAuth2 client secret:
- From the OAuth2 client tab, locate and open the OAuth2 client you wish to delete.
- Click Reset Secret in the OAuth2 Client console.
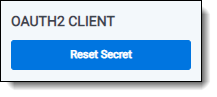
- From the confirmation dialog, click Ok. The OAuth2 client secret is reset.
After resetting, the new client secret will be displayed only once. You must copy and store it securely, as it cannot be viewed again later.
Deleting an OAuth2 client
To delete an OAuth2 client:
- From the OAuth2 client tab, locate and open the OAuth2 client you wish to delete.
- Click Delete.
- From the confirmation dialog, click Ok. The OAuth2 client is removed.
System clients can't be deleted.
Viewing an OAuth2 client audit history
Use the OAuth2 client audit history to view all actions taken on a record. Use this information to view what the values were prior to a change.
To view an OAuth2 client's audit history:
- From the OAuth2 client tab, locate and click the OAuth2 client for which you wish to view its history.
- Click View Audit. A dialog appears, listing all actions taken on that OAuth2 client.
- (Optional) Using the Export to File drop-down list at the bottom of the dialog, click Go to export the following audit history details in a .CSV file:
- User Name
- Action
- Timestamp
- Close the dialog when finished viewing the audit.