


Feedback
Reusing trained models
Note: The Active Learning application is now read-only. Create new projects in Review Center.
If you have Active Learning and Review Center installed in your workspace, you can view data for previous projects on the Active Learning History tab. Please note that uninstalling Active Learning removes the project data.
For more information, see:
Reusable Active Learning models provide the ability to take the knowledge, or the training, from one Active Learning project and re-use it in another project. A trained model contains how many times a word occurred and what those words are, essentially remembering what was relevant, what was irrelevant, and how those were defined. With that information, you can use it to find relevant documents in a new workspace.
See these related pages:
What a trained model contains
A reusable model contains the training from a previous Active Learning project, which includes:
- What words occurred.
- How many times words occurred.
- Which words generally predicted relevance or irrelevance.
The model does not contain any actual documents from the original project. Instead, it contains relevance predictors in an encrypted, digested form that cannot be accessed by human users.
Privacy considerations when reusing trained models
Reusable models can be shared across workspaces within the same instance, regardless of client domain, as long as the admin sharing the model has access to both workspaces and trained model permissions in both.
There is some risk that the model will reveal aspects of its training indirectly based on how it classifies. For example, if a document that it predicts as relevant contains the name "Jennifer" and nothing else, users can assume that the original project had "Jennifer" in the source data and that it was considered relevant. However, the source documents themselves are not actually revealed. The model does not store any identifying information such as the name of the original workspace, the name of the Active Learning project, or the control numbers of the documents that trained the original model.
You can control user access to trained models with both item-level and object-level security. For more information about permissions related to trained models, see Security permissions.
Common use cases for reusable models
If you handle cases with similar document types or subject matter, reusable models help you jump-start a new case and start reviewing relevant documents more quickly. Instead of training a new model from scratch, you can link a reusable model to a new project and immediately start coding documents that the model predicts as relevant. After the new project is underway, you can choose either to continue with both the reusable model and the local model built from newly coded documents, or you can remove the link to the reusable model and continue coding with only the local model.
Some use cases include:
- Anti-trust cases in different jurisdictions.
- Cases with similar subject matter such as medical-based reviews, toxic workplace, or bribery.
- Serial litigations.
- Internal investigations for improper or risky behavior.
You can also use reusable models to find particular document types across cases. Examples of these include:
- Culling junk documents such as spam emails.
- Culling office noise such as vacation chatter and party invitations.
- Finding specific categories of documents such as contracts or financial paperwork.
Exporting a trained model for re-use
You can export the trained model from any Active Learning project that has at least five positive and five negative documents coded. Projects with more documents coded will have more fully developed models, so we recommend exporting models from late-stage or completed Active Learning projects.
For a list of required permissions, see Security permissions.
To export a trained model from an existing Active Learning project:
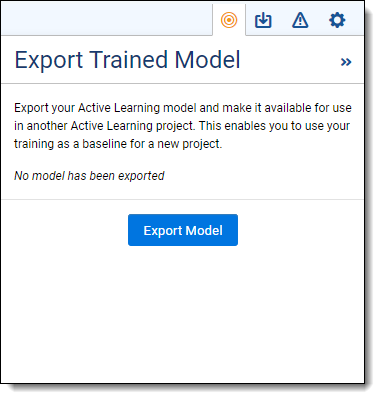
- From the Project Home dashboard, click the Export Model icon
 on the top right. This opens the Export Trained Model side panel.
 - Click Export Model.
- Fill out the following fields:
- Name—the name of your trained model. If you plan to export the model from this project multiple times, consider including a version number or a date.
- Description (Optional)—any identifying features of this model such as what to use it for or what workspace it originated from.
- Click Export.
The model will begin exporting.
Note: Exported models reflect the state of the model at the time of export. They are not linked to the original project, and they do not update themselves to reflect additional coding in the original project. Changing or deleting documents in the original project does not affect the exported model.
Viewing export status
To see the status of an export request, click the Export Model icon on the top right. The Export Trained Model panel shows the following:
- Last exported date and time.
- Last exported model's unique identifier (GUID).
- Export status.
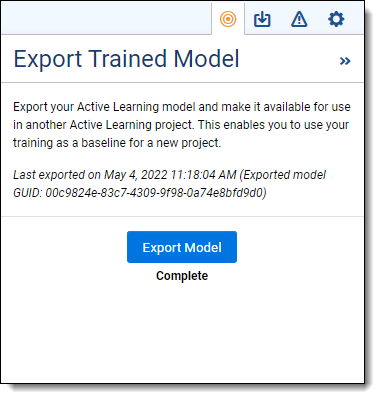
The export statuses are as follows:
- Requested—the export has not yet started.
- In Progress—the export is in progress.
- Completed—the export is complete. You can access the exported model on the Trained Models tab.
- Errored—the export failed. To view the error details, select the model on the Trained Models tab, then expand the Advanced Configuration section.
After you have exported one or more trained models, you can manage them under the Trained Models tab.
Managing trained models
You can access your trained models on the Trained Models tab in your workspace. This tab shows all models that originate in this workspace, including in-progress exports, and all models that have been shared to this workspace from outside.
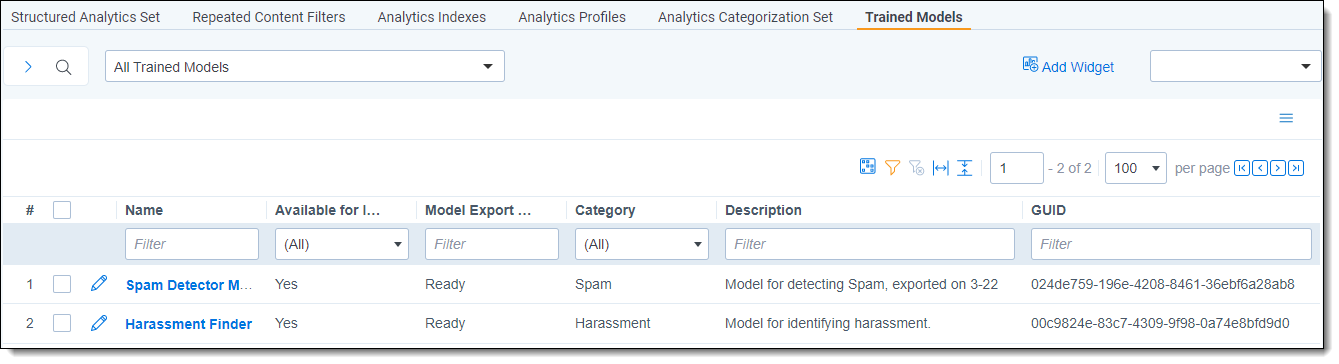
The tab shows the following for each model:
- Name
- Available for Import—this indicates if a model is ready to be shared to other workspaces.
- Model Export Status
- Category—how the model is categorized. For information on creating model categories, see Editing categories from the Trained Models tab.
- Description
- GUID—the model's Globally Unique Identifier (GUID). This ID stays the same for a model regardless of which workspace it appears in or whether it has been renamed.
If you have several trained models to manage, you may want to create a workspace to serve as a central model library. Sharing all reusable models to this library workspace, then re-sharing them to individual workspaces as needed, allows you to manage all of your reusable models in one place.
After a model has been shared to the library workspace, it can be safely deleted from its original workspace. Shared copies of models are not linked to the original copy.
Editing or deleting trained models
Every trained model is independent. Editing or deleting a trained model in one workspace does not affect shared copies in other workspaces, nor does it affect the Active Learning project the model came from.
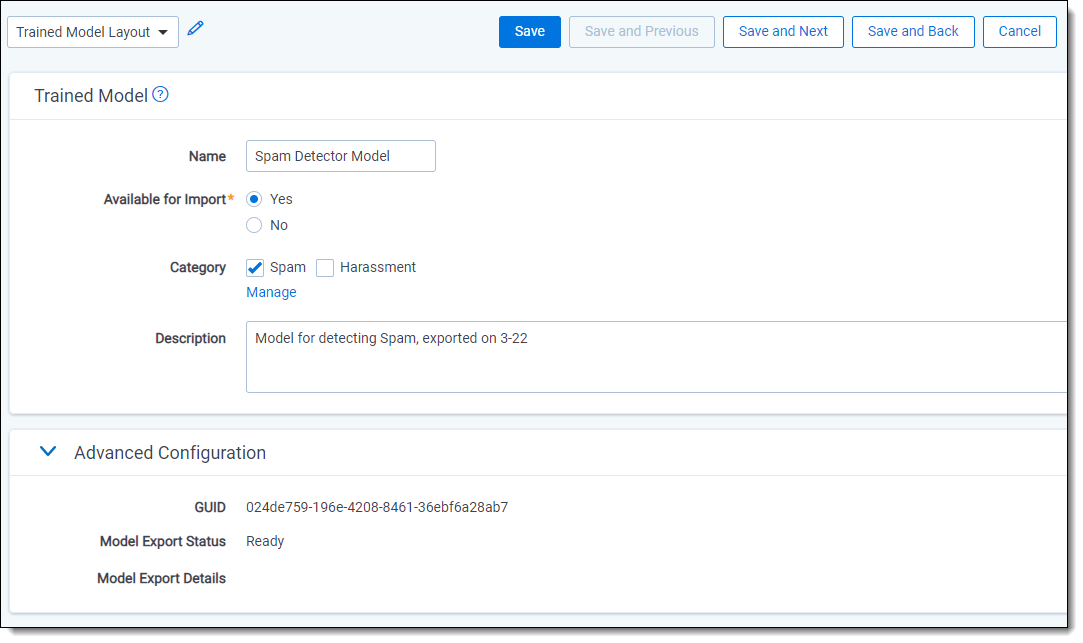
To edit a trained model:
- From the Trained Models tab, click the Edit icon (pencil) beside the model.
- Edit the fields you want to change.
- Click Save.
To delete a trained model:
- On the Trained Models tab, check the box beside the model.
- Open the Mass Operations menu at the bottom of the grid.
- Click Delete.
A confirmation message appears. - Click Delete.
Editing categories from the Trained Models tab
You can use categories to organize your trained models by type or purpose. Some example categories might include Subject Matter Specific, General Purpose, or Spam Removal. These categories remain assigned to each model even if it is exported to another workspace.
To assign a category to your trained model:
- From the Trained Models tab, click the Edit icon (pencil) beside the model.
- Click the Manage link underneath Category.
The choice creation options will appear. - Click Add Choice, then type the name of your new category.
- Select the checkbox for the newly created category.
- Click Save.
Editing categories from the Fields tab
Trained model categories can also be edited under the Fields tab. This enables you to set up categories before any models exist in your workspace.
To edit trained model categories from the Fields tab:
- At the top of the screen, select All Fields from the drop-down menu.
- Filter the Object Type column to show Trained Model.
- Click the Edit icon (pencil) beside Category.
- In the Choices section, click Add Choice, then type the name of your new category.
- Press Enter.
Changes are saved automatically.
For more information, see Fields.
Sharing trained models to another workspace
Models can be shared across workspaces within the same instance, regardless of client domain. To share a model, you must have Trained Model – Edit and Trained Model – Add permissions in the target workspace.
For more information on permissions, see Security permissions. For more information on model sharing and privacy concerns, see Privacy considerations when reusing trained models.
To make a model available for use in another workspace:
- On the Trained Models tab, check the box beside the model or models you want to share.
- Open the Mass Operations menu at the bottom of the grid, then click Share Trained Models.
- A workspace list will appear.
- Select the workspace or workspaces you want to share to, then click Share.
Note: You can only share models that have the Model Export Status of Ready. If any of your checked models are not ready to share, you will receive a warning saying those models will be excluded from the share operation.
After sharing, each workspace has its own separate copy of the model. If you re-share a model to a workspace that already has a model with the same GUID, it updates the model's name, description, and categories. The training within the model remains the same.
Category behavior when sharing models
If your model has a category assigned when you share it, Relativity will check if a category with that exact spelling already exists in the target workspace. If it does, the preexisting category will be assigned to the shared model. If the category does not yet exist, it will automatically be created and assigned.
In order to auto-create categories for shared models, you must have permissions to create choices in the target workspace. For more information, see
Linking a reusable model to an Active Learning project
After a model has the Ready export status, you can link it to another Active Learning project to jump-start the coding predictions for the new project. For most situations, we recommend linking models to a newly created or early-stage project. However, it is possible to link them at any stage. Any documents that are already coded within the destination project will add to the relevance predictions, but they are not required for the model to build.
Training in the linked model and the local model of a project are weighted equally. In other words, the relevance predictions are calculated as if the coding decisions within the project and the linked training model both came from the same set of documents.
To link a reusable model when creating a new Active Learning project, see Creating the classification index.
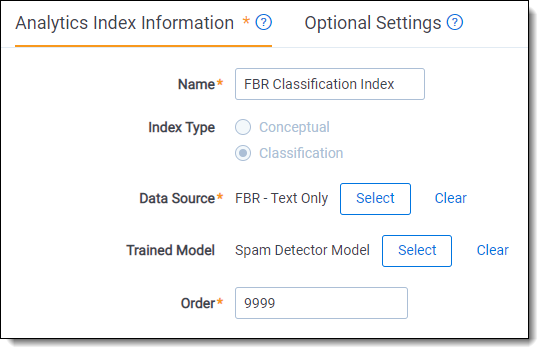
To link a reusable model or to change models for an existing Active Learning project:
- From the Analytics Indexes tab, click the Edit icon (pencil) beside the classification index used for the Active Learning project.
- Next to Trained Model, press Select.
The model selection options will appear. - Select the model you want to link.
- Click Set.
- Click Save and Back to return to the Analytics index console.
- Click Run.
The index build options will appear. - Select Full Population.
- Click Run.Note: This will also clear the suppressed duplicates for your Active Learning project.
Exporting from projects with linked models
When you link a reusable model to an Active Learning project, the local model built from that project’s documents is stored separately from the reusable model. Because of this, if you export a trained model from a project that has a reusable model linked to it, the newly exported model will only contain training from local documents coded within the project. It will not contain any training from the linked model.
If you want to create a trained model that has training from two different document sets, you must collect and code both sets of documents in a single project.
Removing a linked model from an Active Learning project
Once you have coded enough documents in the project for the local model to build, you can remove the linked model at any time. After you remove it, the project's relevance predictions will be calculated only from coding decisions within the project.
To remove a linked model from an Active Learning project:
- From the Analytics Indexes tab, click the Edit icon (pencil) beside the classification index used for the Active Learning project.
- Next to Trained Model, click Clear.
- Click Save and Back to return to the Analytics index console.
- Click Run.
The index build options will appear. - Select Full Population.
- Click Run.Note: This will also clear the suppressed duplicates for your Active Learning project.
How linked models behave with ARM
When using the Archive, Move, Restore (ARM) tool, linked models will be retained if you archive and restore within the same instance. However, if you attempt to restore a workspace with a linked model in another instance, you will not be able to populate your classification index and will receive an error. You will need to remove the linked model from the index to run a full population.