


Feedback
Last date modified: 2026-May-28
Contracts Viewer
The Contracts Viewer is a review interface designed specifically for contract review in RelativityOne. Use it to locate key clauses, data points, and contract metadata more efficiently than with the standard document viewer.
You must run Contracts OCR on your documents before the Contracts Viewer is available. You do not need to run any other type of Contracts analysis. For more information, see run Contracts OCR.
How the viewer displays:
- When you click a document that has not been through Contracts OCR, the standard Relativity viewer opens.
- When you click a document that has been through Contracts OCR, the Contracts Viewer opens.
The Contracts Viewer is organized into three main areas:
| Area | Location | What it contains |
|---|---|---|
| Contract Navigation pane | Left | Table of Contents, sections, related documents, data points, definitions, and document list |
| Document display | Center | Extracted text or imaged view of the contract, plus search and toolbar functions |
| Details panel | Right | Coding layouts for updating document fields during review |
Definitions
This section provides an overview of how you can navigate definitions in the Contracts Viewer after extracting definitions from contracts.
You can navigate to where a contract defines terms using the definitions pane in the viewer or the definitions object list.
Definitions pane
To navigate to where a contract defines terms via the Definitions pane:
- Click the Definitions section in the left pane of the Contracts Viewer.
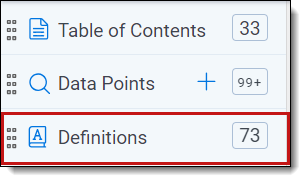
- Click a definition name. Definitions are sorted alphabetically.
- The contract navigates to the location of that term and underlines the definition in orange.
Definitions object list
To add the Definitions object list to a layout:
- Click the layout drop-down menu in the top right of the viewer.
- Click the edit icon next to the layout you want to modify.
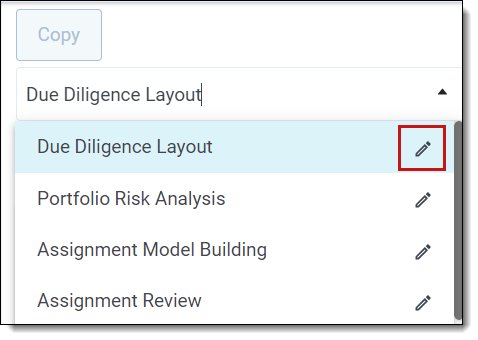
- Under Layout Options, click the Add Category drop-down menu and select the Add Object List option.
- Select the Contracts Definition object.
- Click Save and Close.
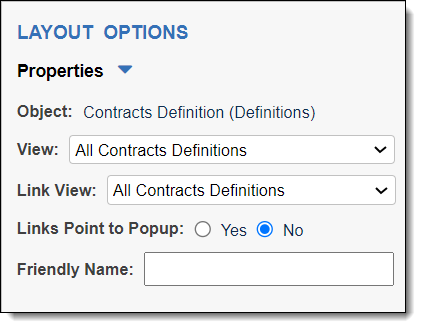
After adding the object list, you can filter definitions by name and click the Text field to navigate to a definition's location in the contract.
Adding definitions
To add new definitions to the list:
- Expand the Contracts Definition pane on the right side of the viewer.
- Click Add.
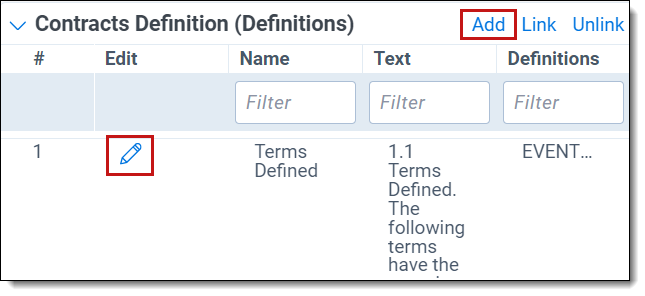
To edit an existing definition:
- Click the Edit button on the inline object list.
- Use the filter to search for the definition by name.
- Click the Edit button in the row for that definition, then click the Text field to navigate to the definition in the contract.
When adding a new definition, use send-to-field to capture the Text value. This stores the location of the definition in the contract. If the Text field does not display a green dot, the location was not captured using send-to-field.
Sections
The sections that analysis create appear beneath the Table of Contents on the left side of the Contracts Viewer.
Each section displays a section heading, which it extracts verbatim from the contract. Below the heading is the section type, provided by Contracts Analysis or manual entry.
When you click a section in the left pane, you're navigated to that section in the extracted text. The section is also marked with a blue highlight to the left of the text.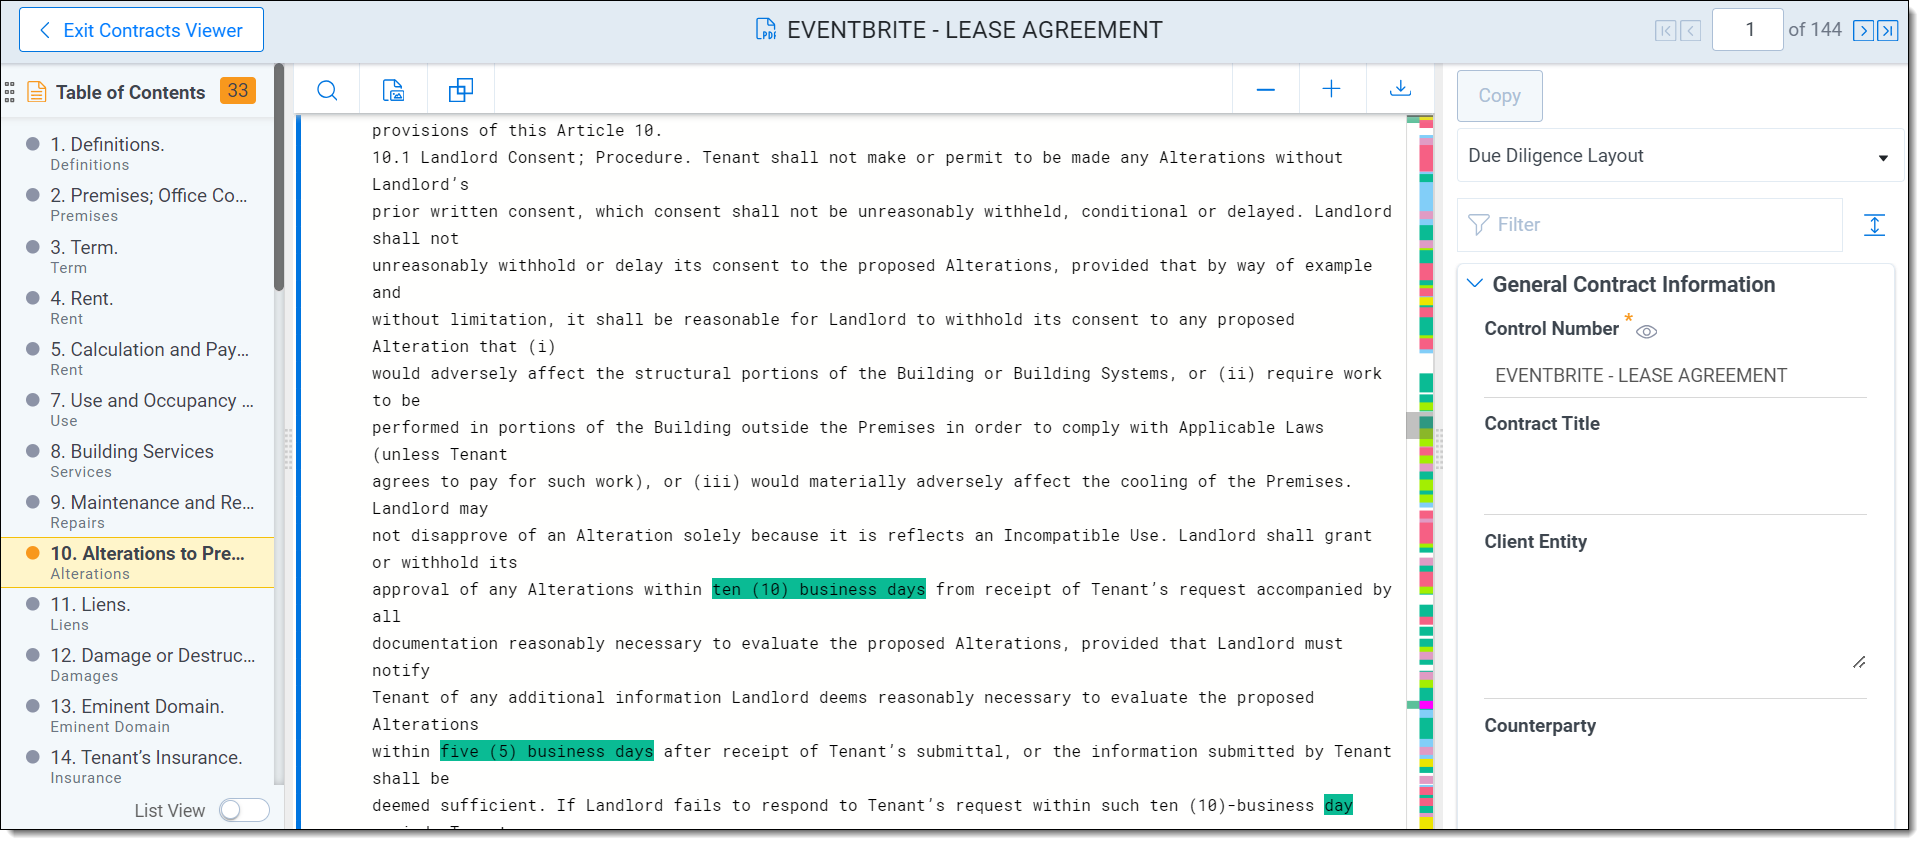
Context menu for sections
Right-clicking on a section in the left pane will display the following options:
| Option | Description |
|---|---|
| Merge Above | Combines the section with the one above it. The merged section inherits the heading and type of the upper section. |
| Merge Below | Combines the section with the one below it. The merged section inherits the heading and type of the upper section. |
| Edit Section Heading and Type | Opens a modal where you can update the section heading and section type. |
| View in Relativity | Opens the Relativity Viewer in a new tab displaying the section document. |
| Code Section | Enters section-coding mode where you can code this individual section document. |
| Delete | Deletes the section and its Relativity document. An Undo option appears at the bottom of the screen. If you do not undo the deletion, you lose any coding applied to that section. |
Document list navigation
Reviewers require the flexibility to navigate to contracts across their batch. This can help spot patterns and similarities for faster review and augment coding decisions using similar contracts.
To access the document list directly from the Contracts Viewer, select List View beneath the Contract Navigation Pane.

The document list appears in place of the Section Navigation Pane.
You can sort, filter, and click to access contracts from the document list.
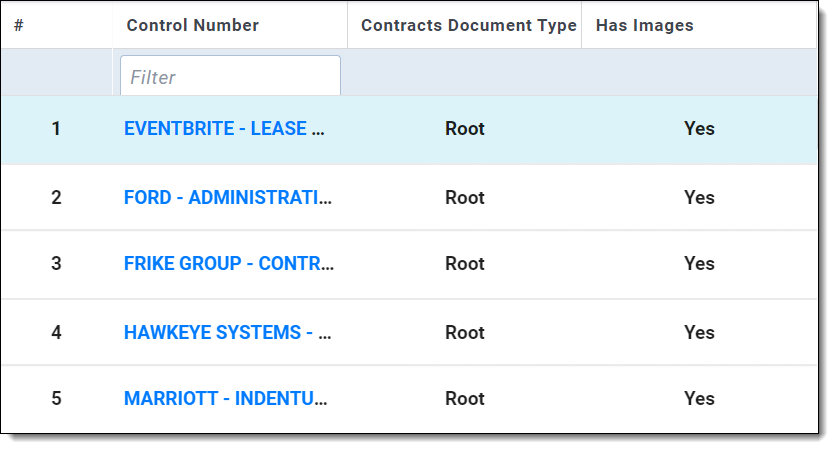
Open the detailed list view in its own tab or window and arrange side by side for dual coding power.
Related documents and their sections
The first item located at the top of the navigation pane is always the Root Agreement. The second item that appears is the Related Documents tab, which displays all related documents including amendments, exhibits, addendums, etc. Administrators can configure this using the Contracts Related Documents field.
Click the Related Documents button to expand and view all related documents. 
Click a related document to view its sections. When you click on a section, you're redirected to its location in the extracted text, marked with a blue highlight to the left of the text.
Data points
The Data Points pane helps reviewers locate and navigate to key data in contracts. For more information on setting up data points, see Create and edit regular expressions and Set up data points in the viewer.
To navigate data points:
-
View regular expression or persistent highlight results by opening the Data Points pane in the Contracts Viewer.
To see all the data points, including ones without hits in the document, click Show All.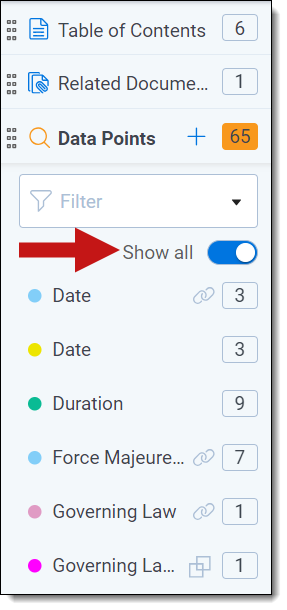 There is a Filters drop-down menu in the Data Points pane. You can select a filter from the drop-down menu to only show the data points associated with that filter.
Learn more about setting up data point filters in Set up data points in the viewer. - The data point group name is the name of the regular expression or persistent highlight set created for this review project. When you click a data point group, it expands to show all results. If a result repeats throughout the contract, it includes a badge indicating the number of individual hits. You can expand this result group to see all results. Click the dot to the left of the data point group name to toggle the highlights on and off.
- Each result displays the section type where it appears. Click a result to go to its location in the contract. Even if you toggle the highlights off, you can click results and navigate to them in the contract.
- Data points are also visible on the Highlights Minimap, and respect all colors from regular expressions or persistent highlight sets.
Highlights minimap
Whether you're in the first pass review or the final QC stage, the Highlights Minimap provides a visual snapshot of important data points and reviewer actions across a document.
Clicking on the Highlights Minimap navigates to search results, coded fields, data points, or comments. A different color categorizes each action, providing a visual overview of key contract data across the document.
Highlights minimap color key
Below are descriptions of each of the colors that appear in the highlights minimap:
| Color | Indicates |
|---|---|
| Green | Text captured using the send-to-field action |
| Red (underline, when you click a coded field) | The text associated with a coded field in a layout |
| Red (search results) | Locations of search results; highlight by clicking the up and down arrows |
| Gray (default) | Text found by regular expressions or persistent highlight sets listed in Data Points. Turns fire red when clicked from the Data Points pane. |
| Yellow | Locations of inline comments |
Contracts toolbar
The Contracts toolbar appears at the top of the Contracts viewer. This section explains how to use various functions in the Contracts toolbar.
Search for text in a contract
The Contracts Viewer search bar supports the following search modes. 
| Mode | Icon | Description | Supports symbols |
|---|---|---|---|
| Default | (none highlighted) | Displays real-time results as you type. Matches partial words, whole words, multiple words, and symbols. | Yes |
| Whole Word | ab | Finds case-insensitive results for complete words only. For example, searching "termination" excludes "determination." | No |
| Case Sensitive | Ab | Finds case-sensitive results. For example, searching "Chief Executive Officer" excludes "chief executive officer." Can be combined with Whole Word search. | No |
| Regular Expressions | .* | Uses regular expression syntax. For more information, see [Create and edit regular expressions]. | N/A |
Auto-run toggle
On — Search runs and returns results as you type.
Off — Search runs only after you press Enter.
Viewing search results
After running a search, matching results will appear below the search bar in the results list. The results list helps reviewers understand the location of a result in the contract.
Results appear in order of which section of the contract they appear in, with results Not in a Section appearing first.
The section heading appears in bold, with the section type noted in parentheses.
The number of the result you're currently viewing and the total number of results found shows in the search bar. You can use the arrows in the search bar to navigate to result locations in the contract.
Clicking on a result in the result list will also navigate you to its place in the contract.
To expand or collapse your search results, click the three dots below the search bar.
View documents
With the Contracts Viewer reviewers can open the current document in Relativity's review interface. Click the Relativity icon to open a new browser tab that shows the same document in Relativity.
Working in multiple tabs
By keeping both tabs open, you can switch back and forth between the Contracts and Relativity Viewers. Or, you can separate tabs into their individual windows, allowing a side-by-side view.
When both tabs are open the action of navigating from document to document in the Contracts Viewer will duplicate in the Relativity Viewer. For instance, if you click to the next document in the Contracts Viewer, the Relativity Viewer will replicate that action and proceed to the next document.
This can save time by removing extra or redundant clicks and opening new tabs or windows.
Image viewer
You can click the Show PDF button to view the original PDF of the contract in Contracts Image Viewer.
Navigating section, data point, and send-to-field highlights
Whether clicking on a section, data point, or field, the Image Viewer will navigate to your highlight and display it in an active state, as the Text Viewer does.
As you toggle between the text and PDF, Contracts will keep your location in the document based on last-clicked highlight.
Context menu options
If you right click on the document in the image viewer, a context menu with an option to Go To Text appears. Selecting Go To Text will take you to that exact location in the Text Viewer.
If you select text in the Image Viewer, a context menu that includes the option to Go To Text and the option to Send to Field appears. If you select Send to Field, you can click on a field on a layout to populate it. For more information see Coding contracts via send-to-field
Adjust text size
To adjust text size of the contract you're viewing in the Contracts Viewer:
- Click the plus (+) or minus (-) icons in the Contracts Toolbar to increase or decrease the text size of the document you are viewing.
- Clicking the magnifying glass icon will reset the text back to 100%.
Context menu
The Context menu is the main review interface of the Contracts Viewer. This section describes functions available in the Context menu.
Send text to the section heading field
If segmentation did not properly extract the section heading and you'd like to correct it, you can send text to the section heading field. You can select text in the viewer and, if it's within a section, send that text to the Section Heading field.
To send text to the section heading field:
- Select text within a section in the text or image viewer.
- Right click and select the Send to Section Heading button.

The section with text you selected will go into a loading state on the left pane and the new section heading will appear.
Create sections
You can create sections directly from the viewer context menu in the course of your review. You can use the left pane navigation and search to find the section you'd like to create.
To create sections from the Contracts Viewer:
- Select the text of the section that you would like to create.
- Click Create New Section.
- A modal with the text of your section will appear on the right. A section information form will appear on the left.
-
Contracts will try to auto-populate the section heading and the section type. If it cannot, add that information manually.
For section heading, you can select text and Send to Section Heading. - Once you enter your section heading and type, click the Save button.
The left pane of the viewer will reload with your newly created section. This section is now a new document in Relativity grouped with the parent contract via the Document Parts field.
If the text you select to create a new section is part of an existing section, Contracts will auto-adjust the offsets and highlights associated with that existing section so that it will be smaller. If the text you select to create a new section covers an entire existing section, Contracts will delete that section and replace it with your new section.
Remove text from sections
If text is at the beginning or end of a section, you can select it in the viewer and remove it from the section. This can be helpful if segmentation mistakenly lumped a page number or footer at the end of a section.
To remove text from sections:
- Select text at the beginning or end of a section in the text or image viewer.
- Click Remove Text from Section.
The section you removed text from will go into a loading state on the left pane.
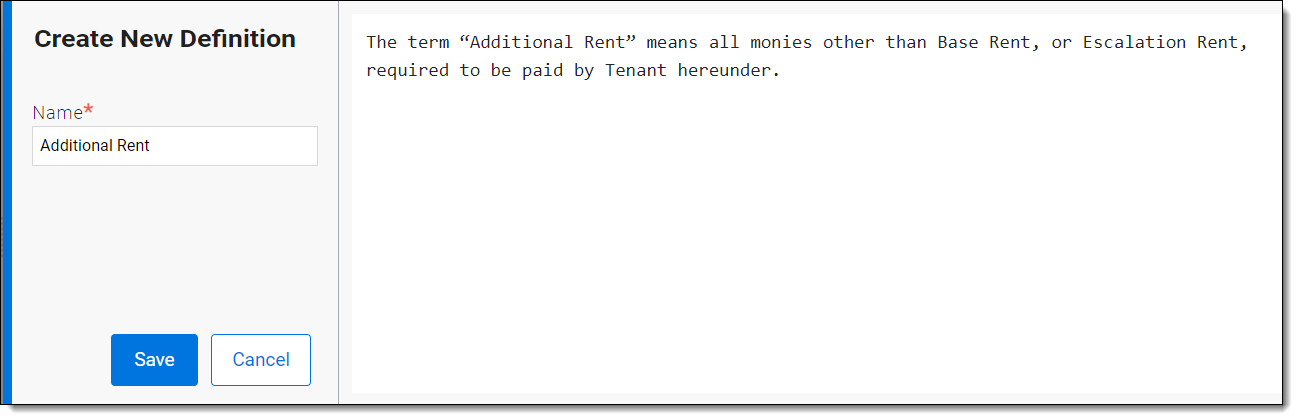
Create definitions
You can create new definitions that you can navigate to later in the Contracts Viewer. You can create a new definition that will appear in the Contracts Definition object list and the definitions pane of the viewer by selecting text in the viewer and clicking Create New Definition. You can also add a new definition by using the definitions object list on a layout.
To create definitions by selecting text in the viewer:
- Select your definition in the contract text and click Create New Definition .
-
Contracts will try to auto-populate the definition name. If it cannot, you can enter the text of the name manually or select text on the right and click Send to Name.
-
Click Save and your new definition will appear in the definitions pane to the left.
If you refresh the page, it will also show up in the definitions object list on your layout.
To create definitions via the definitions object list:
- Add the Definitions object list to your layout.
- Click Add on the top right of the object list.
- Type the name of the definition in the Name field.
- Select the full definition text in the contract and send to field for the Text field.
- Click Save in the top right of the object list.
Create bookmarks and links
You can create bookmarks in documents and link other text in the document to those bookmarks.
For example, you might see text in a contract that says “as referenced in Section 6.2.” You could go to Section 6.2, create a bookmark for it, and then create a link for the “as referenced in Section 6.2” text that will point to your bookmark.
You can also link text to sections that Contracts has found using Segmentation or that you created manually using Section Edit Mode.
Add a bookmark
To add a new bookmark:
- Select any text in the Contracts Viewer.
- Choose the context menu option to Add Bookmark.
- A bookmark icon will show up in the left margin. Hovering over it will underline your bookmarked text.
Link to a bookmark
To link text to a bookmark:
- Select any text in the Contracts Viewer.
- Choose the context menu option to Link to Bookmark.
- A list of all bookmarks will appear.
- Sort or filter on fields to find your bookmark and click anywhere in the row to select it.
- Click Save.
- The text you selected will appear as a hyperlink. Clicking it will navigate you to the bookmark you selected.
Link to a section
To link text to a section:
- Select text.
- Choose the context menu option to Link to Section.
- A list of all sections will appear, filtered by the contract you are viewing.
- Sort or filter on fields to find your section and click anywhere in the row to select it.
- Click Save.
- The text you selected will appear as a hyperlink. Clicking it will navigate you to the section you selected.
Deleting bookmarks or links
To delete a bookmark or link:
- Right click on a bookmark icon or a link.
- Choose the context menu option to Delete Bookmark or Delete Link.
Linking to bookmarks or sections in other documents
You can link to bookmarks or sections that are in other documents using the same steps.
After doing so, clicking on the link will open a new browser tab and navigate you to the appropriate bookmark or section in the other document.
Navigate to exact lines between image and text
When viewing a document in the Contracts Viewer, you can navigate between the same line of text in the image and text viewers.
From the image viewer:
To navigate to text in the text viewer from the image viewer:
- Right-click any word of text that you're reading.
- The option to switch to the Text Viewer will appear.
- Click Go to Text.
This will navigate you to the same line in the Text Viewer.
From the text viewer:
To navigate to text in the image viewer from the text viewer:
- Right-click any word of text that you're reading.
- The option to switch to the Image Viewer will appear.
- Click Go to Image.
This will navigate you to the same line in the Image Viewer.
Context menu search
With Context menu search reviewers can use text found in a contract to activate the full search functionality found in the Viewer Toolbar.
To enable Context menu search, use one of the following:
- Highlight your text to activate the Context Menu and click Search.
- Highlight your text and use your keyboard to hit Ctrl + / B on Windows devices, or Command + F on Apple devices.