


Feedback
Last date modified: 2026-May-28
Publishing files
Publishing files to a workspace is the step that loads processed data into the environment so reviewers can access the files. At any point after file discovery is complete, you can publish the discovered files to a workspace. During publish, Relativity:
- Applies all the settings you specified on the profile to the documents you bring into the workspace.
- Determines which is the primary document and primary custodian and which are the duplicates.
- Populates the All Custodians, Other Sources, and other fields with data.
For details on deleting files after publishing, see Post-publish delete.
Publish includes the three distinct steps of deduplication document ID creation, primary document publish, and overlaying deduplication metadata. Because of this, it’s possible for multiple processing sets to be publishing at the same time in the same workspace.
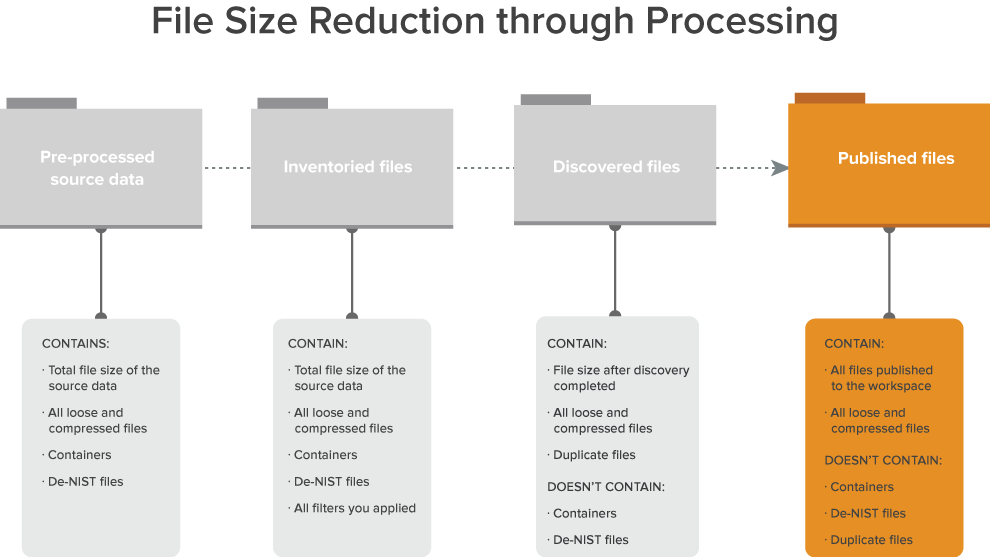
The following graphic depicts how publish fits into the basic workflow you use to reduce the file size of a data set through processing. This workflow assumes that you are applying some method of de-NIST and deduplication.
The following is a typical workflow that incorporates publish:
- Create a processing set or select an existing set.
- Add data sources to the processing set.
- Inventory the files in that processing set to extract top-level metadata.
- Apply filters to the inventoried data.
- Run discovery on the refined data.
- Publish the discovered files to the workspace.
Running file publish
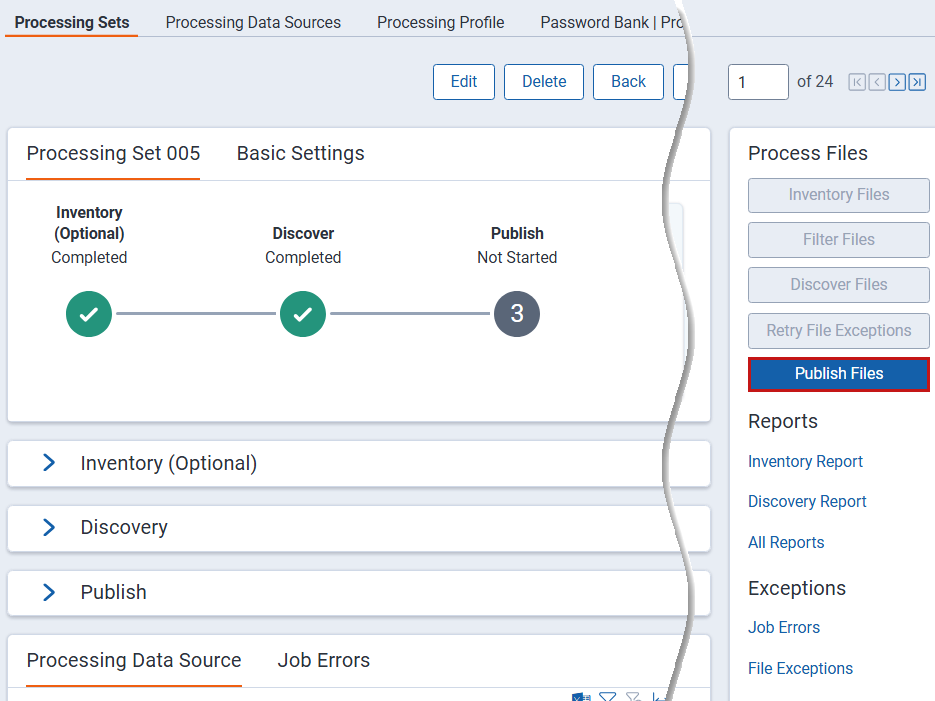
To publish files, click Publish Files. You only need to manually start publish if you disabled the Auto-publish set field on the profile used by this processing set.
When processing documents without an actual date, Relativity provides a null value for the following fields: Created Date, Created Date/Time, Created Time, Last Accessed Date, Last Accessed Date/Time, Last Accessed Time, Last Modified Date, Last Modified Date/Time, Last Modified Time, Primary Date/Time, and Sort Date/Time. The null value is excluded and not represented in the filtered list.
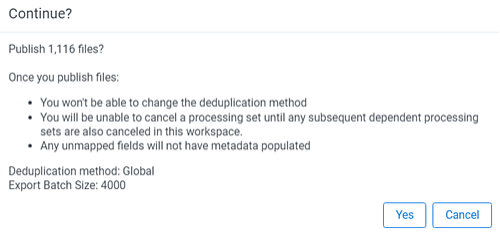
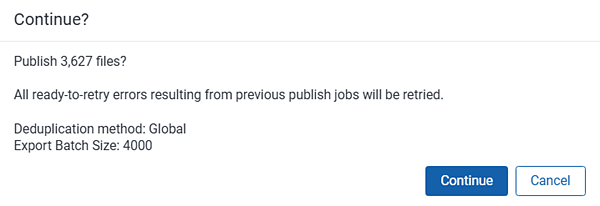
When you click Publish Files, you are presented with a confirmation message containing information about the job you are about to submit. If you have not mapped any fields in the workspace, the message reflects this. Click Publish to proceed or Cancel to return to the processing set layout.
Consider the following when publishing files:
- During publish, Relativity assigns control numbers to documents. Duplicates do not receive unique control numbers. You cannot control the order in which Relativity assigns control numbers to files. The sorted order of files in the originating file system (generally, alphabetically) does not influence the order in which files are published, folders created, and control numbers assigned. Therefore, you may see sequential gaps in control numbers within folders.
- The publish process includes the three distinct steps of deduplication document ID creation, primary document publish, and overlaying deduplication metadata; as a result, it’s possible for multiple processing sets to be publishing at the same time in the same workspace.
- After data is published, we recommend that you not change the Control Number (Document Identifier) value, as issues can arise in future publish jobs if a data overlay occurs on the modified files.
- If you have multiple data sources attached to a single processing set, Relativity starts the second source as soon as the first set reaches the DeDuplication and Document ID generation stage. Previously, Relativity waited until the entire source was published before starting the next one.
- The Publish option is available even after publish is complete. This means you can republish data sources that have been previously published with or without errors.
- If you have configured auto-publishing on the processing profile, then when you start discovery, you are also starting publish once discovery is complete, even if errors occur during discovery. This means that the Publish button is never enabled.
- Once you publish files, you are unable to delete or edit the data sources containing those files. You are also unable to change the deduplication method you originally applied to the set.
- When you delete a document, Relativity automatically recalculates deduplication and publishes a new document to replace the deleted one, if applicable.
- If you arrange to copy source files to the Relativity file share, Relativity no longer needs to access them once you publish them. In this case, you are not required to keep your source files in the location from which they were processed after you published them.
- Publish is a distributed process that is broken up into separate jobs, which leads to more stability by removing this single point of failure and allowing the distribution of work across multiple workers. These changes enable publish to operate more consistently like the other processing job types, where batches of data are processed for a specific amount of time before completing each transactional job and moving on. Note the upgrade-relevant details regarding distributed publish:
- UpdateMastersWithDedupeInformation- the third phase of publish that finishes before metadata updates if no deduplication fields are mapped.
- The deduplication fields are All Custodians, Deduped Custodians, All Paths/Locations, Deduped Count, and Deduped Paths.
- If no deduplication fields are mapped for a publish job where the deduplication method is either Global or Custodial, then the UpdateMastersWithDedupeInformation job should finish before overlaying or updating any metadata.
- The tracking log reads "Overlaying dedupe information will not be performed on the primary documents. The deduplication fields are not mapped."
- The following instance settings have been added to facilitate the work of distributed publish. Due to the change in publish behavior caused by these new instance settings, we recommend contacting Relativity support for guidance on what values to specify for these settings before performing an upgrade.
- ProcessingMaxPublishJobCountPerRelativitySQLServer- the maximum number of publish jobs per Relativity SQL server that may be worked on in parallel.
- The default value is 21. Leaving this setting at its default value results in increased throughput.
- This updates on a 30-second interval.
- If you change the default value, note that setting it too high could result in web server, SQL server, or BCP/file server issues. In addition, other jobs in Relativity that use worker threads may see a performance decrease, such discovery or imaging. If you set it too low, publish speeds may be lower than expected.
- You cannot allocate more jobs per workspace than what is allowed per SQL server.
- ProcessingMaxPublishSubJobCountPerWorkspace- the maximum number of publish jobs per workspace that may be worked on in parallel.
- The default value is 7. Leaving this setting at its default value results in increased throughput.
- This updates on a 30-second interval.
- If you change the default value, note that setting it too high could result in web server, SQL server, or BCP/file server issues. In addition, other jobs in Relativity that use worker threads may see a performance decrease, such discovery or imaging. If you set it too low, publish speeds may be lower than expected.
- You cannot allocate more jobs per workspace than what is allowed per SQL server.
- ProcessingMaxPublishJobCountPerRelativitySQLServer- the maximum number of publish jobs per Relativity SQL server that may be worked on in parallel.
- UpdateMastersWithDedupeInformation- the third phase of publish that finishes before metadata updates if no deduplication fields are mapped.
The following table provides the recommended values for each instance setting per environment setup:
| Environment setup | ProcessingMaxPublishSubJobCountPerWorkspace | ProcessingMaxPublishJobCountPerRelativitySQLServer |
|---|---|---|
| Tier 1 | 3 | 7 |
| Tier 2 | 6 | 12 |
| RelativityOne baseline | 3 | 7 |
Once you publish data into Relativity, you have the option of exporting it with Import/Export.
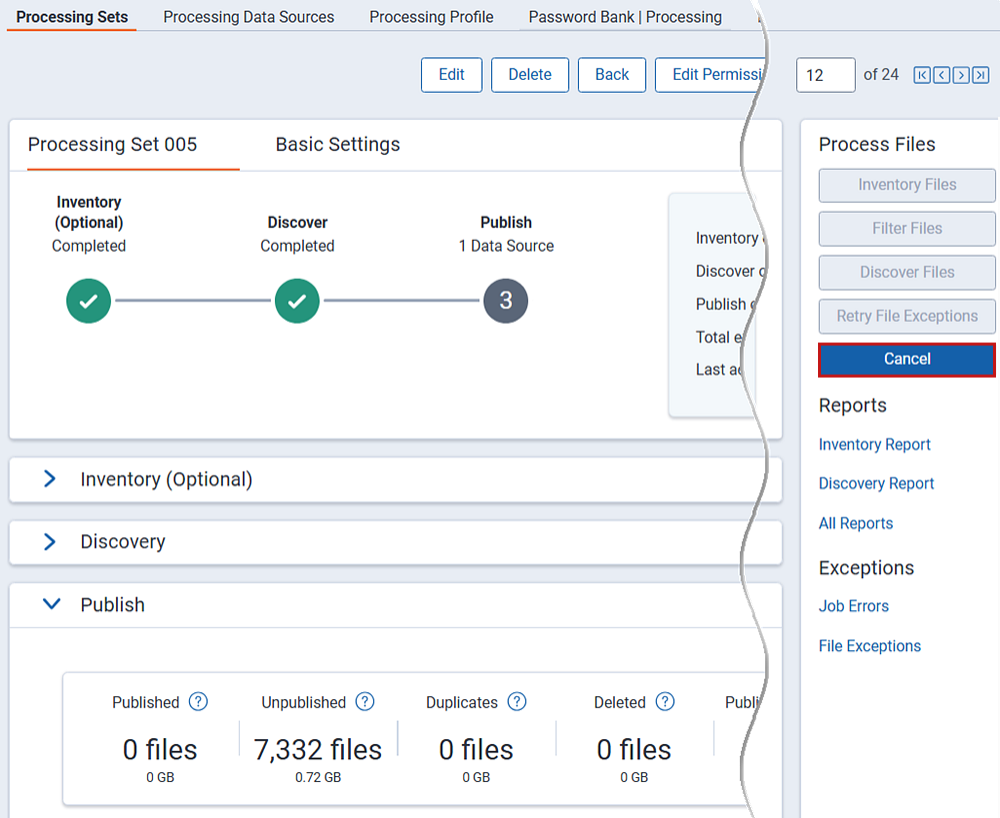
When you start publish, the Publish Files button changes to Cancel. You can use this to cancel the processing set. For more information, see Canceling publish.
Publish process
The following graphic and corresponding steps depict what happens behind the scenes when you start publish. This information is meant for reference purposes only.
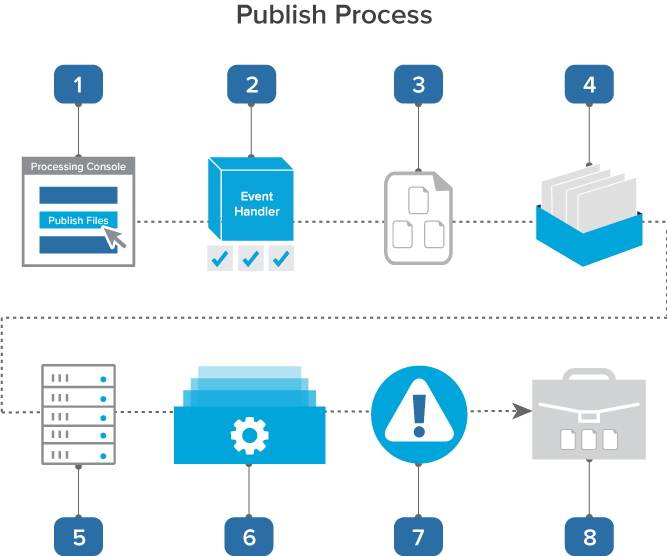
- You click Publish Files on the processing set console. If you have set auto-publish after discovery, publish begins automatically and you are not required to start it manually.
- A console event handler checks to make sure that the set is valid and ready to proceed.
- The event handler inserts all data sources on the processing set into the processing set queue.
- The data sources wait in the queue to be picked up by an agent, during which time you can change their priority.
- The processing set manager picks up each data source based on its order, all password bank entries are synced, and the agent submits each data source as an individual publish job to the processing engine. The agent then provides updates on the status of each job to Relativity, which then displays this information on the processing set layout.
- The processing engine publishes the files to the workspace. Relativity updates the Publish is a distributed process that is broken up into separate jobs, which leads to more stability by removing this single point of failure and improves performance by allowing the distribution of work across multiple workers. Thus, publish is consistent with the other types of processing jobs, in that it operates on batches of data for a specific amount of time before completing each transactional job and moving on.
- Any errors that occurred during publish are logged in the errors tabs. You can view these errors and attempt to retry them. See Processing error resolution for details.
- You set up a review project on the documents you published to your workspace, during which you can search across them and eventually produce them.
Monitoring publish status
You can monitor the job's progress on the Processing Set Details page. This page breaks down each of the processing phases (Inventory, Discover, Publish) into their own sections that include dashboard summaries, sub-job details, and counts.
Publish job details
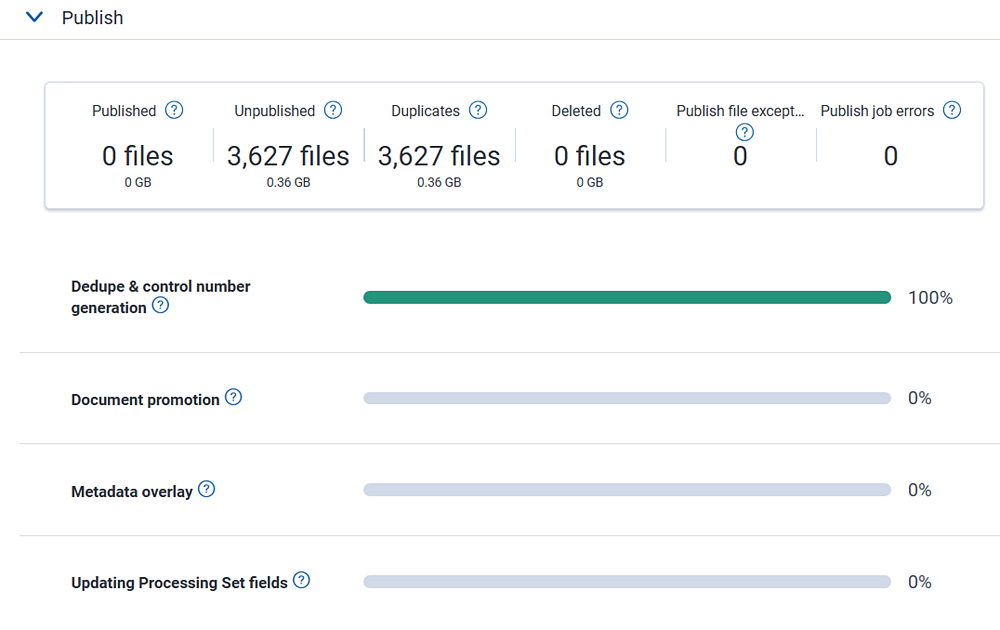
Dashboard numbers
- Published—the number of files promoted to the Documents tab.
- Unpublished—the number of files that have either errored or not gone through the Publish phase yet. Some files may be unpublished if they had discover errors which were later resolved, with the files now waiting to be published.
- Duplicates—the number of files identified as duplicates. These include duplicate parent and child loose documents.
- Deleted—the number of files deleted from the Document tab after Publish completes.
- Publish file exceptions—the number of files with publish exceptions. These issues result in unpublished files and should be remediated.
- Publish job errors—the number of publish job errors. These issues can results in large groups of unpublished files and should be remediated.
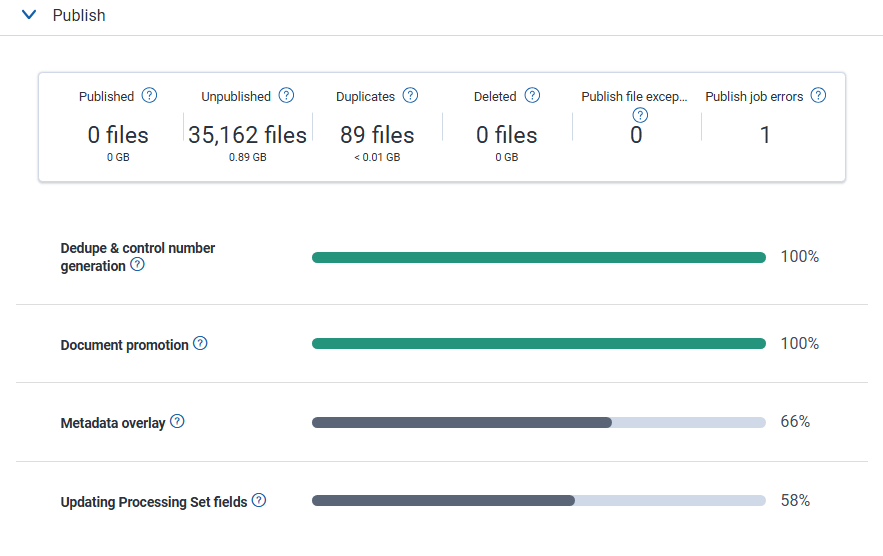
Progress bars
- Dedupe & control number generations—Relativity identifies primary and duplicate records by comparing hash values against all published documents in the workspace. The resulting primary records receive a generated control number.
- Document promotion—Relativity imports primary documents and their families to the Documents tab.
- Metadata overlay—Relativity updates previously published records with information from duplicate documents.
- Updating Processing Set fields—Relativity updates associated fields in the processing set with results from the job.
See Processing error overview for details.
Once publish is complete, the status section displays a blue check mark and you have the option of republishing your files, if need be. For details, see Republishing files.
Canceling publishing
If the need arises, you can cancel your publish job before it completes.
To cancel publish, click Cancel.
Consider the following about canceling publish:
- You cannot cancel a republish job. The cancel option is disabled during republish.
- Once the agent picks up the cancel publish job, no more errors are created for the data sources.
- If you click Cancel Publishing while the status is still Waiting, you can re-submit the publish job.
- If you click Cancel Publishing after the job has already been sent to the processing engine, then the set is canceled, meaning all options are disabled and it is unusable. Deduplication isn’t run against documents in canceled processing sets.
- Errors that result from a job that is canceled are given a canceled status and cannot be retried.
- Once the agent picks up the cancel publish job, you cannot delete or edit those data sources.
- When you cancel a processing set during publish, documents already published before canceling are not deleted. You must manually delete them to remove them.
Once you cancel publish, the status section is updated to display the canceled set.
- When you publish multiple sets with global deduplication, dependencies are put in place across the sets to ensure correct deduplication results. Because of this, cancel behavior for publish has been adjusted in the following ways.
- If you need to cancel three different processing sets that are all set to global or custodial deduplication, you must do so in the reverse order in which you started those publish jobs; in other words, if you started them 1-2-3 order, you must cancel them in 3-2-1 order.
- When Global deduplication is set, cancel is available on all processing sets in which the DeDuplication and Document ID generation phase has not yet completed. Once the DeDuplication and Document ID generation phase is complete for all data sources on the set and there are other processing sets in the workspace that are also set to be deduped, the cancel button is disabled on the processing set.
Republishing a processing set
The following information is specific to republishing files via the processing set console and is distinct from republishing files at the file level via the Files tab. For details on republishing at the file level, see Republishing files on the Files tab topic.
You can republish a processing set any time after the Publish Files option is enabled after the previous publish job is complete. Republishing is required after retrying errors if you want to see the previously errored documents in your workspace.
To republish, click Publish Files. The same workflow for publishing files applies to republish with the exception that Relativity does not re-copy the settings from the profile to the data sources that you are publishing.
When you click Publish Files again, you are presented with a confirmation message containing information about the job you are about to submit. If you haven not mapped any fields in the workspace, the message reflects this. Click Publish to proceed or Cancel to return to the processing set layout.
The status section is updated to display the in-progress republish job.
The Publish dashboard and status bars reflect the new job's progress.
Consider the following when republishing files:
- All ready-to-retry errors resulting from this publish job are retried when you republish.
- Deduplication is respected on republish.
- When you resolve errors and republish the documents that contained those errors, Relativity performs an overlay, meaning that there is only one file for the republished document in the Documents tab.
- Once published, a processing set may not be republished if the numbering type (default or level) on the set’s profile has been changed.
- Once published, the start number(s) on a processing set may not be changed. Attempting to do so is disallowed.
- Changes made to numbering type in a processing profile are not respected after initial publishing. Data Source information cannot be changed after initial publishing.
Retrying exceptions after publish
During the Discover phase, some files may be identified as having exceptions, such as password-protected files that cannot be decrypted. You can still publish these files, but the published data may have incomplete metadata or missing extracted text. If you resolve exceptions for files that have already been published, you must republish those files so the updated version replaces the original in the workspace. To republish, see Republishing files from the Files tab or Common Use cases for using the Republish mass action .