


Feedback
Last date modified: 2026-May-28
Discovering files
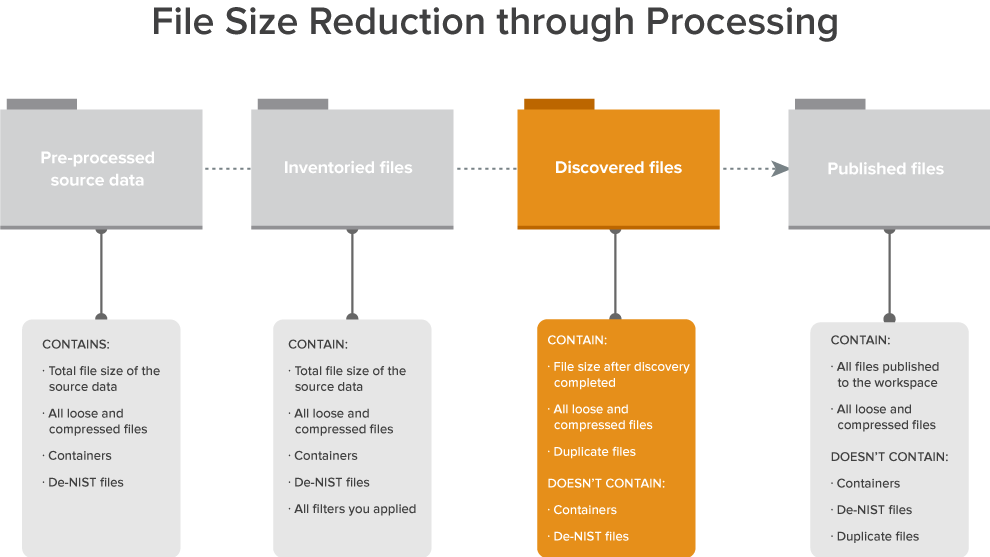
Discovery is the phase of processing in which the processing engine retrieves deeper levels of metadata not accessible during Inventory and prepares files for publishing to a workspace.
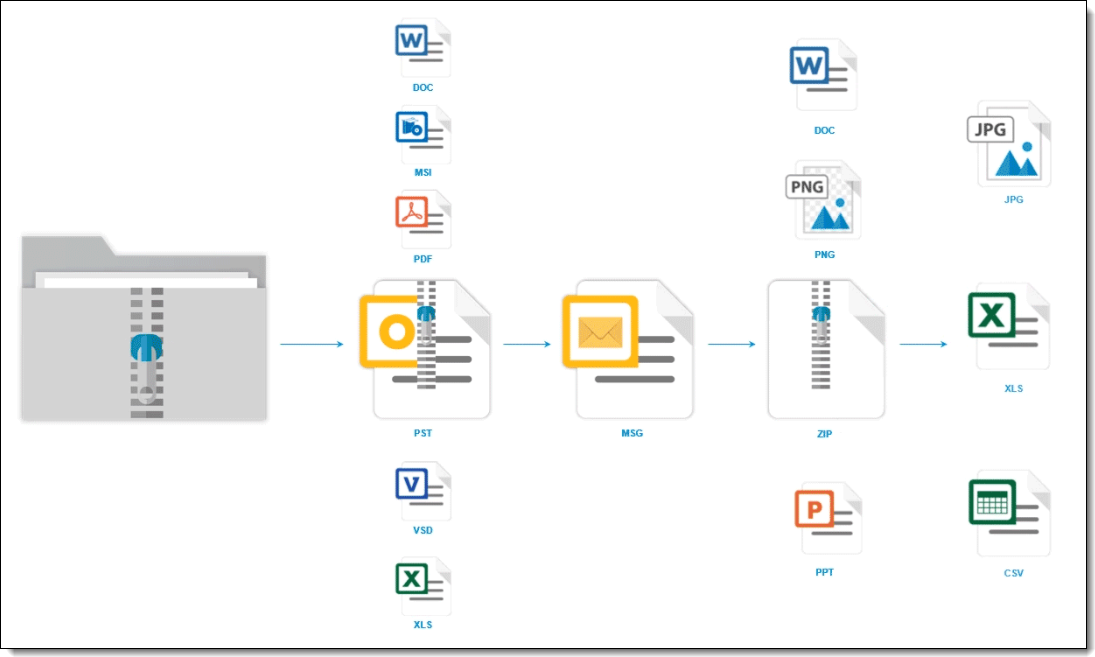
The following graphic depicts how discovery fits into the basic workflow used to reduce the file size of a data set through processing. This workflow assumes that you are applying some method of deNIST and deduplication.
The following is a typical workflow that incorporates discovery:
- Create a processing set or select an existing set.
- Add data sources to the processing set.
- Inventory the files in that processing set to extract top-level metadata.
- Apply filters to the inventoried data.
- Run discovery on the refined data.
- Publish the discovered files to the workspace.
Running file discovery
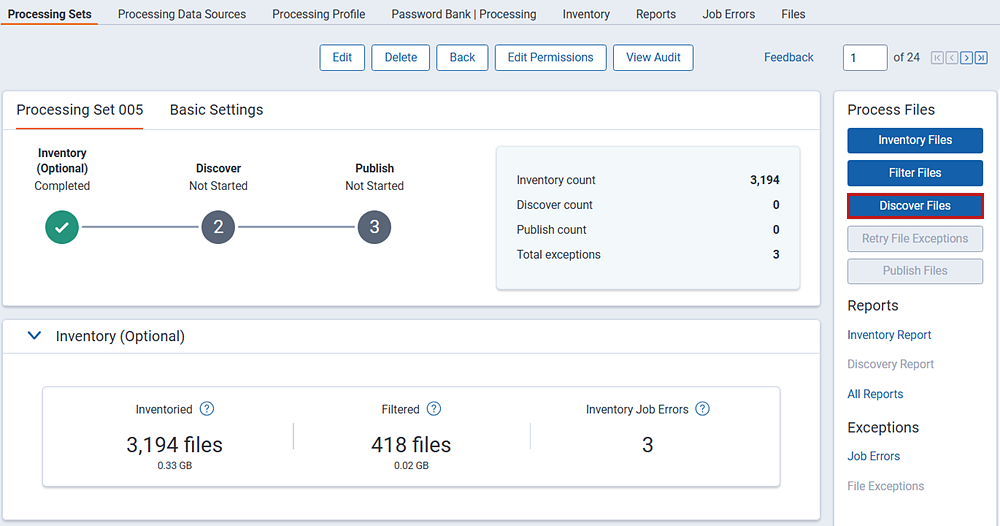
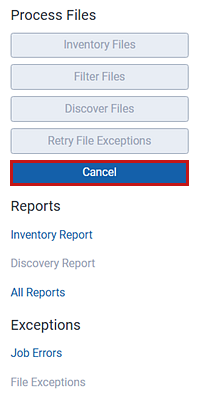
To start discovery, click Discover Files in the Process Files console. You can run the discover job whether or not you have inventoried or filtered your files.
When processing documents without an actual date, Relativity provides a null value for the following fields: Created Date, Created Date/Time, Created Time, Last Accessed Date, Last Accessed Date/Time, Last Accessed Time, Last Modified Date, Last Modified Date/Time, Last Modified Time, Primary Date/Time, and Sort Date/Time. The null value is excluded and not represented in the filtered list.
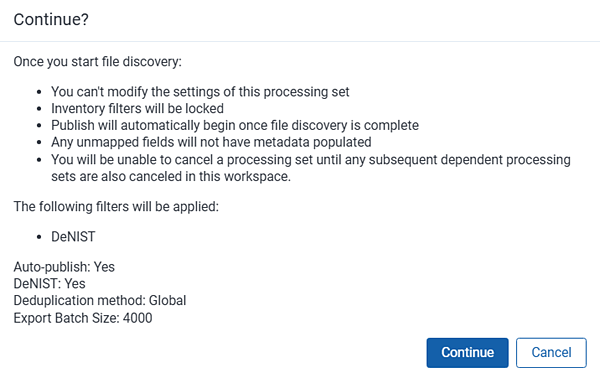
A confirmation message appears with the discovery settings and filters applied. Click Continue to proceed with discovery or Cancel to return to the processing set layout. If you enabled auto-publish, the confirmation message provides the option to discover and publish the files.
Consider the following when discovering files:
- Relativity does not re-extract text for a re-discovered file unless an extraction error occurred. This means that if you discover the same file twice and you change any settings on the profile, or select a different profile, between the two discovery jobs, Relativity will not re-extract the text from that file unless there was an extraction error. This is because processing always refers to the original/primary document and the original text stored in the database.
- If you have arranged for auto-publish on the processing set's profile, the publish process begins when discovery finishes, even if errors occur during discovery. This means that the Publish button is not enabled for the set until after the job is finished. You also see a status display for both discover and publish on the set layout.
- When discovering file types, Relativity refers to the file header information to detect the file type.
- You can’t change the settings on any processing job at any point after file discovery begins. This means that once you click Discover, you can’t go back and edit the settings of the processing set and re-click Discover Files. You would need to create a new processing set with the desired settings.
- You cannot start discovery while inventory is running for that processing set.
- When you start discovery or retry discovery for a processing job, the list of passwords specified in the password bank accompanies the processing job so that password-protected files are processed in that job.
Relativity prioritizes application metadata over operating system file properties where possible. For example, if a file type stores application metadata, such as Date Created and Date Modified, Relativity retains those values for the file. If the application metadata fields are empty or the file type does not store application metadata, Relativity uses the operating system's file properties instead. Application metadata is more reliable since it is stored in the file itself. Operating system file properties can often change. For example, moving a file from one folder to another may change property values. Examples of file types that store application metadata include Microsoft Office files such as Word or Excel.
When you start discovery, the Discover button changes to Cancel. Click this to stop discovery.
Discovery process
The following graphic and corresponding steps depict what happens behind the scenes when you start discovery. This information is meant for reference purposes only.
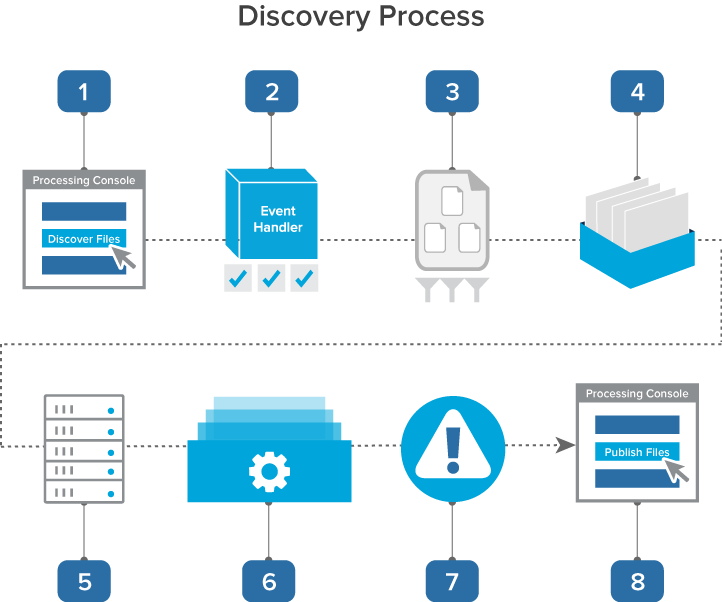
- You click Discover Files on the processing set console.
- A console event handler copies all settings from the processing profile to the data sources on the processing set and then checks to make sure that the set is valid and ready to proceed.
- The event handler inserts all data sources into the processing set queue.
- The data sources wait in the queue to be picked up by an agent, during which time you can change their priority.
- The processing set manager agent picks up each data source based on its order, all password bank entries are synced, and the agent submits each data source as an individual discovery job to the processing engine. The agent then provides updates on the status of each job to Relativity, which then displays this information on the processing set layout.
- The processing engine discovers the files and applies the filters you specified in the Inventory tab. It then sends the finalized discovery results back to Relativity, which then updates the reports to include all applicable discovery data.
- Any errors that occurred during discovery are logged in the errors tabs. You can view these errors and attempt to retry them. See Processing error resolution for details.
- You can now
Container extraction
It may be useful to understand how the processing engine handles container files during discovery. Specifically, the following graphic depicts how the engine continues to open multiple levels of container files until there are no more containers left in the data source.
This graphic is meant for reference purposes only.
Special considerations - OCR and text extraction
Consider the following regarding OCR and text extraction during discovery:
- If enabled on the processing profile, Relativity performs OCR on the following qualifying files:
- Pixel-based image formats, such as .tiff, .jpeg, .gif, .bmp, .png and so forth.
- Vector-based drawing formats such as .cad, .vsd/x, .dwg, and so forth.
- Note that for .svg files, Relativity only supports extraction of text-based elements. Images within these files are not subject to OCR.
- PDF pages with image layers.
- Images embedded in documents, as well as email in-line images; also requires enabling the Extract children setting on the processing profile.
- Relativity populates the Extracted Text field with the results of OCR performed during processing discovery.
- Documents successfully OCR'd during processing can be identified in the workspace using the fields Has OCR Text and Text Extraction Method. For more information, see Mapping processing fields.
- For multi-page records with a mix of native text and images, Relativity segments out OCR and extracted text at the page level, not the document level. Relativity combines all page-level text and OCR within the published Extracted Text field.
- In the case where a file contains both native text and OCR within the extracted text of the record, there is a header in the Extracted Text field indicating the text that was extracted through OCR. This header only exists if the OCR Text Separator option is enabled in the processing profile.
- Relativity extracts OCR to Unicode. Any and all language scripts represented in the OCR, including non-English characters, are Unicode-encoded in the published Extracted Text field.
- Relativity displays a missing extracted text error if it cannot OCR one or more pages in a document. The error reads: An error occurred on X (number of) page(s) when attempting to OCR. Consider retrying. Page numbers missing OCR text : (page numbers)
- The processing engine copies native files and OCR results to the document repository. Whether or not you publish these files, they remain in the repository, and they are not automatically deleted or removed.
- If OCR is not essential to your processing job, it is recommended to disable OCR and related settings on your processing profile. Forgoing OCR at this stage can significantly reduce processing time and prevent irrelevant documents from having OCR performed on them. You can then perform OCR on only relevant documents post-publish within the workspace. For more information regarding OCR settings and impact on processing, see Processing profile - Extraction settings.
Monitoring discovery status
You can monitor the job's progress on the Processing Set Details page. This page breaks down each of the processing phases (Inventory, Discover, Publish) into their own sections that include dashboard summaries, sub-job details, and counts.
Discover job details
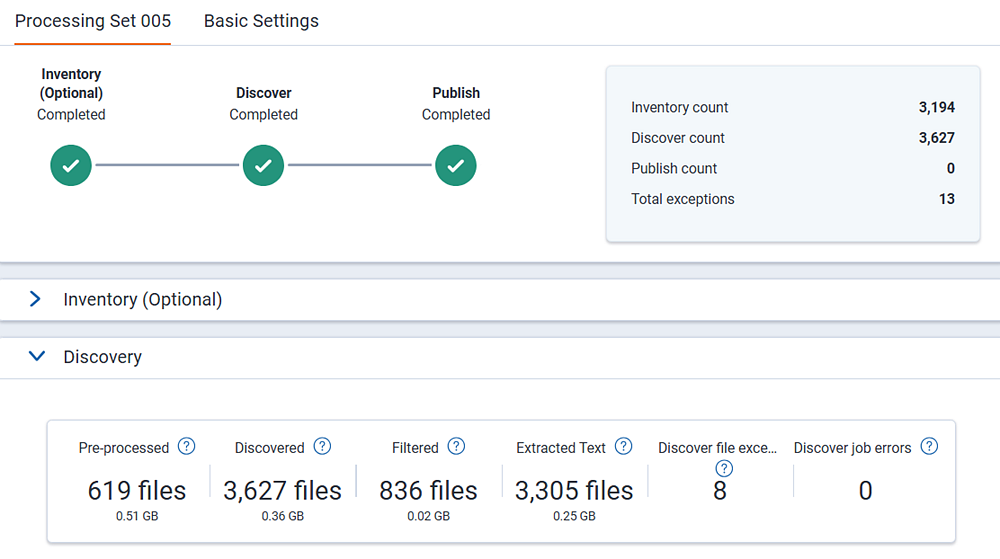
Dashboard numbers
- Pre-processed—the number and size of all files in the data source location for the processing set.
- Discovered—the number of files discovered, excluding deleted files and containers.
- Filtered—the total number of non-container files filtered from the Discover job. This includes files filtered from Inventory, Inclusion/Exclusion, and DeNIST. This number includes both parent and child documents. To view specific filter counts, view the Discovery Exclusion Results report.
- Extracted Text—the number of files where Relativity obtained text either directly from the file or through OCR. Not all files discovered have text extracted, for example, image files that do not have text. Previously discovered files with extracted text are included in this count.
- Discover file exceptions—the number of files with Discover exceptions. Some Discover file exceptions are expected in cases of corruption or encryption.
- Discover job errors—the number of job errors that occurred during Discovery. Job errors are critical issues that must be remediated. If a job error occurs during the initial expanding files stage, it will be unresolvable by default. You should create a new processing set.
In some rare cases, you may see an additional field called Files removed after Retry. If you retry discovery errors, this field appears when the total file count after retrying is less than the original discovery file count. For example, you see the Files removed after Retry field is 10. This number tells you the total number of files discovered after retrying errors is ten less than the original number of discovered files.
Progress bars
Each processing phase—Inventory, Discover, and Publish—consists of distinct sub-jobs that execute sequentially until the phase is complete. Progress for each job is visually represented by progress bars that appear under the dashboard. Once all sub-jobs within a phase are finished, the progress bars are no longer displayed.
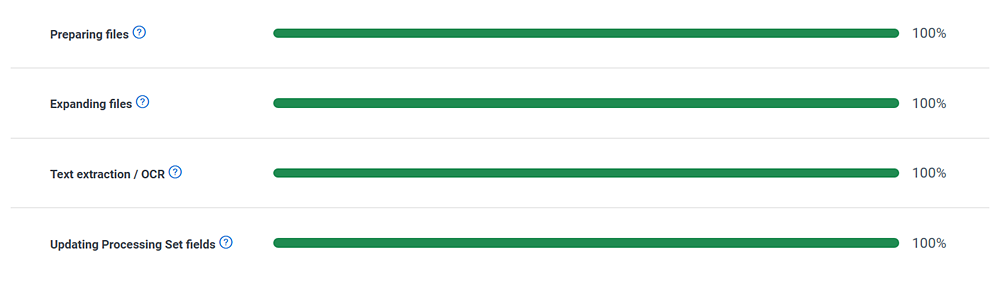
- Preparing files—Relativity identifies and preps data from the data source(s) for expansion and extraction.
- Expanding files—Relativity expands all source records to locate files and extract metadata.
- Text extraction/OCR—Relativity extracts text from discovered files. If enabled, it performs OCR on applicable records to extract additional text. Be aware that OCR can affect performance and accounts for the majority of the overall job time.
- Updating Processing Set fields—Relativity updates associated fields in the processing set with the job results.
Once discovery is complete, the status section displays a check mark, indicating that you can move on to publishing your files or viewing your files in the Discovered files view.
Canceling discovery
Once you start discovery, you can cancel it before the job reaches a status of Discovered with errors or Discover files complete.
To cancel discovery, click Cancel in the Process Files console.
Consider the following regarding canceling discovery:
- If you click cancel while the status is still waiting, you can re-submit the discovery job.
- If you click cancel after the job has already been sent to the processing engine, the set is canceled, meaning all options are disabled and it is unusable. Deduplication isn’t run against documents in canceled processing sets.
- If you have auto-publish enabled and you cancel discovery, file publishing does not start.
- Once the agent picks up the cancel discovery job, no more errors are created for the processing set.
- Errors resulting from a canceled job are given a canceled status and cannot be retried.
- Once you cancel discovery, you cannot resume discovery on those data sources. You must create new data sources to fully discover those files.
Once you cancel discovery, the status section is updated to display the canceled state.
