


Feedback
Last date modified: 2026-May-20
Layouts
Layouts are web-based coding forms that give you the ability to view and edit document fields. You can use layouts to develop workflows specific to the needs of your case. You can develop layouts that contain only the fields required to complete specific review tasks, making the review process clean and intuitive. You can also use object-level permissions to turn layouts on and off as necessary.

Layouts permissions
The following permissions are needed to use layouts:
| Object Security | Tab Visibility | Other Settings |
|---|---|---|
|
|
Creating and editing layouts
To create a new layout or edit an existing one:
- Navigate to the Layouts tab.
- Click New Layout. To edit a layout, click the Edit link next to the layout's name. The Layout Information details layout opens.
- Complete the required fields on the Layout Information layout. An orange bar to the right of the field name indicates that it is required. See Layout Information fields
- Click Save.
- From the Layout console, click Build Layout to open the layout builder. See Using the layout builder.
Layout Information fields
The Layout Information contains the following fields:

Layout Information
- Owner drop-down—determines which users can view the layout. Select from the following options:
- Public—all users can see the layout. This is the default selection.
- Specific User—limits the visibility of the layout to the selected user in the drop-down.
- Me—limits visibility to the logged in user.System admins can view layouts and other securable items that users have made private.
- Object Type—the object type that the layout uses to modify or code. For example, select Document as the object type if you were creating a layout for coding documents.
- The Document layout is the only layout that contains the Enable Copy From Previous field. See Copy from Previous.
- Name—the name of the layout. There is a 50-character limit for this field.
- Order—the number that represents the position of the layout in relation to the other layouts. The lower the number, the higher the position on the list. Layout order can be any positive or negative integer, but you can't use decimals.
- View Order—click to open up a pop-up window displaying the order of existing views.
- Overwrite Protection—prevents a user from saving changes to an item that another process has modified since the user opened or edited the layout. By default, this field is set to Disabled.
- You can edit this field only when the instance setting AllowChangesToOverwriteProtection is set to True in the instance setting table in SQL. By default, this value is False.
- If you disable Overwrite Protection, we recommend that you avoid using Save & Next while coding documents because there is a possibility that your coding decisions may not be saved if another user is editing the same document at the same time. Instead, as a best practice, we recommend clicking Save and then carefully reviewing the layout to ensure your coding selections have been saved before navigating to the next document.
- You can edit this field only when the instance setting AllowChangesToOverwriteProtection is set to True in the instance setting table in SQL. By default, this value is False.
- Relativity Applications—associates the layout with an application created in the Relativity Applications tab. Click Select to display the Select Items pop-up, and choose an application. To set this option, you must have the permission Manage Relativity Applications, available under Admin Operations on the Security page.If users have many layouts that they use during document review, you can add a new layout with dashes in the Name field, (-----------) and an appropriate order number to serve as a separator. This assists in organizing layouts and building the workflow.

Other
- Keywords—include any key words to associate with the layout.
- Notes—contains any notes regarding the layout.
Changing layouts
The layout with the lowest order number displays by default when a user opens a document. Depending on your screen resolution and the length of the current layout's name, it may appear truncated in the layouts drop-down menu. To display a tool-tip with the layout's full name, hover your cursor over the layouts drop-down menu.
You can change layouts before or while you are reviewing documents by doing the following:
- Click on the layouts drop-down menu.
- Select the desired layout.If you have entered a coding decision and have not saved it before selecting a new layout, a pop-up will display. Click Cancel to go back and save the coding decision before changing layouts or click OK to discard the coding decision and proceed to the new layout.
Using the layout builder
The layout builder is a customizable screen where users can create a layout. The layout console exists within the layout builder, which is available once you save a layout or when you select an existing layout from the Layout List page.
To build a layout, click Build Layout in the Layout console. The layout builder appears.

The layout builder contains the following components:
- Edit Layout Information: [Layout Name]—click this link to navigate back to edit mode for the layout you are currently updating. See Creating and editing layouts.
- Category—contains fields on the layout. See Adding and editing categories.
- Layout group—consists of one or more categories or object lists in a tabular format. See Creating and editing a layout group.
Layout Options console
Use the Layout Options console to build your layout. Clicking an item to the left of the console displays that item's properties for you to interact with.
The Layout Options console contains the following items:
- Properties—depending on the selected item in the layout, that item's properties appear here. See Field properties or Object list properties.
From the Properties section, click
 to collapse the properties or click
  to expand an item's properties.
 - Add Category/Add Object List drop-down—use these buttons to add a category or an object list to the layout.
- Add Category—adds a new category to the layout. See Adding and editing categories.
- Add Object List—adds a new object list to the layout. See Adding and editing an object list.
- Fields—drag and drop available fields onto the layout category or object list. See Adding fields and text.You cannot add fields stored in Data Grid to layouts.
Creating and editing a layout group
A layout group consists of one or more categories or object lists that display in a tabular format to maximize screen space and eliminate scrolling in the layout. Use layout groups on the Document or RDO layout.
A layout group may consist of both categories and objects.
To create a layout group:
- From the layout builder, click and drag a category/object list over another category/object list, then let go of your cursor click. A plus sign appears to the right of the category that you're dragging the other category onto.
 The category/object list appears in a new tab.
- Click
 or drag another existing category/object list onto the layout group to add more items to the group.
 - Click Save or Save and Close.
To delete a category/object list, click  next to the item. If the category/object list contains fields, a warning appears before deletion.

To move a category/object list outside of a layout group, click and drag that item out of the group and place anywhere on the layout.
Layout Group properties
When you select a layout group, the Layout group properties appear in the Layout Options console.
From the Properties section, click to collapse the properties or click to expand an item's properties.
The layout group properties contain the following items:
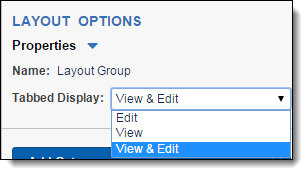
- Name—the name of the layout group property.
- Tabbed Display—this option determines when to render the layout group as tabs. When the layout group does not display as tabs, it displays in a sequential, vertical list.
- Edit—displays the tabbed layout group only when a user is in edit mode. Once the user saves and views the layout, the categories render in a list.
- View—displays the tabbed layout group only when a user is in view mode. When the user is editing the layout, the categories render in a list.
- View & Edit—displays the tabbed layout group when a user is in view and edit mode.
Saving the layout
Changes made to a layout are applied when you click Save. The next time a user loads the layout when editing or selecting to go to the next document, the changes are visible.
If a user is in the process of editing a document when a change is made to the layout, the Overwrite Protection setting determines whether the user can successfully save those edits, or if they need to re-open the layout and make their selections again before saving.
Adding a choice to a layout
To add a choice to a layout in edit mode:

- Click the Manage link on a single choice or multiple choice field on the layout. The Choice editor modal opens.
- Click Add Choice,Add Many Choices, or Click to add a choice.
- Enter a name for the choice or many choices.
- (Optional) Click Details to further customize the choice.
- Modify the details of the choice.
- Click Close.
New choices appear at the bottom of the list of choices. New choices also appear in the Choices tab and Field forms.
If you have edit permissions, you can reorder the choice.
Pop-ups on the layout
In most instances, choices and objects appear as check boxes and radio buttons. Occasionally there are too many options to reasonably display on the layout, such as in a large list of issues. In these cases, you can display the choices in a pop-up picker. To add a field with a pop-up display, select Popup Picker on the Display Type field on the Add or Edit Field to Layout form.
To access the pop-up display for a field, click Select. You can filter the choices in the pop-up to locate the desired one.