Last date modified: 2026-Jul-22

Express Transfer Preferences

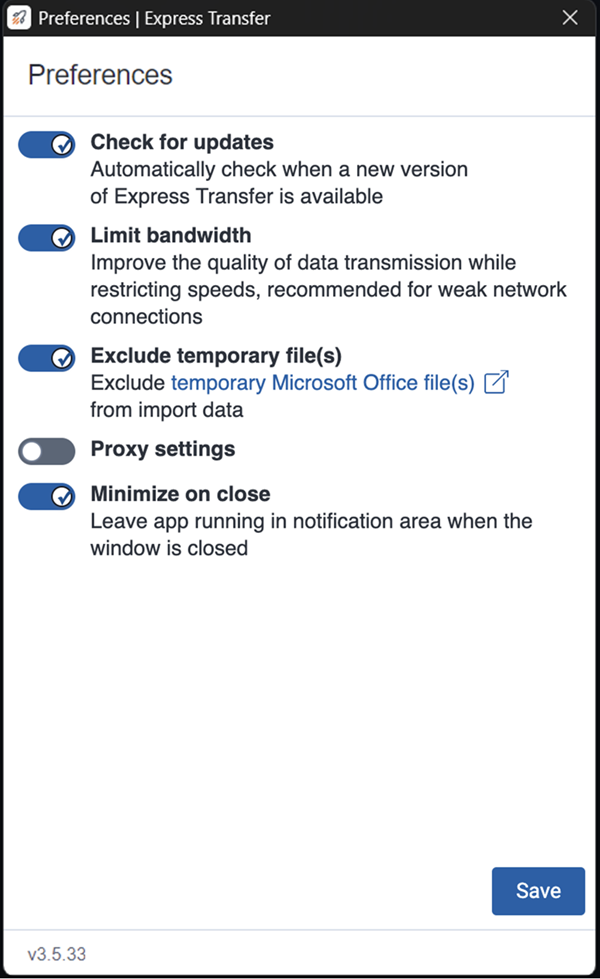
Use Express Transfer Preferences to modify the Check for Updates setting, limit bandwidth, exclude temporary Microsoft Office files from data import, configure proxy settings, and choose the Close button behavior.

Automatically checking for software updates

You can configure whether you want the system to automatically check for new software versions of Express Transfer each time it opens and notify you with a message box. By default, this feature is enabled in Express Transfer Preferences. We recommend keeping the default setting so the system can automatically check for updates and help ensure you are using the latest feature versions. To check for updates manually, use the Check for Updates option in the Express Transfer system tray. See Manually checking for software updates for more information.

To automatically check for software updates:
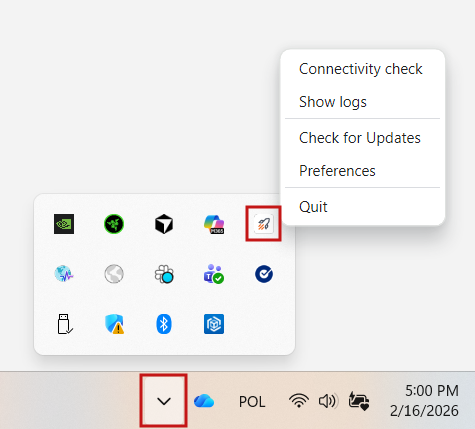
  1. Right-click on the Express Transfer icon in your system tray.
    Right-click menu for Express Transfer icon in system tray
  2. Click Preferences. 
    Express Transfer Preferences
  3. By default, the Check for Updates is toggled on. If you do not want the system to automatically check for updates and notify you, toggle it off.
    We recommend keeping this option on. If it is off, your Express Transfer version may not contain the latest features. Also, you need to regularly use the Check for Updates option in the Express Transfer system tray to determine if your software version is current. See Manually checking for software updates for more information.
  4. Click Save after updating the setting.
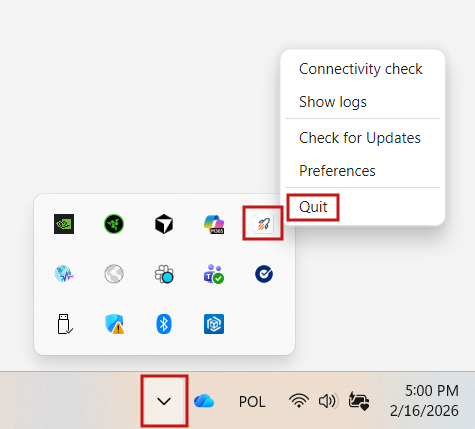
  5. To apply any changes made to Preferences, quit the Express Transfer application by right-clicking on the Express Transfer icon in your system tray and clicking Quit.
    Quit option for Express Transfer in ssytem tray menu
  6. Reopen the application by double-clicking on its desktop shortcut, if you saved one for it, or select it from your computer's list of programs.

When a new version is available, an Application update dialog appears with the version number and release notes for it. Click Update now to download the new version's executable file, and then follow the Express Transfer Preferences steps to complete the installation.
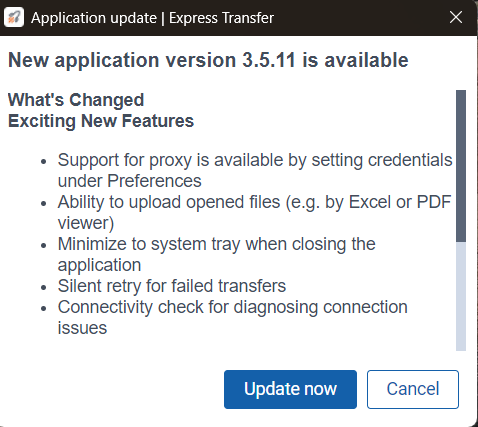
What's changed in Express Transfer

Limit bandwidth

Some organizations have slow internet speeds. This can cause transfer jobs to fail due to connection timeouts. In this situation, the organization may want to limit bandwidth so that it is shared with Import/Export transfers and other business activities. This may help improve transfer stability and reduce connection timeouts. You can configure bandwidth limitation in Express Transfer by turning on the Limit bandwidth option in Preferences. When this option is on, Express Transfer job transfers are slower, but more stable.

To configure Limit bandwidth:

  1. Right-click on the Express Transfer icon in your system tray.
    Right-click menu for Express Transfer icon in system tray
  2. Click Preferences.
    Express Transfer Preferences
  3. The Limit bandwidth option is toggled off by default. To turn the option on, click the toggle.
  4. Click Save after updating the setting.
  5. To apply any changes made to Preferences, quit the Express Transfer application by right-clicking on the Express Transfer icon in your system tray and clicking Quit.
    Quit option for Express Transfer in ssytem tray menu
  6. Reopen the application by double-clicking on its desktop shortcut, if you saved one for it, or select it from your computer's list of programs.

Exclude temporary Microsoft Office files from data import

Whenever you open a Microsoft Office file, a temporary file is created with a ~ (tilde) sign at the beginning of the file name. When you are importing unprocessed data for Processing and selecting the data source on the Create Processing Job dialog, these temporary files are displayed in the file list and are also included in the data import process.

Example of file with tilde

To prevent these temporary files from being included in the import process, the Exclude temporary file(s) option is toggled on by default in Express Transfer Preferences. To change that setting and include those temporary files, refer to the steps below.

To include temporary Microsoft Office files in import jobs:

  1. Right-click on the Express Transfer icon in your system tray.
    Right-click menu for Express Transfer icon in system tray
  2. Click Preferences.
    Express Transfer Preferences
  3. The Exclude temporary file(s) option is toggled on by default. To turn the option off, click the toggle.
  4. Click Save after updating the setting.
  5. To apply any changes made to Preferences, quit the Express Transfer application by right-clicking on the Express Transfer icon in your system tray and clicking Quit.
    Quit option for Express Transfer in ssytem tray menu
  6. Reopen the application by double-clicking on its desktop shortcut, if you saved one for it, or select it from your computer's list of programs.

Configuring proxy settings

If your organization or IT department requires using Express Transfer with a proxy server, follow the steps below to set up the necessary credentials. Contact your IT Department for the required information.

The port number used in the steps below is different from Port 443, which is still required to be open regardless of this proxy configuration. See Port access for more information.

To configure proxy settings:

  1. Right-click on the Express Transfer icon in your system tray.
    Right-click menu for Express Transfer icon in system tray
  2. Click Preferences.
    Express Transfer Preferences
  3. The Proxy settings option is toggled off by default. To turn the option on, click the toggle, and then enter the necessary information for the following fields. Contact your IT Department for the correct information:
    • Proxy address (required)
    • Port (required)
    • Username
    • Password
  4. Click Save after updating the setting.
  5. To apply any changes made to Preferences, quit the Express Transfer application by right-clicking on the Express Transfer icon in your system tray and clicking Quit.
    Quit option for Express Transfer in ssytem tray menu
  6. Reopen the application by double-clicking on its desktop shortcut, if you saved one for it, or select it from your computer's list of programs.
  7. Perform a Connectivity Check to make sure Express Transfer is connected to the Internet. If it is not, the proxy settings are incorrect and you need to change them.

Minimize on close

By setting the Minimize on close option, you choose what happens when you click the application Close button.

  1. Right-click on the Express Transfer icon in your system tray.
    Right-click menu for Express Transfer icon in system tray
  2. Click Preferences.
    Express Transfer Preferences
  3. The Minimize on close option is toggled on by default. When this option is on, clicking Close minimizes the application to the background rather than shutting it down. To close the application fully using the Close button, toggle this option off.
  4. Click Save after updating the setting.
  5. To apply any changes made to Preferences, quit the Express Transfer application by right-clicking on the Express Transfer icon in your system tray and clicking Quit.
    Quit option for Express Transfer in sytem tray menu
  6. Reopen the application by double-clicking on its desktop shortcut, if you saved one for it, or select it from your computer's list of programs.
Return to top of the page
Feedback