


Feedback
Last date modified: 2026-Jun-08
Imaging errors
This topic describes document-level imaging errors, where they appear, and how to resolve them.
Viewing imaging errors
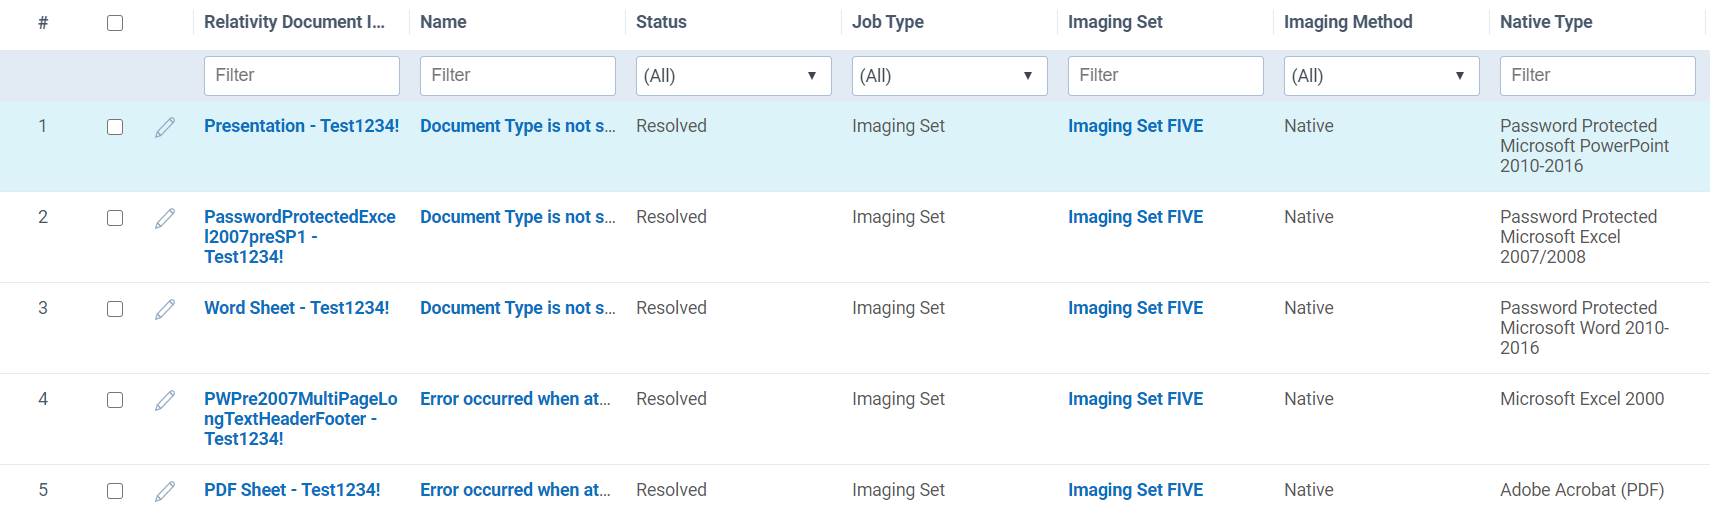
To view document level imaging errors, go to the Imaging Document Errors tab. The Imaging Document Error tab contains all imaging error history, including errors that are resolved.
The tab includes the following error names:
- Document Type is not supported.
- OI EXOpenExport failed - 11: file is password protected or encrypted.
- OI EXOpenExport failed - 4: no filter available for this file type.
- OI EXOpenExport failed - 9: file is corrupt.
- OI EXOpenExport failed - 10: file is empty.
Imaging errors recorded before upgrading to 9.7.229.5 remain in the Show Errors dialog box and are not migrated to the Imaging Document Errors tab.
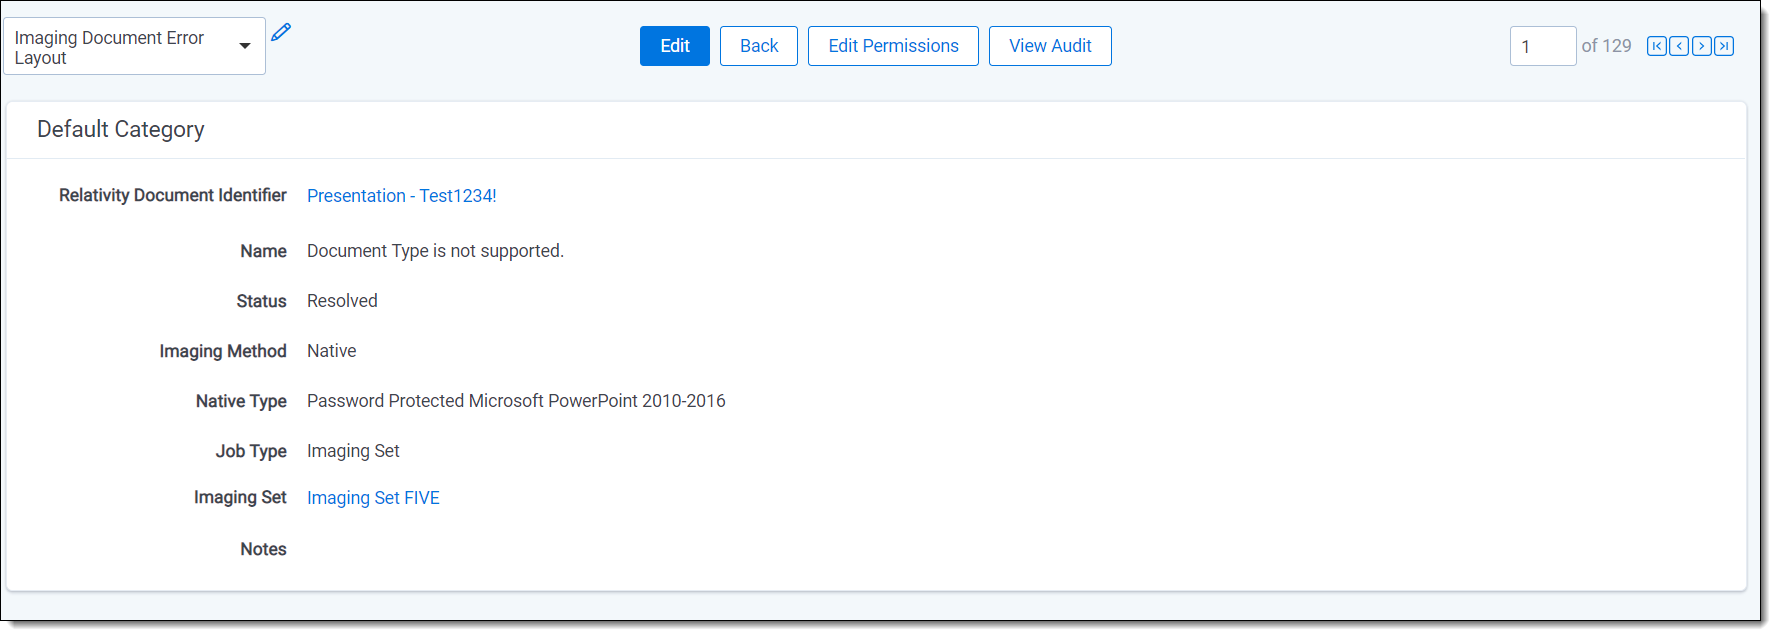
To learn more about an imaging error, click the Name field for a document on the Imaging Document Error tab. The Imaging Document Error Layout will open.
Layout fields include:
- Relativity Document Identifier — The unique identifier for the document.
- Status — The current status of the imaging error: Ready to retry, Retried, or Resolved.
- Imaging Method — The method used to image the document: Basic or Native.
- Native Type — The file type of the document in error, as identified by the native imaging engine.
- Job Type — The method used to run the imaging job: Imaging Set, Mass Imaging, or Image on the Fly.
- Imaging Set — The imaging set the document belongs to, when the Job Type is Imaging Set. Click the imaging set name to open the Imaging Set Layout.
- Notes — A space to record notes about the imaging error.
You can also open the Imaging Document Error Layout from the following locations:
Imaging Sets tab
To see imaging errors via the Imaging Sets tab:
- Go to the Imaging Sets tab.
- Click an imaging set. The Imaging Set Layout opens.
- Click the Name field for a document to view more details about the error. The Imaging Document Error Layout opens.
- Click View Document Errors on the Imaging Set console. This brings up the Imaging Document Error tab with a list of the errors that occurred during the job. By default, this action will add a filter to the Imaging Document Error tab to show only errors with a status of Ready to retry.

- Click on the Name field for a document to obtain more information about the error. The Imaging Document Error Layout will open.
Documents tab
To see documents with imaging errors via the Documents tab:
- Go to the Documents tab.
- Create a new view.
Fields Conditions Sort - Originating Imaging Document Error
- Has Images, any of these: Error
- NA
- Select the view you just created from the View bar.
- In the Document list, click on the Originating Imaging Document Error link for a document. The Imaging Document Error layout will open.
Review Interface
To see imaging errors on the Review Interface layout:
- Click
 on the Layout.
 - Add the Originating Imaging Document Error field to the Layout.
- Click Save and Close.
- In the layout, click on the Originating Imaging Document Error link for a document that has an imaging error. The Imaging Document Error layout will open.
Imaging error scenarios
Errors will occur in your imaging job in any of the following scenarios:
- The Native Imaging engine attempts to render a corrupted native file.
- The Native Imaging engine attempts to render a password-protected native file that does not have a valid corresponding entry in the Password Bank. For more information, see Password Bank in imaging workflow.
- The Native Imaging engine attempts to render a document when the native file for that document is deleted from the repository.
- The Native Imaging engine attempts to render a native file when the FileShare repository is unavailable (access is denied).
- The Native Imaging queue service is stopped when the user attempts to run an imaging job.
- The Native Imaging queue service is disabled during an imaging job.
- The Native Imaging engine attempts to render a native file when there is no hard drive space in the file share repository.
- The Native Imaging engine is installed but the imaging job is not pointing to a valid server because the Native Imaging URL in the instance setting table is incorrect or invalid.
- The conversion request failed.
- The imaging request is no longer tracked. This occurs when a request key is removed from the server, typically as a result of an Internet Information Services (IIS) reset. This error appears only in the population table and not in the Errors tab. This scenario applies to imaging set, mass imaging, and image-on-the-fly jobs.
- The request key is no longer valid. This occurs when Relativity receives a status report for a conversion or imaging job that it is no longer tracking, typically because the job timed out. An IIS reset may cause this. This scenario applies to imaging set, mass imaging, and image-on-the-fly jobs.
When Relativity Native Imaging encounters an error, it retries the imaging job one time. Relativity logs additional errors in the error report.
Error email notification
When errors occur during an imaging job, Relativity sends an email to all users listed in the Email Notification Recipients field for that imaging set. The email summarizes the errors and includes a link to the Imaging Document Errors tab.
Retrying imaging errors
To retry imaging errors:
- Click View Document Errors on the imaging set console. The Imaging Document Errors tab opens, filtered to errors with a status of Ready to retry.
- Click Retry Errors.
Retrying imaging errors re-images the documents that previously resulted in errors. When the retry job reaches a status of Initializing, the Retry Errors button changes to Stop Imaging. Click Stop Imaging to cancel the retry job.
Password Bank in imaging workflow
The following steps depict how the Password Bank typically fits into the imaging cycle.
- You create a password bank that includes a list of passwords that correspond with the files you intend to image.
- You create an imaging set with the data source that contains the encrypted documents.
- You start imaging the documents in the imaging set by clicking Image Documents in the Imaging Set console.
- All passwords you supplied to the password bank become synced via an agent and accompany the job as it goes to the imaging engine.
- The imaging engine images the files in the imaging set and refers to the passwords provided in the password bank. It then sends the imaged files back to Relativity.
- Once the imaging status changes to Completed, you review and release images from QC review.
- The imaged documents become available for review in the workspace, along with all the other previously-encrypted documents whose passwords you provided.
The Password Bank works with both Native and Basic imaging.
To view and resolve password-protection errors:
- After running an imaging set, click View Document Errors in the imaging set console.
- In Relativity, go to the Password Bank and create entries for every password that corresponds with the files that resulted in errors.
- Click Retry Errors in the imaging set console to re-image the files that previously resulted in password-protection errors.
The imaged documents, along with other documents that were previously encrypted, become available for review in the workspace.
For more information, see