


Feedback
Last date modified: 2026-Jul-22
Name normalization
Name normalization analyzes email document headers to identify all aliases, such as proper names, email addresses, and more, and the entities, such as the person, distribution group, and others, those aliases belong to. Name normalization automatically merges entities with those created by Legal Hold, Processing, or Case Dynamics.
This page talks about how name normalization works. For steps to set it up, see Running structured analytics.
See these related pages:
- Name normalization results
- Best practices for name normalization
- Running name normalization on email headers
- Alias object
- Entity object
- Common searches with the entity object and name normalization
- Structured analytics
- Running structured analytics
Name normalization overview
The name normalization process includes the following steps at a high level:
First, the operation parses header data, From, To, Cc, Bcc, from every segment within an email document using the same logic as email threading. Once the header data is parsed, name normalization identifies aliases within each section, looking for semi-colon delimiters to identify multiple aliases. Each unique alias is stored and matched with an unnamed entity.
Consider the following email segment:
| Segment |
|---|
| From: john.doe@example.com To: jason.smith@example.com; mary.adams@example.com Cc: Bcc: Date: 11/01/2018 10:00AM Subject: Let's talk about NN Hey Jason, How's Name Normalization going? Does your team need any help? Cheers, John |
Name normalization identifies the following aliases:
| Entity | Alias |
|---|---|
| Entity 1 | john.doe@example.com |
| Entity 2 | jason.smith@example.com |
| Entity 3 | mary.adams@example.com |
If an alias is in one of the formats below, the full alias is stored as well as separate aliases for the description, Doe, John, and the email address, john.doe@example.com. All three aliases are joined to the same entity.
- "Doe, John" <john.doe@example.com>
- 'Doe, John' <john.doe@example.com>
- Doe, John <john.doe@example.com>
- 'Doe, John' [john.doe@example.com]
- Doe, John [john.doe@example.com]
For example, if an email segment contains "Doe, John" <john.doe@example.com>, name normalization identifies the following aliases:
| Entity | Alias |
|---|---|
| Entity 1 |
|
Generic aliases, such as Mom or John, are not created to limit over-merging.
If a newly identified alias matches an existing alias, it is not created again. However, name normalization uses logic to match alias siblings to the same entity.
For example, imagine after identifying "Doe, John" <john.doe@example.com>, like in the example above, "Doe, John" <jdog99@domain.com> is identified. All of the aliases are linked to the same entity based on the matching "Doe, John" alias:
Name normalization limits the number of aliases assigned to a single entity to prevent over merging.
| Entity | Alias |
|---|---|
| Entity 1 |
|
To further improve results, entities with the same first name and last name values are automatically merged with each other. Also, entities identified by name normalization are automatically merged with those created by Legal Hold, Processing, or Case Dynamics when their first and last name values match.
Name normalization also uses segment matching to infer relationships between different aliases that appear in the email headers. Consider the segments below from two different documents:
| Segment 1 (from Document X) | Segment 2 (from Document Y) |
|---|---|
| From: Doe, John To: jason.smith@example.com Cc: Bcc: Date: 11/01/2018 10:00AM Subject: Let's talk about NN Hey Jason, How's Name Normalization going? Does your team need any help? Cheers, John |
From: johnathan.doe@example.com To: jason.smith@example.com Cc: Bcc: Date: 11/01/2018 10:55AM Subject: Let's talk about NN Hey Jason, How's Name Normalization going? Does your team need any help? Cheers, John |
By analyzing the body text and date sent, name normalization identifies these two segments as matching. It then uses different strategies to determine if the aliases match.
Using new name normalization (beta) logic
Under the Optional Settings for a structured analytics set, you have the option to enable Try new name normalization (beta) logic. If this option is turned on, name normalization will put more emphasis on the proper names of email participants when choosing which aliases to link to an entity.
This new logic helps to prevent over-merging in cases where different people might be emailing from the same address. Instead of merging them all based on the shared address, name normalization divides them according to the Proper Names (first name and last name) attributed to that address on each email. Participants that only have a first name, but not a full proper name, follow the same logic as before. Participants that have a single-character name, such as J Smith, will not be merged based on the single-character name unless it's a Chinese, Japanese, or Korean ideograph.
For example:
| Participants | Results using previous logic | Results using new logic |
|---|---|---|
|
Entity: Alytics, Ann Aliases:
|
Entity: Alytics, Ann Aliases:
Entity: Iscovery, Ed Aliases:
Entity: Doe, John Aliases:
|
Because the new logic places more emphasis on proper names, some entities may be created that have the same email address. To compare entities that share an address, use the Entity Group ID on the Entities tab. For more information, see Entities.
Why this feature is flagged as beta
Because the new name normalization logic can significantly change results, it is currently in beta testing. This enables users to test it out while minimizing the impact to existing workflows.
Attempting to merge undefined aliases
If you enable the new name normalization (beta) logic, another option appears called Attempt to merge undefined aliases. Enabling this option tells name normalization to try merging aliases that are undefined, meaning that the proper names have one of the following:
- Too short to qualify as a proper name (such as "IT")
- Contains special characters (such as $^$&*^ Johnathan Doe %&^%&)
- includes a list of multiple names (such as Alice Smith, John Doe, Kate Smith)
When this setting is enabled, name normalization takes a first pass at creating entities and aliases, then loops through a second time. For every entity that contains an alias with the Alias Type Proper Name, and that Proper Name contains at least 7 characters and two tokens, the system checks it against all entities that only contain undefined aliases:
- If the Proper Name is fully contained in one undefined alias, the system merges that undefined alias with the entity.
- If the Proper Name is fully contained in multiple undefined aliases, the system does not merge those undefined aliases with the entity. This would lead to potential over-merging.
Using enhanced domain filtering
When you create a structured analytics set for name normalization, the Enable additional domain filtering option controls the types of filtering available for extracted email domains. By default, this option is set to No. This puts all extracted email domains into a set of fields with simple text filtering.
If you choose Yes for Enable additional domain filtering, the name normalization operation also puts the extracted email domains into a set of additional fields. These fields have enhanced filtering capabilities, stronger text standardization, and support for tracking all domains in a single list.
The names of the default and enhanced domain fields are as follows:
| Default field name | Enhanced field name | Definition |
|---|---|---|
| Alias To::Domain | Alias Email To Domain | Email domain identified in the To section of the document's top-most segment header |
| Alias From::Domain | Alias Email From Domain | Email domain identified in the From section of the document's top-most segment header |
| Alias CC::Domain | Alias Email Cc Domain | Email domain identified in the CC section of the document's top-most segment header |
| Alias BCC::Domain | Alias Email Bcc Domain | Email domain identified in the BCC section of the document's top-most segment header |
| Alias Recipient::Domain | Alias Email Recipients Domain | Email domain identified in the To, CC, or BCC section of the document's top-most segment header |
For full instructions on creating a structured analytics set for name normalization, see Running structured analytics.
Differences between default and enhanced domain fields
The following are the key benefits of the enhanced domain fields:
- They standardize all domain names to lowercase, regardless of letter case in the original email.
- They remove all empty values.
- They remove duplicates of the same domain in the same field.
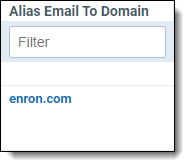
- They have multi-select filtering options when viewed from the document list.
| Key difference | Default field example | Enhanced field example |
|---|---|---|
| Lowercase domains |
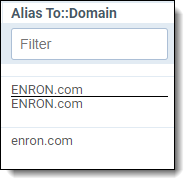
|

|
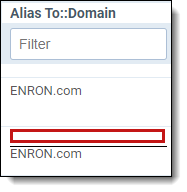
| Removing empty values |
Note the empty value in the second row, marked by red. |
|
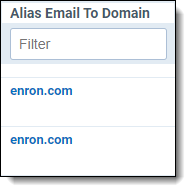
| Removing duplicate domains in the same field |
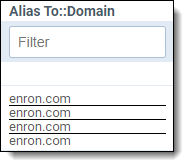
|
|
| Multi-select filtering options instead of text filtering |

|
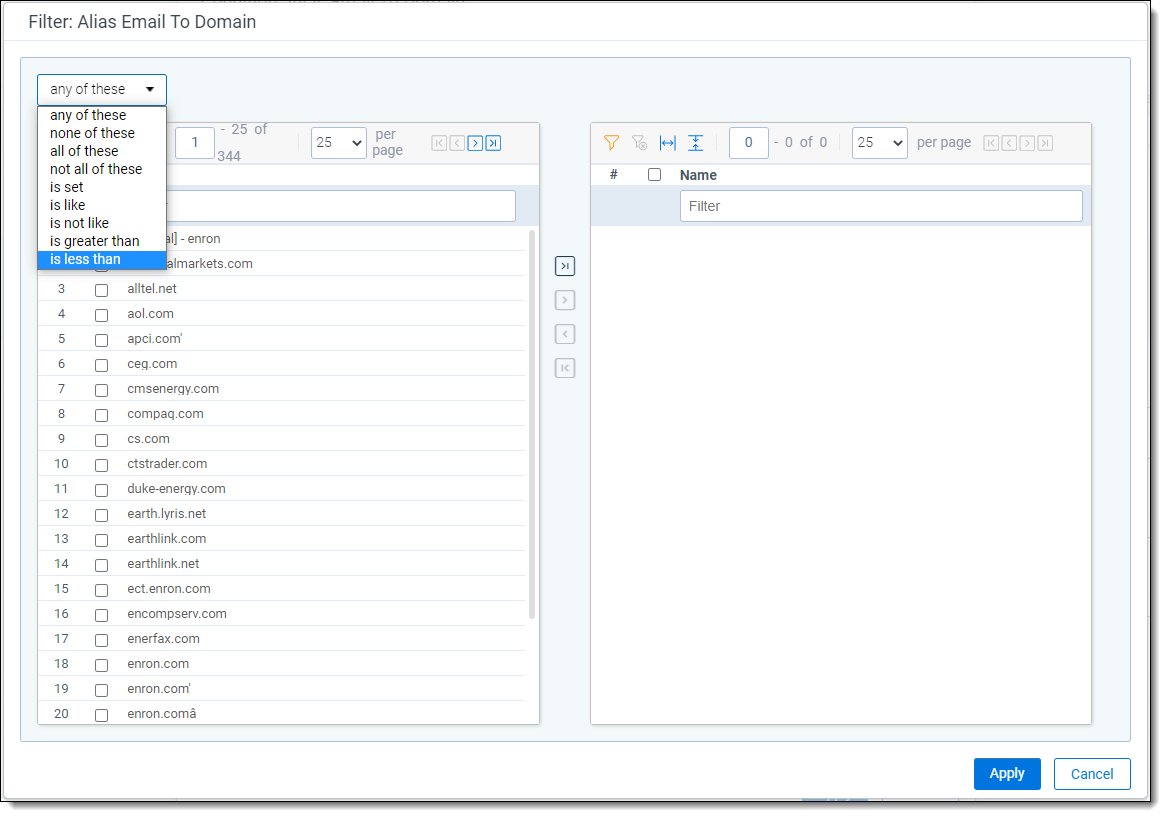
|
Creating and exporting a list of domains
The enhanced domain fields store data as Relativity dynamic objects (RDOs). This format gives extra flexibility for manipulating and exporting the data as needed. One use is to create an exportable list of all email domains in the document set. This list can also be saved as an easy-to-access tab in the sidebar.
To track domains in a single list and export them to other formats, complete the following:
Prerequisites for creating a domain list tab
To extract the domains before creating a list, complete the following:
- Create a saved search containing the documents you want to extract email domains from.
- Run name normalization on that saved search with the Enable additional domain filtering option set to Yes. For full instructions, see Running structured analytics.
The results will be stored in the enhanced domain fields. For a list of field names, see Using enhanced domain filtering.
Creating a domain list tab
To create a tab containing a list of all domains, complete the following:
- Under Configure, go to Workspace Admin, then Tabs.
- Click New Tab.
- Fill out the fields as follows:
- Name—enter "Domains" or similar.
- Tab Type—select Object.
- Object Type—select Alias Domain.
- Show in Sidebar—to create an icon for the domains list tab in the sidebar, toggle this On. If you do not want the icon in the sidebar, leave this Off. The tab will still be accessible from the All Tabs menu.
- Order—enter an integer value. Lower numbers make the tab appear higher in the sidebar, but the exact position will depend on the numbers assigned to your other tabs.
- Click Save. Your Domains tab will now appear in the All Tabs menu. If you selected Show in Sidebar, it will also appear there.
For more information on creating new tabs, see Tabs.
Exporting a domain list
To export the domain list to CSV format, complete the following:
- Navigate to the newly created Domains tab.
- Select all domains, then choose Export to File from the Mass Actions drop-down at the bottom of the grid. An options modal will appear.
- Select Comma Separated Values (.csv), then click Export.
Using an exclusion list for name normalization
If your document set includes emails that come from system notifications or a shared email address, name normalization sometimes considers all emails from this address to be from the same entity. To prevent this, you can add shared email addresses to an exclusion list.
When you apply an exclusion list to a structured analytics set, name normalization ignores participants that match or partially match the entries in the list. The documents remain in the data set, but no aliases or entities will be created for those participants.
For example, if you apply an exclusion list that includes notifications@acme.com:
- Participants such as
Joe Smith <notifications@acme.com>andKate Doe <notifications@acme.com>will be excluded from the results. - Other emails from Joe Smith and Kate Doe will still be normalized as usual. If
Kate Doe <notifications@acme.com>is excluded, this does not stop name normalization from creating an entity or alias forKate Doe <kdoe@acme.com>orKate Doe <katiekate@yahoo.com>.
Guidelines for writing exclusion lists
When creating a structured analytics set, you can set up an exclusion list by enabling the Apply Exclusion List option. By default, the list includes several common keywords for notification and no-reply email addresses.
When modifying the exclusion list:
- Type each entry on a separate line.
- Entries can be any keyword. They do not need to be a whole email address.
- White space and special characters matter. Writing "John Doe" with a space will not exclude "johndoe" without a space.
- Entries are not case sensitive. "no-reply" and "NO-REPLY" are treated the same.
- Any participant that contains the text of an exclusion list entry will be excluded. For example, if "reply" is in the exclusion list,
reply@[domain],no.reply@[domain],Reply_To@[domain], and all other variants containing the word "reply" will be excluded. If “John” is in the exclusion list,Johnny Doe <email>,scott john <email>,[person] <johnson@[domain]>, and all other variants containing "John" will be excluded.
|
Entry |
Participants that would be excluded |
Participants that would not be excluded |
|---|---|---|
|
reply |
[person] <reply@[domain]> do_not_reply@[domain] no.reply@[domain] reply_to@[domain] Replyable@[domain] |
Any participant not containing the text "reply" |
|
notifications |
notifications@[domain] more-notifications@[domain] notifications from@[domain] stopnotifications@[domain] |
Any participant not containing the text "notifications" |
|
@jira.com |
[person]@jira.com
|
jiraffe@email.com [person]@newjira.com [person]@jira-new.com [person]@jira.net |
|
John |
john.Doe <email> john_smith <email> Johnny <email> ScottJohn <email> [person] <johnson@[domain]> |
Any participant not containing the text "John" |
|
John Doe |
Any participant containing the text "John Doe" with a space |
John <email> john.Doe <email> johnDoe <email> [person] john-Doe@[domain] John Smith <email> |
|
www |
www.[domain].com shawwwilliams@[domain] |
login.[domain].com http://[domain].com shaw.w.williams@[domain] |
Adding a Classification value for Legal Hold
If Processing or Legal Hold are installed in your workspace with Analytics, we strongly recommend that you add a Classification value to your existing entities so that you can differentiate between them and the entities created by the name normalization operation. A Custodian - Processing value exists, but you must manually create a value for Legal Hold.
To do this, complete the following:
- Create a choice called Custodian - Legal Hold on the Classification field on the Entity object.
- Select all of your existing Legal Hold entities and perform a Mass Edit to add the Custodian - Legal Hold classification value to these objects.
- Select all of your existing Processing entities and perform a Mass Edit to add the Custodian - Processing classification value to these objects.
- Once completed, you can search or filter on the Classification field to observe specific entities.
Document linking limits
If a document has more than 500 total entities and aliases associated with it, the document is excluded from name normalization analysis, and the system generates a document-level error. This limit counts all participants in the To, From, CC, and BCC headers.
Aliases and entities identified in the excluded document are not imported. However, if the same aliases and entities appear in documents that are not excluded, they will be imported and linked to those documents as usual. These aliases and entities will not be associated with the excluded document.
Special considerations
Before running the name normalization operation, note the following:
-
We generally recommend that you run name normalization in its own structured analytics set for maximum flexibility. While it is faster to run multiple structured analytics operations together in one set, you may find that you are ultimately constrained if you want to make modifications to the document set or the settings.
- In order to run name normalization, you must have at least a From field and one other email header field such as To, CC, BCC, Subject, or Date Sent. If these fields do not exist, name normalization will attempt to analyze the extracted text and locate a From field within it.
- You can add aliases by importing via Import/Export, manually creating them from an Entity layout page, or manually creating them on the Alias page and then linking them to an entity via the Assign to Entity mass operation. We recommend adding aliases like email addresses, unique variations of the entity's name, such as John Doe; Doe, John, or any other unique identifiers that may be used by this entity. If you do not add these values prior to running name normalization, you can still use the Merge mass operation to consolidate duplicate entities.