


This topic provides information on installing and configuring processing so that you can run it in your Relativity environment.
You must have the following in order to use processing:
- A processing license.
- The worker manager server installed and configured.
- The worker manager server attached to the resource pool in which the workspace resides.
- A token-authentication processing Web API path specified for the ProcessingWebApiPath entry in the Instance Settings table.
 The content on this site is based on the most recent monthly version of Relativity, which contains functionality that has been added since the release of the version on which Relativity's exams are based. As a result, some of the content on this site may differ significantly from questions you encounter in a practice quiz and on the exam itself. If you encounter any content on this site that contradicts your study materials, please refer to the What's New and/or the Release Notes for details on all new functionality.
Upgrade considerations for Relativity Juniper
Starting in Server 2021, Invariant requires worker server installation on each worker to function properly. This ensures workers have the appropriate Microsoft Visual C++ 2019 redistributables necessary.
When installing the RPC, the username must be EDDSDBO for Relativity Servercustomers.
Installation process
The following steps make up the comprehensive procedure for installing processing:
- Review the most current system processing requirements to ensure that you have enough resources to run processing.
- Review the worker manager server pre-installation steps to ensure that your environment is updated with the required security and other configuration settings.
- Run the Invariant installer for a fresh install or an upgrade.
- Add/configure the worker manager server in the Servers tab.
- Add the worker manager server to a resource pool.
- Enter the ProcessingWebAPIPath instance setting.
- Import the processing application.
- Configure the processing agents (if they weren't automatically created when you imported the Processing application).
- Create a choice for the processing source location.
Throttle settings for distributed publish
Note the following recommended throttle settings for distributed publish:
- The following instance settings have been added to facilitate the work of distributed publish.
- ProcessingMaxPublishSubJobCountPerRelativitySQLServer- the maximum number of publish jobs per Relativity SQL server that may be worked on in parallel.
- This puts an absolute limit on the number of publish jobs that occur in parallel for a given SQL server, independent of how many workspaces may be publishing simultaneously. This means that it overrides the limit set by ProcessingMaxPublishSubJobCountPerWorkspace.
- The default value is 21. Leaving this setting at its default value will result in increased throughput; however, we recommend contacting Support before you upgrade for guidance on what value will be most beneficial to you based on your environment setup.
- This updates on a 30-second interval.
- If you change the default value, note that setting it too high could result in web server, SQL server, or BCP/file server issues. In addition, other jobs in Relativity that use worker threads may see a performance decrease, such discovery or imaging. If you set it too low, publish speeds may be lower than expected.
- You can't allocate more jobs per workspace than what is allowed per SQL server. This means that if this value is set to be higher than the value for the MaxPublishJobCountPerRelativitySQLServer instance setting, then Relativity only allows the maximum of jobs per SQL server. For example, if you have a workspace limit of 4 and a server limit of 8 and all of your workspaces are on the same SQL server, you will have at most 8 publish sub jobs running concurrently.
- The default value is 7. Leaving this setting at its default value will result in increased throughput; however, we recommend contacting Support before you upgrade for guidance on what value will be most beneficial to you based on your environment setup.
Note: The default value of this setting was changed from 3 to 5 in Relativity 9.6.202.10.
- This updates on a 30-second interval.
- If you change the default value, note that setting it too high could result in web server, SQL server, or BCP/file server issues. In addition, other jobs in Relativity that use worker threads may see a performance decrease, such discovery or imaging. If you set it too low, publish speeds may be lower than expected.
- ProcessingMaxPublishSubJobCountPerRelativitySQLServer- the maximum number of publish jobs per Relativity SQL server that may be worked on in parallel.
- The ProcessingExportMaxThreads instance setting has been deprecated in accordance with the addition of the ProcessingMaxPublishSubJobCountPerWorkspace and ProcessingMaxPublishSubJobCountPerRelativitySQLServer instance settings, which facilitate the work of distributed publish.
The following table provides the recommended values for each instance setting per environment setup:
| Environment setup | ProcessingMaxPublishSubJobCountPerWorkspace | ProcessingMaxPublishSubJobCountPerRelativitySQLServer |
|---|---|---|
| Tier 1 | 5 | 7 |
| Tier 2 | 6 | 12 |
| RelativityOne baseline | 5 | 7 |
License considerations
You are unable to process data in Relativity if any of the following conditions are true:
- You don't have a processing license associated with your environment.
- The processing license associated with your environment is invalid.
- The processing license associated with your environment is expired.
- The worker manager server associated with the resource pool is not included in the processing license.
Contact your system admin if any of these occur.
Note: You can add processing capacity to your environment by adding hardware and additional licenses. For more information, contact your system admin.
Importing the Processing application
To install processing in your Relativity environment, import the Processing application from the application library. To do this, you must have the appropriate system admin rights.
You must have obtained a processing license before you can import the Processing application.
To import the Processing application:
- Navigate to the Relativity Applications tab.
- Click New Relativity Application.
- Select Select from Application Library.
- Click
 on the Choose from Application Library field.
 - Select Processing and click OK.
- Click Import.
Worker manager server
The worker manager server uses workers to perform imaging, and all phases of processing, including inventory, discovery, and publish. You can configure the default queue priorities for your entire environment on the Worker Manager Server layout. If you are not licensed for processing, then the worker manager server only handles save as PDF and imaging.
To enable processing in your workspace, you must add a worker manager server to your Relativity environment through the Servers tab available from Home.
Note: Don't restart a worker manager server if there are currently processing jobs running on it, as you'll need to recreate those jobs and re-run them once the server has completed restarting.
Designating a worker for processing
In order to process files, you need to designate at least one worker for processing.
To designate a worker for processing, perform the following steps:
- Navigate to the Servers sub-tab.
- From the list of servers, select the worker(s) on your worker manager server that you need to perform processing jobs.
- Click Edit on the worker layout and navigate to the Worker Designated Work field.
- Check the box next to the Processing choice.
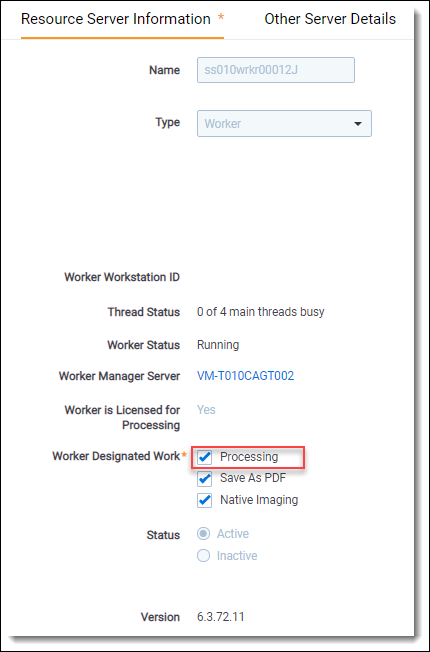
- Click Save.
Entering the ProcessingWebAPiPath instance setting
You must enable token authentication on your web server for certain Relativity features, such as the worker manager server, which requires this authentication type for processing.
You must also edit the ProcessingWebAPIPath Instance Setting. This setting identifies the URL that directs to the Relativity token-authenticated endpoints that Invariant uses to process and image files. Invariant requires this URL and a Relativity admin must enter it.
To do this, perform the following steps to comply with this change:
- While in Home mode, navigate to the Instance Settings sub-tab.
- In the default All Instance Settings view, enable filters and enter ProcessingWebAPIPath in the Name field.
- Click the ProcessingWebAPIPath name and click Edit in the instance setting layout.
- In the Value field change the existing ProcessingWebAPI URL to the RelativityWebAPI URL.

- Click Save.
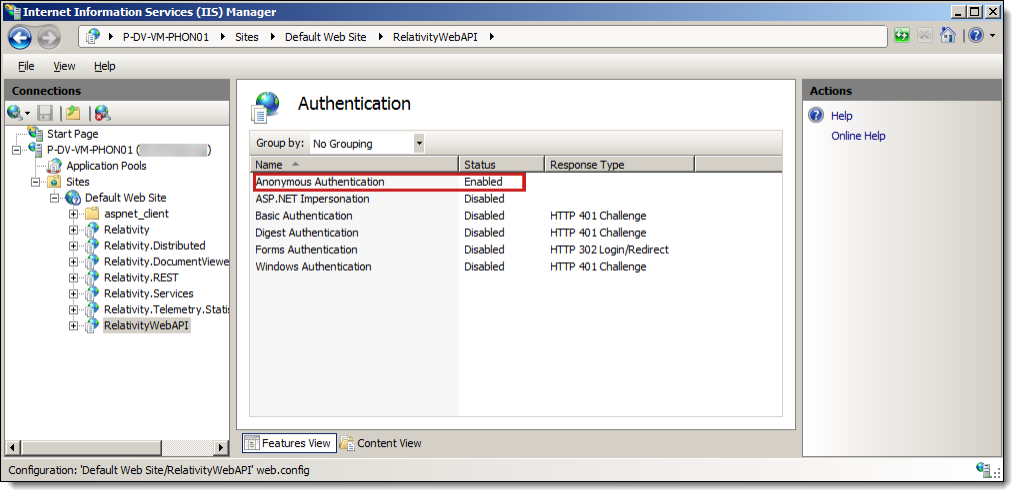
Depending on what Relativity version you're installing or upgrading, you may need to enable the RelativityWebAPI setting in IIS for Anonymous authentication in order to publish documents to a workspace.
To do this, perform the following steps:
- Open IIS.
- To enable anonymous authentication, complete the following steps:
- Click on the RelativityWebAPI site.
- In the Features view, click Authentication.
- In the Authentication view, right-click on Anonymous Authentication and click Enable.
- To update the web.config file, locate it in the following folder:
C:\Program Files\Relativity Corporation\Relativity\WebAPI
- Open the file in an editor. Update the authentication mode and authorization sections as follows:
<system.web>
     <authentication mode="None" />
     <authorization><allow users="*" />
</authorization>
</system.web>
- Restart IIS.
Adding the worker manager server to a resource pool
You must add the worker manager server to the resource pool associated with the workspace that is hosting processing. You can only have one worker manager server per resource pool.
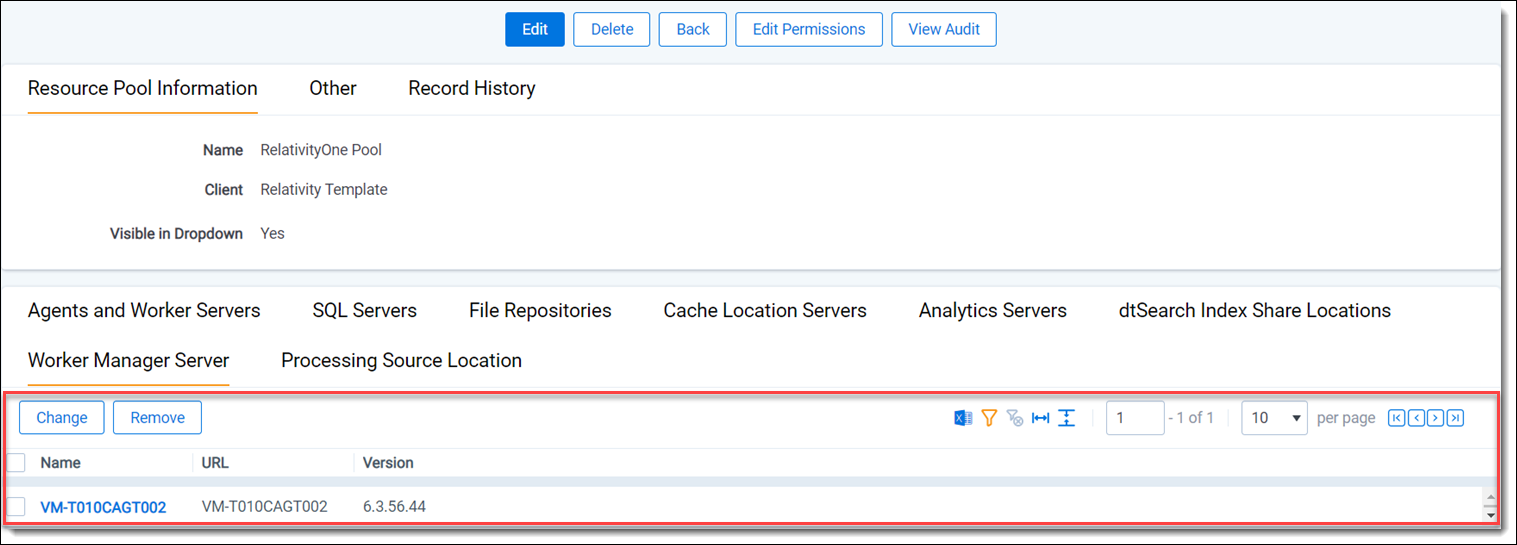
Note: Don't change the worker manager server in a resource pool after you've processed data in a workspace that uses that resource pool. Changing the worker manager server after data has been processed causes unexpected results with retrying errors, deduplication, and document numbering. This is because a new server is not aware of what has happened in the workspace before it was added.
Configuring processing agents
The Processing application uses the following agents:
- Server Manager - retrieves version information from the worker manager server and updates the processing queue tab with this information.
- Processing Set Manager - manages the running of processing sets, retrieves errors encountered while sets are running, and picks up processing set deletion jobs and submits them to the worker manager server.
We recommend running two Processing Set Manager agents and adding more of them as needed.
To manually install processing agents, perform the following steps:
- Navigate to the Agents tab.
- Click New Agent and complete the following required fields:
- Agent Type - click to display a list of agents. Filter for one of the processing agents, select the agent, and click OK.
- Number of agents - enter the number of agents you want to add.
- Agent Server - click to display a list of servers, then select a server and click OK. Select the regular agent server here, not the processing worker or processing queue manager.
- Run interval - enter the interval, in seconds, at which the agent should check for available jobs.
- Logging level of event details - select Log critical errors only (recommended), Log warnings and errors, or Log all messages.
- Enabled - select Yes.
- Click Save.
Creating a choice for the processing source location
After saving a processing set, you must select a value for the Select source for files to process field on the data sources you add to the set. To make a value available for this field, you must create a choice for the Processing Source Location field.
To create a choice for the Processing Source Location field:
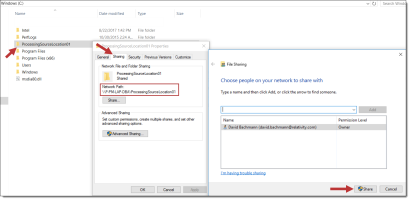
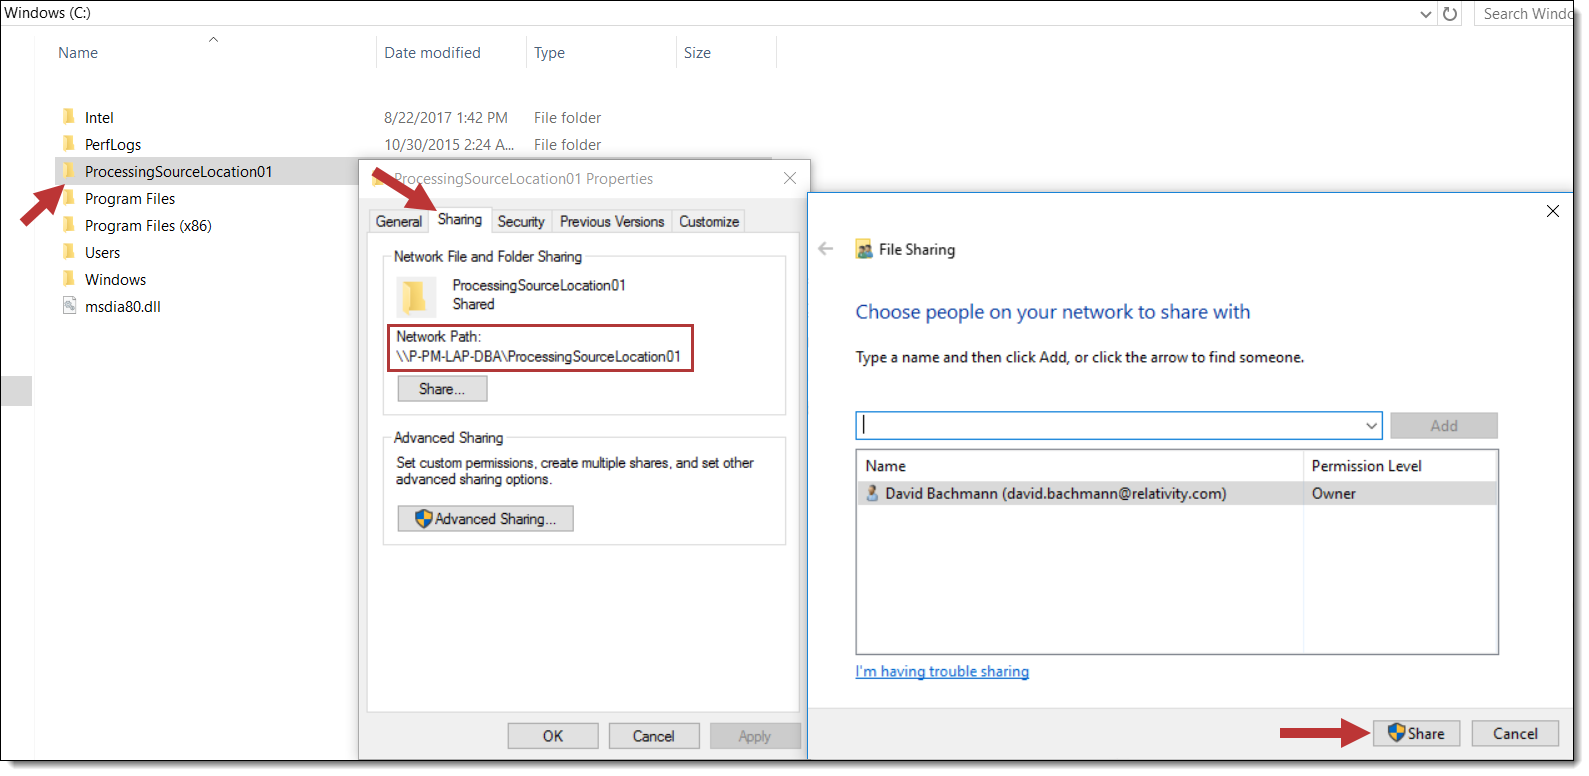
- In your File Explorer, locate the folder containing the files that you intend to publish, right-click on it and select Properties.
- In the Properties window, select the Sharing tab and then click the Share button in the Network File and Folder Sharing section.
- In the File Sharing window, add the appropriate user and click the Share button.
- Return to the Sharing tab in the Properties window and copy the folder path displayed in the Network Path field. When you create the corresponding choice in Relativity, you'll use this path as the name of that choice.
- Log in to Relativity and navigate to the Choices sub-tab.
- Click New Choice.
- Enter the following values for the following required fields:
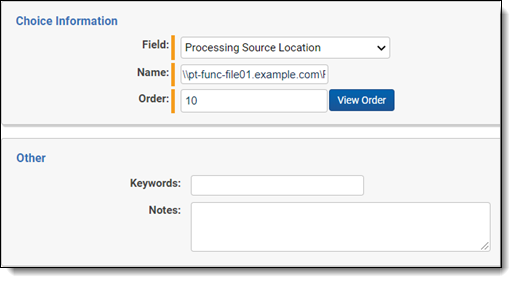
- Field - select Processing Source Location. The Processing Source Location field is automatically created for you.
- Name - the name of the repository containing the files you want to process. Enter an absolute network path (UNC). For example, \\pt-func-file01.example.com\FileShare\Custodian\MJones.
Note: The Relativity Service Account must have read access to the processing source location.
- Order - the desired order of the choice.
- Add the source location you just created to the resource pool:
- Navigate to the Resource Pools sub-tab.
- Select the pool to which you want to add the source location.
- Click Add on the Processing Source Locations tab.
- Select the source location choice you created and move it to the right column.
- Click Apply. The source location is now attached to the resource pool.
Logging for processing
The logging framework enables you to efficiently gather runtime diagnostic information. You can use logging for troubleshooting application problems when you need a very granular level of detail, for example, when working with a Relativity Support representative.
Relativity system components that can log messages are identified based on the system-subsystem-application designation. When troubleshooting, use the system-subsystem-application matrix to configure logging to target a specific Relativity component, such as the Processing application.
Note: It is recommended that you not set your logging to verbose when publishing documents to a workspace, as doing so can cause your worker to run out of resources, such as CPU, RAM, disk usage, or others, which then causes your publish job to cease entirely. If you need to use verbose logging in order to collect detailed logs, do so for short periods of time only, under 5 minutes, and have a developer on hand to troubleshoot if any issues occur.
For more information, see Logging and Logging system-subsystem-application matrix.
Security permissions
The following security permissions are the bare minimum required to publish files to a workspace with Relativity Processing.
| Object Security | Tab Visibility |
|---|---|
|
|
If you want access to view, add, and edit other processing objects, such as profiles, errors, reports, and the password bank, you must configure these options in the Tab Visibility and Object Security windows in the Workspace Security console.
You're finished configuring processing in your Relativity environment. You can now move on to using the processing feature in your workspace through the following components and phases: