The following graphic depicts how discovery fits into the basic workflow you'd use to reduce the file size of a data set through processing. This workflow assumes that you’re applying some method of deNIST and deduplication.
 The content on this site is based on the most recent monthly version of Relativity, which contains functionality that has been added since the release of the version on which Relativity's exams are based. As a result, some of the content on this site may differ significantly from questions you encounter in a practice quiz and on the exam itself. If you encounter any content on this site that contradicts your study materials, please refer to the What's New and/or the Release Notes for details on all new functionality.
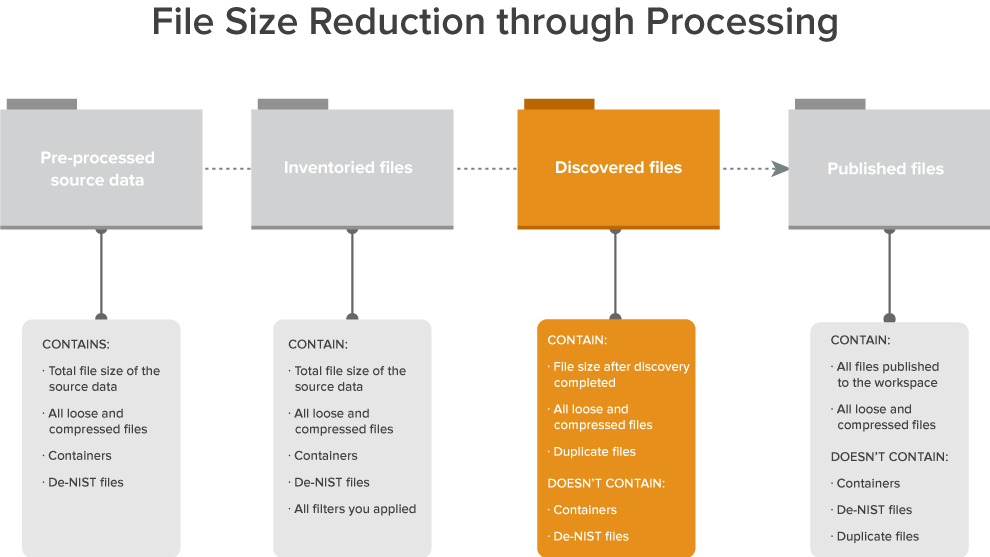
The following is a typical workflow that incorporates discovery:
- Create a processing set or select an existing set.
- Add data sources to the processing set.
- Inventory the files in that processing set to extract top-level metadata.
- Apply filters to the inventoried data.
- Run discovery on the refined data.
- Publish the discovered files to the workspace.
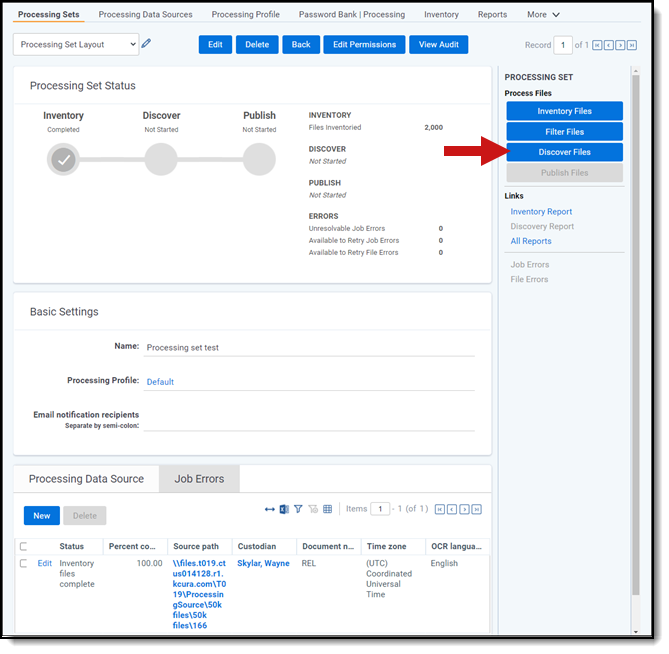
Running file discovery
To start discovery click Discover Files on the processing set console. You can click this whether or not you've inventoried or filtered your files.
Note: When processing documents without an actual date, Relativity provides a null value for the following fields: Created Date, Created Date/Time, Created Time, Last Accessed Date, Last Accessed Date/Time, Last Accessed Time, Last Modified Date, Last Modified Date/Time, Last Modified Time, and Primary Date/Time. The null value is excluded and not represented in the filtered list.
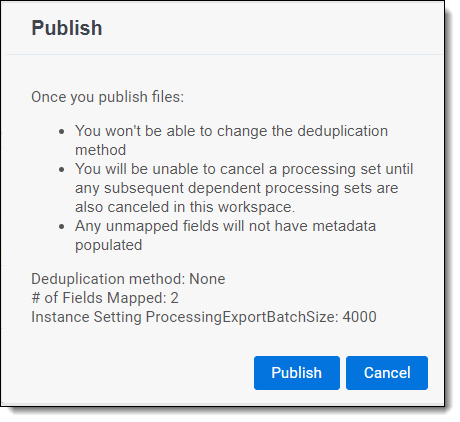
A confirmation message pops up reminding you of the settings you're about to use to discover the files. Click Discover to proceed with discovery or Cancel to return to the processing set layout.
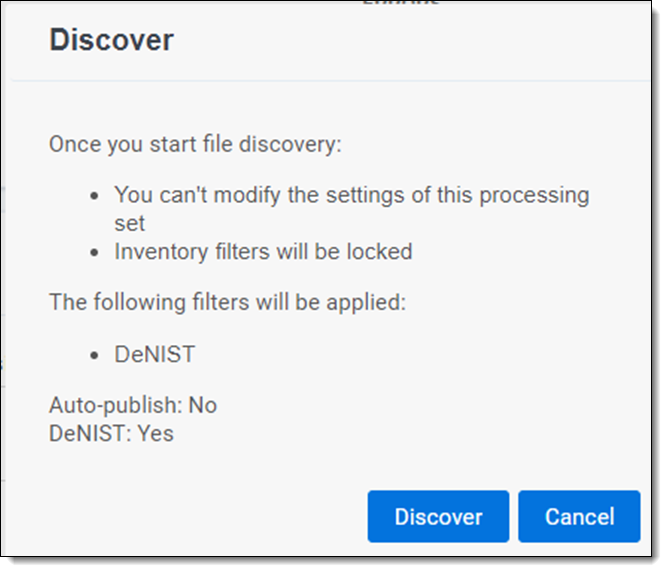
If you enabled auto-publish, the confirmation message will provide an option to Discover & Publish. Click this to proceed with discovery and publish or Cancel to return to the processing set layout.
Note: The default priority for all discovery jobs is determined by the current value of the ProcessingDiscoverJobPriorityDefault entry in the Instance setting table.
Consider the following when discovering files:
- Relativity doesn't re-extract text for a re-discovered file unless an extraction error occurred. This means that if you discover the same file twice and you change any settings on the profile, or select a different profile, between the two discovery jobs, Relativity will not re-extract the text from that file unless there was an extraction error. This is because processing always refers to the original/master document and the original text stored in the database.
- If you've arranged for auto-publish on the processing set's profile, the publish process begins when discovery finishes, even if errors occur during discovery. This means that the Publish button is not enabled for the set until after the job is finished. You'll also see a status display for both discover and publish on the set layout.
- If your discovery job becomes stuck for an inordinate length of time, don't disable the worker associated with that processing job, as that worker may also be performing other processing jobs in the environment.
- When discovering file types, Relativity refers to the file header information to detect the file type.
- You can’t change the settings on any processing job at any point after file discovery begins. This means that once you click Discover, you can’t go back and edit the settings of the processing set and re-click Discover Files. You would need to create a new processing set with the desired settings.
- You can't start discovery while inventory is running for that processing set.
- When you start discovery or retry discovery for a processing job, the list of passwords specified in the password bank accompanies the processing job so that password-protected files are processed in that job.
Note: Relativity prioritizes application metadata over operating system file properties where possible. For example, if a file type stores application metadata, such as Date Created and Date Modified, Relativity retains those values for the file. If the application metadata fields are empty or the file type does not store application metadata, Relativity uses the operating system's file properties instead. Application metadata is more reliable since it is stored in the file itself. Operating system file properties can often change. For example, moving a file from one folder to another may change property values. Examples of file types that store application metadata include Microsoft Office files such as Word or Excel.
When you start discovery, the Discover button changes to Cancel. Click this to stop discovery.
Discovery process
The following graphic and corresponding steps depict what happens behind the scenes when you start discovery. This information is meant for reference purposes only.
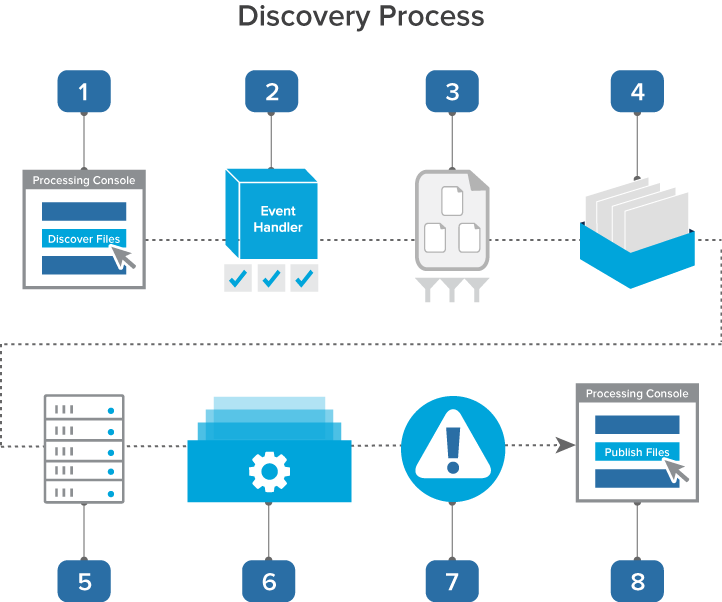
- You click Discover Files on the processing set console.
- A console event handler copies all settings from the processing profile to the data sources on the processing set and then checks to make sure that the set is valid and ready to proceed.
- The event handler inserts all data sources into the processing set queue.
- The data sources wait in the queue to be picked up by an agent, during which time you can change their priority.
- The processing set manager agent picks up each data source based on its order, all password bank entries are synced, and the agent submits each data source as an individual discovery job to the processing engine. The agent then provides updates on the status of each job to Relativity, which then displays this information on the processing set layout.
- The processing engine discovers the files and applies the filters you specified in the Inventory tab. It then sends the finalized discovery results back to Relativity, which then updates the reports to include all applicable discovery data.
- Any errors that occurred during discovery are logged in the errors tabs. You can view these errors and attempt to retry them.
- You can now
Container extraction
It may be useful to understand how the processing engine handles container files during discovery. Specifically, the following graphic depicts how the engine continues to open multiple levels of container files until there are no more containers left in the data source.
This graphic is meant for reference purposes only.
Special considerations - OCR and text extraction
Consider the following regarding OCR and text extraction during discovery:
- During discovery, the processing engine copies native files and OCR results to the document repository. Whether or not you publish these files, they remain in the repository, and they aren't automatically deleted or removed.
- Relativity populates the Extracted Text field when performing OCR during discovery. Relativity doesn’t overwrite metadata fields during OCR.
- For multi-page records with a mix of native text and images, Relativity segments out OCR and extracted text at the page level, not the document level. For each page of a document containing both native text and images, Relativity stores extracted text and OCR text separately.
- In the case where a file contains both native text and OCR within the extracted text of the record, there is a header in the Extracted Text field indicating the text that was extracted through OCR.
- Relativity extracts OCR to Unicode.
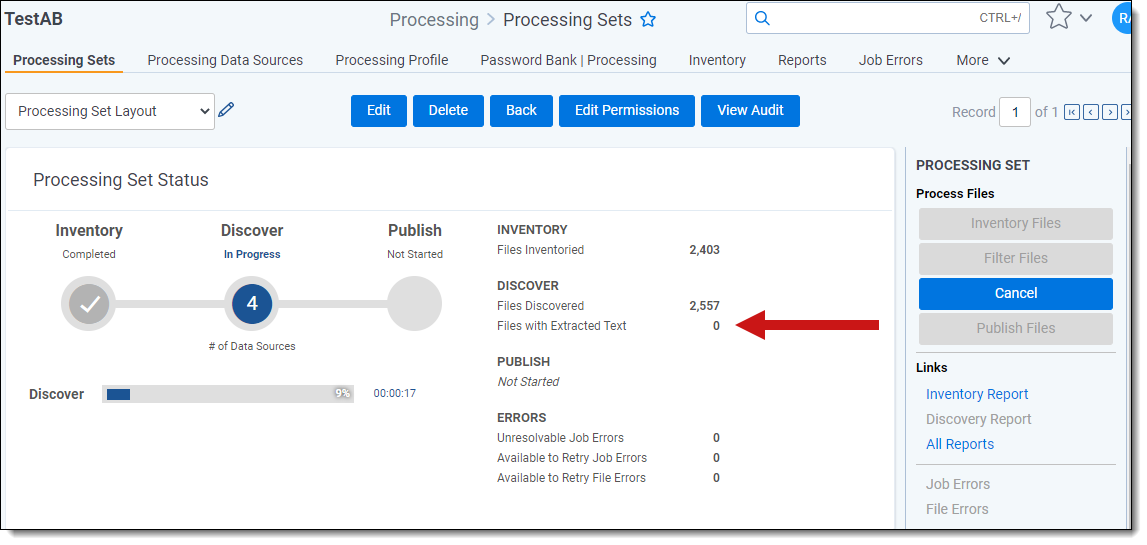
Monitoring discovery status
You can monitor the progress of the discovery job through the information provided in the Processing Set Status display on the set layout.
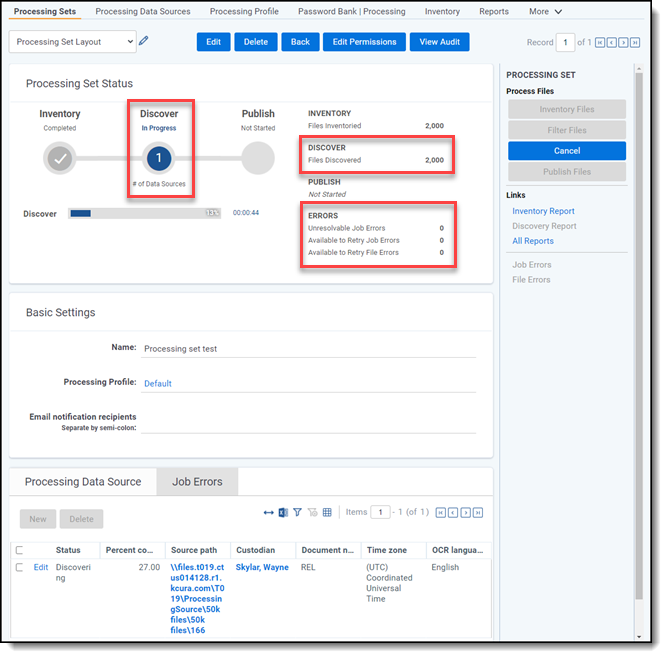
Through this display, you can monitor the following:
- # of Data Sources - the number of data sources currently in the processing queue.
- Inventory | Files Inventoried - the number of files across all data sources submitted that the processing engine inventoried.
- Inventory | Filtered Inventory - the number of files you excluded from discovery by applying any of the available filters in the Inventory tab. For example, if you applied only a Date Range filter and excluded only 10 .exe files from your data after you inventoried it, this will display a value of 10. If you applied no filters in the Inventory tab, this value will be 0. This value doesn't include files that were excluded via the DeNIST setting on the processing profile associated with this set.
- Discover | Files Discovered - the number of files across all data sources submitted that the processing engine has discovered.
- Discover | Files with Extracted Text - the number of files across all data sources submitted that have had their text extracted. This value will only be displayed while the discovery jobs are still in progress. If the value is 0, text extraction has not started yet.
- Errors - the number of errors that have occurred across all data sources submitted, which fall into the following categories:
- Unresolvable - errors that you can't retry.
- Available to Retry - errors that are available for retry.
- In Queue - errors that you have submitted for retry and are currently in the processing queue.
Note: Overall progress is calculated based on the number of data sources and percentage complete for each source.
If you enabled the auto-publish set option on the profile used by this set, you can monitor the progress for both discovery and publish.
See Processing error workflow for details.
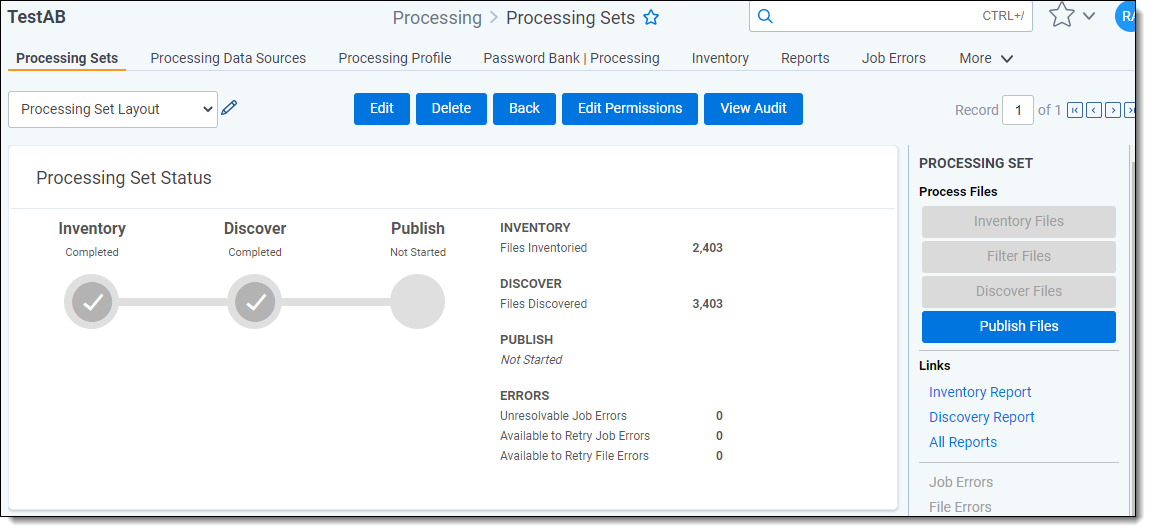
Once discovery is complete, the status section displays a check mark, indicating that you can move on to publishing your files.

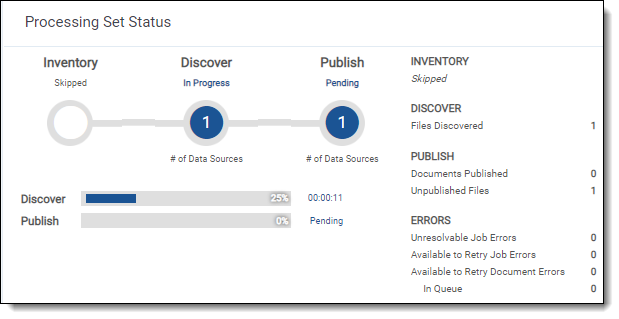
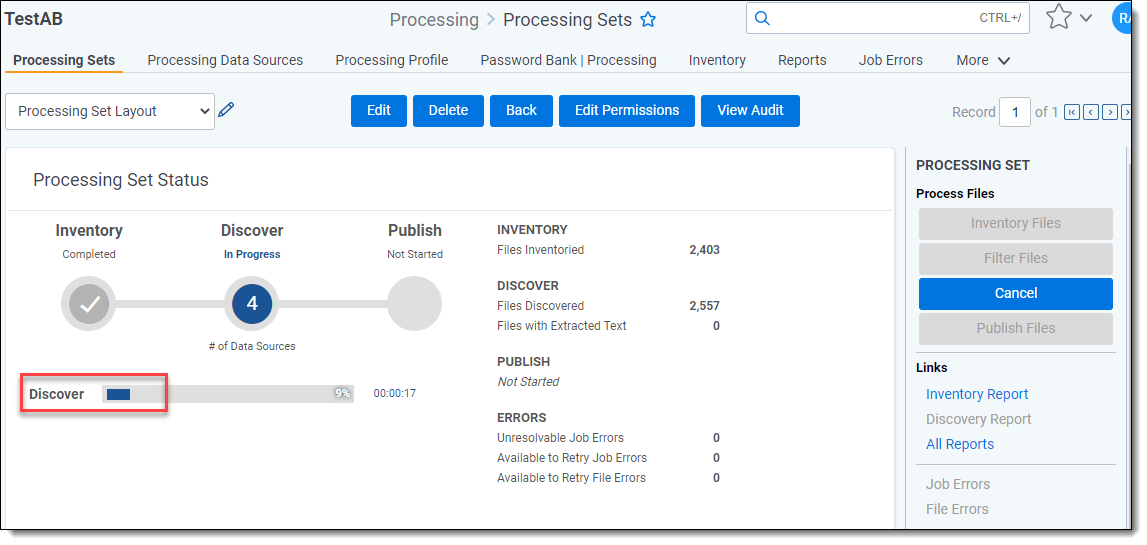
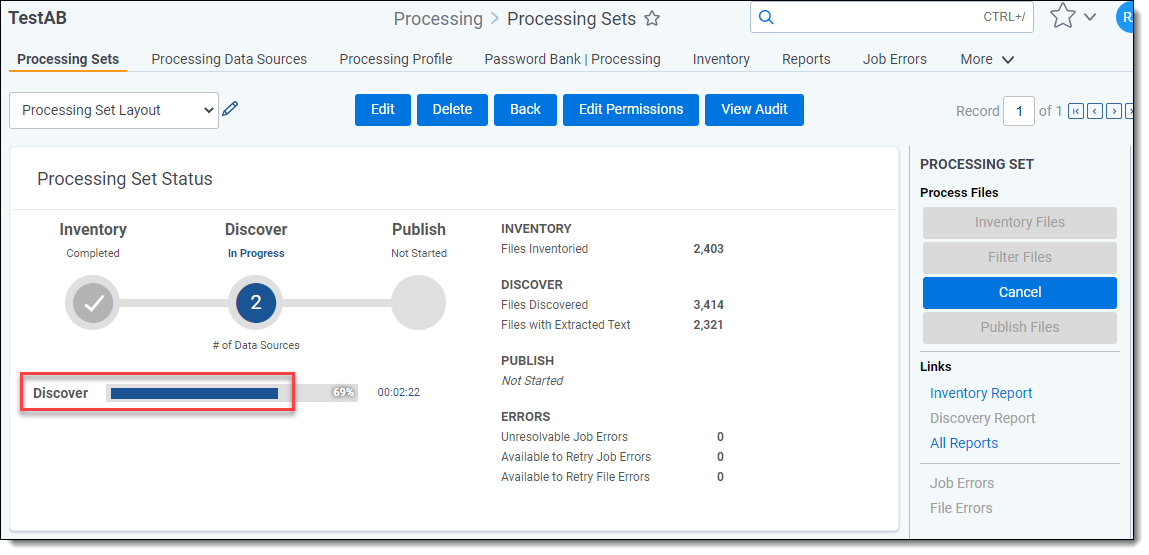
Viewing text extraction progress in processing sets
This feature is located below the Discover | Files Discovered count and shows the progress of text extraction by displaying an incrementing count of the number of files containing text within the processing sets.
Initial Discovery occurs when the percentage bar displays 0-25%.
Text Extraction occurs when the percentage bar displays 25-50%.
Finalization occurs at a much faster rate (50-100%).
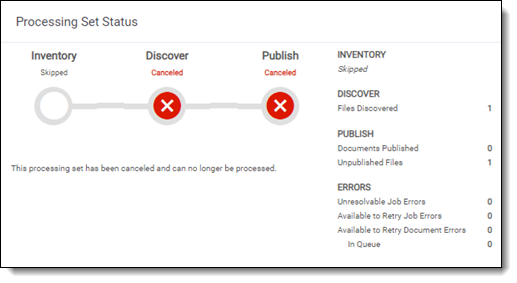
Canceling discovery
Canceling discovery
Once you start discovery, you can cancel it before the job reaches a status of Discovered with errors or Discover files complete.
To cancel discovery, click Cancel.
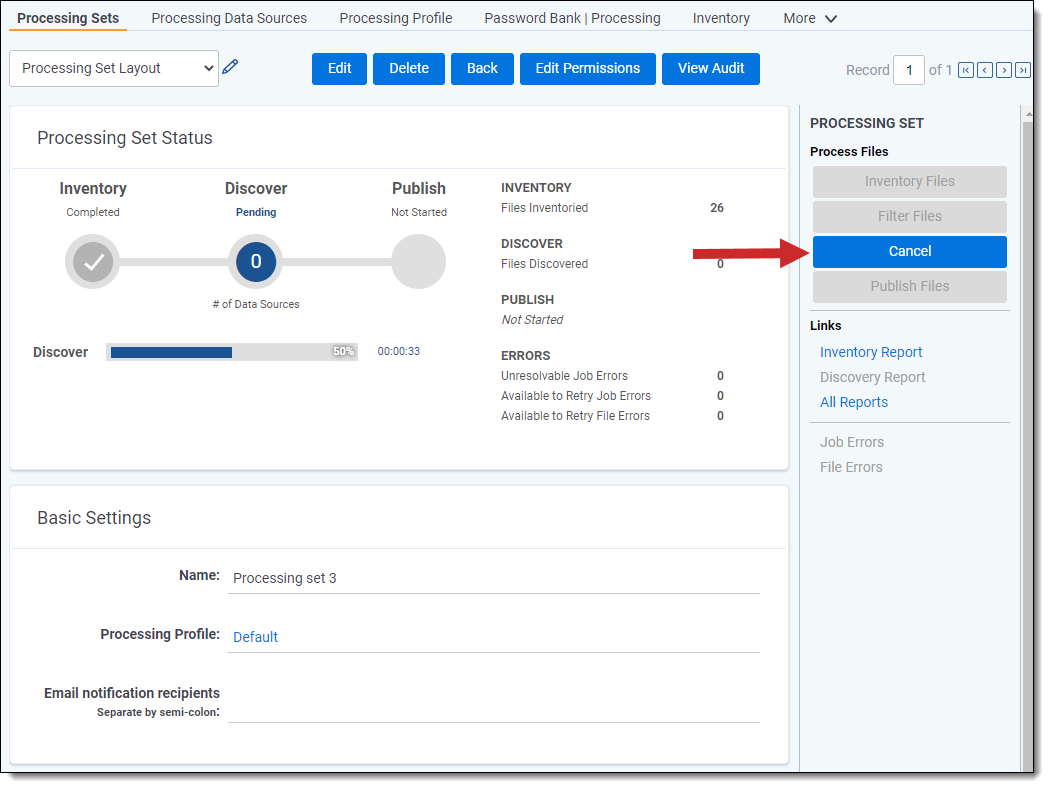
Consider the following regarding canceling discovery:
- If you click Cancel while the status is still Waiting, you can re-submit the discovery job.
- If you click Cancel after the job has already been sent to the processing engine, the set is canceled, meaning all options are disabled and it is unusable. Deduplication isn’t run against documents in canceled processing sets.
- If you have auto-publish enabled and you cancel discovery, file publishing does not start.
- Once the agent picks up the cancel discovery job, no more errors are created for the processing set.
- Errors resulting from a canceled job are given a canceled status and can't be retried.
- Once you cancel discovery, you can't resume discovery on those data sources. You must create new data sources to fully discover those files.
Once you cancel discovery, the status section is updated to display the canceled state.