


You must complete the pre-installation process to ensure that your environment is configured with the software, user accounts, directories, and other prerequisites required for an initial installation of Relativity. In addition, the Relativity service bus requires that you either install and configure Service Bus for Windows Server or RabbitMQ.
As you set up your environment, use the
Note: If you use a firewall, refer to the Ports Diagram in the Relativity Community to ensure that you configure your firewall correctly with Relativity.
Note: Relativity plans to deprecate Windows Service Bus in Server 2023. We recommend that you begin conversion to RabbitMQ beginning in Server 2022.
Windows updates
Install the latest Microsoft Windows Server Service Pack on all Relativity servers.
However, compatibility for higher .NET versions is not guaranteed and we do not recommend installing higher .NET versions than what is listed as required by your Relativity version. Furthermore, install any smaller security patches, Windows updates, and anything else at your own discretion. We only test major service packs, not every Microsoft update. Deploy any patches to your test instance of Relativity first. Ensure that a rollback plan is in place if you discover any issues during deployment.
Ensure you disable the option to Install updates automatically on all Relativity servers. Apply any required updates during a planned maintenance window.
After installing Windows updates, reboot your machines before attempting to install Relativity. Complete this step to ensure that all Relativity components are properly installed. Incomplete Windows updates lock system files, which may cause silent failures and prevent the proper installation of Relativity components.
Note: You must enable Windows Network discovery on all machines.
Required certificates for Relativity
Relativity verifies that all HTTPS services running in your environment have a trusted certificate. The HTTPS services run on the following components of your Relativity installation, so they require that you install valid certificates:
- Analytics server
- Components that connect to the Services API
- Components that use HTTPS to connect to the REST API
- Service Host Manager on all web and agent servers for running application-based Kepler services
- Viewer
- Web servers
Note: For more information about required certificates and their corresponding Relativity servers, see All certificates used by Relativity servers on the Community site.
You need to add certificates to any server in your Relativity environment that is accessed by an HTTPS service. By adding these certificates, you will not see warning messages and insecure-connection icons displayed as you navigate to different components of your Relativity site. Use these guidelines for installing certificates in your Relativity environment:
- If your Relativity site is exposed to the internet, install a certificate on any server that users can access with HTTPS services.
- If Relativity users access your web server with different internal and external names, install a second certificate for the internal name.
- If you use different internal and external URLs bound to the same IP address on your servers, install a second certificate on the server for the internal IP address. You may want to consider using Server Name Indication (SNI), which is an extension to the Transport Layer Security (TLS).
Note: If you do not want to use SNI in your environment, then configure separate IP addresses on your web servers for internal and external URLS. You might not be able to use SNI if your IIS or web browser versions do not support it.
For information on setting up HTTPS for the Service Host Manager on web and agent servers, see
For information on enabling HTTPS for Invariant Kepler Services, see
Microsoft Storage Sense
The Microsoft Storage Sense feature that is built in to Windows Server 2019 and later has the potential to cause instability in your Relativity Server instance by inadvertently clearing out Windows TEMP folders.
To mitigate this scenario, see the knowledge base article Temp folder inadvertent clean up by Windows on the Community.
You must have valid Community credentials to access this content.
Creating a self-signed certificate in PowerShell
To create a self-signed certificate with PowerShell 4.0, perform the following steps:
- Open PowerShell.
- Ensure you are running PowerShell in administrator mode. Otherwise, you will receive an error when attempting to create the certificate.
- Import the PKI module into PowerShell via the following command:
Import-Module PKI
- Create the certificate through the following commands, where "FQDN" is the fully-qualified domain name.
Note: If you are performing these steps as part of enabling HTTPS for Invariant Kepler Services, the fully-qualified domain name will be for the Queue Manager. For details, see
Set-Location Cert:\LocalMachine
New-SelfSignedCertificate -DnsName "FQDN" -CertStoreLocation Cert:\LocalMachine\My
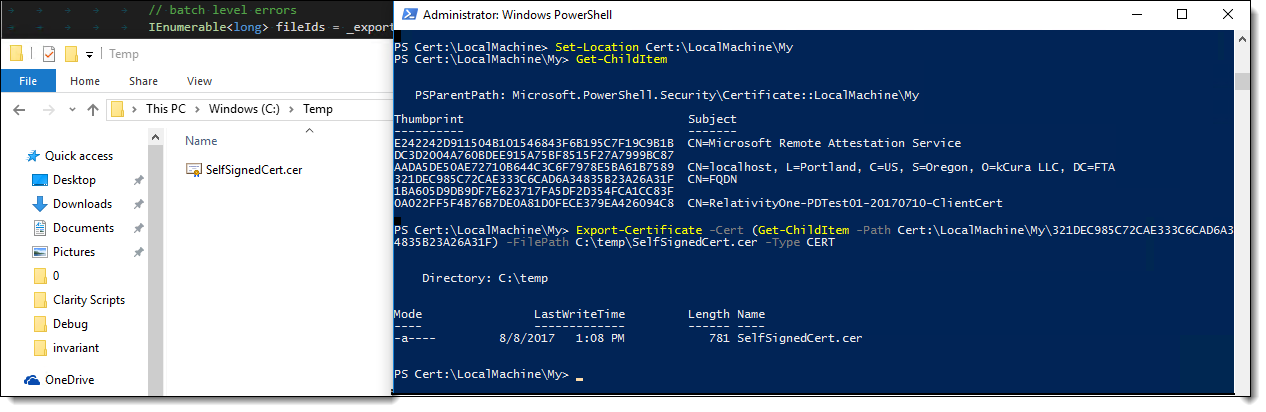
- Confirm that you have created a certificate in the personal store. Your PowerShell display should resemble the following image:

- Create, or designate, a folder in your C drive to which you want to export the certificate, which you will do through the final “Export-Certificate” prompt included below. You will receive an error if that file path doesn’t exist.
- Export the certificate through the following commands:
- Doing this sets your location to the folder you just created the certificate in.
Set-Location Cert:\LocalMachine\My
Get-ChildItem
- This displays the thumbprint of all certificates in the folder you just created, including the one you just added. Make sure to copy the signature of the certificate you created and paste it into the following command.
Export-Certificate -Cert (Get-ChildItem –Path Cert:\LocalMachine\My\CertificateSignature) -FilePath C:\Temp\SelfSignedCert.cer -Type CERT
- Make sure you pasted the certificate signature you copied after running the Get-ChildItem command into this command, specifically in place of "CertificateSignature" above.
- Confirm that you successfully exported the certificate you created. Your PowerShell display and corresponding folder should resemble the following image:
Certificate requirements for message broker
The Relativity service bus requires the installation of one of the following message brokers as a prerequisite. To facilitate secure communication, the message broker requires a certificate. Depending on the message broker you decide to use, complete the following steps:
Certificate requirements for Service Bus for Windows Server
Certificate requirements for RabbitMQ
Certificate requirements for Service Bus for Windows Server
You can use one of the following options for obtaining a trusted certificate for Service Bus for Windows Server:
- Use an existing certificate—you may already have a certificate for externally facing web servers. If the domain name for the certificate matches the fully qualified domain name (FQDN) of the service bus server, you can use this same certificate for both the web server and the service bus.
- Issue a certificate with an internal certificate authority—if you have access to an internal CA, issue a certificate with the internal FQDN of your service bus server. The certificate must include the following information:
- For any certificate, either the Subject Name, Subject Alternative Name, or both must be valid for each host in the farm.
- Private and public key.
- Valid start date, end date, and trust chain.
- AT_KeyExchange set.
- Corresponding CRL list for the signing authority.
- Auto-generate a certificate—you can use the Service Bus Configuration tool to auto-generate the required certificate when you configure a new farm. If you use an auto-generated certificate, each host must be on the same domain. For more information,
Certificate requirements for RabbitMQ
The certificate must include the following information:
- For any certificate, either the Subject Name, Subject Alternative Name, or both must be valid for the Fully Qualified Domain name that will be configured in Relativity.
- Private and public key.
- Valid start date, end date, and trust chain.
- Corresponding certificate for the authority that issued the certificate. A corresponding certificate is not required if using a self-signed certificate.
- Certificate itself, the private key, and the certificate for the authority must be in the PEM format. For more information, see Convert certificates to PEM format.
You can use one of the following options for obtaining a trusted certificate for RabbitMQ:
- Using a certificate authority—if using a certificate authority complete the following:
- Request or generate a certificate with the required properties.
- If you are using an internal certificate authority that is not capable of generating the key and certificate in PEM format directly, generate and convert the certificate, the certificate’s private key, and the certificate authorities certificate to PEM format. For more information, see Convert certificates to PEM format.
- Self-signed certificate—there are several ways to generate a self-signed certificate including:
- Powershell
- OpenSSL—use the following script to directly generate the files in the PEM format. You need to update the inputs for the following script for your environment.
Note: To run OpenSSL commands, you need to add the OpenSSL path to the environmental variable or run a command prompt as an admin at that directory.
@echo off

								REM IN YOUR OpenSSL FOLDER, SAVE THIS FILE AS: makeCERT.bat
								REM AT COMMAND LINE IN YOUR OpenSSL FOLDER, RUN: makecert
								REM IT WILL CREATE THESE FILES: HOSTNAME.cnf, HOSTNAMEKey.pem, HOSTNAMECert.pem, HOSTNAMEpfx.pfx

								REM PLEASE UPDATE THE FOLLOWING VARIABLES FOR YOUR NEEDS.
								SET HOSTNAME=yourrabbitcluster
								SET DOT=company.corp
								SET COUNTRY=US
								SET STATE=IL
								SET CITY=Chicago
								SET ORGANIZATION=PD
								SET ORGANIZATION_UNIT=PD
								SET EMAIL=admin@%HOSTNAME%.%DOT%

								(
								echo [req]
								echo default_bits = 2048
								echo prompt = no
								echo default_md = sha256
								echo x509_extensions = v3_req
								echo distinguished_name = dn
								echo:
								echo [dn]
								echo C = %COUNTRY%
								echo ST = %STATE%
								echo L = %CITY%
								echo O = %ORGANIZATION%
								echo OU = %ORGANIZATION_UNIT%
								echo emailAddress = %EMAIL%
								echo CN = %HOSTNAME%.%DOT%
								echo:
								echo [v3_req]
								echo subjectAltName = @alt_names
								echo:
								echo [alt_names]
								echo DNS.1 = *.%DOT%
								echo DNS.2 = %HOSTNAME%.%DOT%
								)>%HOSTNAME%.cnf

								openssl req -new -x509 -newkey rsa:2048 -sha256 -nodes -keyout %HOSTNAME%Key.pem -days 3560 -out %HOSTNAME%Cert.pem -config %HOSTNAME%.cnf
			openssl pkcs12 -inkey %HOSTNAME%Key.pem -in %HOSTNAME%Cert.pem -export -out %HOSTNAME%pfx.pfx
Note: After updating the inputs at the beginning of the script for your environment, this script can be used to directly generate a self-signed certificate in the PEM format.
- Open Run on your desktop, and enter MMC.exe.
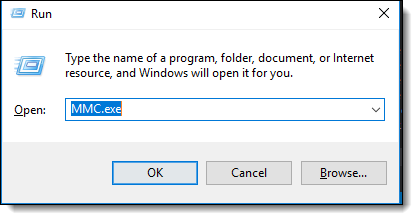
- Click OK.
- In the Console window, click File > Add/Remove Snap-ins.
Select Certificates under Available Snap-ins.

Click Add.
- Select Computer Account and click Next.
Select Local Computer and click Finish.
Click OK.
Right click the certificate you want to export and click All Tasks > Export.
On Export Private Key select Yes, export the private Key.
On Export File Format select Personal Information Exchange (.pfx).
Select Include all certificates in the certification path if possible.
Click Next.
On Security select Password.
Enter in a unique and secure password, you will need it for when converting the .pfx to a .pem.
Save the file in a secure location.
Using the Windows Certificate Manager store, export the .pfx certificate without the private key, making sure to choose the .der (.cer) option.

Convert certificates to PEM format
The certificates in RabbitMQ must be in PEM format. There are multiple ways to convert certificates to the PEM format. The following an example conversion done using OpenSSL:
- If applicable, export the certificates from the Window Certificate Store. For more information. see Export existing certificates for conversion to PEM format.
- Using OpenSSL, complete the following steps convert the certificate to PEM format:
Save the private key as a PEM file:
- Save the certificate as a PEM file:
- Save the CA certificate as a PEM file, this step is not required for self-signed certificates:
openssl pkcs12 -in <PathToPfx>.pfx -out <OutputPathForKey>.pem -nodes -nocerts
openssl pkcs12 -in <PathToPfx>.pfx -out <OutputPathForCert>.pem -nodes -nokeys
openssl x509 -inform der -in <PathToCACer>.cer -out <OutputPath>.pem
Note: For more information on using OpenSSL to convert the certificate to PEM format, see How to convert a certificate into the appropriate format.
(Optional) Running the RabbitMQCertificate utility
When configuring the RabbitMQ TLS setting, you have the option of running the RabbitMQCertificate utility available on the Community, which contains a copy of OpenSSL. If you cannot use Powershell for any reason, then you need to use the manual setup instructions provided above.
To use the RabbitMQCertificate utility:
- Download the RabbitMQCertificateUtility from the Community.
- Unzip the RabbitMQCertificateUtility.zip file and open the RabbitMQCertificateUtility folder.
- Navigate to the File tab in your file explorer.
- Select Open Windows PowerShell and then select Open Windows PowerShell as administrator.
- Run the script by typing .\RabbitMQCertificateTool.ps1 and clicking Enter.
- Select one of the following options:
- Option 1 to set up RabbitMQ with a self-signed certificate.
- Provide a password, which will be used when creating the private key.
- The password must not contain ! or &.
- Restart the service when prompted.
- Export the newly created certificate and install it on all web, agent, and Invariant servers.
- Option 2 to use a PFX.
- The PFX must be in the C:\Users\{RSA}\AppData\Roaming\RabbitMQ folder.
- The PFX must be called RabbitMQ.pfx.
- You must know the password for this PFX file, as you will be prompted for it when running this option.
- Option 1 to set up RabbitMQ with a self-signed certificate.
User and group accounts
Configure the following user and group accounts in your environment.
Relativity service account
Make sure that the Relativity services account has local administrator privileges on each of the servers where you want to install Relativity. You must log in under this account when installing this software. You can find additional requirements for this account under the sections describing how to configure specific servers.
The Windows Service Component and the Relativity COM Plus Component run under the Relativity Service Account. Verify that this account is configured as follows:
- Create account in Active Directory.
- Add account to the Administrators group on all machines running Relativity components.
- If using a workgroup, verify that the account has identical credentials on all Relativity servers.
Database server setup
Set up the database server by completing the steps in this section.
You should disable User Access Controls (UAC) prior to installation of Relativity. You can enable it again once installation is complete for all servers, except the Worker servers.
The SQL sa account must exist with the name sa and be enabled during installation.
Required software
The following software must be installed on the database server:
-
Windows Server 2019, Windows Server 2016, or Windows Server 2012 R2
- SQL Server 2017 or SQL Server 2019
SQL Server 2019 requires Windows Server 2016 or 2019.
Caution: As of August 2024, due to issues found within email aliasing and name normalization, if you're running SQL Server 2019 on any SQL Server in your instance, you need to get Cumulative Update package 28 from Microsoft. To do so, see Cumulative Update 28.
-
Relativity supports in-place upgrades from SQL Server 2016 to any higher supported version. For details on SQL Server upgrade, follow the EDDS migration Guide. To determine if you should upgrade your current SQL Server version to SQL Server 2019, note the following considerations. Contact Relativity Support if you have further questions.
-
The base operating system of your SQL Server must be at a minimum Windows Server 2016. Any Windows Server version below 2016 will require an EDDS migration to be performed to a server with a proper operating system version and SQL version. Relativity does not support in-place operating system upgrades. .
-
SQL Server version lower than SQL 2016 will require an EDDS migration since upgrading to SQL Server 2019 from versions lower than SQL Server 2016 has not been tested by Relativity.
-
- .NET 4.7.2 or 4.8
- .NET 3.5
Additional considerations:
-
Each environment is different, research settings that your specific environment may utilize before performing any upgrades.
-
Ensure that you have tested backups before performing any upgrades.
-
Although an in-place SQL upgrade is supported by Relativity. Performing an EDDS migration is the cleanest way to perform a SQL upgrade.
- Notes:
- Relativity requires Full Text Search from the Database Engine Services feature as part of the SQL Server installation.
- For information about the service bus and server software versions, see
Enable Microsoft DTC
Microsoft DTC must be enabled on the SQL Server along with the following configuration changes:
- Add the Application Server role and select Distributed Transactions. Select Incoming Remote Transactions and Outgoing Remote Transactions.
- Type dcomcnfg on your Start menu and press Enter to open Component Services.
- Expand Component Services > Computers > My Computer > Distributed Transaction Coordinator.
- Right-click Local DTC and click Properties.
- Click the Security tab.
- Select the following check boxes. For additional details on DTC enablement, see the Deployment workbook on the Relativity Community.

- Allow Remote Clients
- Allow Inbound
- Allow Outbound
- Click Apply.
- Click Yes to restart the MSDTC service.
- Click OK.
Note: As of Windows Server 2016 the Application Server role has been deprecated. Use the Distributed Transaction Coordinator, if it is not present on your machine download the Microsoft Distributed Transaction Coordinator (MSDTC) 2016 Management Pack for Microsoft System Center located here, download.
Assign admin permissions to the Relativity service account
You must configure permissions for the Relativity service account on the SQL Server as part of the database setup process. Make sure that the Relativity service account has local administrator and system admin permissions on the SQL Server.
Create SQL Server login
The following login must be added to the SQL Server environment. Set this account to Never Expire and Not Enforce Password policy.
Note: The Relativity installer creates this SQL Server account if it does not already exist.
The EDDSDBO account is the login used by the owner of all objects in the EDDS system databases. Follow these guidelines for configuring this account:
- Authenticate this user with SQL Server Authentication.
- Give this account only the following server roles:
- bulkadmin
- dbcreator
- public
- If you have multiple SQL Servers, create this account on each server with the same name, permissions, and credentials.
- Make sure that password for EDDSDBO account doesn't contain an equals sign (=), carats (< or >), double quotes ("), parenthesis, curly braces ( { or } ), or semicolons (;).
Set authentication mode
After creating a SQL Server login, you must set the Windows authentication mode property on the server.
Complete the following steps to set the authentication mode:
- Log in to Microsoft SQL Server Management Studio.
- Right-click on your server in the Object Explorer, and then click Properties in the menu.
- On the Server Properties dialog box, click the Security page.

- Under Server authentication, click SQL Server and Windows Authentication mode.
- Click OK.

Create BCP share
Create a directory on the SQL Server in a location where the Relativity Service Account can read and write. In addition, give SQL services permissions to read from and write to this directory.
- Make sure that this directory is an actual folder, not merely a drive letter.
- Confirm that the account running SQL has access to this directory. If it does not have access to this folder, it cannot create new cases. This directory is used for temporary files during imports, exports, case creations, and dtSearch queries.
- Place this share on the drive housing the backup files for optimal performance. This share should be named BCPPath in every instance.
- If you have multiple SQL Servers, create this share on each server and use the BCPPath as the share name on all servers.
- Make sure the account running the SQL services has rights to the BCPPath. Bulk import fails when this account does not have these rights.
Note: Consider setting up an SQL Service Account that is a domain account with local admin rights. You should review the security requirements of your organization before setting up this account.
Complete the following steps to share the folder:
- Right-click the folder and go to Properties.
- Open the Sharing tab and click Share.
- Enter the Relativity Service Account name, domain\account, and click Add.
- Select the service account on the share list and set the Permission Level to a minimum of Read/Write.
- Click Share.
- When the share completes, click Done.
- On the Document Properties dialog box, select the Security tab.
- Verify that the Relativity Service Account has Full Control security permissions to the folder itself.
Update the permissions on the BCPPath file share
In the Failover Cluster Manager, you must update the permission settings for the BCPPath file share to ensure the case creation occurs properly on the failover cluster. When you create the BCPPath on a clustered disk, verify that Enable continuous availability option is not selected under Settings on the BCPPath Properties page. See the sample settings on the following screen shot:

Note: You must configure this setting only for SQL Server 2012, 2014, and 2016.
Optionally configure an authentication token-signing certificate
When you run the Relativity installer, it automatically adds an authentication token-signing certificate, named RelativityIdentityCertificate, to the certificate store on your primary database server. However, you also have the option to use your own certificate rather than the one created by the Relativity installer.
Note: You only need to install an authentication token-signing certificate if you do not want to use the default certificate called provided by the Relativity installer.
Before you begin installing Relativity, you may want to configure the token-signing certificate in the store on your primary database server. The other servers in your Relativity installation automatically retrieve this certificate information from the EDDS database server, so you do not need to configure their certificates individually.
Note: For a clustered environment, you need to export a copy of your RelativityIdentityCertificate from the primary database server, and install the certificate to each database server hosting the EDDS.
Pre-installation steps for a token-signing certificate
You may want to install your custom token-signing certificate on the database server before you install Relativity in your environment. However, you can also complete these steps after installation.
Use this procedure to configure your certificate:
- Obtain a signed certificate and install it on the certificate store on your primary database server.
- Copy the thumbprint of the certificate for later use. You need this value to update the instance setting after you install Relativity.
- Install Relativity on the database and other servers.
Optionally restrict account permissions for third party applications
This section describes how to allow a user to execute worker operations in a user account that is independent of the default account used in Processing. This user account can be configured without admin level permissions in order to make the file conversions execute un-managed code in a highly secure fashion.
To restrict account permissions:
- Create the desired user account on the worker machines that will be doing work for Processing.
- The user account is not required to have permissions to access a file share or network.
- The user account does need to be able to read and write local temporary files.
- A single account name and password will be used for all workers in use by Invariant. This can be a local user account created on each worker.
- Store the user account name and password in Secret Store so that Processing can access them. This information can be configured in Secret Store either through the InvariantResponse.txt file used during installation or using the Secret Store client utility.
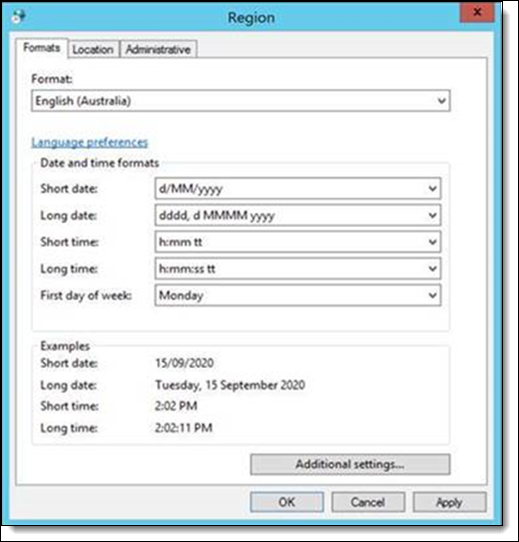
Note: The date format settings for this user account should be set up the same way as the Relativity service account. For example, if a service account is set up with the date format of DD/MM/YYYY, then the restricted user account must follow this format. Otherwise, applications executed under the restricted user account can be affected by mismatched date formatting. To verify your date format settings, see the regional format date and time configuration under the workers Windows settings.
Web server setup
This section describes how to prepare your web server for installing Relativity. Install the following software on the web server:
-
Windows Server 2019, Windows Server 2016, or Windows Server 2012 R2
- .NET 4.7.2 or 4.8
- .NET 3.5
Setting IIS options
Make these updates on all web servers in your Relativity installation:
- Install the required versions of the .NET Framework Full Profile on all web servers.
- Configure the Legacy Unhandled Exception Policy on all web servers:
- Browse to the following directory on your web server: C:\Windows\Microsoft.NET\Framework64\v4.0.30319\
- Open the Aspnet.config file in a text editor.
- Locate the tag <legacyUnhandledExceptionPolicy>.
- Set the enabled attribute to true. This sample code illustrates the attribute that you need to update:
- Save the changes to the file.
<legacyUnhandledExceptionPolicy enabled="true" />
HTTP Strict Transport Security
IIS 10.0 provides native support for HTTP Strict Transport Security (HSTS). If you enable this and check Redirect HTTP to HTTPS you must also configure Service Host Manager for HTTPS connections across the entire environment.

IIS role service configuration
Relativity requires that you configure several role services in the IIS. You also have the option of using a full installation of the Web Server (IIS) role.
For the IIS on Windows Server 2012 R2 or Windows Server 2016, use this procedure to view the minimum role service requirements for Relativity:
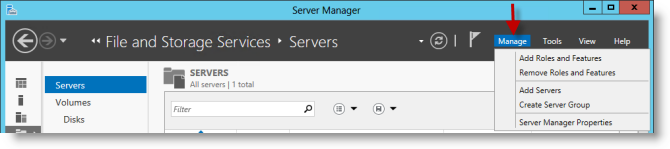
- Open the Server Manager on Windows Server 2012 R2 or Windows Server 2016.
- Click Manage to display a drop-down menu.
- Click Add Roles and Features. The Add Roles and Features wizard appears.
- Click Next on the Before you begin dialog box.
- Click Next on the Select installation type dialog box.
- On the Select destination server dialog box, select Server Roles.
- Select Web Server (IIS), and then click Install.
- On the pop-up window, ensure that Include management tools (if applicable) is checked, and then click Add Features.
- Click Next to go to the Features page.
-
Review the following illustration for Features configuration settings:
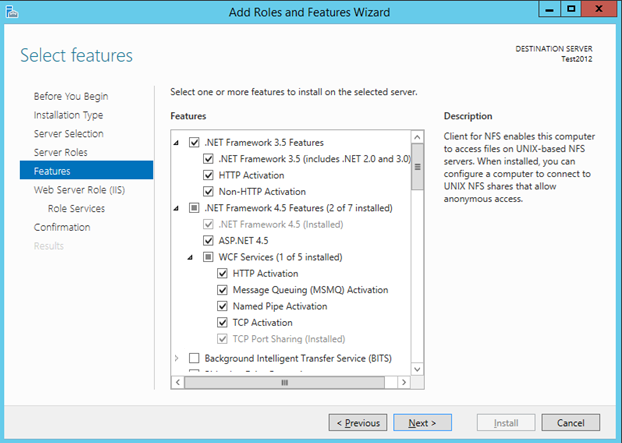
- Click Next to confirm the applicable Features.
- Click Next on the Web Server Role (IIS) page.
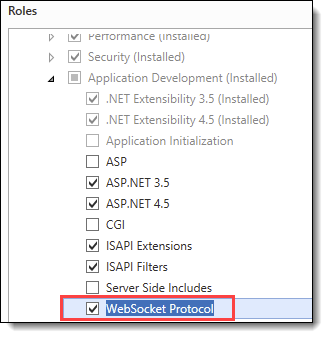
- On the Role Service page, review the following illustration for minimum role service requirements for Relativity:

- Click Next to confirm the Role Services.
- Click Install.
Enabling the WebSocket protocol
If you are using Windows Server 2012 R2, Relativity requires that you have the WebSocket protocol enabled on the IIS to support documentation conversion and imaging. Confirm that you have this protocol enabled on your web server.
Configuring log file options
If you enabled logging on the IIS, you can avoid performance and other issues by limiting the size of log files, as well as the number of trace files stored on the IIS. This section describes how to configure these features in your environment for optimum performance.
Log file options for Windows Server 2012 R2
Use the instructions in this section to configure logging settings for Windows Server 2012 R2.
Logging is a default role installed on the IIS and enabled in most environments. Use the following instructions to set the maximum size for the log files:
- Open the Server Manager.
- On the Tools menu, select Internet Information Services (IIS) Manager.
- Expand the server node to display the Features View.
- Double-click the Logging icon to display the Logging page.

- Update the maximum file size for your environment if necessary. The following illustration shows the maximum file size used to restrict the log files from growing larger than 3 MB.


If you manually installed the failed trace logging through the Role Services on your IIS, complete the following steps to set the maximum number trace files stored.
- Open the Server Manager.
- On the Tools menu, select Internet Information Services (IIS) Manager.
- Expand the server node to display the Features View.
- Highlight the Default Web Site.
- Double-click the Failed Request Tracing icon to display the Failed Request Tracing Rules page.

- Right-click on the rules to display a pop-up menu, and then click Edit Site Tracing.
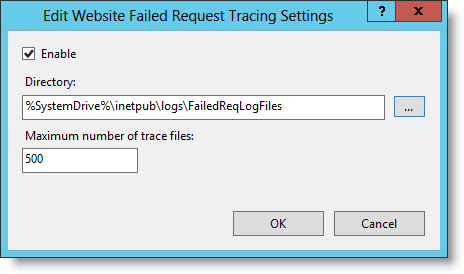
- Update the value in the Maximum number of trace files box. This value should be set no higher than 500.

Configuring SSL on a web server
Before installing Relativity, we recommend that you set up SSL on the IIS for your Relativity instance. This configuration provides added security for the communication between the web server and the browser on a client computer. Your browser uses this secure connection to verify that it is communicating with the Relativity server. It also provides additional protection against the theft of cookies used to maintain a session between the browser and the server.
Note: You are not required to configure SSL on the web server hosting Relativity. If you decided not to use HTTPS in your environment, you must set the CookieSecure instance setting to False before logging in to Relativity, or you receive an error message. You can also complete this setup after installation but before logging in to Relativity.
The process for configuring SSL on your web server includes these steps:
To set up SSL on your web server, you must obtain a certificate, which is digital identification document used by the browser to authenticate the server. A server certificate contains detailed identification information, such as the name of the organization affiliated with the server content, the name of the organization that issued the certificate, and a public key used to establish an encrypted connection. It provides a way for the browser to confirm the authenticity of web server content and the integrity of the SSL-secured connection before transmitting information.
You can obtain a certificate from Microsoft Certificate Services or from a mutually trusted CA. A CA confirms your identity to ensure the validity of the information contained in your certificate. In general, you must provide your name, address, organization, and other information.
Note: If you do not issue your server certificate through Microsoft Certificate Services, a third-party certification authority must approve your request and issue your server certificate.
After obtaining an SSL certificate, install it in the certificate store on your web server. For more information, see Import or export certificates and private keys on the Microsoft Windows website.
The IIS resets after you configure the HTTPS site bindings and update the SSL setting as described in the following section.
Use these steps to configure HTTPS site bindings:
- Open the IIS Manager.
- In the IIS Manager Connections pane, expand Sites.
- Right -click on the Default Web Site, and then click Edit Bindings on the menu.
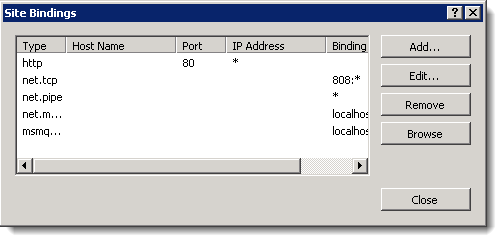
- Click Add to display the Add Site Binding dialog box.
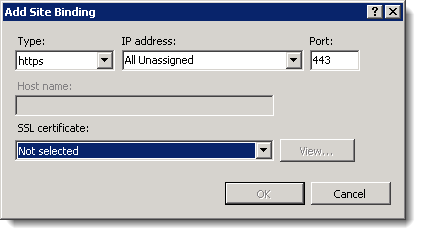
- In the Type drop-down menu, select https.
- In the SSL certificate drop-down menu, select your certificate.
- Click OK. You now see https listed in the Type column.
- Click Close.
Use the following steps to configure SSL settings on the IIS:
- Open IIS Manager.
- Navigate to the Relativity virtual directory, and then select Relativity.
- Double-click SSL Settings.
- Select Require SSL.
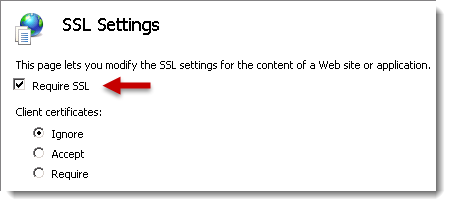
- Click Apply in the Actions pane.
You also need to enable HTTPS for the Service Host Manager service, which must run on all web and agent machines that use Relativity. For a detailed overview of this service and configuration steps, see Service Host Manager.
Agent server setup
An agent server performs background processing. It requires the following software:
-
Windows Server 2019, Windows Server 2016, or Windows Server 2012 R2
- .NET 4.7.2 or 4.8
- .NET 3.5
In most environments, the Relativity installer automatically enables Microsoft DTC and HTTP activation. You may require the following instructions if you need to troubleshoot your installation or if its configuration requires you manually complete these steps.
You must enable Microsoft DTC on the Agent server along with the following configuration changes:
- Add the Application Server role and select Distributed Transactions. Select Incoming Remote Transactions and Outgoing Remote Transactions.
- Type dcomcnfg on your Start menu , and then press Enter to open Component Services.
- Expand Component Services > Computers > My Computer > Distributed Transaction Coordinator.
- Right-click Local DTC, and then click Properties.
- Click the Security tab.
- Select the following check boxes:
- Allow Remote Clients
- Allow Inbound
- Allow Outbound
- Click Apply.
- Click Yes to restart the MSDTC service.
- Click OK.
Note: As of Windows Server 2016 the Application Server role has been deprecated. Use the Distributed Transaction Coordinator, if it is not present on your machine download the Microsoft Distributed Transaction Coordinator (MSDTC) 2016 Management Pack for Microsoft System Center located here, download.
You must enable HTTP activation on your agent server as follows for Microsoft Windows Server 2012 R:
- Click Start > Administrative Tools > Server Manager.
- In the Server Manager Dashboard, click Manage > Add Roles and Features.
- In the Add Roles and Features, choose Server Selection.
- Select the server running the agents is selected in the Server Pool box, and then click Next.
- Click Features in the sidebar of the wizard.
- Select the following check boxes in the Feature box:
- .NET Framework 3.5 Features
- .NET Framework 4.5 Features
Note: Ensure all check boxes below .NET Framework 3.5 Features are checked.
Note: Ensure all check boxes below .NET Framework 4.5 Features are checked.
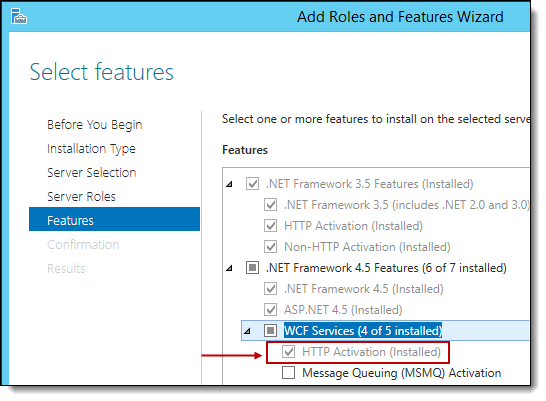
Make sure that HTTP Activation is installed and selected when you expand each of these sections.
- Install any missing features are necessary.
- When the installation is complete, expand .NET Framework 3.5 Features and .NET Framework 4.5 Features to verify that HTTP Activation is installed. See the following screen shot:
Message broker options
Relativity requires that you install and configure a message broker before you install or upgrade Relativity. While Relativity supports both Service Bus for Windows Server and RabbitMQ, we strongly recommend that you use RabbitMQ for Relativity Server 2022. Depending on the message broker you decide to use, complete the following steps:
RabbitMQ
RabbitMQ is the most widely deployed open source message broker with more than 35,000 production deployments. Additionally, RabbitMQ is fully supported on the latest Windows operating systems, features full support for TLS 1.2, and includes superior monitoring, administration, and performance capabilities. For more information, see the RabbitMQ website. The process for installing and configuring RabbitMQ includes these steps:
Use the following guidelines to optimize the RabbitMQ installation:
- RabbitMQ installation—for a typical installation, install RabbitMQ on a server or VM that is accessible throughout your Relativity instance. Must be accessible by all Web and Agent servers. Minimum of 2 GB of RAM, 2 CPU cores, and 10 GB of free disk space. Recommend 4-8 GB of RAM, 4 CPU cores, 40 GB of free disk space. Additionally, in environments where large batch jobs may be sent to RabbitMQ, such as mass conversions with greater than 25,000 documents, disk IO may become a factor in performance. Relativity recommends RabbitMQ’s mnesia database be located on a drive with less than 15ms latency and at least 30 mb/sec read/write speeds. For information about configuring RabbtitMQ’s directories, see the RabbitMQ website.
- Clustering and High Availability—a typical Relativity installation requires only a single RabbitMQ server. However, high availability can be achieved by deploying multiple RabbitMQ servers in a cluster. For more information, see Setting up RabbitMQ for high availability.
Before installing RabbitMQ, complete the following prerequisites:
-
If you wish to have RabbitMQ and Relativity communicate over TLS, see Certificate requirements for RabbitMQ.
- Ensure that you have the prerequisites for RabbitMQ. You need to meet these requirements to set up your cluster correctly.
- For a typical installation, identify the server or VM where you want to install RabbitMQ. To install RabbitMQ on multiple hosts, identify the servers or VMs for this purpose. The cluster can have any number of servers, but three servers is recommended. For more information, see Best practices for RabbitMQ.
-
Relativity agent and web servers must be able to communicate with the cluster over the following ports:
- TCP: 5672 (non TLS configurations) and/or 5671 (TLS configurations)
- HTTP(S): 15672 (non TLS configurations) and / or 15671 (TLS configurations)
Note: You must use RabbitMQ version 3.11.x or 3.12.x and a compatible version of Erlang.
Complete the following steps to install Erlang and RabbitMQ:
-
Download and install the latest version of Erlang that is compatible with RabbitMQ 3.11.x, or 3.12.x. Note that you cannot currently run version 3.12.x with any supported version of Erlang above v25.x. With how frequently both RabbitMQ and Erlang upgrade their products, we recommend you review the RabbitMQ-Erlang version requirements here. Make sure to run the installer in Administrator mode.
- Complete the steps in the Installation Configuration Wizard.
- When the installation process completes, click Close. You have now installed Erlang.
-
Download and install RabbitMQ 3.11.x or 3.12.x here. Be sure to run the installer in Administrator mode.
- Complete the steps in the Installation Configuration Wizard.
- When the installation process completes, click Finish. You have now installed RabbitMQ.
- Search "RabbitMQ Command Prompt (sbin dir)" on your machine. Open the RabbitMQ command prompt.
- In the RabbitMQ command prompt, run the following command:
- Restart the RabbitMQ Windows Service.
- Open a browser and navigate to http://localhost:15672/
- Log in with the following credentials:
- Username: guest
- Password: guest .
rabbitmq-plugins enable rabbitmq_management
This command enables the management plugin, management UI, and management API. Relativity's RabbitMQ provider requires the management API to perform certain operations.
Note: The default user guest can only log in from local host.
You should see an overview and your server displaying various green statistics.

Note: RabbitMQ requires .NET 3.5
After installing Erlang and RabbitMQ, you need to complete the following steps to configure RabbitMQ:
Create a new virtual host to be used by Relativity
Complete the following steps to create a new virtual host to be used by Relativity:
Note: Virtual hosts in RabbitMQ are analogous to Namespaces in Azure Service Bus and Service Bus for Windows Server.
- Open a browser and navigate to http://localhost:15672/
- Log in using the following credentials:
- username: guest
- password: guest
- Click Admin > Virtual Hosts.
- Expand Add a new virtual host.
- Enter a name for a virtual host to be used in the Name field, ex: Relativity.
- Click Add virtual host.
Note: The default user guest can only log in from local host.
Create a new user to be used by Relativity
Complete the following steps to create a new user to be used by Relativity:
- Open a browser and navigate to http://localhost:15672/
- Log in using the following credentials:
- username: guest
- password: guest
- Click Admin > Users.
- Expand Add users.
- Enter a user name and password in the Username and Password fields.
- Select Admin, under the Tags field.
- Click Add user.
- Expand All users.
- Click on the user you just created.
- Expand Permissions.
- Select the virtual host you created in the previous steps in the Virtual Host drop-down menu.
- In the Configure regexp, Write regexp, and Read regexp fields ensure the value is set to .* .
- Click Set permission, the permissions now display under current permissions.
Note: The default user guest can only log in from local host.
Note: For advanced deployment and configuration options, see the RabbitMQ website.
Adding a new RabbitMQ policy for SignalR
A SignalR policy ensures all SignalR queues are deleted after five minutes without a consumer, rather than the default setting of one hour. In addition, high availability policies are not applied to SignalR queues, limiting the performance impact of many queues.
To add a SignalR policy:
- Open your browser and navigate to http://localhost:15672/.
- Log in using the following credentials. The default user guest can only log in from local host.
- username: guest
- password: guest
- Click Admin > Policies.
- Expand the Add / update a policy section.
- Select a virtual host to be used, specifically Relativity.
- Name - SignalR
- Pattern - SIGNALR
- Priority - 10
- Definition - expires = 300000 | Number
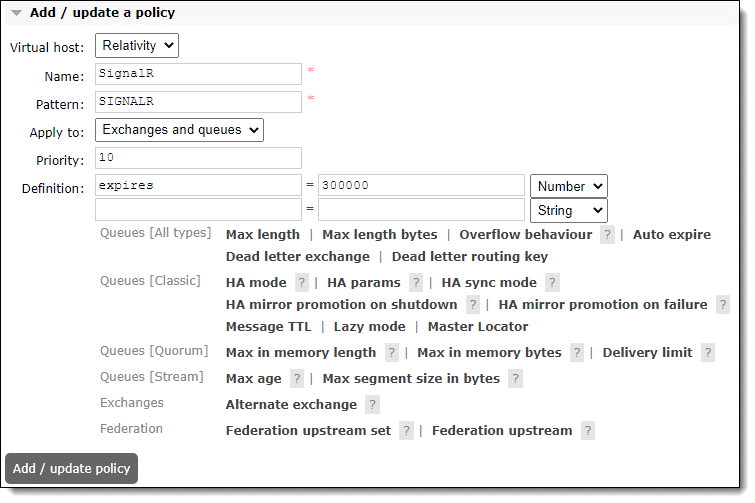
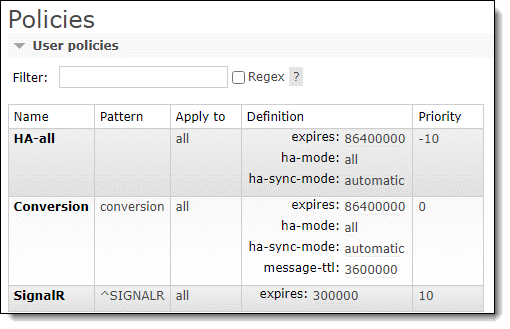
- Click Add / update policy to save the policy. Confirm the policy has been saved in the following format:

Note: TLS is optional and controlled by the TLSENABLED response file input and EnableTLSForServiceBus instance setting.
In order to setup RabbitMQ to use TLS for secure communication you must update the server side configuration of RabbitMQ. To enable SSL communication with the RabbitMQ server in Relativity, you must also update the instance setting. The following section documents the minimum requirements for using RabbitMQ over TLS with Relativity. For complete documentation of RabbitMQ with TLS, see the RabbitMQ website.
Note: Relativity only supports TLS 1.0, 1.1, and 1.2. SSL3 is NOT supported. When TLS is enabled for Relativity the ports 5671 and 15671 must be open and available for use by RabbitMQ.
- Before you begin, you need a certificate. For more information, see Certificate requirements for RabbitMQ.
- Navigate to your RabbitMQ directory. On Windows, this defaults to C:\Users\<user>\AppData\Roaming\RabbitMQ, <user> is the user account used to install the service.
- Depending on the version of RabbitMQ, download the advanced.config file.
The slashes in the advanced.config file must be forward slashes (/); entering backward slashes will result in an error.
Below RabbitMQ 3.8.15+ RabbitMQ 3.8.15+ or above advanced.config advanced.config
[
    {ssl, [
        {versions, ['tlsv1.2', 'tlsv1.1']}
    ]},

    {rabbit, [
        {consumer_timeout, 5400000},
        {tcp_listeners, []},
        {ssl_listeners, [5671]},
        {ssl_options,
            [{cacertfile, "C:/Path/To/Your/CACert/caCert.pem"},
             {certfile,   "C:/Path/To/Your/Cert/cert.pem"},
             {keyfile,    "C:/Path/To/Your/Key/key.pem"},
             {verify,     verify_none},
             {fail_if_no_peer_cert, false},
             {versions, ['tlsv1.2', 'tlsv1.1']}
            ]}
    ]},

    {rabbitmq_management, [
        {listener, [
            {port,     15671},
            {ssl,      true},
            {ssl_opts, [
                {cacertfile, "C:/Path/To/Your/CACert/caCert.pem"},
                {certfile,   "C:/Path/To/Your/Cert/cert.pem"},
                {keyfile,    "C:/Path/To/Your/Key/key.pem"}
            ]}
        ]}
    ]}
].
Note: Before editing the advanced.config file, ensure the certificate files are converted into the .PEM format. For more information, see Convert certificates to PEM Format.
The below image is an example of the advanced.confg file setup for TLS utilizing a self-signed certificate:
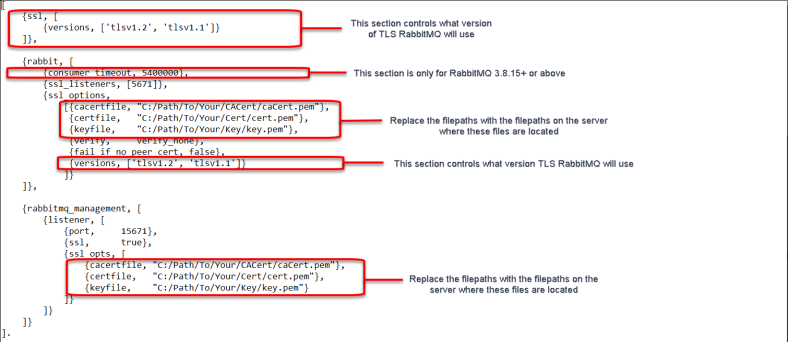
- Notes:
- In the advanced.confg file, ports 5671 and 15671 are specified in the file and are required for Relativity.
- The settings verify and fail_if_no_peer_cert are used for Client Certificates. Relativity does not support Client Certificates with RabbitMQ at this time, and requires username password authentication. As a result, verify must be set to verify_none, and fail_if_no_peer_cert must be set to false.
- For more information on how to configure RabbitMQ for TLS, see TLS Support and Configuring Cipher Suites.
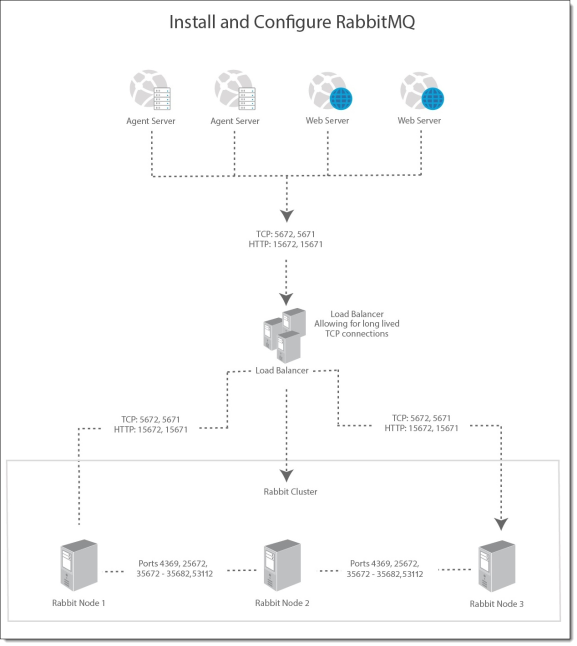
In order to deploy RabbitMQ in a high availability configuration, create a cluster of servers, nodes, hosting RabbitMQ. Once configured, Relativity can continue to function in the event that any individual RabbitMQ node goes down. While this section provides the basic steps necessary set up a RabbitMQ cluster, clustering in RabbitMQ supports many different configurations and network topologies. For more information, see clustering on the RabbitMQ website.
Optional configuration topics not included in this section include:
Planning the cluster
To achieve high availability, your cluster must include at least two nodes, servers, hosting RabbitMQ, and it is generally recommended to have at least three nodes. It is highly recommended that all nodes communicate over a reliable LAN. A reliable network connection between nodes is important for avoiding partitions. For more information, see partitions on the RabbitMQ website.
- Review the port requirements, see ports on the RabbitMQ website.
- Relativity agent and web servers must be able to communicate with the cluster over the following ports:
- TCP: 5672 (non TLS configurations) and / or 5671 (TLS configurations)
- HTTP(S): 15672 (non TLS configurations) and / or 15671 (TLS configurations)
- Options for handling node failures:
- Manual Fail Over
- No special network configuration required.
- Manual updates to relativity configuration and service restarts needed in the event of node failure.
- Load Balancer/Proxy
- Configure Relativity’s service bus instance settings to connect to a load balancer for the cluster.
- HTTP and TCP traffic should be load balanced across at least two nodes in the cluster.
- The load balancer must allow for long lived TCP connections to avoid a degradation in performance.
- In the event of a node failure, Relativity processes connected to the node will attempt to reconnect until successful allowing the load balancer to the direct the connection to a healthy node.
- Round Robin or other more advanced routing techniques can be used.
- Dynamic DNS
- Configure Relativity to connect to a domain name which is dynamically routed to the RabbitMQ nodes with a very short time to live.
- Effectively a Round Robin Load Balancer.
- Manual Fail Over
Creating the Cluster
Note: The following steps assume a windows server based RabbitMQ deployment.
-
Before forming a cluster, install Erlang and RabbitMQ on each server you which to include in the cluster. For more information, see Installing Erlang and RabbitMQ.
- Obtain an Erlang cookie to be used by the cluster. This cookie is used for inter-node authentication and is randomly generated on start-up if not present. For a cluster, the values much match on every host. For more information, see the RabbitMQ website.
- Log into the host server.
- Navigate to C:\WINDOWS\system32\config\systemprofile.
- Copy the .erlang.cookie file to a central location. This will serve as the shared cookie for the cluster.
- For each host server:
- Run rabbitmqctl stop_app in the RabbitMQ command prompt.
- Run rabbitmqctl reset.
- Replace the .erlang.cookie file at C:\WINDOWS\system32\config\systemprofile with the one you copied to a central location.
Run rabbitmqctl join_cluster rabbit@%ComputerNameOfHostThatCookieWasCopiedFrom%.
Note: Do not use the FQDN of the server or the command will error without the RABBITMQ_USE_LONGNAME setting in RabbitMQ set. Also, the host name is case sensitive.
- Replace the .erlang.cookie file at C:\Users\%USERNAME_THAT_INSTALLED_RABBITMQ%\.erlang.cookie with the one you copied to a central location.
Open RabbitMQ command prompt.
Note: If you run into issues while running RabbitMQ commands, trying restarting the RabbitMQ windows service. If you still see issues, try rebooting the server.
- Run rabbitmqctl cluster_status on any host in the RabbitMQ command prompt and confirm the output for nodes and running nodes contains all hosts.
- Verify the status of the cluster on the RabbitMQ management page.
- If any of the nodes are missing, log into that node and complete the steps found under Creating a cluster.
- If any of the nodes are yellow, this likely means the management plugin has not been enabled. Log in to that host and run rabbitmq-plugins enable rabbitmq_management in the RabbitMQ command prompt. For more information, see Installing Erlang and RabbitMQ.
Note: Ensure the management plugin is enabled on each node. For more information, see Installing Erlang and RabbitMQ.

- Notes:
Configuring the Cluster
By default, each queue and exchange only exists on a single node in the cluster. This means that those queues and exchanges are no longer be available if those nodes go down. For high availability, it is also necessary to ensure the individual queues and exchanges on the cluster are mirrored across multiple nodes. For more information, see the RabbitMQ website.
- Notes:
- If your cluster has more than three nodes, it may be beneficial to configure your queues and exchanges to be mirrored across an exact number of nodes in order to limit internode communication.
- The following steps can be used to configure all queue and exchanges to be mirrored across all nodes.
- Open a browser and navigate to http://localhost:15672/
- Log in using the following credentials:
- username: guest
- password: guest
- Click Admin > Policies.
- Expand Add / update a policy.
- Select a virtual host to be used, ex: Relativity.
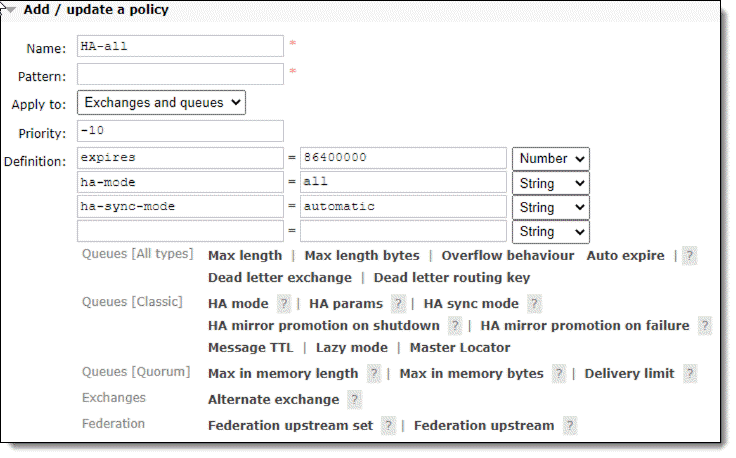
- Enter the following information:
- Name—Ha-all
- This will apply to all queues that are not SignalR or Conversion. In addition to the normal HA values, it also places a default expiration on all queues of 24 hours. The addition of the expiration value should help to clean up miscellaneous orphaned queues, such as ResourcePoolStatus queues for agents that no longer exist.
- The 24-hour expiration only starts after the policy has been applied. This means the orphaned queues will not be cleaned up immediately, but will be cleaned up 24 hours after creating the policy.
- Pattern—leave blank, means the policy will apply to everything.
- Priority— -10
- Definition
- expires = 86400000 | Number
- ha-mode = all | String
- ha-sync-mode = automatic | String
- Name—Ha-all
- Click Add policy. The policy now appears under User policies.
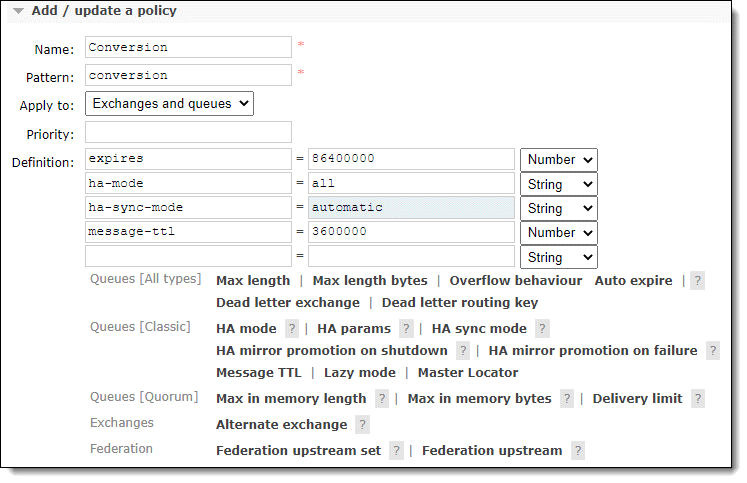
- Add another policy for Relativity Document Conversions by first selecting Relativity again as the virtual host to be used.
- Enter the following information:
- Name—Conversion
- This policy applies to all conversion queues. This includes all values from the new HA-All policy as well as lowering the message time to live to 1 hour, down from 24 hours. The reduced message time to live will help discard conversion requests for especially large documents that are taking a very long time to convert.
- The messages will not be discarded if they are currently in an unacked/in progress state, and restarting or deleting and recreating conversion agents may still be required.
- Pattern—Conversion
- Priority— 0
- Definition
- expires = 86400000 | Number
- ha-mode = all
- ha-sync-mode = automatic
- message-ttl = 3600000 | Number
- Name—Conversion
- Confirm that all policies are properly logged. From the queues page, all SignalR queues should display SignalR under features. All conversion queues should display Conversion under features. All other queues should display HA-All under features.
Note: The default user guest can only log in from local host.
Service Bus for Windows Server
Note: Microsoft has announced that it will not be making any future updates to Service Bus for Windows Server. Microsoft support for Service Bus for Windows Server ended in January 2023 and the product is no longer receiving security updates. Additionally, Microsoft only officially supports Service Bus for Windows Server for Windows Server 2012 and SQL Server 2012. While Service Bus for Windows Server is still supported for Relativity Server 2021, we plan to remove support in subsequent Relativity Server releases. RabbitMQ is the recommended message broker for Relativity Server 2021.
You can perform an online installation for Service Bus for Windows Server that requires an internet connection, or an offline installation that requires the internet only to download the installer.
Note: You can optionally install the Service Bus for Windows Server on multiple hosts.
The process for installing and configuring Service Bus for Windows Server includes these steps:
Use the following guidelines to optimize the Service Bus for Windows Server installation and farm setup:
- Service bus installation—For a typical installation, install Service Bus for Windows Server on a server or VM that is accessible throughout your Relativity instance. Install the service bus on a machine that meets these minimum requirements: CPU clock speed of 1.6GHz, a CPU core count of 2 or more, and physical memory of 3.5 GB, although 6 GB is recommended. These same guidelines also apply when installing the service bus on multiple hosts.
- Node—a typical Relativity installation requires only a single node in a farm. For a multiple host installation, ensure that you have an odd number of nodes, but do not exceed the maximum of five nodes. Three nodes is a common configuration for most environments configured with multiple hosts. While you can install the service bus on five nodes, determine if your Relativity installation requires these additional nodes. They may result in unnecessary overhead for your environment.
Note: During installation or upgrade, the machine for the Relativity service bus must be a node in the farm.
- SQL Server instance location—any machine in the farm can host the service bus databases. We recommend hosting the SQL instance on the Invariant database server. However, you can host it on a SQL instance on a separate machine. The SQL Server instance used for the Service Bus for Windows Server must meet the minimum requirements that Microsoft specifies in Prerequisites on MSDN.
- Message containers—For a typical Relativity installation with a single node, we recommend using the default value of three message containers in the farm.For a multiple host environment, Microsoft recommends using 2n message containers, where n is the number of nodes. For example, if you install the service bus on three hosts, then you need six message containers.
- Message backing (SQL) high availability—review the Microsoft recommendations for message backing with high availability, which suggest using SQL mirroring or SQL AlwaysOn availability groups.
- Server roles—install the Relativity service bus on a single machine that is a node in the Service Bus for Windows Server farm. In a multiple host environment, install the Service Bus for Windows Server on multiple machines that you want added to your farm. However, you only need to install the Relativity service bus on single machine as in a typical installation.
Note: Make sure that you set up a farm and configure it before you run the Relativity installer. The Relativity installer validates that your environment meets this requirement.
Before installing Service Bus for Windows Server, complete the following prerequisites:
- Complete the pre-installation steps for Relativity, such as setting up user accounts and certificates.
- Ensure that you have the prerequisites for Service Bus for Windows Server. You need to meet these requirements to set up your farm correctly.
- For a typical installation, identify the server or VM where you want to install Service Bus for Windows Server. To install the service bus on multiple hosts, identify the servers or VMs for this purpose. The farm requires that you add an odd number of nodes, but you should not exceed a maximum of five nodes.
Note: For a typical installation, install Service Bus for Windows Server on a server or VM that is accessible throughout your Relativity instance. Install the service bus on a machine that meets these minimum requirements: CPU clock speed of 1.6GHz, a CPU core count of 2 or more, and physical memory of 3.5 GB, although 6 GB is recommended. These same guidelines also apply when installing the service bus on multiple hosts.
- Ensure that you install .NET Version 4.7.2 or 4.8 in your environment. You must install.NET Version 4.7.2 or 4.8 before you install Service Bus 1.1 with TLS 1.2. It requires .NET Version 4.7.2 or 4.8.
To perform an online installation, you must have an internet connection. This process includes downloading the Microsoft Web Platform Installer (Web PI) and then installing the service bus on server or VM in your Relativity environment.
Review the following installation considerations:
- For a typical installation, install Service Bus for Windows Server on a server or VM that is accessible throughout your Relativity instance. Consider installing the service bus on the agent server where you intend to run conversion agents. Follow these same guidelines when installing the service bus on multiple hosts.
- In a multiple host environment, install the Service Bus for Windows Server on each machine that you want added as a node in the farm. However, you only need to install the Relativity service bus on single machine that is a node in the farm.
- Notice that the installer for the Service Bus for Windows Server adds the database files for the service bus to the default locations used by your SQL Server. These database locations differ from those used for the Relativity databases specified in the RelativityResponse.txt file installation input file.
You can use the default locations for the Service Bus for Windows Server databases.
If you do not have an internet connection, you can perform an offline installation.
Use the following steps to install Service Bus for Windows Server:
-
- In the WebPI 5.0 section, click the appropriate link for your machine.
- Locate the WebPlatformInstaller_amd64_en-US.msi that was downloaded by the installer. It appears in the lower left corner of the browser, or in your download folder.
- Double-click the file to launch the Web PI. When the Security Warning dialog box appears, click Run.
- On the Spotlight tab, search for Service Bus 1.1 with TLS 1.2 Support.

- Select Windows Azure Pack: Service Bus 1.1 with TLS 1.2 Support in the search results.
- Click Add > Install.
- Click I Accept to accept the license terms and start the installation.
- When the installation process completes, click Finish. You have now installed Service Bus for Windows Server.
- Complete the steps for configuring the service bus.

To perform an offline installation, you only need an internet connection to download the installer. You can then complete the offline installation process on server or VM in your Relativity environment.
Review the following installation considerations:
- For a typical installation, install Service Bus for Windows Server on a server or VM that is accessible throughout your Relativity instance. Consider installing the service bus on the agent server where you intend to run conversion agents. Follow these same guidelines when installing the service bus on multiple hosts.
- In a multiple host environment, install the Service Bus for Windows Server on each machine that you want added as a node in the farm. However, you only need to install the Relativity service bus on single machine that is a node in the farm.
- Notice that the installer for the Service Bus for Windows Server adds the database files for the service bus to the default locations used by your SQL Server. These database locations differ from those used for the Relativity databases specified in the RelativityResponse.txt file installation input file.
You can use the default locations for the Service Bus for Windows Server databases.
After you complete the installation, call the WebPICmd executable using the following command line switches in a command prompt window:
- /list—displays a list of available products.
- /listoption:—acts as a sub-command used for filtering on a list.
- /install—installs products available through the Web PI.
- /offline—downloads the products for use offline. This command downloads products so you can be installed later by running the /install command.
- /Products:—acts as a sub-command of both the /offline and /install commands. You can use it to indicate which of the available products you want to download and install, respectively.
Downloading the Web Platform Installer
You need an internet connection to download the Web Platform Installer (Web PI) used to install the Service Bus for Windows Server.
Use the following steps to download the installer:
- On a machine with an internet connection, complete steps 1-4 listed in Online installation for Service Bus for Windows Server. You should now have installed the Web PI on your machine.
- Verify that the WebPICmd.exe file was installed on your machine by locating it in the following folder:
%ProgramFiles%\Microsoft\Web Platform Installer
- Open a Windows PowerShell command prompt. Select Run as Administrator.
- Run the following /list command to display ServiceBus_1_1 in a list of service bus products:
webpicmd /list /listoption:Available|?{ $_.Contains(“ServiceBus”) }

- Use the following command to download the files for installing Service Bus 1.1 with TLS 1.2 Support:
webpicmd /offline /Products:"ServiceBus_1_1_TLS_1_2" /Path:C:\ServiceBusOfflineFiles

- Verify that PowerShell displays information about the products that are cached and processed, and the feeds being built.
These processes succeeded if you see the message listed in the following screen shot. The path command indicates where the files are downloaded. You can modify this path as necessary.

- After the download completes, copy the entire /Path directory to the machines in your offline environment where you want to install Service Bus for Windows Server.


Installing Service Bus for Windows Server
For a typical Relativity installation, install the Service Bus for Windows Server on the machine that you want added as a node in the farm. For a multiple host environment, repeat this installation process on all the machines that you want added as nodes in the farm.
Use the following steps to install the service bus:
- Open a Windows PowerShell command prompt. Select Run as Administrator.
- Change to the directory containing the installation files that you downloaded using the /offline command and copied to this machine. See step 7 in Downloading the Web Platform Installer.
For example, if you download the files to a directory on your hard drive called ServiceBusOfflineFiles, you would execute this command:
cd C:\ServiceBusOfflineFiles\
- Run the following command to install Service Bus 1.1 with TLS 1.2 Support. Update the initial part of the path displayed after the /xml command with the directory where your files are located. For example, you would replace C:\ServiceBusOfflineFiles with your file path:
.\bin\WebpiCmd.exe /install /Products:"ServiceBus_1_1_TLS_1_2" /xml:C:\ServiceBusOfflineFiles\feeds\latest\webproductlist.xml
- Accept the licensing agreement to install the service bus.
- After the installation completes, verify that you see a message like the one in the screen shot:

- Complete the steps for configuring the service bus.

After installing Service Bus for Windows Server, you need to complete several configuration steps, which include setting up a new service bus farm. A farm consists of one or more servers, or nodes that use the service bus.
This section contains the following information:
- Setting up a new farm
- Configuring an auto-generated SSL certificate
- Optionally adding multiple servers to an existing farm
- Adding a new message container
- Troubleshooting the service bus farm
Setting up a new farm
You set up a new farm by adding a single server to it. After completing this process, you can optionally add multiple hosts to the farm.
Note: Before you can add a server to a farm, you must install the Service Bus for Windows Server on it.
Use the following steps to set up a new farm:
- Locate the Service Bus Configuration tool on your desktop. The service bus installer automatically installs this tool for you.
- Launch the Service Bus Configuration tool, and then click With Custom Settings.
- Complete the fields in the Service Bus Configuration wizard. See Fields in Service Bus Configuration wizard.
- After you set the fields in the wizard, click the
 to display a summary of the information used to configure the service bus.
 - Click the
 to start the configuration process.
 - Set the DNS for the service bus farm. Execute the following commands with the Service Bus PowerShell tool. This DNS must match the name in the Issued to field on the certificate used for the service bus.
Stop-SBFarm
							Set-SBFarm -FarmDns 'YOUR_DNS'
							Update-SBHost
					Start-SBFarm
- Verify that the service bus is configured properly by entering your URL into a web browser, and confirming that the following page is displayed. Use this format for the URL: https://<Your_DNS>:<Your_HTTPS_Port>/<Your_Namespace>.


Fields in Service Bus Configuration wizard
In the Service Bus Configuration wizard, you need to set the following fields, including the suggested or required values for them.
Configure Farm Management Database
In this section, click the Advanced Options drop-down to display additional fields.
- SQL Server Instance—enter the name or address of the SQL Server where you want to host the SbManagementDB. This SQL instance hosts the databases for your farm.
- Enable SSL connection with the SQL Server instance—optionally, click this checkbox to use SSL.
- Authentication—complete one of the following tasks to set up authentication for the SQL instance:
- Windows Authentication—select this option if your instance supports Windows authentication.
- SQL Server Authentication—select this option to use SQL server authentication. Enter credentials in the User Name and Password fields for a sysadmin account or the EDDSDBO account.
- Use the above SQL Server instance and settings for all databases—click this checkbox.
- Database Name—optionally, update the name for your database. You can also just use the default name, which is SbManagementDB.
- Test Connection—click this button to ensure that you have enter the correct settings for your SQL Server.
Configure Gateway Database
- SQL Server Instance—do not modify the default setting for the Gateway database.
- Database Name—do not modify the default name for the Gateway database.
- Test Connection—click the button for the database instance.
 appears next to the server instance when the installer verifies a connection.
Configure Message Container Database
- SQL Server Instance—do not modify the default setting for the Message Container database.
- Database Name Prefix—do not modify the default name for the Message Container database.
- Number of Containers—enter a value for the number of containers. For a typical Relativity installation with a single node, we recommend using the default value of three message containers in the farm. For a multiple host environment, Microsoft recommends using 2n message containers, where n is the number of nodes. For example, if you install the service bus on three hosts, then you need six message containers. For more information,
Note: If you previously configured the number of containers and need to update this value, see
- Test Connection—click this button for the database instance. appears next to the server instance when the installer verifies a connection.
Configure Service Account
- User ID—enter the user ID for the Relativity service account.
- Password—enter the password for the Relativity service account.
Note: You must use the Relativity service account credentials for the service account on the Service Bus for Windows Server. For more information, see
Configure Certificate
Use one of the following methods to configure a certificate. You can auto-generate a certificate. Alternatively, you can use an existing certificate with the same domain as the FQDN of the service bus server, or you can issue a certificate through an CA. For more information, see Certificate requirements for Service Bus for Windows Server.
- Auto-generate—select this checkbox to automatically create a certificate. If you select this option , you must enter a value in the following fields:
- Certificate Generation Key—enter a certificate generation key of your choice, any combination of characters, if you are auto-generating a certificate. This key is required if you want to add more hosts to the farm in the future. Complete the steps required to distribute the generated certificate to all agent, web, queue manager, and worker servers agent and web servers. See Configuring an auto-generated SSL certificate.
Note: A certificate is required on the queue manager and worker servers as part of the connection between Invariant and Service Bus.
- Confirm Certificate Generation Key—re-enter the key from the previous field.
- Farm Certificate—if you did not auto-generate a certificate, click Browse to select the certificate that you want to use for HTTPS communication between the service bus and the clients. For more information, see Certificate requirements for Service Bus for Windows Server.
- Encryption Certificate—if you did not auto-generate a certificate, click Browse to select the certificate used to encrypt all the connection strings in the SbManagementDB database and registry. You configured the SbManagementDB database in Configure Farm Management Database. For more information, see Certificate requirements for Service Bus for Windows Server.
Configure Ports
- Consider using the port numbers in the following table. These port numbers are suggested configuration values.
Port name Port number Description HTTPS Port 9455 Specifies the HTTPS port used for communication with Service Bus for Windows Server. To avoid port conflicts with Data Grid, this value differs from Microsoft's default value. TCP Port 9454 Specifies the TCP port used for communication with Service Bus for Windows Server. To avoid port conflicts with Data Grid, this value differs from Microsoft's default value. Message Broker Port 9456 Specifies the port used for message broker communication by Service Bus for Windows Server. To avoid port conflicts with Data Grid, this value differs from Microsoft's default value. Resource Provider HTTPS Port 9459 Specifies the port used for communication with the Service Bus Management Portal. To avoid port conflicts with Data Grid, this value differs from Microsoft's default value. AMQP Port 5682 Specifies the AMQP port used for communication with the Service Bus via the AMQP protocol. The default value of 5672 is the industry default for AMQP communication. We recommend changing this value to 5682 to avoid potential port conflicts. AMQPS Port 5681 Specifies the AMQPS port used for communication with the Service Bus via the AMQP protocol over SSL. The default value of 5671 is the industry default for AMQPS communication. We recommend changing this value to 5681 to avoid potential port conflicts. Internal Communication Port Range 9000 Specifies the ports used for communication between hosts in the Service Bus farm. Use the default recommended by Microsoft default. It does not have any port conflicts with Relativity components.
- Enable firewall rules on this computer—select this checkbox. When you select this option, the service bus automatically sets up the necessary rules to communicate over the firewall. If you do not select this option, then the client must configure the necessary rules or the service bus will not function properly.
Configure Admin Group
- Configure Admin Group—enter the name of an admin user group. This group has access to the service bus databases and admin access to the farm, including full admin rights on the Service Bus for Windows Server. By default, the Admin Group box is set to BUILTIN\Administrators group, but you can modify the users in this group as necessary.
Note: If the admin group is a local group, make sure that it exists on all servers in the farm and the SQL instance specified in Configure Farm Management Database.
Configure Service Bus Namespace
- Create a default namespace—select this check box. Optionally, enter a name for the namespace in the text box. You can use the default value, since Relativity creates an new namespace during installation.
Note: After you complete these fields, you must return to step 4 in Setting up a new farm to complete the installation process. Additional steps include setting up the DNS for the service bus farm, and verifying that the service bus is working properly.
Configuring an auto-generated SSL certificate
You can auto-generate SSL certificates for remote clients and then export the CA and Certificate revocation list (CRL) to them.
Use the following steps to configure a certificate on a remote client:
- Log in to the machine where you installed Service Bus for Windows Server.
- Open the Service Bus PowerShell tool.
- To export the CA and CRL from a farm node, execute the following cmdlet:
Get-SBAutoGeneratedCA
If you do not provide file names, the cmdlet exports the CA and CRL to the service bus root folder with the name AutoGeneratedCA.cer and AutoGeneratedCA.crl respectively. The following example illustrates how to run this cmdlet with file names:
Get-SBAutoGeneratedCA -CACertificateFileName "C:\CACert.cer" -RevocationListFileName "C:\RevocationList.crl"
- Import the CA and CRL files to your Relativity servers that need access to the service bus. For example, you need to import the auto-generated service bus certificates to the web, agent, worker, and worker manager servers.
- On the client machine, open a Microsoft Management Console (MMC) window. On the Start menu, click Run, enter MMC, and then click OK.
- In the MMC window, click File > Add/Remove Snap-in. The Add/Remove Snap-in dialog box appears.
- Add the Certificates snap-in by selecting the Computer Account and Local Computer options. Click OK.
- In the MMC window, right-click the Certificates\Trusted Root Certification Authorities.
- Open All Tasks, and select Import.
- Select the AutoGeneratedCA.cer file and import it.
- In the MMC window, right-click on the Intermediate Certification Authorities.
- Open All Tasks, and select Import.
- Select the AutoGeneratedCA.crl file and import it.
Optionally adding multiple servers to an existing farm
You can optionally add more servers or nodes to increase the computing power of the service bus. A typical Relativity installation requires only a single node in the farm. For a multiple host installation, you can optionally add three or five nodes to the farm. Three nodes is a common configuration for most environments using multiple hosts.
Before adding more nodes to your farm, review these guidelines:
- Add nodes that reside in the same domain.
- Use the fully qualified domain name as the instance address for each machine that you add.
- Ensure that you have an odd number of nodes. A service bus farm must have an odd number of nodes. For example, it can include one, three, or five nodes.
- Do not exceed the maximum of five nodes in the farm. To avoid extra overhead, determine whether your environment needs the additional nodes.
Use the following steps to add another server:
- Open the Service Bus Configuration tool.
- Click Join an Existing Farm.

- In SQL Server Instance box, enter the name or address of the SQL Server where the SbManagementDB is hosted.
- Enter the SQL Server instance address. Use the fully qualified domain name for the machine as the instance address.
- In the Database Name box, enter the name of the database if you modified the default name.
- Under Advanced Options, click one of these options to set up authentication for the SQL instance:
- Enable SSL connection with the SQL Server instance—select this option for SSL.
- Windows Authentication—select this option if your instance supports this authentication type.
- SQL Server Authentication—if you select this option, enter credentials in the User Name and Password fields.
- On the Join Service Bus Farm page, enter the User ID and Password for the Relativity service account. For example, you could use relativity.service@example.com as the User ID.

- Select Enable firewall rules on this computer. If you auto-generated the certificate, you must enter the certificate generation key in the Provide Certificate Generation Key box. You must enter the same farm key you used to auto-generate the certificate for the service bus farm.
- Click the , and then to start the configuration process.


Adding a new message container
After you configure your service bus farm, you can continue to add new message containers to your environment. Adding containers scales the data tier of the service bus. The larger data tier increases the availability of the SQL layer to store messages, queues, topics, and other entities. Review following guidelines to determine the number of message containers required for your service bus:
- Single node installation—For a typical Relativity installation with a single node, we recommend using the default value of three message containers in the farm.
- Multiple node installation—For a multiple host environment, Microsoft recommends using 2n message containers, where n is the number of nodes. For example, if you install the service bus on three hosts, then you need six message containers.
Use the following PowerShell cmdlets to add a new message container.
- Execute a cmdlet from outside the farm—when you execute a cmdlet from outside the farm, the SBFarmConnectionString points to the management databases of the service bus farm.
New-SBMessageContainer –ContainerDBConnectionString <Connection string for the database with message containers> -SBFarmConnectionString <Connection string for the SbManagementDb>
- Execute a cmdlet from inside the farm—when you execute a cmdlet inside the farm, you call the cmdlet without the SBFarmConnectionString. In this example, the database is called container2. You must specify a unique database name for use in your environment when you run the New-SBMessageContainer command.
New-SBMessageContainer -ContainerDBConnectionString "data source=localhost\sqlexpress;database=container2;integrated security=true"
Troubleshooting the service bus farm
Review the following list of errors and resolutions to troubleshoot your service bus configuration.
Service Bus Gateway service will not start
If you cannot start the Service Bus Gateway service, then you may need to install a Windows update. To install this update, see https://support.microsoft.com/en-us/kb/3086798.
Timeout error occurs when creating or joining service bus farm
If you receive a timeout error when attempting to create or join a service bus farm, you may have a port conflict in your environment. You can check the availability of a port in your environment by running the following netstat command:
netstat -na | find "<Your Port>"
See the following sample command:
netstat -na | find "9455"
If the command doesn’t return a value, then the port is free. For a list of recommended ports, see Configure Ports.
File (document) share or server
You can use a file share or server as a repository for documents stored in Relativity. You must create a directory that is used as the root of the directories and documents created through the Relativity system. This file share must be a folder rather than a drive letter. For example, C:\Fileshare instead of just the C drive.
In addition, confirm that the Full Text, .ldf files, .mdf files, and Backups are all specified to the folder level. Do not specify them to only a drive.
Note:
Create share
The document root directory is exposed to the Relativity application through a shared drive. Use these steps to share the folder:
- Right-click the folder, and go to Properties.
- Open the Sharing tab, and click Share.
- Enter the Relativity Service Account name, domain\account, and then click Add.
- Select the service account on the share list, and then change Permission Level to Co-owner.
- Enter the Relativity Upload Users group, and then click Add.
- Select the group on the share list, and then set the Permission Level to Co-owner.
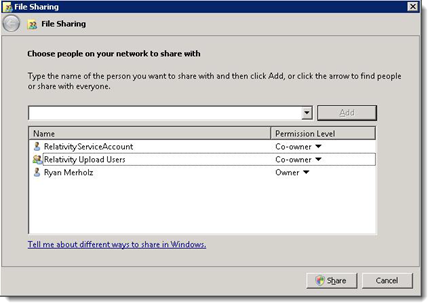
- Click Share.
- When the share completes, click Done.
- On the Document Properties dialog box, select the Security tab.
- Verify that the users and groups you added to the share also have Full Control security permissions to the folder itself.
Cache location server
The cache location server requires the same permissions as the file share. For more information, see File (document) share or server.
Note: During installation or upgrade, Relativity automatically creates a cache location server based on the location of your file repository. You can also manually add cache location servers.
Analytics server setup
Before completing the steps for upgrading the Analytics server, make sure you have completed the steps contained in this section.
- Required software
- Create installation index directory
- Assign permissions to the analytics directories
- Required setup
Required software
The following software must be installed on the analytics server:
- Windows Server 2019, Windows Server 2016, or Windows Server 2012 R2
-
.NET Version 4.7.2 or 4.8
-
.NET Version 3.5
CAAT 4.5.0 and above
The following table breaks down which versions of Microsoft Visual C++ are required for which versions of CAAT.
| Required Microsoft Visual C++ version (Redistributable x86 and x64) | ||||
|---|---|---|---|---|
| CAAT version | 2010 | 2012 | 2013 | 2015 |
| CAAT 4.2.5 and above | √ | √ | √ | √ |
Create installation index directory
- Create a folder called CAAT on the root of the C: drive.
- The Analytics index directory must also be created before installing Analytics. We recommend that you not keep the index directory on the C: drive due to the size requirements. We recommend you use locally-attached storage referenced by a drive letter, such as E:\AnalyticsData, rather than a UNC path.
Assign permissions to the analytics directories
You must configure permissions for the necessary directories on the analytics server. Follow these steps to assign the proper permissions:
- Add the Relativity Service Account user to both the Administrators and the Users group.
- Navigate to C:\CAAT\ and add Full Control permissions to both the Administrators and the Users group.
- Right-click on C:\CAAT.
- Navigate to the Security tab.
- Edit the Users group permissions and add Full Control.
- Edit the Administrators group permissions and add Full Control.
- Click Apply.
- Navigate to the index directory and add Full Control permissions to both the Administrators and the Users group.
- Right-click on the index directory folder.
- Navigate to the Security tab.
- Edit the Users group permissions and add Full Control.
- Edit the Administrators group permissions and add Full Control.
- Click Apply.
- Reboot the server after all user and/or permission changes.
Required setup
- The web server needs to be able to communicate with the analytics server via TCP ports 445, 8080, and 8443.
- Disable anti-virus programs. At minimum it needs to be set to ignore the C:\CAAT installation folder as well as the index directory.
- Ensure that proxy settings are disabled on the analytics server by performing the following steps:
- Go to Internet Options via the Control Panel.
- Select the Connections tab.

Select LAN Settings and ensure the Proxy server section is cleared:
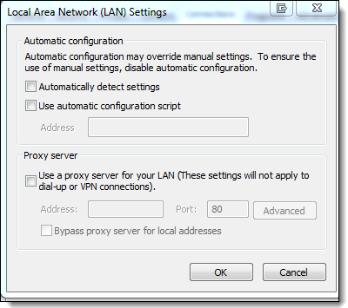
- Click OK to save your changes.
- Ensure that the required display language is set on the analytics server by performing the following steps:
- On the Analytics server, click the Start button.
- Click Control Panel.
- Click Change date, time, or number formats.
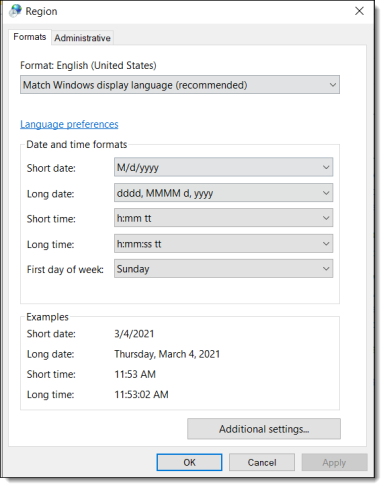
-
Click the Administrate tab.
-
Select Copy settings and ensure the correct language is set:
-
Click OK to save your changes.
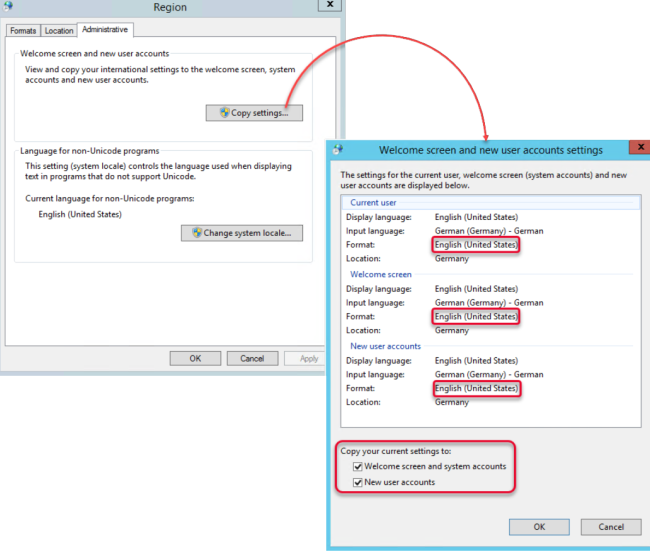
Elasticsearch server setup
Required software
The following software must be installed on the Elasticsearch server:
- Windows Server 2012 R2 or Windows Server 2016 or Windows Server 2019
For more information, see Installing Elasticsearch.
To access the Elasticsearch installation package, go to the Community.
Index share - dtSearch repository
Create a root directory for the directories created by dtSearch index builds within the system.
Create share
The dtSearch index directory is exposed to the Relativity application through a shared drive. Use these steps to share the folder:
- Right-click on the folder, and then go to Properties.
- Open the Sharing tab, and then click Share.
- Enter the Relativity Service Account name, domain/account, and then click Add.
- Select the service account on the share list, and then set the Permission Level to Co-owner.
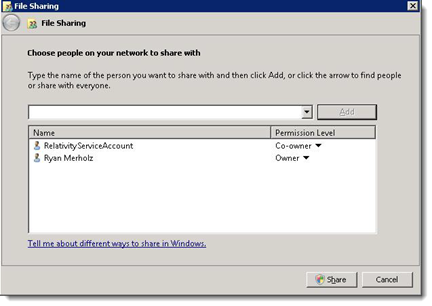
- Click Share.
- When the share completes, click Done.
- On the Document Properties dialog box, select the Security tab.
- Verify that the Relativity Service Account also has Full Control security permissions to the folder itself.
SMTP server setup
Relativity requires access to an SMTP server to handle the delivery of error messages, job notifications, and billing statistics to both internal contacts and to us at Relativity. We provide an easy to use SMTP connectivity tool, which Customer Support runs against your system to verify the servers can properly communicate with your specified SMTP server.
Note: Make sure that the newly created agent and web servers used in your Relativity environment are configured to permit the relay of messages to external recipients. If you do not provide this permission, job notifications and other messages are blocked.
Environment modification for processing or native imaging
Before running the Invariant, worker manager server, installer, you must perform the following steps to modify your environment.
| Component | Environment Configuration Settings |
|---|---|
| Database |
|
| Queue Manager | None |
| Workers |
|

Database server for processing or native imaging
The following sections provide basic information about setting up the database server for processing or native imaging.
Required software
Install the following software on the database server:
-
Windows Server 2019, Windows Server 2016, or Windows Server 2012 R2
- SQL Server 2017 or SQL Server 2019
SQL Server 2019 requires Windows Server 2016 or 2019.
Caution: As of August 2024, due to issues found within email aliasing and name normalization, if you're running SQL Server 2019 on any SQL Server in your instance, you need to get Cumulative Update package 28 from Microsoft. To do so, see Cumulative Update 28.
-
Relativity supports in-place upgrades from SQL Server 2016 to any higher supported version. For details on SQL Server upgrade, follow the EDDS migration Guide. To determine if you should upgrade your current SQL Server version to SQL Server 2019, note the following considerations. Contact Relativity Support if you have further questions.
-
The base operating system of your SQL Server must be at a minimum Windows Server 2016. Any Windows Server version below 2016 will require an EDDS migration to be performed to a server with a proper operating system version and SQL version. Relativity does not support in-place operating system upgrades. .
-
SQL Server version lower than SQL 2016 will require an EDDS migration since upgrading to SQL Server 2019 from versions lower than SQL Server 2016 has not been tested by Relativity.
-
- .NET 4.7.2 or 4.8
- .NET 3.5
Additional considerations:
-
Each environment is different, research settings that your specific environment may utilize before performing any upgrades.
-
Ensure that you have tested backups before performing any upgrades.
-
Although an in-place SQL upgrade is supported by Relativity. Performing an EDDS migration is the cleanest way to perform a SQL upgrade.
Required software
Install the following software on the worker server:
| Software | Description |
Required for system installation? |
|---|---|---|
| Windows Server 2019, Windows Server 2016, or Windows Server 2012 R2 |
Required server software. The Windows Print Spooler service must also be enabled on all Worker Server machines in the environment. |
Yes |
|
.NET 4.7.2 or 4.8 .NET 3.5 |
Required server software. | Yes |
| Desktop Experience (Windows Server feature) | Required server software. | Yes |
|
Microsoft Office 2016 Professional (32-bit), Microsoft Office 2016 Professional Plus (32-bit) Note the following:
|
This includes:
Note: The Courier New font must be installed on your machine. This font is installed by default when you install Microsoft Office, in which case you must ensure that you do not remove it. Note: Relativity does not support add-ins for Microsoft Office. |
No - you are able to install the worker manager server without first installing Office. Note: Some features found in files created in different versions of Office may not be available or render correctly when processed or imaged using a different version than the file was originally created in. For more information about features differences between Office versions, please consult the appropriate Microsoft documentation. |
| Microsoft Works 6–9 File Converter | The Microsoft Works Converter is also required. You can download it from the Relativity Community here. | Yes |
| Microsoft Visio 2016 Professional or Standard SP2 (32-bit) | Used for processing and imaging .vsd, .vdx, .vss, .vsx, .vst, .vsw files. |
No
|
| Microsoft Project Professional 2016 (32-bit) | Used for processing and native imaging of .mpp files. |
No
|
|
(Optional) Lotus Notes v8.5 and higher
|
It is recommended that you install Lotus Notes 9 or higher on your workers, because Lotus Notes version 8.5.x cannot read certain Lotus 9 databases. Please note that some Lotus 9 databases cannot be opened in 8.5.x and will generate an error during processing. |
No
|
|
Used for processing, text extraction, and imaging for CAD files. This is the only optional component.
|
No
|
| JungUm Global Viewer v9.1 or higher | This is required for processing and imaging GUL files, for Korean documents. |
No
|
* Microsoft Project and Visio are not required to install and use Relativity Processing. These components are only required if you intend to process Project and Visio files, specifically.
Relativity Service Account
The Relativity Service Account must be the owner of all objects in the processing databases and have permissions for logging in to the SQL Server environment. It must be set up as follows:
- Configure the account with Windows Authentication.
- Ensure that the account has local administrator rights to perform the installation of the native imaging database and queue manager.
- Ensure that this account has SQL administrator rights.
- Do not include special characters in the Relativity service account active directory account name.
Create Invariant worker network file path share
Create a directory on the SQL Server in a location where the Relativity Service Account can read and write. Make sure that SQL services can also read from this directory. This directory must be an actual folder, not a drive letter. It stores the installation files for worker servers.
Worker server for processing or native imaging
The following sections provide basic information about setting up the worker server for processing or native imaging.
-
.NET Version 4.7.2 or 4.8
Required software
Install the following software on the worker server:
| Software | Description |
Required for system installation? |
|---|---|---|
| Windows Server 2019, Windows Server 2016, or Windows Server 2012 R2 |
Required server software. The Windows Print Spooler service must also be enabled on all Worker Server machines in the environment. |
Yes |
|
.NET 4.7.2 or 4.8 .NET 3.5 |
Required server software. | Yes |
| Desktop Experience (Windows Server feature) | Required server software. | Yes |
|
Microsoft Office 2016 Professional (32-bit), Microsoft Office 2016 Professional Plus (32-bit) Note the following:
|
This includes:
Note: The Courier New font must be installed on your machine. This font is installed by default when you install Microsoft Office, in which case you must ensure that you do not remove it. Note: Relativity does not support add-ins for Microsoft Office. |
No - you are able to install the worker manager server without first installing Office. Note: Some features found in files created in different versions of Office may not be available or render correctly when processed or imaged using a different version than the file was originally created in. For more information about features differences between Office versions, please consult the appropriate Microsoft documentation. |
| Microsoft Works 6–9 File Converter | The Microsoft Works Converter is also required. You can download it from the Relativity Community here. | Yes |
| Microsoft Visio 2016 Professional or Standard SP2 (32-bit) | Used for processing and imaging .vsd, .vdx, .vss, .vsx, .vst, .vsw files. |
No
|
| Microsoft Project Professional 2016 (32-bit) | Used for processing and native imaging of .mpp files. |
No
|
|
(Optional) Lotus Notes v8.5 and higher
|
It is recommended that you install Lotus Notes 9 or higher on your workers, because Lotus Notes version 8.5.x cannot read certain Lotus 9 databases. Please note that some Lotus 9 databases cannot be opened in 8.5.x and will generate an error during processing. |
No
|
|
Used for processing, text extraction, and imaging for CAD files. This is the only optional component.
|
No
|
| JungUm Global Viewer v9.1 or higher | This is required for processing and imaging GUL files, for Korean documents. |
No
|
* Microsoft Project and Visio are not required to install and use Relativity Processing. These components are only required if you intend to process Project and Visio files, specifically.
Required Microsoft Visual C++ redistributables
The following table breaks down which versions of Microsoft Visual C++ are required for which versions of Relativity/Invariant. Note that you are required to install each version of Microsoft Visual C++ only if you are upgrading to the Relativity/Invariant version listed and not if you are installing it for the first time.
| Required Microsoft Visual C++ version (Redistributable x86 and x64) | ||||
|---|---|---|---|---|
| Relativity/Invariant version | 2010 | 2012 | 2013 | 2015 |
| 10.3.287.3/5.3.282.2 | √ | √ | √ | √ |
| Server 2021/ 6.1.1798 | √ | √ | √ | √ |
| Server 2022/7.1.431.1 | √ | √ | √ | √ |
Relativity Service Account
The Relativity Service Account must be given local administrator rights to each worker server. The installation process uses this account. It must remain logged in to each server to run local processes during native imaging.
Obtaining applications for native imaging and processing
On the Relativity Native Imaging/Processing worker, you must install additional software to support imaging/processing.
For convenience, this section includes links to download pages for specific software, which may require licensing or may be downloaded for free:
Note: When you visit the IBM site to download Lotus Notes, you have the option of buying the software online or downloading a free trial of it. If you select the free trial, you are required to sign in with an IBM user ID, which you must create if you don't already have one.
- SolidWorks eDrawings 2015 (64-bit), with the option to view 3D XML and PRO/E files
-
Default log file location
The default file location for Relativity logs is set by the %RELATIVITY_LOGS% environment variable. Define the variable on all machines in your Relativity environment, web servers, agent servers, except SQL Servers.
Post-installation considerations
After you install Relativity, review the post-installation considerations listed in this section.
Re-enabling User Access Controls
You should disable User Access Controls (UAC) prior to installation of Relativity. You can enable it again once installation is complete for all servers, except the Worker servers.
User group for uploading documents
You can improve performance when documents are uploaded with the Win Relativity component by creating a group of users with Full Control permissions on the file share used as a document repository. This group can import and export documents in Direct mode, which is significantly faster than Web mode.
Relativity service account information
The Relativity installer automatically creates the Relativity service account. It assigns this account an email address, as the user name, and a default password. We highly recommend that you change the default Forms password through the Relativity UI after the software is deployed. However, you should not disable this account or modify any other authentication information assigned to it.
The Active Directory (AD) domain also includes a Relativity services account, which has the same user name. The Relativity services account on this domain must log in to Relativity to perform various tasks. Tasks like running agents and authenticating against the Relativity Services API. The audit history for Relativity often lists the Relativity services account as the user who performed a task. To avoid destabilizing your environment, we recommend that you do not change the user settings in Relativity for this account or the AD domain for this account. Since Relativity uses AD authentication for the Relativity services account only for performing agent tasks, you can change the Forms authentication password through the Relativity UI without encountering any environment issues.
As previously mentioned, the Relativity service account is sometimes used to identify the user who performed certain tasks in the software. For example, you might set up a dtSearch index job that includes a private search created by one of your users. The Relativity service account needs access to this private search in order to build the index automatically. It is the only account that can provide this functionality within Relativity.
Post-installation steps for a token-signing certificate
Note: To minimize any interruption to your Relativity workflows, we recommend that you complete the following process during off-hours.
After installation, perform the following steps for a token-signing certificate:
- On the primary SQL server, navigate to the Relativity install directory and then navigate to the Procuro folder (typically C:\Program Files\kCura Corporation\Relativity\Procuro).
- Run the kCura.EDDS.Procuro.exe application as an administrator.
- On the EDDS Database Upgrade window, click Back.
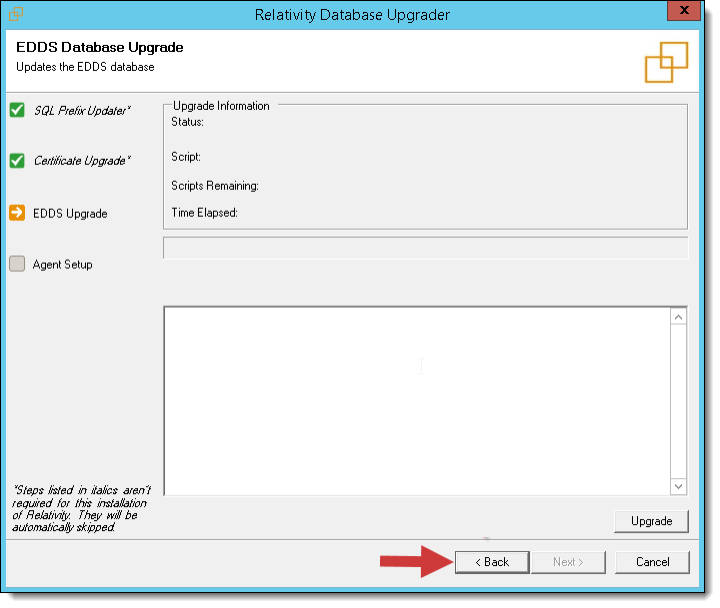
- Select the certificate that you wish to use as the signing certificate. The certificate must already be in the Personal store on the machine for it to appear in the drop-down.
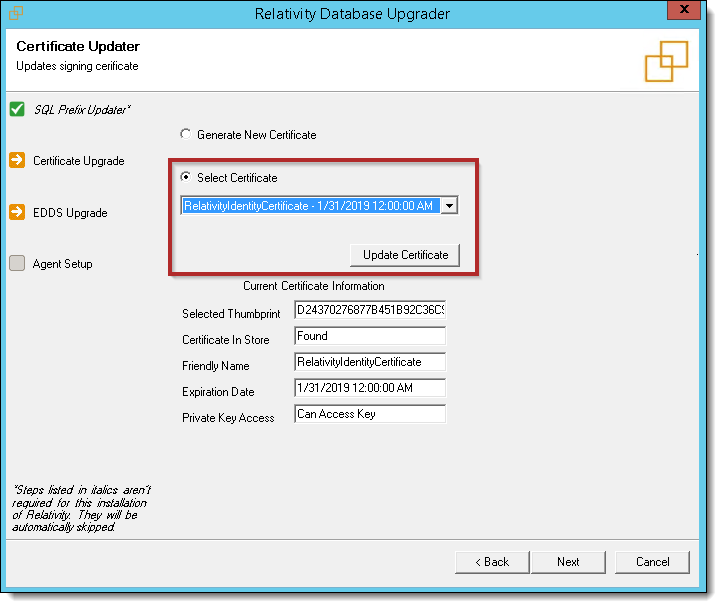
- Click Update Certificate.
- Restart all of the Relativity services in the environment and IIS.
Logo customization
Customize your Relativity web interface with your company’s logo. To accommodate variable space requirements, provide two logos with different sizes. The height may be 50 pixels and the width is discretionary. You can hide the logo using a setting in the Instance setting table. The name of the logo file is also set in the Instance setting table. Add the logos to the images folder at the root of the EDDS directory.
Resource groups
A workspace does not contain resource servers after you install Relativity. After the agents start up, the servers self-register. They are not automatically associated with a resource group. To associate these servers to a resource group, you must manually add them through the Resource Group tab available only from Home.
License keys
After you install Relativity, you need to either activate new licenses or renew your current ones by requesting and applying activation keys for the applications you intend to use in your Relativity instance, including Processing. Relativity licensing includes flexible options that you can tailor to the size, type, and other requirements of your organization as part of your contractual agreement with us.
Relativity instance name
During a first-time installation, you must provide a name for your Relativity instance. This value is displayed on License details page available through the License tab. It is stored as the Instance setting in the Relativity.LicenseManager section of the Instance setting table on the EDDS database.
Note: Modifying the instance name by updating this setting in the Instance setting table immediately invalidates your Relativity and Processing licenses.
When you request a Relativity license, this instance name is included in the request key.
In the RelativityResponse.txt file, the RELATIVITYINSTANCENAME value records the Relativity Instance Name option when you perform a first-time installation.