


You will use a response text file to install the Invariant queue manager and worker to your machine.
Note the following before you begin:
- You must have created a network directory on the SQL Server before you begin the installation. This directory must have share permissions to the Relativity Service Account.
- You should install the worker on a separate server from the machine that hosts the Invariant queue manager.
- Verify that Relativity is installed in your environment before you install the worker manager server.
- Make sure to review the Worker manager server pre-installation steps.
Note: There is one Invariant database per workspace, and Relativity appends the tables in that database throughout the life of the workspace, as opposed to using a new set of tables for each processing job.
Hosting Invariant Kepler services in HTTPS
If you want to host Invariant Kepler services in HTTPS, you must complete the following steps:
- Set the EnforceHttps instance setting to On. This will ensure that the QueueManager service attempts to start the Kepler Services in HTTPS after you create the self-signed certificate.
- Create a self-signed certificate on the QueueManager with the following specifications.
- Install the certificate to both the Personal and Trusted Root Certification Authorities certificate stores for the Computer Account on the Queue Manager server.
- The port that the certificate is bound to is specified in the C:\Program Files\kCura Corporation\Invariant\QueueManager\Settings\appSettings.config under the ApiPort value.
- The default port for the Invariant Kepler services is 8092.
- Restart the Queue Manager.
Upon initialization, the Queue Manager attempts to automatically configure HTTPS and select the certificate, assuming that the EnforceHTTPS is set to On. Specifically, the Queue Manager does the following:
- It opens the Personal store for the Computer Account and look for an exact host name match. The host name comes from the fully qualified domain name of the QM server.
- If there is no exact host name match, it queries the store for all valid certificates and use the one with the largest encryption key.
- If there are no valid certificates, it looks for a wildcard certificate that would work.
- If there are no valid wildcard certificates and the scheme is set to HTTPS, it logs an exception.
To override the default automatic certificate selection behavior, add the SslCertificateThumbprint instance setting for the server to explicitly specify the certificate to use.
- Name—SslCertificateThumbprint
- Section—kCura.Service.ServiceHost
- MachineName—the machine name entered in the Invariant AppSettings table. When Relativity searches for the existence of the thumbprint setting, it looks up the machine name in the Invariant AppSettings table (where Category = "QueueManager" and the SubCategory = NULL) and looks for the thumbprint instance setting for this particular machine name.
- Value—the thumbprint of the certificate for SSL bindings. For instructions on retrieving the thumbprint, see https://msdn.microsoft.com/en-us/library/ms734695(v=vs.110).aspx.
- Make sure to copy the Thumbprint certificate field when retrieving the thumbprint value. It is easy to confuse with the Serial number field.
- The thumbprint value must not include spaces. When you copy-paste it from the Windows certificate form, it does includes spaces.
- You must also remove the leading space because it contains an illegal character that can't be matched when the certificate is retrieved from the store. You likely have different certificates for different machines. To configure the certificate for HTTPS bindings for each machine, use the MachineName field of the instance setting.
Installing the Invariant database to a non-default SQL Server port
You can configure Invariant to connect to a SQL server on a non-default port. To do this, perform the following steps:
- Ensure that no jobs are in the queue or in progress and that a backup has been made of the Invariant queue manager.
- Stop the Invariant Queue Manager service.
- Reconfigure your SQL Server instance to use a port other than the default of 1433.
- Restart your SQL Server instance.
- Ensure that you can connect to your SQL Server instance using the server name and port number via SSMS. The formatting should be <server_name>,<port_number>. For example, InvariantSql001,1435.
- Update your sys.servers table to include the comma separated port number in the server name.
- Restart the SQL Server instance.
- Once the server has been restarted, reconnect to your SQL Server instance and ensure that the name is correct in the sys.servers table.
- Update your stores to point to the new server name by running the following command on the Stores table:
UPDATE [Invariant].[dbo].[Stores]
SET [Server] = '<server_name>,<port_number>'
- Update all of your InvariantResponse.txt files to include the following additional response file parameter, which is not included in the response file by default. For example, SQLINSTANCEPORT=1435.
- Run the Invariant upgrade as normal on the Queue Manager. See Installing the Invariant queue manager.
- Upon completion of the upgrade, validate that:
- All of your stores were successfully upgraded to the latest version by the Relativity Workspace Upgrade Worker agent. You can find the status of the store upgrade in the Workspace Upgrade Queue tab. Note this could take several minutes while the agent works to run the workspace and store upgrades.
- Running a processing set in a workspace with an existing store completes successfully.
- Running a processing set in a new workspace completes successfully.
Invariant installation files
You will use the following files to install Invariant. Steps for downloading these files are included in the procedures described below.
- Install.bat—a batch script designed to run the install exe with logging. You can alter this for the purposes of repair or uninstall, as noted in the actual batch script file. You will need to copy over this and the Invariant.exe file during upgrades.
- InvariantResponse.txt—the text file to be filled out with the proper parameters for Invariant installation. Here is where you specify which components, queue manager and worker, you would like to install, as well as the SQL instance, service user names and passwords.
- Invariant.exe—the executable combining the three different installer for the components, queue manager and worker. You will need to copy over this and the Install.bat file during upgrades. The name will reflect the type of build it was, as well as the version number ending with "Invariant.exe."
Installing the Invariant queue manager
To install the Invariant queue manager, follow these steps:
- Create a network directory on the SQL Server before you begin the installation. This directory must have share permissions to the Relativity Service Account.
- Log in to the server with the Relativity Service Account where you want to install the Invariant queue manager.
- Contact Support and request the Invariant.exe and the InvariantResponse.txt files. You'll save them both to the root directory of the computer you want to use as the worker manager server.
- Open the InvariantResponse.txt file in a text editor.
- Notes:
- Each option in the input file has a description of what it is for, as well as an example input.
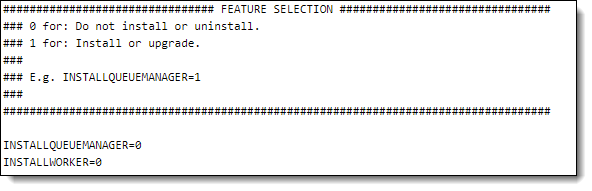
Accidental spaces can cause an installation failure, so only include spaces if they are needed. - Complete the following Feature Selection settings in the input file:
- INSTALLQUEUEMANAGER—set this to 1 to install the Queue Manager on this machine.
- Changing the URL for the queue manager requires an IIS reset on the Relativity server in order to clear the cache.
- INSTALLWORKER—set this value to 0, as you want to install the Worker on a different machine.
- Complete the following Common Properties settings in the input file:
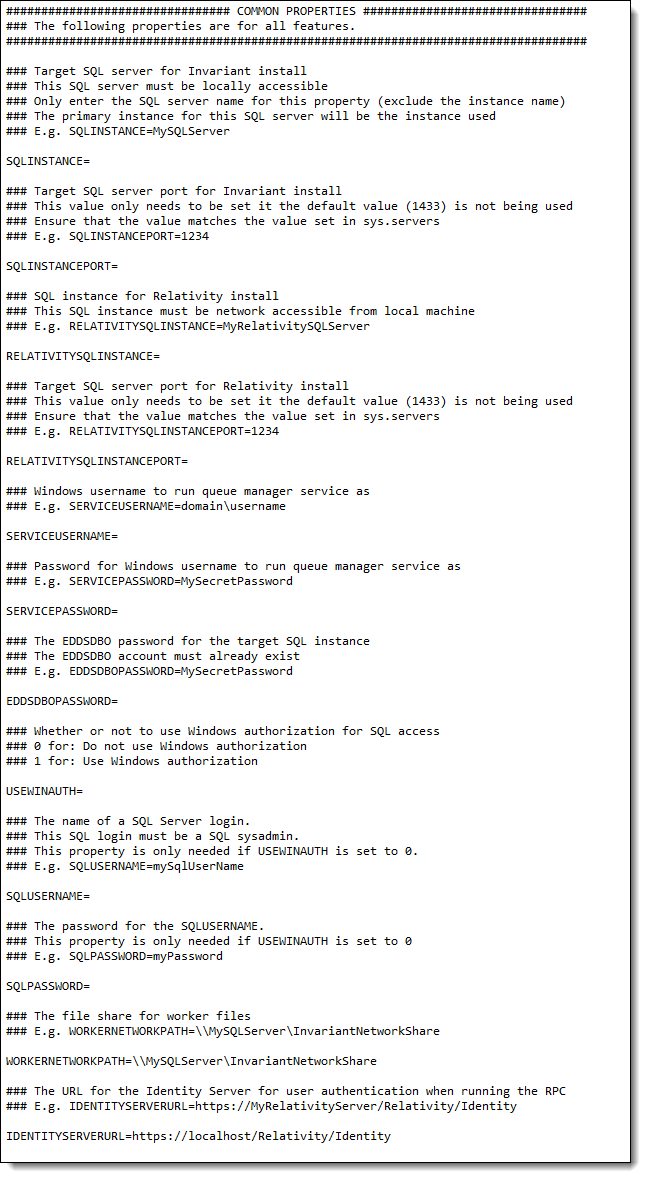
- SQLINSTANCE —enter the name of the SQL instance you want to use as the Invariant database host.
- This SQL instance must be locally accessible.
- Do not enter "localhost" as the SQL Instance name.
- The Invariant.exe confirms that SQL Server 2012 is installed. It attempts to connect to the SQL instance with the authentication method that you select.
- SQLINSTANCEPORT—if you are using something other than the default port of 1433, enter the SQL server port for the Invariant installation.
- This is only required if you are using something other than the default port of 1433. For example, SQLINSTANCEPORT=1234.
- Ensure that the port you enter here matches the value set in the sys.servers.
- For details about setting up an Invariant installation for a non-default port, see Installing the Invariant database to a non-default SQL Server port.
- RELATIVITYSQLINSTANCE—enter the SQL instance for the Relativity installation. This must be network-accessible from a local machine. If this machine will be used as a standalone Invariant service, make sure to point to a machine with a valid Relativity installation. The EDDSDBO password of the Relativity SQL instance must match that of the of the Invariant SQL instance.
- RELATIVITYSQLINSTANCEPORT—if you are using something other than the default port of 1433, enter the SQL server port for the Relativity installation.
- This is only required if you are using something other than the default port of 1433. For example, RELATIVITYSQLINSTANCEPORT=1234.
- Ensure that the port you enter here matches the value set in the sys.servers.
- For details about setting up an Invariant installation for a non-default port, see Installing the Invariant database to a non-default SQL Server port.
- SERVICEUSERNAME—enter the Windows user name under which you want to run the queue manager service. For example, domain\username.
- SERVICEPASSWORD—enter the password that corresponds to the Windows username you entered above.
- EDDSDBOPASSWORD—enter the EDDSDBO password for the target SQL instance.
- We create an EDDSDBO account for you upon installation.
- The EDDSDBO password of the Relativity SQL instance must match that of the of the Invariant SQL instance.
- USEWINAUTH—determines whether or not to use Windows authentication for SQL access.
- Enter 0 if you do not wish to use Windows authentication.
- Enter 1 to use Windows authentication.
- SQLUSERNAME—enter the name of the SQL Server login.
- This login must be that of a SQL system admin.
- This is only required if you set the USEWINAUTH property above to 0.
- SQLPASSWORD—enter the password that corresponds to the SQLUSERNAME property above. This is only required if you set the USEWINAUTH property above to 0.
- RESTRICTEDUSERNAME—enter the restricted user account created on the worker machine. It is recommended to use this account in order to restrict operations requiring minimal permissions in Invariant and limit the elevated permissions for some third party applications. To limit access, this local user must be created on every worker with the correct configuration before installation in order to use Processing. For more information on creating and configuring this user account, see Pre-installation.
- RESTRICTEDUSERPASSWORD—enter the password that corresponds to the RESTRICTEDUSERNAME property above. This user name and password will be stored in the Relativity Secret Store for Processing access. Note the following details:
- The path where this secret must be stored is predefined, based on the name of your Invariant SQL server. In other words, the value of the Instance Setting InvariantServerName.
- The secret path is “invariant/value-of-InvariantServerName/restrictedaccount".
- The names of the values in the secret are RESTRICTEDUSERNAME and RESTRICTEDUSERPASSWORD.
- These values are taken from the InvariantResponse.txt file and populated into the Relativity Secret Store. This can also be configured using the Secret Store client utility.
- WORKERNETWORKPATH—enter the location of the file share for the worker files. For example, \\<machinename>\InvariantNetworkShare. This can be local, but it is not required to be.
- IDENTITYSERVERURL—enter the identity server of your environment. Note the following details:
- This setting is only used for RPC authentication. Make sure your RPC instance is behind your firewall.
- This server does not need to be load-balanced.
- For fresh installs, you must edit the default value of //localhost/Relativity/Identity and point this to a web server. For example, https://webservername/Relativity/Identity.
- You will not see this value listed when upgrading, only for a fresh install. In this way, you must manually add this line and the identity server location when upgrading.
- This should be https.
- In SQL Server Management Studio, the IdentityServerURL needs to be set correctly in the Invariant.dbo.AppSettings table. This value is case sensitive. If it is not entered in the proper case, you can run the following statement to capitalize "relativity":
--begin tran
--update Invariant.dbo.AppSettings
--set Value1 = 'https://<WebServerName>/Relativity/Identity'
--where Category = 'IdentityServerURL'
--commit
Note: The queue manager service runs under the SERVICENAME and SERVICEPASSWORD credentials. If the server is a member of a Domain, the user name and password must be credentials of a Domain user. If the server is a member of a work group, they must be the credentials of a local user. For a server in a work group, format the user name as machine\username. This user must also have local administrator rights on the server.
- SQLINSTANCE —enter the name of the SQL instance you want to use as the Invariant database host.
- Complete the following Queue Manager Properties settings in the input file:
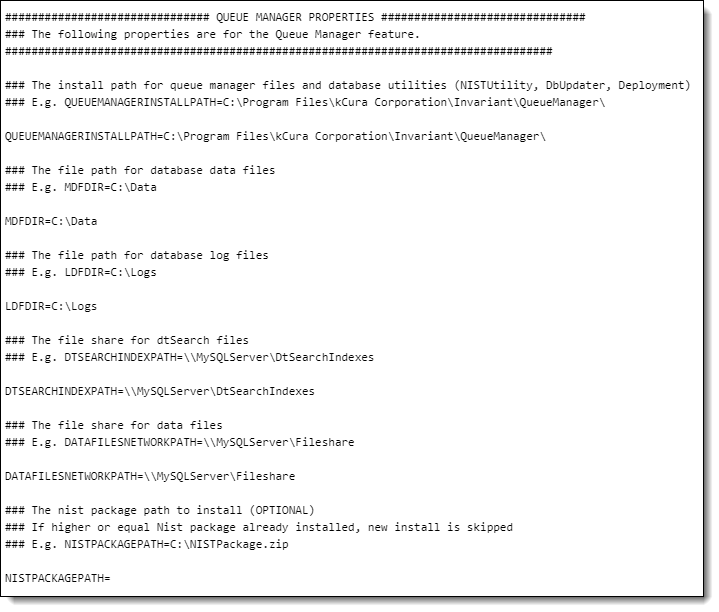
- QUEUEMANAGERINSTALLPATH—enter the installation path for the queue manager files. For example, C:\Program Files\kCura Corporation\Invariant\QueueManager\.
- The Invariant.exe. adds the queue manager files to this folder.
- This path must be completely separate from the WORKERINSTALLPATH.
- MDFDIR—enter the file path for the database data files. For example, C:Data. The Invariant.exe will add the Invariant data files to this folder.
- LDFDIR—enter the file path for the log files. For example, C:Logs. The Invariant.exe will add the Invariant log files to this folder.
- DTSEARCHINDEXPATH—enter the path to the share location where dtSearch indexes are stored. For example, \\MySQLServer\DtSearchIndexes.
- DATAFILESNETWORKPATH—enter the file share for the data files. For example, \\MySQLServer\Fileshare. This is the path to the shared location where you want to store the files that you import for processing so that those files are not written to random locations on each worker server when you use the Relativity Processing Console (RPC) to import data and dtSearch indexes.
- If you are using the RPC, don't enter a local path here. This must be a UNC path that is accessible by all components of Invariant, which includes the queue manager, workers, and users running the RPC.
- It is recommended that you also have a separate file share not used by Relativity for this location.
- NISTPACKAGEPATH—enter the local path for the location of the NIST database, if you plan to de-NIST files during processing.
- This option was introduced in Relativity 9.3.371.2.
- If you already installed the NIST database prior to Relativity 9.3.371.2, you do not have to enter a value for this setting.
- If you plan on installing the NIST database through the NIST installer, you can ignore this setting. For more information, see Installing the NIST database.
- QUEUEMANAGERINSTALLPATH—enter the installation path for the queue manager files. For example, C:\Program Files\kCura Corporation\Invariant\QueueManager\.
- Complete the following Worker Properties settings in the input file:
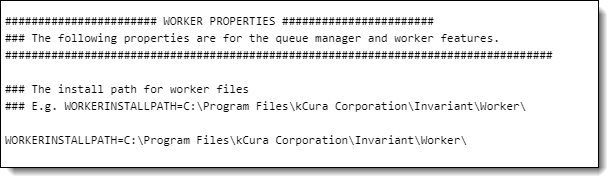
- WORKERINSTALLPATH—enter the install path for worker files. Do not select a location that is a sub directory of the worker network file path. This path must be completely separate from the QUEUEMANAGERINSTALLPATH.
- Upon completing the InvariantResponse.txt file, save it to the root directory of the worker manager server. The following is an example of a completed InvariantResponse.txt file for a queue manager installation:
- Run the Install.bat file that came with the installation package to proceed with the installation.
- The installation process can a while to complete, and there is no progress bar.
- When the installation is complete, you'll see a second line in the command line.
- Logs are found in the same directory as the Install.bat with the names InstallLog.txt. You can also find individual logs for the queue manager and worker .msi.
INSTALLQUEUEMANAGER=1
INSTALLWORKER=0
SQLINSTANCE=MySQLServer
RELATIVITYSQLINSTANCE=MyRelativitySQLServer
SERVICEUSERNAME=domain/username
SERVICEPASSWORD=MySecretPassword
EDDSDBOPASSWORD=MySecretPassword
USEWINAUTH=1
SQLUSERNAME=MySQLUsername
SQLPASSWORD=MySQLPassword
WORKERNETWORKPATH=\\MySQLServer\InvariantNetworkShare
IDENTITYSERVERURL=https://MyWebServer/Relativity/Identity
QUEUEMANAGERINSTALLPATH=C:\Program Files\kCura Corporation\Invariant\QueueManager\
MDFDIR=C:\MDF
LDFDIR=C:\LDF
DTSEARCHINDEXPATH=\\MySQLServer\DTSearchIndexes
DATAFILESNETWORKPATH=\\MySQLServer\FileShare
WORKERINSTALLPATH=C:\Program Files\kCura Corporation\Invariant\Worker\
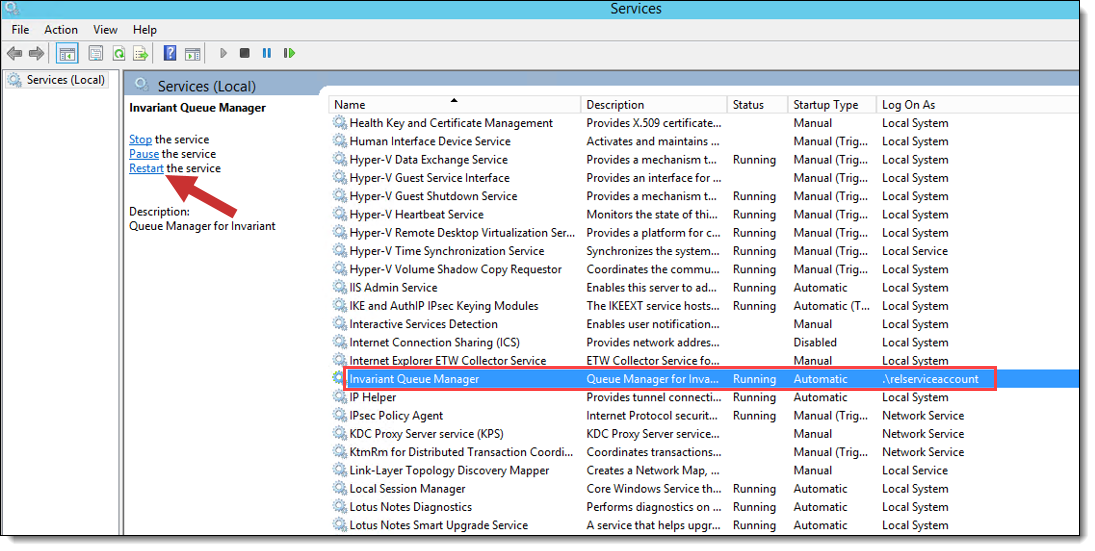
Starting the queue manager service
The queue manager is a Windows service that is deployed automatically with the installer, and it starts automatically after you finish the installation.
If at any point you need to manually start the queue manager, you can do so through the following steps:
- Connect to the Windows Server the queue manager is installed on.
- Open the Start menu.
- Enter services.msc and locate the service called Invariant Queue Manager.
- Click Restart this service in the upper left corner.
Installing the worker
Install the Invariant queue manager before installing the worker component.
Note the following before you begin:
- You should install the worker on a separate server from the machine that hosts the Invariant queue manager.
- Only use worker machines for running workers executing tasks for Invariant. You should not use these machines for running other applications or performing other tasks.
- The Relativity Service Account must remain logged in to the worker machines at all times. If the Relativity Service Account is not logged in to this machine, the Invariant Worker fails.
- You must be logged in as the Relativity Service Account to perform the installation.
To install the worker, follow these steps:
- Log in with the Relativity Service Account to the server where you want to install Invariant Workers.
- Open the InvariantResponse.txt file in a text editor.
- Complete the following Feature Selection settings in the input file:
- INSTALLQUEUEMANAGER—set this value to 0 because you don't want to install the queue manager on the same machine as the worker.
- INSTALLWORKER—set this value to 1.
- Complete the following Common Properties settings in the input file:
- SQLINSTANCE —enter the name of the SQL instance you want to use as the Invariant queue manager host. This SQL instance must be locally accessible.
- RELATIVITYSQLINSTANCE—enter the SQL instance for the Relativity installation. This must be network-accessible from a local machine. If this machine will be used as a standalone Invariant service, be sure to point to a machine with a valid Relativity installation.
Note: The EDDSDBO password of the Relativity SQL instance must match that of the of the Invariant SQL instance.
- EDDSDBOPASSWORD—enter the EDDSDBO password for the target SQL instance. The EDDSDBO account must already exist.
- Complete the following Queue Manager and Worker Properties settings in the input file:
- QUEUEMANAGERINSTALLPATH - enter the installation path for the queue manager files. For example, C:\Program Files\kCura Corporation\Invariant\QueueManager\.
- The Invariant.exe. will add the queue manager files to this folder.
- This path must be completely separate from the WORKERINSTALLPATH.
- WORKERINSTALLPATH—enter the install path for worker files. Do not select a location that's a sub directory of the worker network file path.
- Upon completing the InvariantResponse.txt file, save it to the root directory of the worker. The following is an example of a completed InvariantResponse.txt file for a worker installation:
- Run the Install.bat file that came with the installation package to proceed with the installation.
INSTALLQUEUEMANAGER=0
INSTALLWORKER=1
SQLINSTANCE=localhost
RELATIVITYSQLINSTANCE=MyRelativitySQLServer
EDDSDBOPASSWORD=MySecretPassword
QUEUEMANAGERINSTALLPATH=C:\Program Files\kCura Corporation\Invariant\QueueManager\
WORKERINSTALLPATH=C:\Program Files\kCura Corporation\Invariant\Worker\
WORKERNETWORKPATH=\\us11shsql01t\InvNetworkDirectory
USEWINAUTH=1
Troubleshooting the worker manager server installation
You may encounter the following issues during installation of any component of the worker manager server:
| Error | Cause | Resolution |
|---|---|---|
| Incorrect SQL instance name | If the installer cannot find the SQL Instance, you receive a message stating that a network-related or instance-specific error occurred while establishing a connection to SQL Server. The server was not found or was not accessible. In this case, you need to verify that the instance name is correct and that the SQL Server was configured to allow remote connections. | Verify that the SQL Instance name is entered correctly and that it is located on the current machine. |
| SQL Server Windows authentication fails | The user cannot log in to the server. | Confirm that the user running the installer has administrator rights on the specified SQL instance. |
| Wrong Version of Windows server installed | The Windows Server is not supported. | Upgrade your Windows Server to a supported version. |
| Wrong Version of .NET installed | The version of .NET is not up to date. | Install the required version of .NET Framework. For more information, see |
| Wrong Version of SQL Server installed | The SQL instance is not supported. | Upgrade your SQL Server to a supported version. |
| Error opening installation log file | The user does not have permission to create a file on the root c:\ drive. It may also display when the file c:\InvariantInstall.log exists, but the user running the installation does not have write permission to the file. | Confirm that the server has User Access Control (UAC) disabled and that the user running the installation has local administrator rights. |
| Wrong version for installation or upgrade | Invariant requires that you upgrade or install the Queue Manager and Workers using an installer with the same version as the installed Invariant queue manager. If you attempt to run an installer with the wrong version, you'll receive a message notifying you of the mismatch. | Run a version of the installer that matches the Invariant version listed in the error message. |
Invariant DBupdater considerations
The Invariant.DBUpdater performs the following when you install the queue manager:
- Updates the main Invariant database.
- Sets Relativity stores to Pending, which tells the Workspace Upgrade Worker agent to pick them up.
- Updates the RPC stores.
- Produces a detailed XML log file, which gets created in the install directory and provides information on what happened during the database upgrade. Specifically, this log file contains:
- A list of the all the tasks that were run against the specified databases, including each individual script and success/failure.
- The input parameters that were given to Invariant.DBUpdater.
- It also contains a list of all Relativity Stores that were set to Pending.
Note: Upgrade results from Relativity stores will not appear in the log file, as any errors are captured in the Relativity Errors tab.
Uninstalling or repairing the worker manager server
If you need to uninstall the worker manager server, you have the following options:
- Add/Remove Programs—use the Add/Remove Programs option on your computer's Control Panel to uninstall all components of Invariant. Specifically, you select Invariant in the list of programs and select Uninstall. This method does not provide the benefit of a log file or the ability to uninstall individual components, such as the database, queue manager, or worker only.
- Modify the Install.bat script— to perform an uninstall or repair, add "/uninstall" or "/repair" to the end of the start line in the same batch script you used to install. By doing this method, you get a log file for your uninstall. We recommend that you change the log file name before running the uninstall command. Note the following examples of an uninstall and repair batch script:
echo Running Invariant installer bundle...
start /wait Invariant.Installer.exe /log UninstallLog.txt /responsefilepath=InvariantResponse.txt /uninstall
echo Running Invariant installer bundle...
start /wait Invariant.Installer.exe /log RepairLog.txt /responsefilepath=InvariantResponse.txt /repair
- Modify the InvariantResponse.txt file—after upgrading using a certain install package and Install.bat file, you can run the response file with a modify job and remove certain components of invariant from a machine. If the database, queue manager, and worker properties are all set to 1 in the response file, but you only want to install the database and queue manager, simply update the response file to say INSTALLWORKER=0 and then re-run the Install.bat file.
Configuring the worker manager server in your environment
Once you have installed the worker manager server, you can access and configure it in Relativity.
Use the following steps to access the worker server manager settings:
- Navigate to the Servers sub-tab.
- Click the name of the worker manager server in the list of servers.
- If you want to edit the fields, click Edit, make the desired changes, and click Save.
The following fields are visible on a worker manager server:
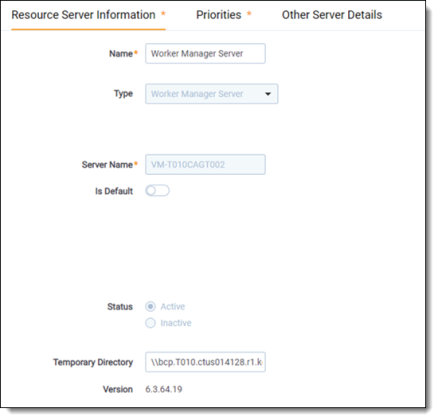
- Name—give the worker manager server a name that appears on the Servers tab.
- Type—this is a read only field that displays the server's primary function.
- Server Name—the name of the server where the Invariant Queue Manager is installed. This value should include a fully qualified domain if the server is on a domain. For example, pt-func-sql02.testing.corp.
Note: This value does not require a net.tcp reference that includes a port number. It also does not require a domain unless the worker manager server and Relativity are on different domain.
- Is Default—if checked, this worker manager server is the default worker manager server added to any resource pool upon creation and any resource pool that does not currently have a worker manager server. On upgrade, the default worker manager server automatically associates with all existing resource pools. If unchecked, you must manually add the worker manager server to each resource pool.
- Status—when a worker manager server is added to Relativity, the server manager agent attempts to make a connection and get information about workers. The Status field is automatically set to Active if a server is online. Relativity automatically updates this value to Inactive when the server manager agent exceeds the maximum connection attempts set by the
- Temporary directory—a UNC share path used as a temporary location for storing files during Relativity processes. This field is available for all server types except Analytics servers. Use the format \\<server name>\ <shared folder name> for the path, and ensure that the directory is accessible to the agent server running the export. Relativity validates the path you enter. If the path format is invalid, you receive an error message when trying to save. If a permission error occurs, Relativity writes a message to the Errors tab.
- Version—this read only field displays the version of Invariant installed on the worker manager server.
Note: Every resource pool should have a worker manager server linked to it. If a resource pool does not have a worker manager server linked to it, any workspace linked to that resource pool is unable to perform imaging and processing.
Use the Priorities tab to specify which jobs the worker manager server gives precedence to when managing jobs. Only one OCR job runs at a time, the lower numbered job runs first and the higher numbered job runs last.
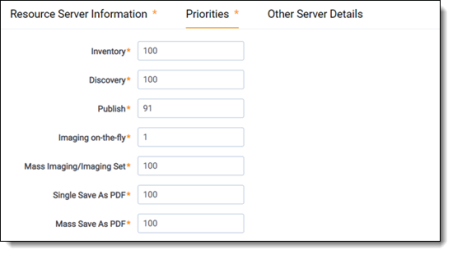
- Inventory—holds the prioritization for inventory jobs.
- Discovery—holds the prioritization for discovery jobs.
- Publish—holds the prioritization for publish jobs.
- Conversion—document conversion occurs on conversion agents working with Rabbit MQ or Windows Service Bus. You cannot modify the priority of the following conversion jobs on the worker manager server: conversion on-the-fly, pre-convert, mass conversion, and conversion. For more information,
- Imaging—holds the priority for imaging jobs, both native and basic.
- Image on the Fly—holds the priority for Image on the fly jobs.
- Save As PDF—holds the priority for Save as PDF jobs.
- Mass Imaging/Imaging Set—holds the priority of a mass imaging job or imaging set
- Single Save As PDF—holds the priority for when you execute Save as PDF on a single document.
- Mass PDF— holds the priority for all Mass PDF jobs. These occur when you select a group of documents from the Documents tab and then select the Save As PDF option from the mass operations drop-down menu.
Entering the ProcessingWebAPIPath instance setting
You must enable token authentication on your web server for certain Relativity features, such as the worker manager server, which requires this authentication type for processing.
You must also edit the ProcessingWebAPIPath Instance Setting. This setting identifies the URL that directs to the Relativity token-authenticated endpoints that Invariant uses to process and image files. Invariant requires this URL and a Relativity admin must enter it.
To do this, perform the following steps to comply with this change:
- While in Home mode, navigate to the Instance Settings sub-tab.
- In the default All Instance Settings view, enable filters and enter ProcessingWebAPIPath in the Name field.
- Click the ProcessingWebAPIPath name and click Edit in the instance setting layout.
- In the Value field change the existing ProcessingWebAPI URL to the RelativityWebAPI URL.

- Click Save.
Depending on what Relativity version you're installing or upgrading, you may need to enable the RelativityWebAPI setting in IIS for Anonymous authentication in order to publish documents to a workspace.
To do this, perform the following steps:
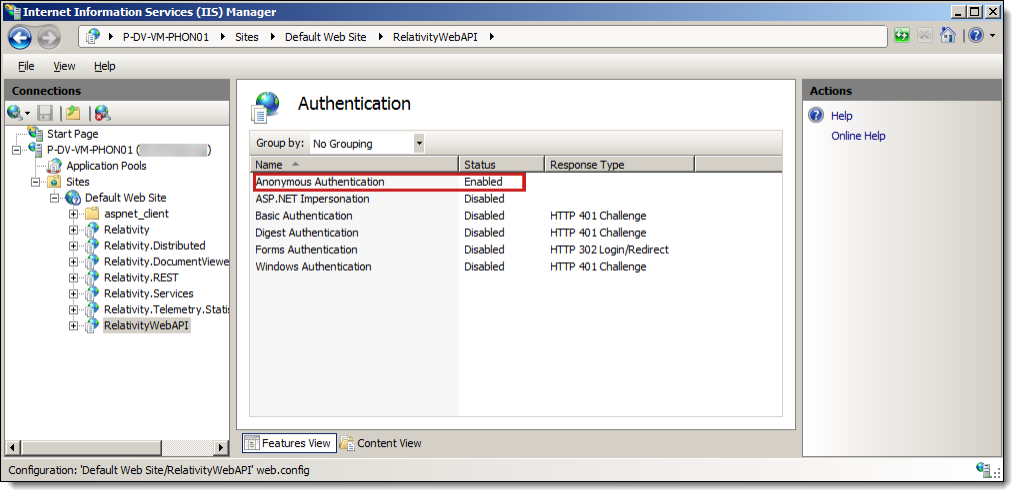
- Open IIS.
- To enable anonymous authentication, complete the following steps:
- Click on the RelativityWebAPI site.
- In the Features view, click Authentication.
- In the Authentication view, right-click on Anonymous Authentication and click Enable.
- To update the web.config file, locate it in the following folder:
C:\Program Files\Relativity Corporation\Relativity\WebAPI
- Open the file in an editor. Update the authentication mode and authorization sections as follows:
<system.web>
     <authentication mode="None" />
     <authorization><allow users="*" />
</authorization>
</system.web>
- Restart IIS.
Installing the NIST database
If you are using the worker manager server to run native imaging only, or if you are running processing and do not want to de-NIST files, you can choose not to install the NIST database.
Before you install the NIST database:
- Your Invariant environment must be installed and operational.
- No processing jobs should be running or submitted while you install or update the NIST database.
To import the NIST package, perform the following steps:
It is important that you read and understand each of the steps before you begin.
- Login to the NIST Package Download webpage on the Relativity Community website and download the two NIST installation files. The files include:
- nist_<version>.zip—which contains the latest NIST hashes
- nist_installer_<installer-release-date>—which contains the latest NIST installer
- Be sure to save the two zip archives to the machine where the Queue Manager service is installed.
- Note the NIST packages are large, between 10-15GB. Be sure you have sufficient space and time prior to downloading the files.
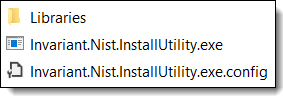
- Extract the contents of the NIST installer zip file to a folder.
- DO NOT extract the larger NIST package zip archive.
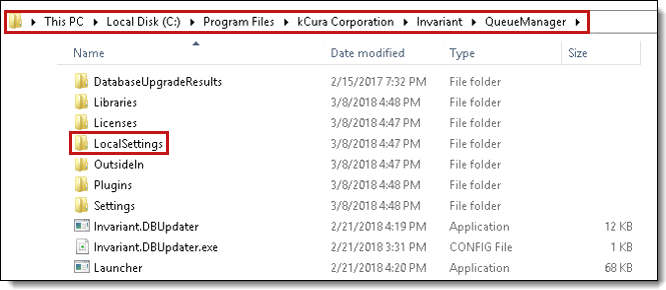
- Navigate to the QUEUEMANAGERINSTALLPATH folder on the Invariant Queue Manager Server. (This QUEUEMANAGERINSTALLPATH folder is specified in the response file during database installation.) Copy the LocalSettings folder.
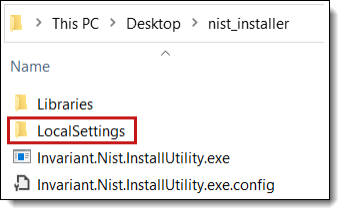
- Paste the LocalSettings folder (and its contents) into the folder where you extracted the NIST installer.
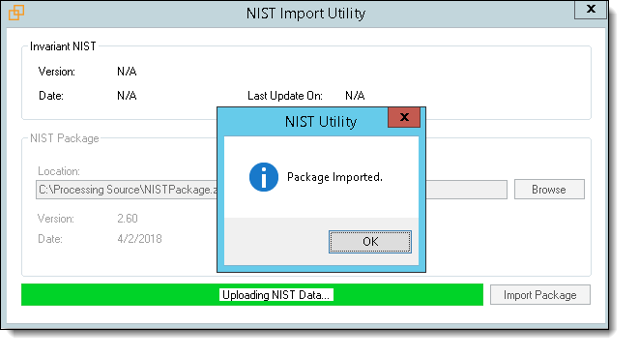
- Run the NIST installer by double-clicking the Invariant.Nist.InstallUtility.exe file. The utility displays information about the currently installed NIST package, when available, in the Invariant NIST section. This information includes the NIST release version, the release date, and the last date and time the NIST database was installed.
- Click Browse and select the nist-package-<version>.zip file downloaded in the previous steps. If the file is valid, the release version and release date display in the NIST Package section.
- Click Import Package. The package import process begins. This process may take a while due to the size of the NIST packages. Note that if you already have imported a file of the same version or with a more recent release date, the Import Package button is disabled.
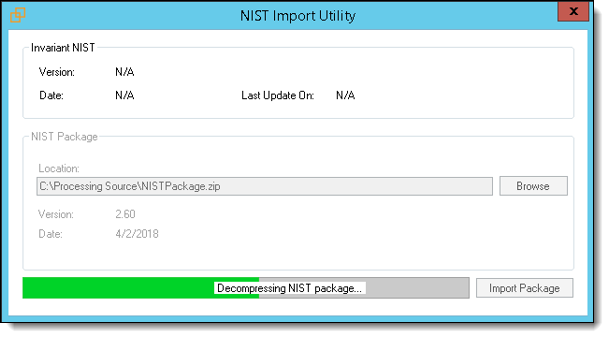
- As the NIST package decompresses, the decompressing progress displays in the progress bar below the NIST package section. After decompressing, the utility uploads the NIST data into the Invariant database and updates the version, date, and last updated date.
- Once the import process is complete, a confirmation message displays. Click OK on the confirmation message. The Invariant NIST section is updated with the version, date, and last updated date information. The Import Package button is disabled since the Invariant NIST data and NIST package file have the same version and date.
The contents of the extracted zip files should look like to the image below.
If an error occurs during this procedure, a short error message appears, and the full error stack is written to the Windows Application Event Logs for both applications.