


A resource pool is a set of servers and file repositories that you can associate with a workspace. Resource pools can be used to group resources based on litigation matter, location, or other categories. For example, you could create resource pools for the West Coast and East Coast to manage resources specific to these regions.
Use the following guidelines when associating resource pools with workspaces:
- You can associate a workspace with only one resource pool.
- Only resource pools that have at least one file repository and SQL Server are available on the Workspace Details page.
- When you create a workspace, the Database Location field lists only SQL Servers associated with the selected resource pool. After you create a workspace, you can't change the SQL Server that appears in this field.
- You can change the resource pool on a workspace, but you can only change it to a resource pool that contains the SQL Server selected as the Database Location.
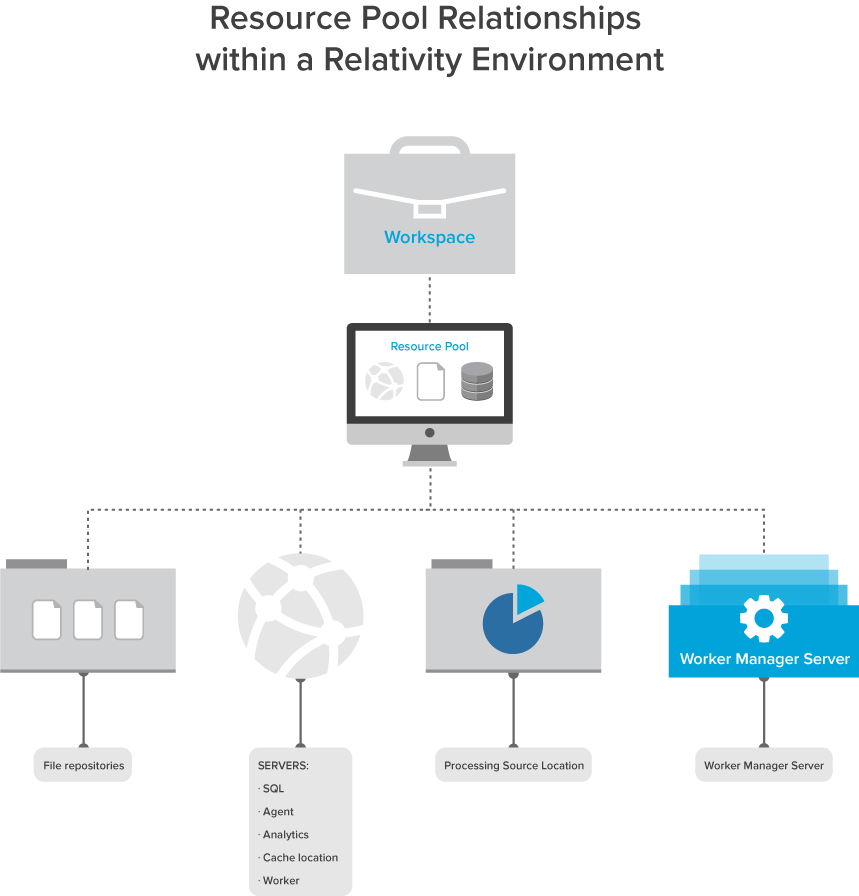
The following graphic depicts the connections between your resource pools, servers, Relativity environment, and workspaces. This is meant for reference purposes only.
(Click to expand)
Creating a resource pool
To create a new resource pool:
- From Home, select the Resource Pools tab.
- Click New Resource Pool.
- Enter information in the following fields:
- Name - the user-friendly name for the resource pool that indicates its purpose. It can't exceed 50 characters.
- Visible In Dropdown - select Yes or No in the drop-down to display the resource pool as an available item within the drop-down list when creating a new workspace.
- Keywords - key words that you can use to filter on the resource pool in a view and for other identification purposes
- Notes - any additional comments about the resource pool
- Click Save. The Resource Pool Details page appears.
Adding resources to a pool
After you create a resource pool, you should add the required servers and repositories to it. You can also edit the resources associated with an existing resource pool.
Use the following guidelines when configuring a resource pool:
- Agent and Worker Servers - only agents residing on the Agent and Worker Servers in a resource pool are available for pick-up jobs in workspaces associated with the pool. For example, if the Transform Set Manager agent is not added to any of the Agent Servers in a resource pool, you won't be able to run a Transform Set in a workspace associated with it. This functionality applies to all agents, except for Case Manager, Billing Agent, and File Deletion Manager.
Note: If you add a worker to one or more resource pools, it is unable to perform tasks for any other resource pool. If you don't add the worker to any resource pools, it can perform tasks that originate from any resource pool associated with the worker manager server.
- Worker Manager Server - this server is meant for document conversion, imaging, and processing. If the Is Default field is enabled on the worker manager server layout, that server is added to any resource pool by default upon creation, as well as to any resource pool that does not currently have a worker manager server. You can assign only one worker manager server to a resource pool. If you have one or more workers assigned to a worker manager server and you remove the worker manager server from a resource pool, its associated workers are also removed.
Note: Every resource pool should have a worker manager server linked to it. If a resource pool does not have a worker manager server linked to it, any workspace linked to that resource pool is unable to perform imaging and processing.
- Primary SQL Server - this server is added to all resource pools during a first-time installation.
- Cache Location - a UNC file path that indicates where the cache resides in your environment. This cache temporarily stores natives, images, productions, and other file types used by the viewer. You can add multiple cache location servers to a resource pool. If you want more cache locations, add a new server of type Cache Location Server. See Servers.
To add servers to a resource pool:
- Click New Resource Pool to create a new resource pool, or click Edit to add a resource to an existing pool. The Resource Pool Details page appears.
- Click Add on the title bar for the type of server that you want to include in the resource pool.
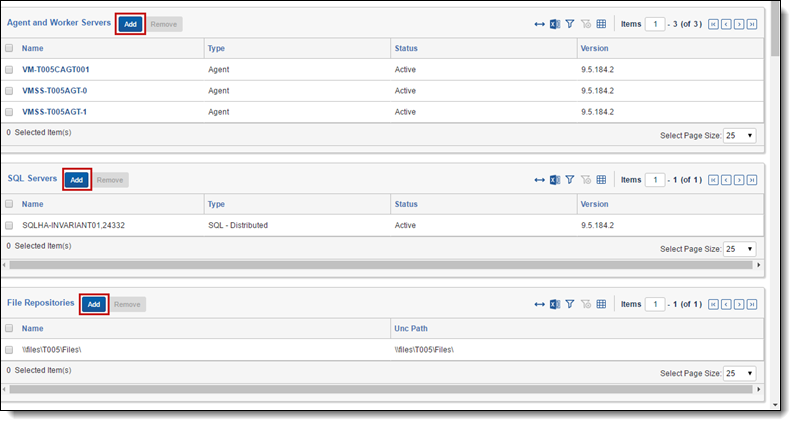
- In the selection dialog, choose the server that you want to add and click OK.
Note: You can also click Edit to update the properties of a server. See Servers for more information.
- Continue adding servers and file repositories until you finish configuring the resource pool. It's now available in workspaces.
- (Optional) Click Remove on a title bar to remove a server or repository from the resource pool.
Note: You can't remove an SQL Server when a workspace associated with the resource pool is using it. Similarly, you can't remove an Analytics server when indexes are using it. See Resource pools.
Note: When you add a location to the Process Source Location object, that location is visible on the Processing application and on the processing set.
Removing an Analytics server from a resource pool
You can remove an Analytics server from a resource pool only when no Analytics indexes are using it. When you want to remove a server, you can display a dependencies report that lists the indexes using it.
- On the Resource Pool Details page, click Remove on the title bar for Analytics Servers.
Note: If you delete all of the Analytics servers set up for structured data analytics, then users won't be able to run any structured data analytics jobs in the workspaces associated with the resource pool.
- Click Remove on the confirmation message. If Analytics indexes are currently using the server, click Dependencies to view a report.
-
Adding or removing a processing source location
In order to make a processing source location available for selection on the data sources that you’ll add to a processing set, you need to add that location to the resource pool associated with the workspace in which you’re running processing.
Note: Depending on the case sensitivity of your network file system, the source location you add through the resource pool may be case sensitive and might have to match the actual source path exactly. For example, if the name of the file share folder is \\files\SambaShare\Samba, you must enter this exactly and not as “\\files\SambaShare\samba” or “\\files\sambashare\Samba”, or any other variation of the actual name. Doing so will result in a document-level processing error stating, “The system cannot find the file specified.”
To add a processing source location to a resource pool:
- Open the resource pool.
- Scroll down to the Processing Source Locations object.
- Click Add to pop up the list of available source locations. These are the locations you manually added as choices during the processing installation process. For information, see Creating a choice for the processing source location.
- Select the location you want to add and click OK.
- Confirm that the location you just selected appears with the other locations on the resource pool. When you go to create a new data source, you should see this new location listed with the others.
Note: A processing source location doesn’t have to be in the same location as Relativity, but the Relativity Service Account must have read access to that processing source location.
If you need to remove a source location from the resource pool because, for example, it’s no longer valid or applicable or because you’ve already published all of its data, you can select the location name on the resource pool and click Remove.
Adding or removing resource pools from a client domain
You can add or remove objects from client domains if you have the client domains feature activated. See Client domains for more information.
Note: This feature was formerly referred to as multi-tenancy
Anyone with permissions to edit resource pools can add or remove them from a client domain.When you enable this for a client associated with a specific workspace, Relativity copies the resource pool for this workspace, and adds the copy to the resource pools used by the client. When you enable this feature for a client associated with a specific workspace, Relativity copies the resource pool if it isn't associated with the client for the workspace, and adds the copy to the resource pools used by the client. See Client domains.
Webservers added to resource pools can load balance and prioritize traffic on a client-by-client basis. You can monitor and manage spikes in resource pools across your environment by adding logging information for resource pool access and usage. Resource availability to Enterprise customers with client domains will vary according to subscription level.
Note: Migrating a workspace that contains published data to a resource pool associated with a different worker manager server results in the loss of all references to previously published data.
Use the following steps to add a resource pool to a client domain:
- Navigate to the Resource Pools tab.
- Select the resource pool you want to add to the client domain from the list.
- Click Edit.
- Click
 next to the Client field in Resource Pool Information section.
 - Select the client with client domains enabled from the list.
- Click Save.
Use the following steps to remove a resource pool from a client domain:
- Navigate to the Resource Pools tab.
- Select the resource pool you want to remove from the client domain from the list.
- Click Edit.
- Click next to the Client field in Resource Pool Information section.
- Select a client not associated with a client domain from the list.
- Click Save.