


Feedback
Last date modified: 2026-Jul-24
Scheduling a report
Use the Scheduled Reports feature to run reports on a set, recurring basis. You would typically use this feature to schedule a report to send out for the duration of a project or hold. Even though you can schedule a one-time report, this feature is optimized for longer term use.
Scheduled Legal Hold reports are run under the permissions of the user scheduling the report.
The scheduled reports can report on one or multiple projects in your workspace. Legal Hold sends the scheduled report in an email PDF attachment to anyone with a valid email address, including non-Legal Hold entities.
You can also run scheduled reports from the Scheduled Reports and Reports tab. See Scheduling a report.
Creating a scheduled report
To create a scheduled report from the Scheduled Reports tab perform the following:
- From the Reports tab, select a reports, select the project, and then click Create Scheduled Report from the Generate Reports console. If you're creating a schedule report from the Scheduled Reports tab, click New Scheduled Report.
- Complete the fields in the Scheduled Report layout. See Create Scheduled Report layout fields.
- Click Save. The Scheduled Reports Detail page appears.
- (Optional) Click Preview Report to preview the report as it will appear in the email.
The Preview Report function only displays the applicable data according to the last set Frequency.
- Click Close to exit the preview. The report is scheduled to send.
Create Scheduled Report layout fields
The Create Scheduled Report layout contains the following fields:
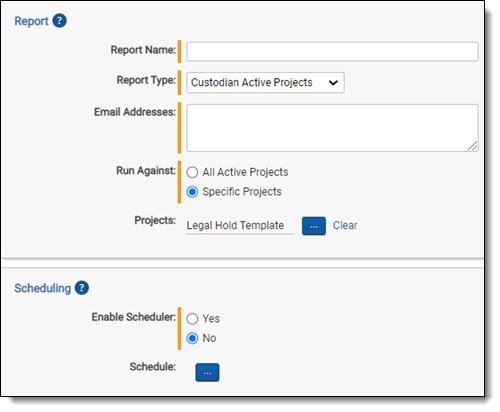
Report
- Report Name—the report name that appears in the scheduled report email and the email subject.
Relativity attaches "Relativity Legal Hold" to the report name in the email subject.
- File Type—select the file type, .pdf or .csv, you want to download the report in.
- Report Type—the scheduled report type. See Report types.
- Email Addresses—the email addresses that Legal Hold sends the scheduled report to. Separate multiple email addresses with a semi colon or a hard return.
- Run Against—specifies if the report should run against a specific group of projects or against all active projects.
- All Active Projects—run the scheduled report on all active projects in the workspace. Upon every subsequent report run, Legal Hold dynamically generates an updated list of active projects to run the report against, so any projects that you've added to the workspace are included in this report.
- Specific Projects—using the
 , select individual projects to run the scheduled report on.
- Projects—lists the projects that Legal Hold retrieves the scheduled report data from.
Scheduling
- Enable Scheduler—select the Yes checkbox to enable the scheduling functionality for this report and No to disable the scheduling functionality. See Disabling or deleting a scheduled report.
- Schedule—click More ellipses icon to open the Schedule Email Job dialog.
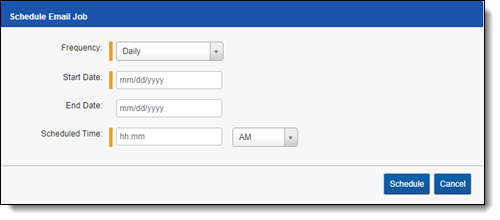
- Frequency—the interval at which Legal Hold sends the scheduled report.
- Daily—select this option to send the scheduled report once every day.
- Weekly—select the days that you want Legal Hold to send the scheduled report once every day.
- Monthly—select the day of the month that you want Legal Hold to send the scheduled report once every month.
- Reoccur—enter the number of weeks/months in which Legal Hold recurrently sends the scheduled report.
- Send On
- Day _ the month—select the day of the month that you want Legal Hold to send the scheduled report.
- The _ _ of the Month—select this option for Integration Points to sync on the chosen day of every month. For example, "The Second Friday of the month."
- Start Date—the date that you want Legal Hold to start sending the scheduled report.
- End Date—(Optional) the date that you want Legal Hold to stop sending the scheduled report. Only set an end date if you want to schedule a report to run during a known time period.
If you don't set an end date, and the projects that you've scheduled the report to run on are closed, the scheduled report is considered disabled and Legal Hold won't continue running the report on the closed projects.
- Scheduled Time—the time at which Legal Hold sends the scheduled report. This time is local to your PC, not to the server.
Disabling or deleting a scheduled report
To disable a scheduled report:
- Select No the Enable Scheduler check box on the Scheduled Reports Detail page.
- Click Save. Legal Hold stops sending this scheduled report. Select Yes to re-enable the scheduler for this report.
To delete a scheduled report:
From the Libraries > Scheduled Reports tab > Scheduled Reports Detail, click Delete.
You can mass disable or delete scheduled reports from the Scheduled Reports landing page.