


Feedback
Last date modified: 2026-Jul-14
Coding documents
Code documents on the go with RelativityOne's mobile app. In the top right corner of the document viewer, tap the coding icon -  . Begin coding documents in this pane .
This functionality is not available in RelativityOne Government environments.
Coding a document
Before coding a document, make sure you are in the correct layout and group. For more information, see Selecting a coding layout . Once the layout is set, follow the steps below:
- Tap a field to code. Tapping on the field opens a new pane with the field type. For more information, see Coding fields.
- Tap the radio buttons, check boxes, or text fields to make your coding choices in the document for the available fields on the layout.
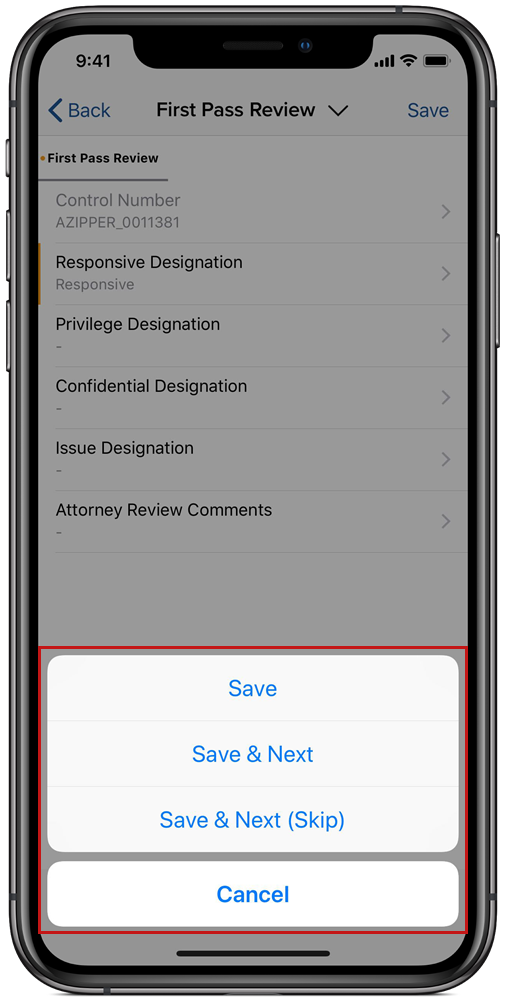
- Tap Save at the top of the screen.
- In the Save Coding Options menu, tap Save, Save & Next, Save & Next (Skip). or Cancel.
Coding fields
Layouts consist of coding fields and RelativityOne's mobile app supports all coding fields. These coding fields can be required, optional, or read-only. Orange bars appear next to required fields. Optional fields don't have an orange bar. Read-only fields, such as file field types, are dimmed.
Choices and objects
Choices and objects appear as check boxes and radio buttons. Tap on your desired option and then tap  to return to coding pane.
Fixed-length and long text
Tap on the text box below the field name to being to update the field. Tapping on the text box will display a larger text box on your screen. Tap the text box when it's available to bring up the keyboard.
Decimal and whole numbers
Both decimal and whole numbers are supported in mobile layouts. To enter any number in a decimal or whole number field, tap on the text box. Once the text box is activated, the devices keyboard appears in the number and symbols mode.
Date and time
Tap on the date fields to set the date and time. Tap the Set Date link, or the date that has already been selected, to open up the date and time selector. Swipe up or down in each column to select the appropriate date and time.
Propagation
The propagation function codes duplicate documents or documents in the same family. For example, if a document is coded Responsive, the documents in the family are also given the Responsive designation. This function improves your workflow by cutting back the amount of documents that need to be coded by you or members of your team.
Document skip
Document skip works concurrently with propagation. After propagation is enabled by you or your admin, the Save & Next (skip) buttons will be propagating coding decisions to other documents. For example, when a document is coded Responsive and the next document is in the same family, that family document is skipped. All documents in the same family as the document that is originally coded Responsive will be skipped when using the Save and Next or Next buttons in the Coding layout.
Enabling document skip
To set up document skip, have a Relativity system administrator navigate to the user's detail page in a web instance of RelativityOne. There are three settings that an admin can set for a user:
- Enabled - the switch is enabled by default and the user is able to switch between document skip and normal within the coding layout.
- Force enabled - the switch is enabled by default and the user is be able to switch between document skip and normal. Document skip is the only option when coding documents.
- Disabled - the switch is disabled by default and the user is not be able to change it within the coding layout.
These document skip options are the same for a web instance and for Relativity's mobile app.
Event Handlers
To use propagation and document skip, RelativityOne's mobile app supports certain Object Type event handlers.
Supported event handlers:
- PreSave - executes after a user changes field values and taps Save or Save & Next in the coding pane.
- PostSave - executes after a user taps Save or Save & Next in a coding pane.
- PreLoad - executes before the new, edit, or view page layouts load.
Unsupported event handlers:
- Console
- PageInteraction
- PreCascadeDelete
- PreDelete
- PreMassDelete
Auto Layout Navigation
Selecting a coding layout
Layouts created in Relativity are immediately available in a rendered and optimized manner for the application. The available layouts in this list are indicative of the security permissions you have.
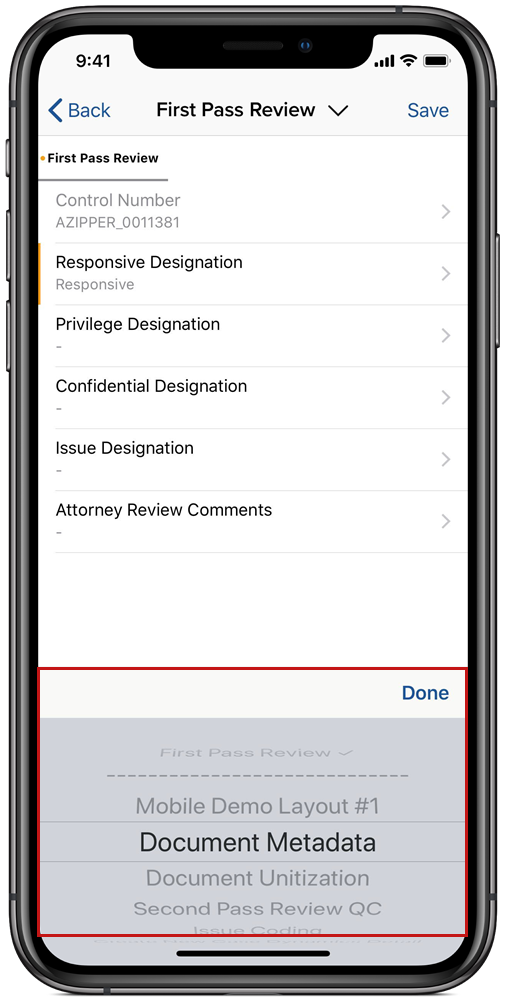
To switch your coding layout:
- Tap the title of the view with
 to open the list.
 - Swipe up or down to find the layout.
- Tap the name of the layout.
- Tap Done
The selected layout displays below. You can proceed to Coding a document.
Multiple layout groups
Multiple groups in a layout can exist, as they do in Relativity. To view another group while coding a document, tap on the group name at the top of the layout. If all groups are not visible, swipe left to view the remaining groups. Tap to view the group when the group is visible.

Automatic-layout navigation
The automatic layout navigation helps you code quickly and efficiently by going to field to field in the coding pane without having to select each field. It automatically navigates you field by field until you've completed the entire layout. There isn't a need to scroll, click in or out of a field, or any extra steps to complete coding. Tap Save and Next to continue using the auto-layout navigation feature on the next document or documents.
To start using the auto-layout navigation, open the coding pane by tapping the . After confirming the correct coding layout, tap  . Tapping the icon opens the first field in the coding layout. From here, enter or select the coding choices. Once entered, the layout either goes to the next field or you need to tap Next to go to the next field to code. The field automatically updates when it is a single-choice, single-object, yes/no field. Tap Next after filling out a multi-choice, multi-object, text, date, number, currency, user, or file field.
You will know that auto navigation layout is off with a message above the icon.
Copying from previous
To use Copy from Previous on the RelativityOne mobile app for iOS, the layout must be enabled on Relativity web instance.
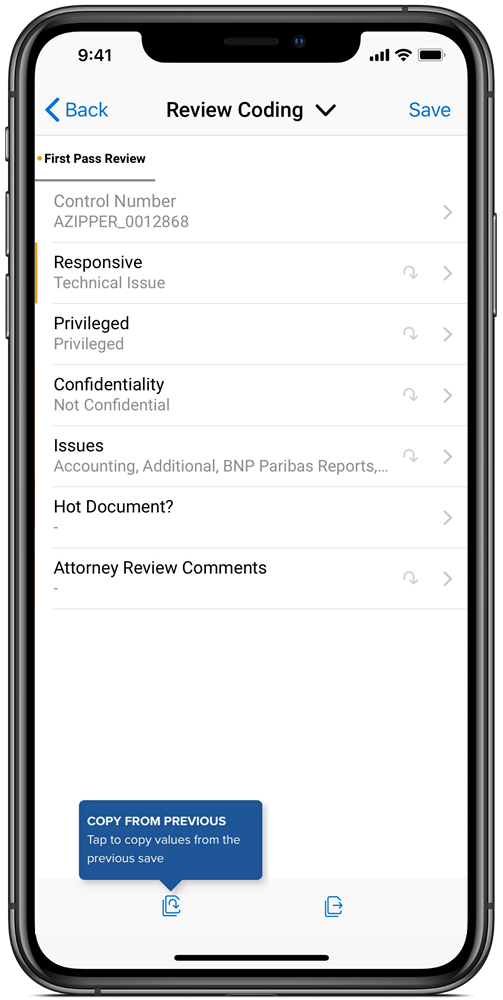
When enabled, the Copy from Previous Icon will be in the footer next to the auto navigation icon on the layout after a previous document has been coded. Tapping the icon applies the coding values to fields in the layout to the document currently displayed in the viewer with the same choices from the previous save. The reviewer can modify the values as necessary, and then save these changes.
When coding choices are copied successfully, a toast appears confirming that the values copied from previous layout. From there, you can save the coding choices and move to the next document.
To use Copy from Previous:
- When you start a review session, code the values for the first document and click Save & Next. This enables the Copy from Previous option on the document layout.
- Tap the Copy from Previous icon to copy the coding values of the designated fields from the previously-saved document to the current one. After Relativity populates the layout with these coding values, you can continue to modify them.
- Tap the Save & Next button to save your changes, and continue the review process.