


Feedback
Last date modified: 2026-May-28
Analysis statuses and results
After you run a Contracts analysis, you can monitor its progress and review results from the Contracts Analysis Set layout.
To view analysis statuses and results, you must first create and run a Contracts analysis set. For instructions, see Analysis.
To review the status of your analysis set:
- Navigate to the Contracts tab.
- Click Contracts Analysis Set.
- Click the name of your analysis set.
Management console
The management console on the analysis set page includes the following actions:
| Action | Description |
|---|---|
| Analyze | Starts the analysis. |
| Retry Errors | Reruns the analysis for documents that encountered errors. Use this as your first troubleshooting step if not all documents were analyzed. |
| Refresh Page | Updates the page with the most current status. Click this icon instead of using your browser's refresh button. |
Processing status
This section includes details about the progress of analyzed documents, status results, the last error of an analysis.
Status
The Status field displays one of the following values:
| Status | Description |
|---|---|
| Waiting | The analysis is queued and has not yet started. |
| Processing | The analysis is actively running. |
| Completed | All documents have been successfully analyzed. |
| Completed with errors | The analysis finished, but one or more documents encountered errors. |
| Canceled / Canceling | The analysis was stopped by a user, or is in the process of being stopped. |
Details
The Details field provides document-level counts for the analysis run:
| Detail | Description |
|---|---|
| Document(s) remaining | The number of documents still in the analysis queue. |
| Document(s) processing | The number of documents currently being analyzed. |
| Document(s) completed | The number of documents that were successfully analyzed. |
| Document(s) canceled | The number of documents canceled by the user. |
| Document(s) excluded | The number of documents excluded because they are unsupported file types. |
| Document(s) with errors | The number of documents that encountered errors and were not analyzed. |
Contracts analysis document list
The Contracts Analysis document list appears at the bottom of the analysis set page and displays all documents included in the analysis. Documents are sorted by control number and display their analysis status from the most recent analysis run.
In the Job Status column, click a status to view more details. For example:
- For excluded documents, you can see the reason for exclusion.
- For errors, the Suggestion field and a detailed error message indicate what may have gone wrong.
Supported file types
The Supported File Types list controls which file types Contracts analyzes. PDFs and Word documents produce the best analysis results. A full list of 94 supported file types is available when you create a new Contracts analysis set.
To add file types to the supported list, click the Link button on the analysis set.
How Contracts handles file types:
- Contracts excludes documents whose Relativity native file type is populated with a type that is not in your supported file types list.
- If the Relativity native file type field is blank, Contracts still analyzes the document regardless of your supported file types selections.
For a complete table of supported file types, see the section below.
Supported file types table
The following file types are supported when using Contracts Analysis:
| File type |
|---|
| Adobe Acrobat (PDF) |
| ASCII Text |
| DRM protected Microsoft Word |
| DRM protected Microsoft Word 2007/2008 |
| EBCDIC encoded Text |
| JPEG File Interchange |
| Mac Word 3.0 |
| Mac Word 4.0 |
| Mac Word 5.x |
| Mac Word 6 |
| Mac Word 97 |
| Mac WordPerfect 1.x |
| Mac WordPerfect 2.0 |
| Mac WordPerfect 3.0 |
| Mac Works 2.0 WP |
| MacWrite II |
| Microsoft Word 2000 |
| Microsoft Word 2002 |
| Microsoft Word 2003/2004 |
| Microsoft Word 2007/2008 |
| Microsoft Word 2007/2008 Macro Enabled Document |
| Microsoft Word 2007/2008 Macro Enabled Template |
| Microsoft Word 2007/2008 Template |
| Microsoft Word 2010 |
| Microsoft Word 2010 Macro Enabled Document |
| Microsoft Word 2010 Macro Enabled Template |
| Microsoft Word 2010 Template |
| Microsoft Word 2010/2011 |
| Microsoft Word 2010/2011 Macro Enabled Document |
| Microsoft Word 2010/2011 Macro Enabled Template |
| Microsoft Word 2010/2011 Template |
| Microsoft Word 2013 |
| Microsoft Word 2013 Macro Enabled Document |
| Microsoft Word 2013 Macro Enabled Template |
| Microsoft Word 2013 Template |
| Microsoft Word 2016 |
| Microsoft Word 2016 Macro Enabled Document |
| Microsoft Word 2016 Macro Enabled Template |
| Microsoft Word 2016 Template |
| Microsoft Word 97/98 |
| Microsoft Word XML 2003 |
| Microsoft Word XML 2007-2016 |
| Microsoft Word XML 2007/2010 |
| Microsoft WordPad |
| Microsoft Works 1.0 |
| Microsoft Works 2.0 |
| Microsoft Works 2000 |
| Password Protected Microsoft Word 2007/2008 |
| Password Protected Microsoft Word 2010 |
| Password Protected Microsoft Word 2010-2013 |
| Password Protected Microsoft Word 2010-2016 |
| PerfectWorks for Windows |
| Pocket Word |
| Pocket Word - Pocket PC |
| Portable Network Graphics Format |
| Rich Text Format |
| Tagged Image File Format |
| UTF-8 encoded Text |
| Windows Bitmap |
| Windows Works 3.0 WP |
| Windows Works 4.0 WP |
| Windows Works WP |
| Windows Write |
| Word 2000 HTML |
| Word 6.0 or 7.0 |
| Word 7.0 |
| Word for DOS 4.x |
| Word for DOS 5.x |
| Word for DOS 6.x |
| Word for Windows 1.2 J |
| Word for Windows 1.x |
| Word for Windows 1.x |
| Word for Windows 2.0 |
| Word for Windows 2.0 Object |
| Word for Windows 5.0 J |
| WordPerfect 4.2 |
| WordPerfect 5.0 |
| WordPerfect 5.1 Far East |
| WordPerfect 5.1/5.2 |
| WordPerfect 6.0 |
| WordPerfect 6.1 - 12.0 / X3 |
| WordPerfect 6.1 - 12.0 / X3-4 |
| WordPerfect 6.1 - 12.0 / X3-5 |
| WordPerfect 6.1 - 12.0 / X3-6 |
| WordPerfect 6.1 - 12.0 / X3-7 |
| WordPerfect 7.0/8.0/10.0 |
| WordPerfect 7.0/8.0/10.0/X3/X4 |
| WordPerfect 8.0/10.0 |
| WordPerfect Encrypted |
| WordPro 96 |
| WordPro 97/Millennium |
| Wordstar 2000 |
| Wordstar 4.0 |
| Wordstar 5.0 |
| Wordstar 5.5 |
| Wordstar 6.0 |
| Wordstar 7.0 |
| Wordstar for Windows |
Views
Contracts includes the following built-in views as starting points for reviewing analysis results. You can customize these views by copying and editing them, or by creating your own custom views.
Contracts Classification view
The Contracts Classification view displays root agreements without section documents, helping you prioritize review by seeing what types of contracts are in your data set.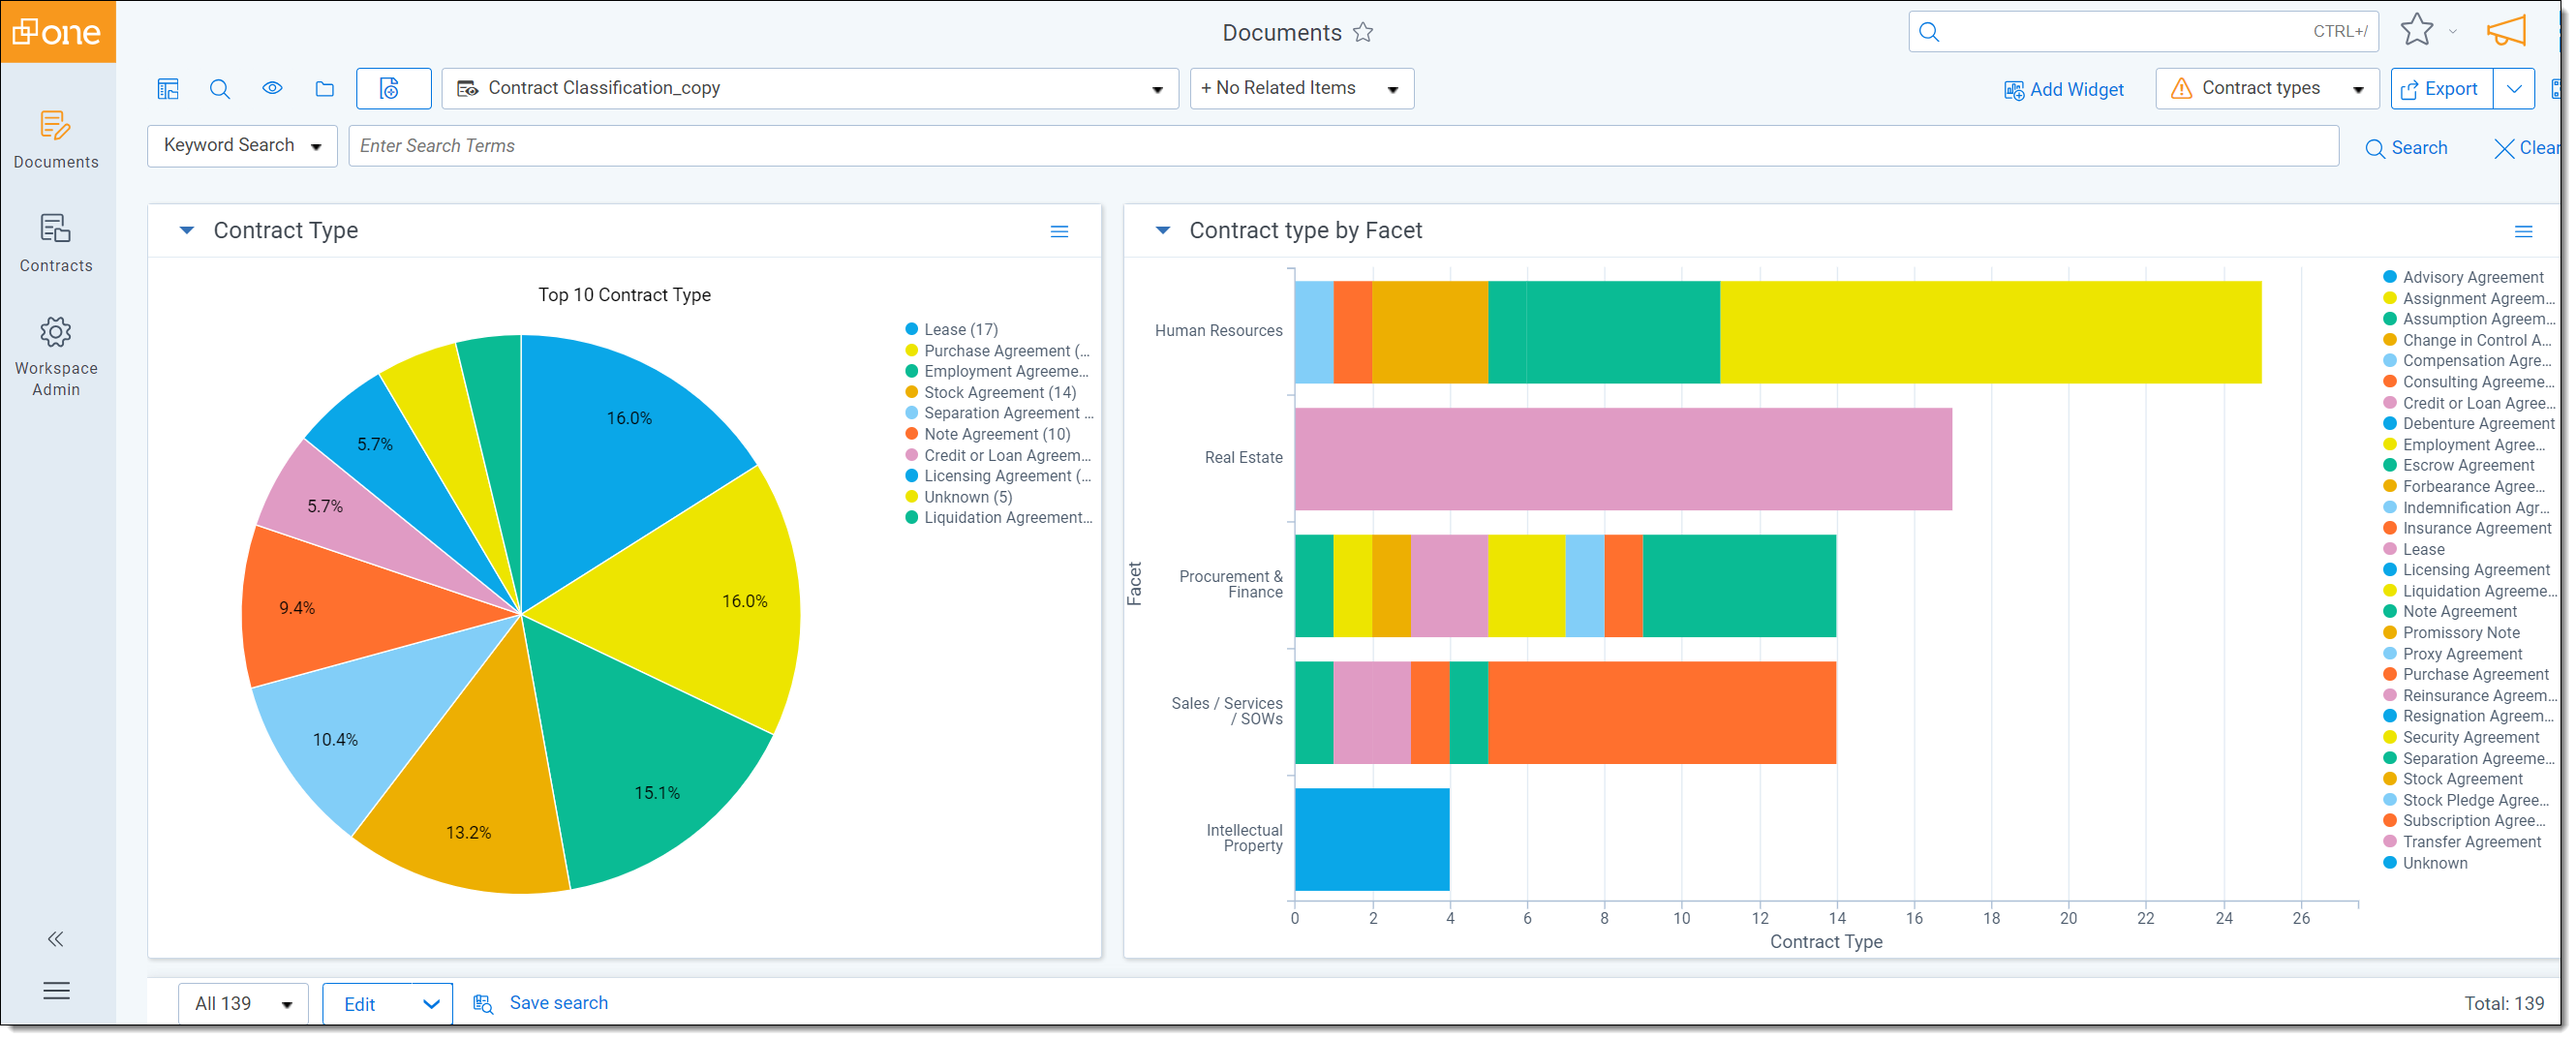
Fields included:
- Control Number
- Contracts Agreement Title
- Contracts Agreement Type
- Contracts Agreement Type Score
- Legacy Agreement Type Group
Contracts Segmentation view
The Contracts Segmentation view includes all sections found across the data set, grouped by their root agreements in the Document Parts family identifier field.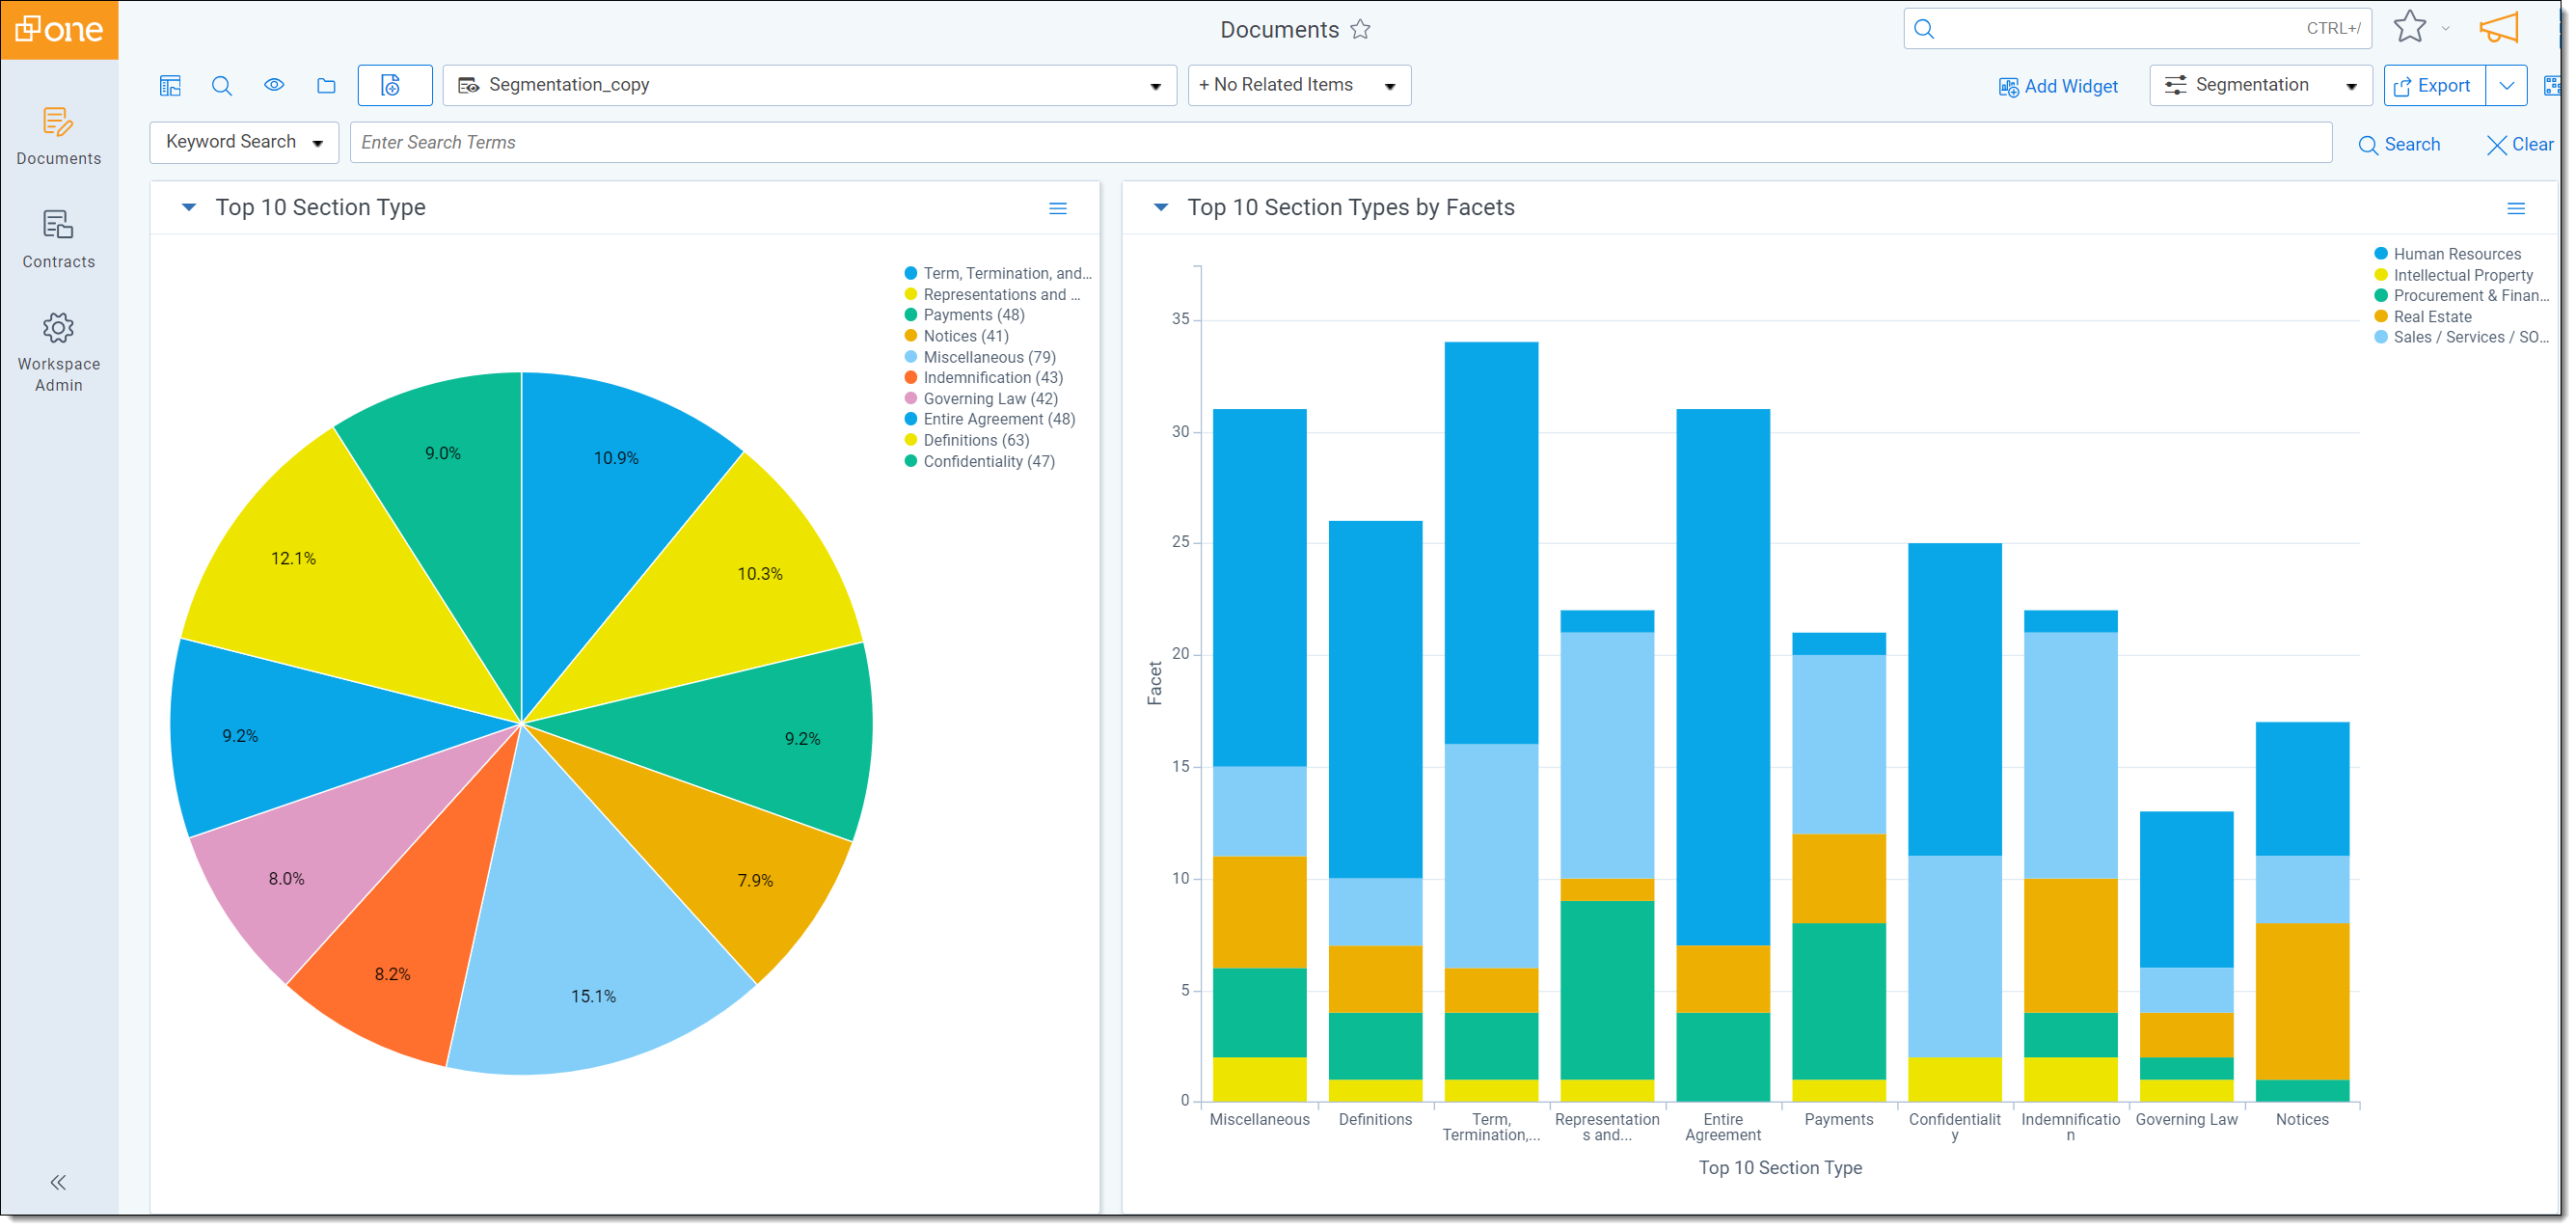
Fields included:
- Control Number
- Contracts Document Type
- Contracts Agreement Title
- Contracts Agreement Type
- Contracts Section Warnings
- Contracts Section Warning Details
- Contracts Section Headings
- Contracts Section Type
- Contracts Section Type Score
- Contracts Section Type Group
Copy and edit a Contracts view
To copy an existing view and edit it to meet your project needs:
- Navigate to the Workspace Admin tab and select Views.
- Select the view you want to copy.
- Click the mass action button at the bottom of the page and select Copy.
- Open the duplicated view (it appears with a "(1)" suffix).
- Rename the view and add or remove fields as needed.
Create a custom view
To create a custom view:
- Navigate to the Workspace Admin tab, and select Views.
- Click New View.
- Select Document for the Object Type field.
- Add a Name for your view.
- Add the desired Fields and set their viewing order.
- Set all other configurations and click Save.
Create a view that maintains grouping of sections to root agreements
To create a document list view that displays all sections in their original sequence nested below their root agreement:
- Select the desired view name from the views drop-down, then click the Edit pencil icon.
- Navigate to the Advanced Settings section, and configure the settings as following.
- Visualization Type: Indented List
- Group Definition: Document Parts
- Indentation Method: Conversation Index
- Indentation Definition Field: Section Start
- Display Field: Artifact ID
- Relativity Applications: Contracts
- Click Next.
- Add new fields to the layout, set the viewing order, and click Next.
- Leave the Set Conditions section as is and click Next.
- Adjust Set Sort to Ascending using the Document Parts field, then click Save.
Export results
You can export data from the Contracts document list to a local file.
To mass export:
- Navigate to the document list and select a view that includes all the fields you want to export.
- Select the documents to export by clicking the checkboxes in the # column, or select all documents by clicking the checkbox in the column header.
- Click the Mass Action button and select Export to File.
- Configure your export settings and click Run.
For more detailed instructions on exporting data, see Mass export to file.