Last date modified: 2026-Feb-05
Custodian targets
In Collect, you manage custodians that have an associated data source. The custodian target is the combination of a custodian and data source. It is an endpoint from which Collect can connect to and collect from.
To collect from custodians, entities either have to already exist, be created, or be imported in Relativity.
Custodian targets will automatically be generated based on the primary email address in the Entity record for the Google Workspace, Microsoft 365, Slack, and X1 data sources. Custodian targets can still be generated manually. For more information, see Generating targets in the wizard.
Custodians
Once you create an entity in the Collect Custodian view and add it to a collect project, it becomes a custodian.
If a custodian does not exist, you can manually create an entity from the Entities tab. If a custodian does exist, you can create a custodian target. For more information, see Creating a custodian target.
You can add custodians to Collect at different times throughout the collection process. There are different ways to populate the entity list including using Integration Points, Import/Export, or manually. For more information, see Integration Points and Import/Export. To manually create a new custodian, follow the steps below:
- Navigate to the Entities tab.
- Click New Entity on the Custodians tab.
- Select the Collection History layout from the drop-down menu and complete the fields. See Fields.
- Click Save.
When creating a custodian from Legal Hold, the Custodians - Legal Hold View is selected by default. If Collection or Processing is also installed in the same workspace, you can view the Custodians - Processing View or Custodians - Collection View.

Fields
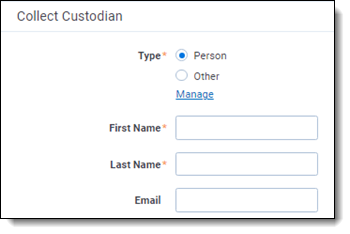
When creating an entity, the Collection Custodian layout provides the following fields and others. To successfully create a collect entity, at a minimum, complete the following fields:
- Custodian Type (Required)—select one of the following:
- Person—select this option to enter first and last name of the individual acting as custodian of the data you wish to process.
- Other—select this option if the custodian of the data to process is not an individual but is, for example, just a company name.
- Selecting this option changes the Custodian layout to remove the required First Name and Last Name fields and instead presents a required Full Name field.
- You can also select this option to enter an individual's full name without having that name include a comma once you export the data associated with it.
- First Name (Required)—the first name of the custodian. This field is only available if you've set the Custodian Type to Person.
- Last Name (Required)—the last name of the custodian.
- This field is only available if you've set the Custodian Type to Person.
- Full Name—the full name of the custodian of the data you wish to process.
- Required when you set the Custodian Type to Other, Organization, or a custom choice type.
- When you enter the full name, it does not contain a comma when you export the data associated with it.
- Email (Required)—the email the custodian uses in the target.
- The entity's email is required to connect the entity to a custodian target. The email is not required to save the entity.
- This email address must match the email address within the connected data source.
Creating a custodian target
You can collect electronic data from custodians who are individuals, or entities, involved in a legal action or case. You may perform multiple collections from a single custodian.
On the Custodians tab, you can create and edit custodians as well as view their details, associate them with collections, and perform other tasks. Custodian Targets can also be automatically generated in the Collection Summary step of the Collect wizard. For more information, see Collection Summary.
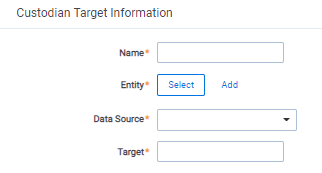
Use the following procedure to create a custodian target that you can associate with a collection:
- Enter the Name of the custodian target.
- Click Select to select available custodians. If the custodian does not exist, click Add and complete additional steps.
- Click the Data Source drop-down menu to select a data source. For more information Collection data sources, see Data source types.
- Enter the custodian's email address in the Target field.

To avoid duplicate custodians, a custodian with multiple emails, you will need to link a second custodian target to the same entity. To make a second custodian target for the same entity, you will need to create another target.
In the target, select the same entity. Then, select the other data source and enter the target value. This way you can have multiple targets, different from the primary email address, for a single entity record.
Generating targets in the wizard
Custodian Targets can also be automatically generated in the Collection Summary step of the Collect wizard. For more information, see Collection Summary.
Click Generate Targets to check if targets exist for the custodians you've selected for collection. If the targets do not exist, Collect creates them based on the email address in the Entity details in each custodian.
If an invalid custodian target is created manually, the auto-generation of custodian targets does not remove the invalid custodian target. Remove it manually. Any errored targets display in the Collection Summary step or on the Status Summary tab.
To delete a custodian target from the Custodians Targets tab, click the data source's checkbox and use the Delete mass operation.
Removing custodian targets
To remove any custodian target, first remove the custodian from the collection or collections. You can use the Mass delete operation to delete collect custodians, also known as entities. For more information, see Mass delete.
Trying to delete a custodian target before removing a custodian results in an error.


